
Connecting Microsoft Defender for Endpoints to Strobes
6 min readEdit
On this page⌄
- Overview
- Why Integrate Microsoft Defender for Endpoint into Strobes?
- Microsoft Defender for Endpoint Connector Details
- What Data Is Imported into Strobes?
- How Vulnerability Status Is Synchronized
- Required Permissions
- Step 1: Navigate to the Connectors
- Step 2: Search for the Connector
- Step 3: Open the Connector
- Step 4: Enter a Configuration Name
- Step 5: Select MS Defender Credentials
- Step 6: Add a New Credential (if needed)
- Step 7: Save the Credential
- Step 8: Choose a Baseline
- Step 9: Proceed to Step Two
- Step 10: Select an Agent
- Step 11: Add Tags (Optional)
- Step 12: Set Sync Frequency
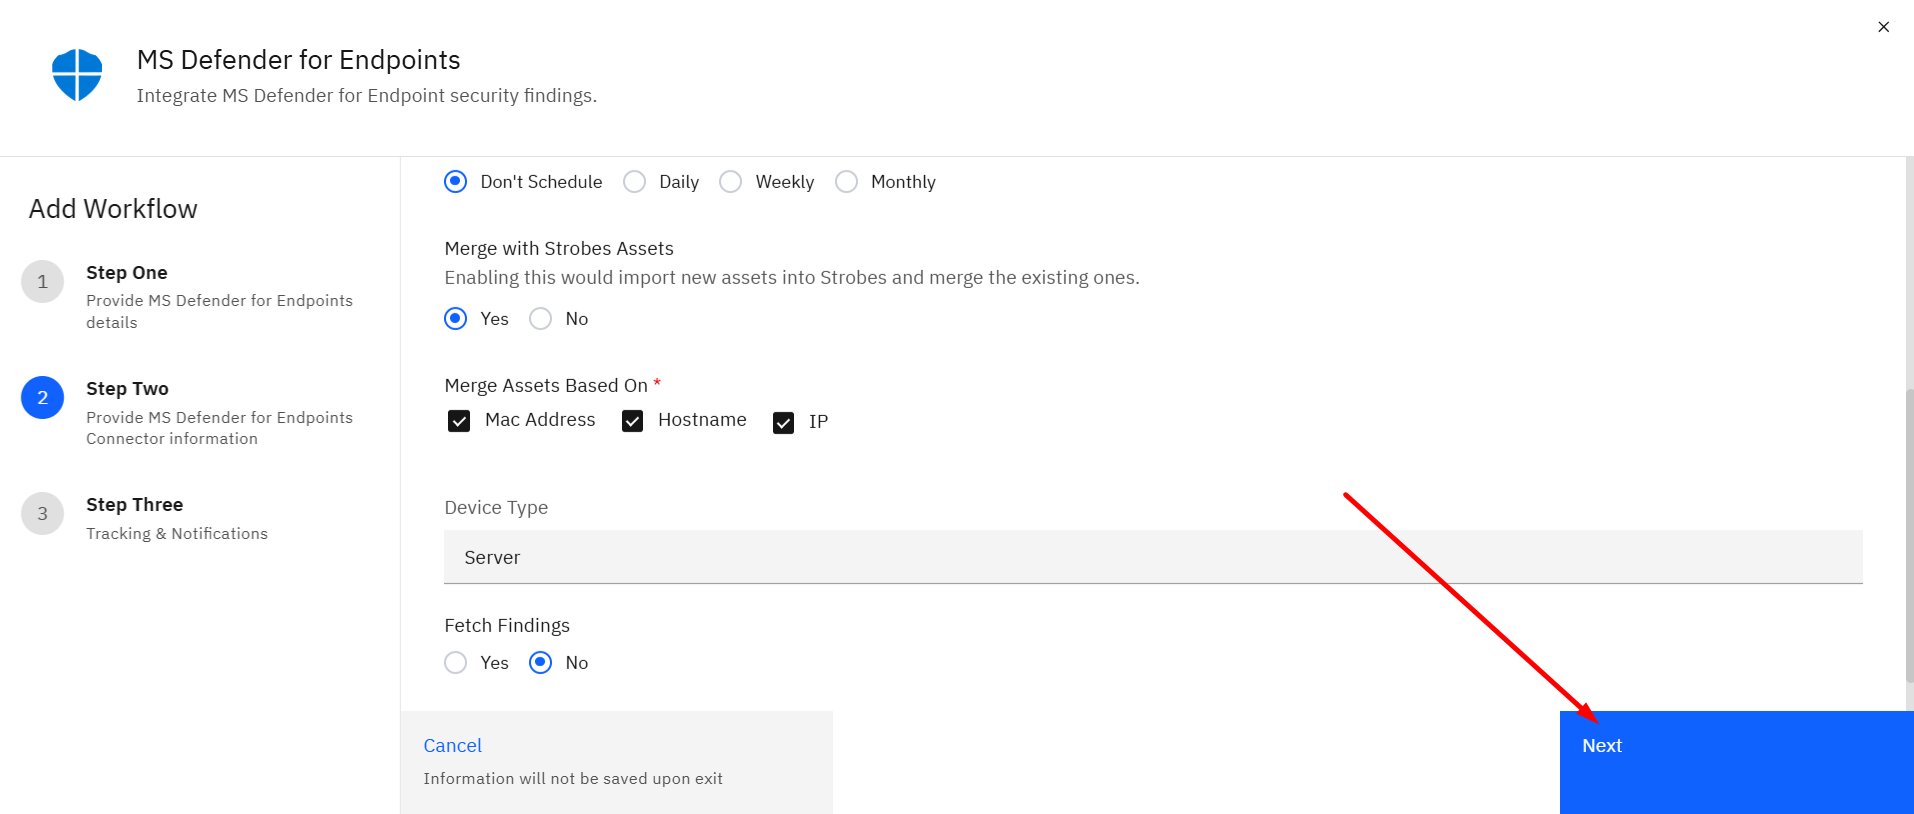
- Step 13: Set Merge with Strobes Assets
- Step 14: Set Merge Assets Based On
- Step 15: Select the Device Type (Optional)
- Step 16: Fetch Findings(Optional)
- Step 17: Proceed to Step Three
- Step 18: Configure a Notification or Tracking Channel (Optional)
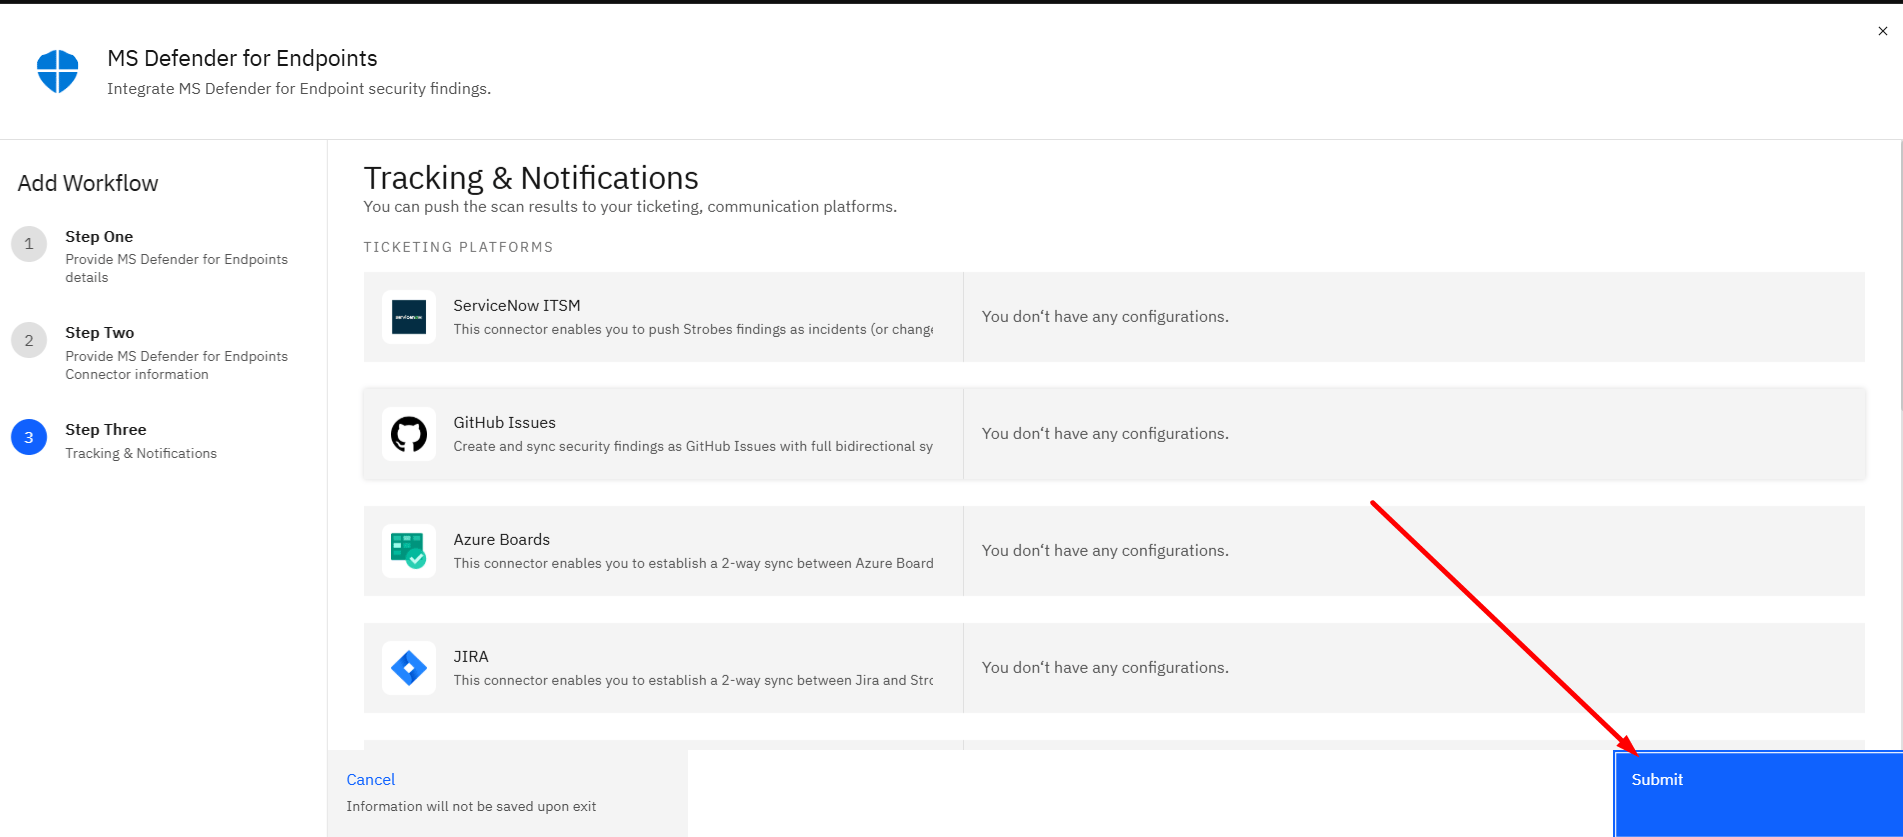
- Step 19: Submit the Configuration
Overview
The Microsoft Defender for Endpoint connector enables you to sync endpoint assets and associated security findings into Strobes, providing centralized visibility into endpoint risks.
Why Integrate Microsoft Defender for Endpoint into Strobes?
Integrating Microsoft Defender for Endpoint with Strobes helps security teams centralize endpoint security data, prioritize vulnerabilities, track remediation, and manage endpoint risks alongside the broader attack surface.
Microsoft Defender for Endpoint Connector Details
Field | Details |
|---|---|
Supported products | |
Category | Vulnerability Assessment (also functions as EDR) |
Ingested asset type(s) | Endpoint |
Integration type | UNI directional (data is transferred from the Connector to the Strobes Platform in one direction) |
Supported version and type | Cloud-based (SaaS) — pulls via Microsoft Graph Security API using an Azure AD app credential (client ID/secret/tenant) |
What Data Is Imported into Strobes?
The Microsoft Defender for Endpoint connector imports the following data into Strobes:
Endpoint Assets
Devices from Microsoft Defender for Endpoint are imported into Strobes as Endpoint type assets. These represent the same machines listed in the customer's Microsoft Defender device inventory.
If the same device is also discovered through other integrations, such as the Microsoft Defender for Cloud connector or Tenable Cloud Security, Strobes identifies and deduplicates the asset to avoid creating duplicate entries.
Security Findings
When enabled during connector configuration, vulnerabilities associated with the imported endpoint devices are also brought into Strobes as security findings. These findings are linked to their respective endpoint assets for centralized tracking and remediation.
How Vulnerability Status Is Synchronized
Strobes keeps the status of vulnerabilities synchronized with Microsoft Defender for Endpoint.
- When a vulnerability is marked as fixed in Microsoft Defender, the corresponding finding in Strobes is automatically marked as Resolved.
- If the vulnerability remains active in Microsoft Defender, the finding stays New in Strobes.
- If a previously resolved vulnerability becomes active again, Strobes reopens the corresponding finding.
This ensures that vulnerability statuses in Strobes remain aligned with the latest information from Microsoft Defender for Endpoint.
Required Permissions
To configure the Microsoft Defender for Endpoint connector, the customer must provide the following details from their Microsoft Azure account:
- Tenant ID
- Client ID
- Client Secret
The following permissions are mandatory for the Microsoft Defender for Endpoint connector:
- Machine.Read.All – Allows Strobes to read machine and device information from Microsoft Defender for Endpoint.
- Vulnerability.Read.All – Allows Strobes to read vulnerability information from Microsoft Defender for Endpoint.
These permissions must be granted to the Azure App Registration before configuring the connector.
These credentials are generated through an App Registration created in the customer's Microsoft Azure portal. The registered application enables Strobes to securely connect to and retrieve the required Microsoft Defender for Endpoint data.
Note: The Azure App Registration must have the necessary API permissions to access Microsoft Defender for Endpoint data. Ensure the required permissions are granted and admin consent is provided before configuring the connector.
Step 1: Navigate to the Connectors
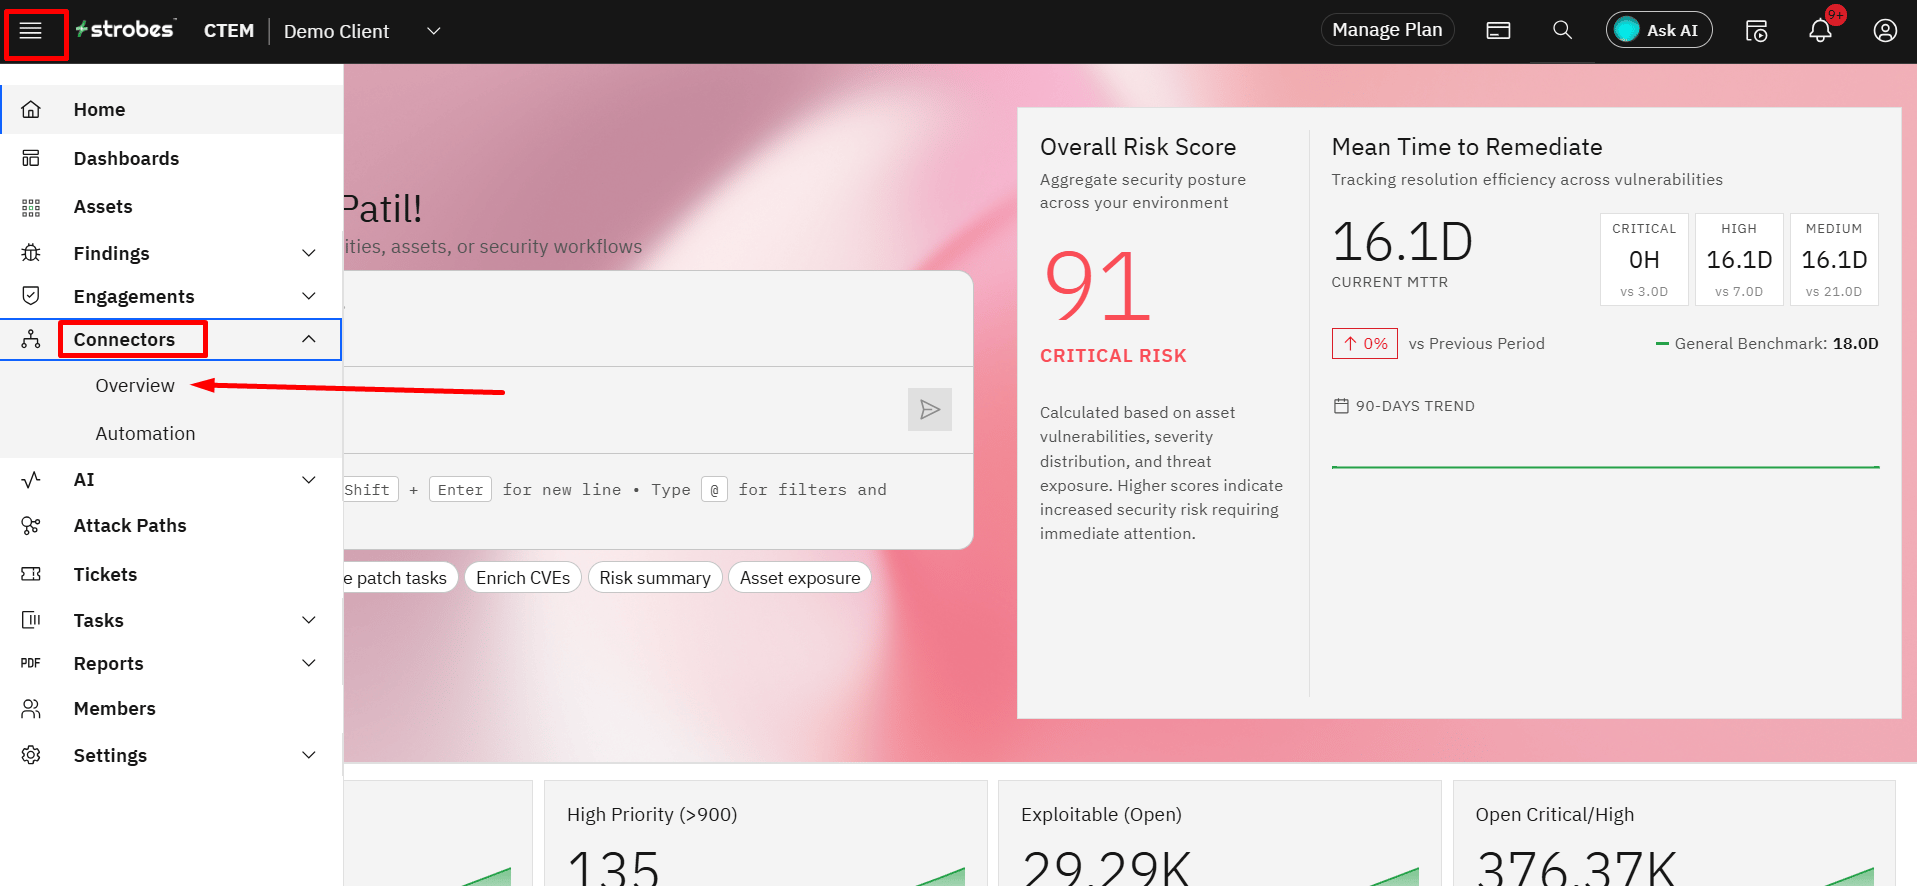
In the left navigation pane, expand Connectors and click Overview. The Connectors Overview page opens, displaying all installed and available connectors organized by category.
Step 2: Search for the Connector
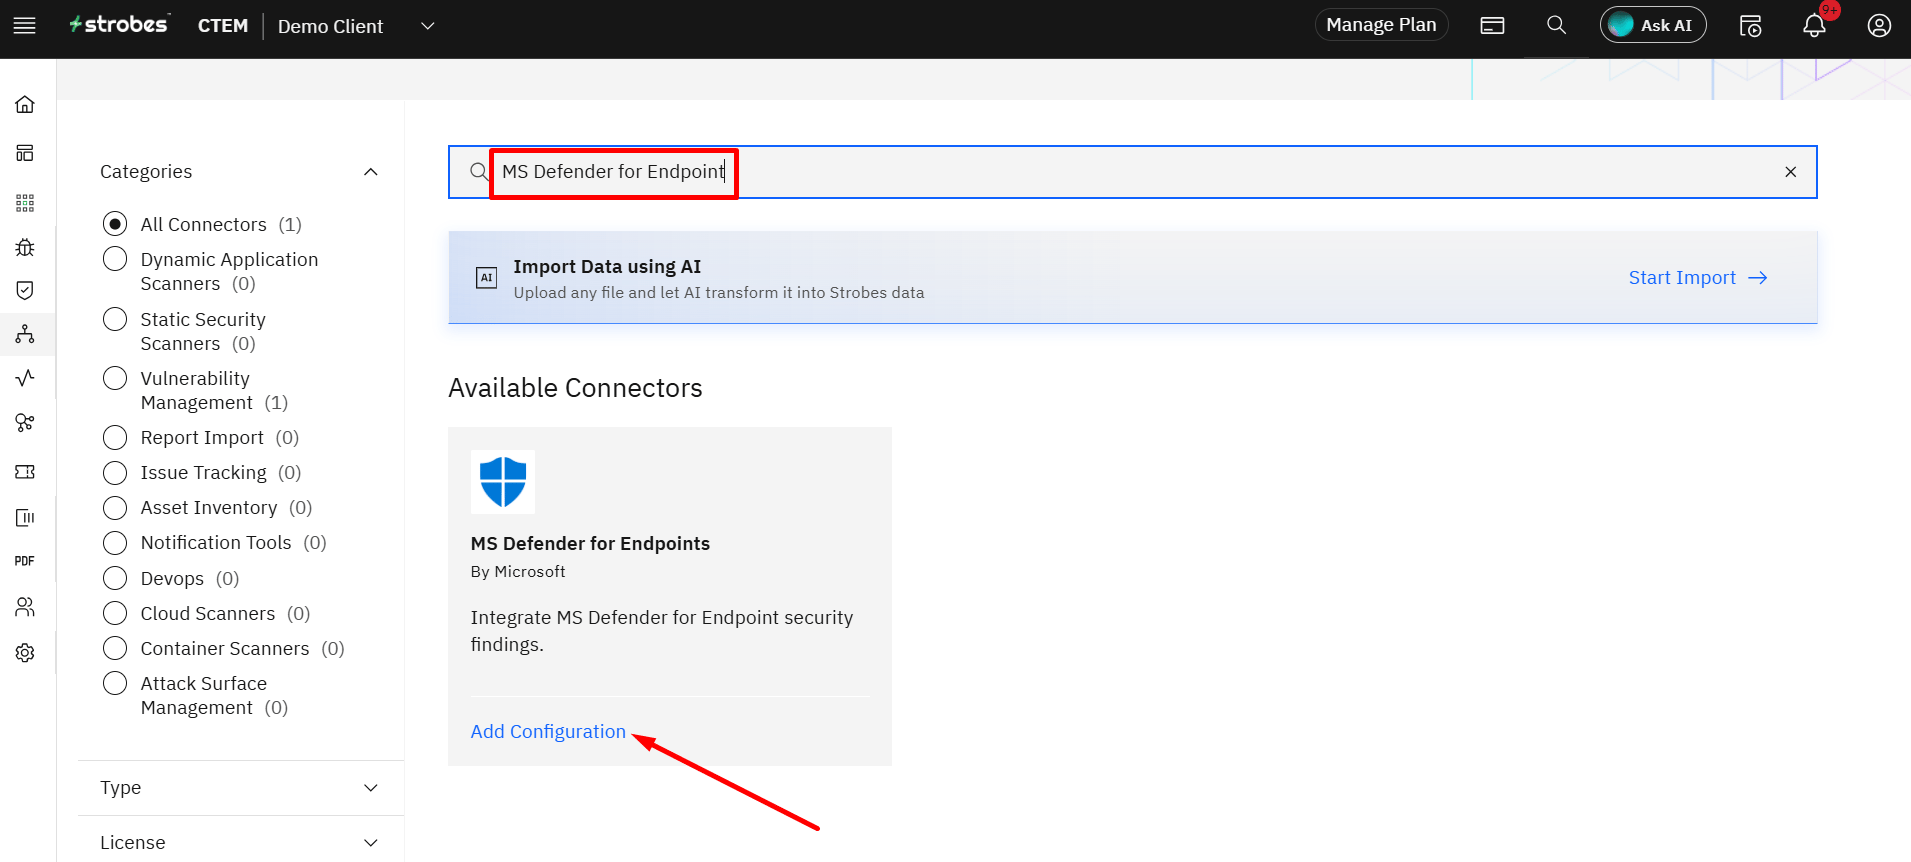
In the Search bar, type MS Defender for Endpoints. The MS Defender for Endpoints connector is displayed under Available Connectors.
Step 3: Open the Connector
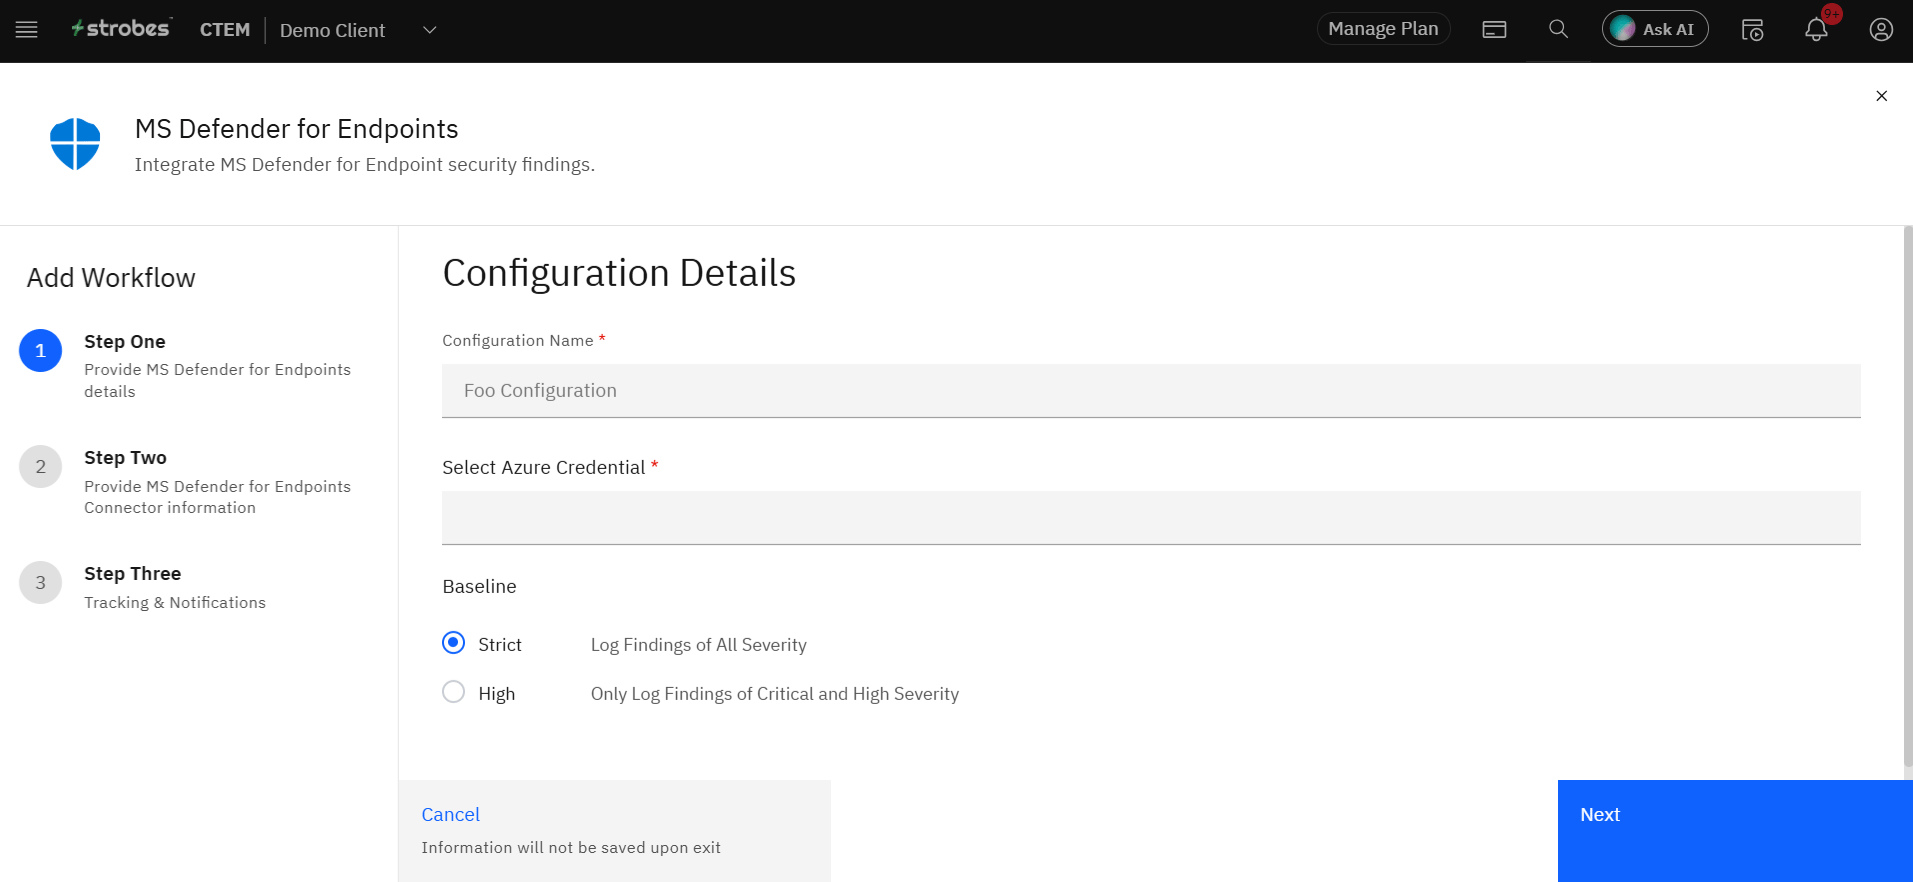
Click Add Configuration on the MS Defender for Endpoints card. The Add Workflow panel opens with three steps listed in the left sidebar.
Step 4: Enter a Configuration Name
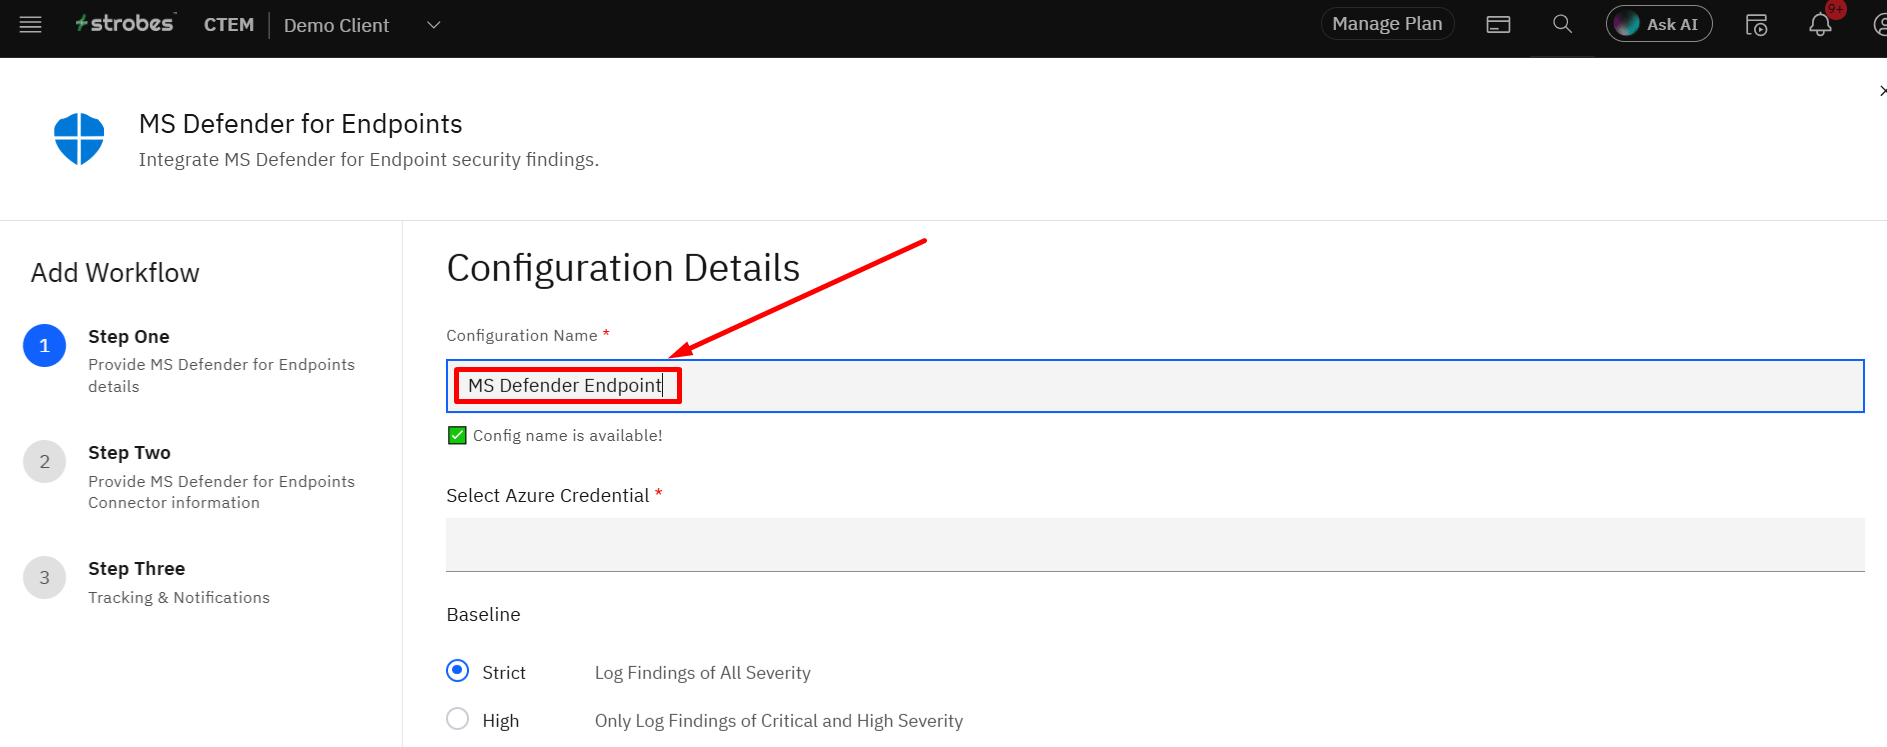
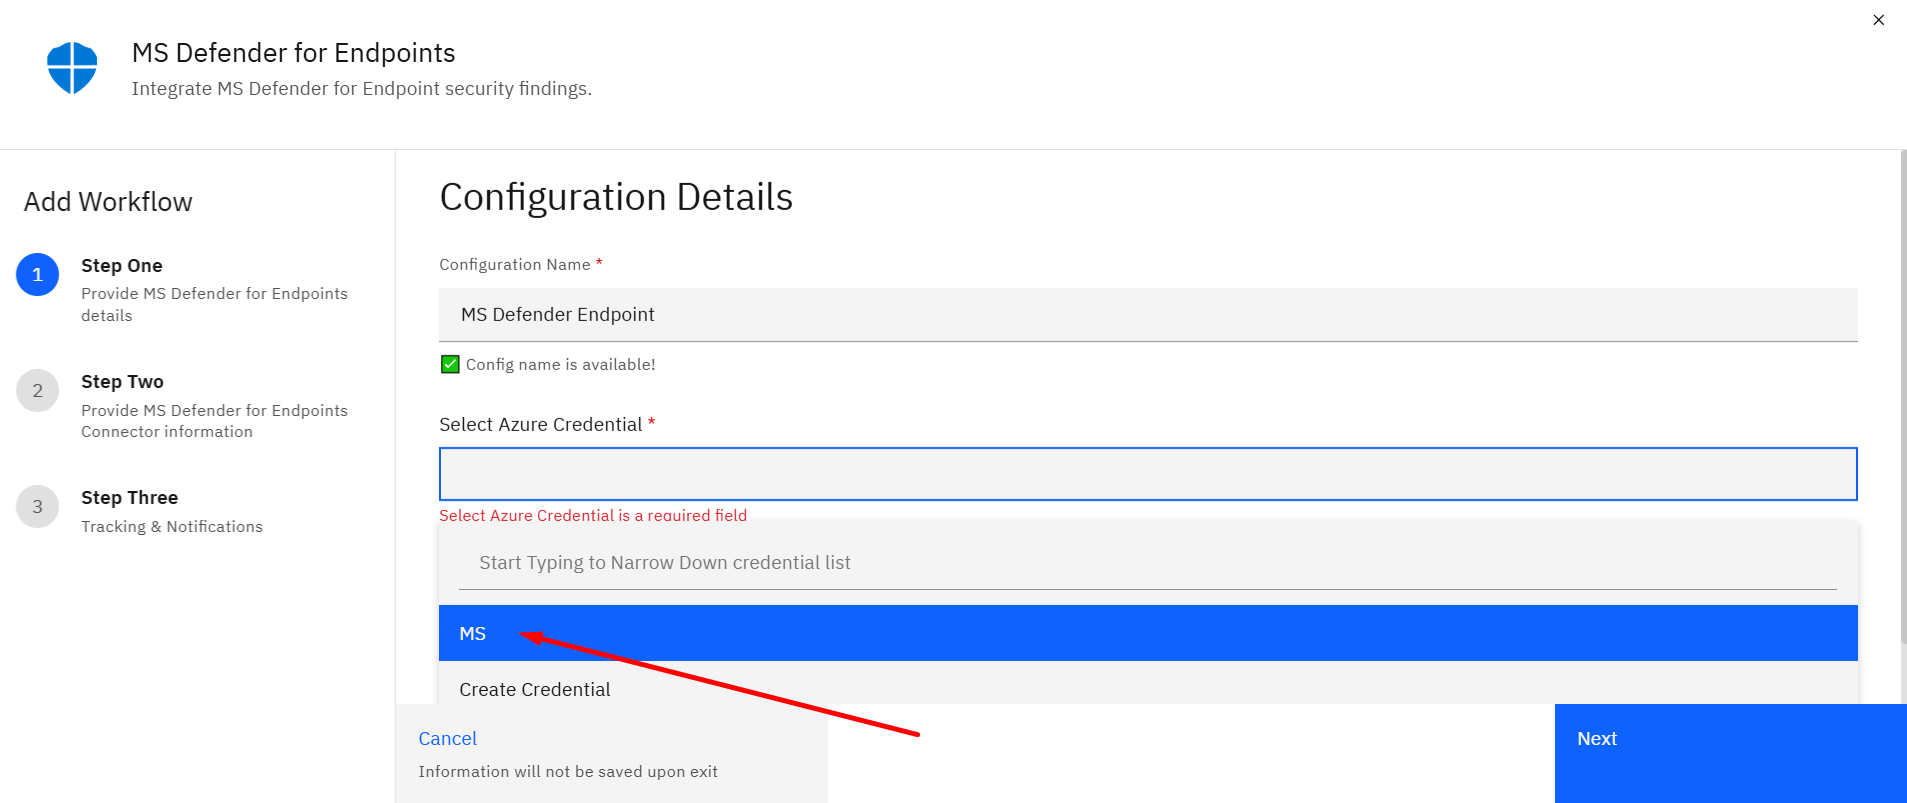
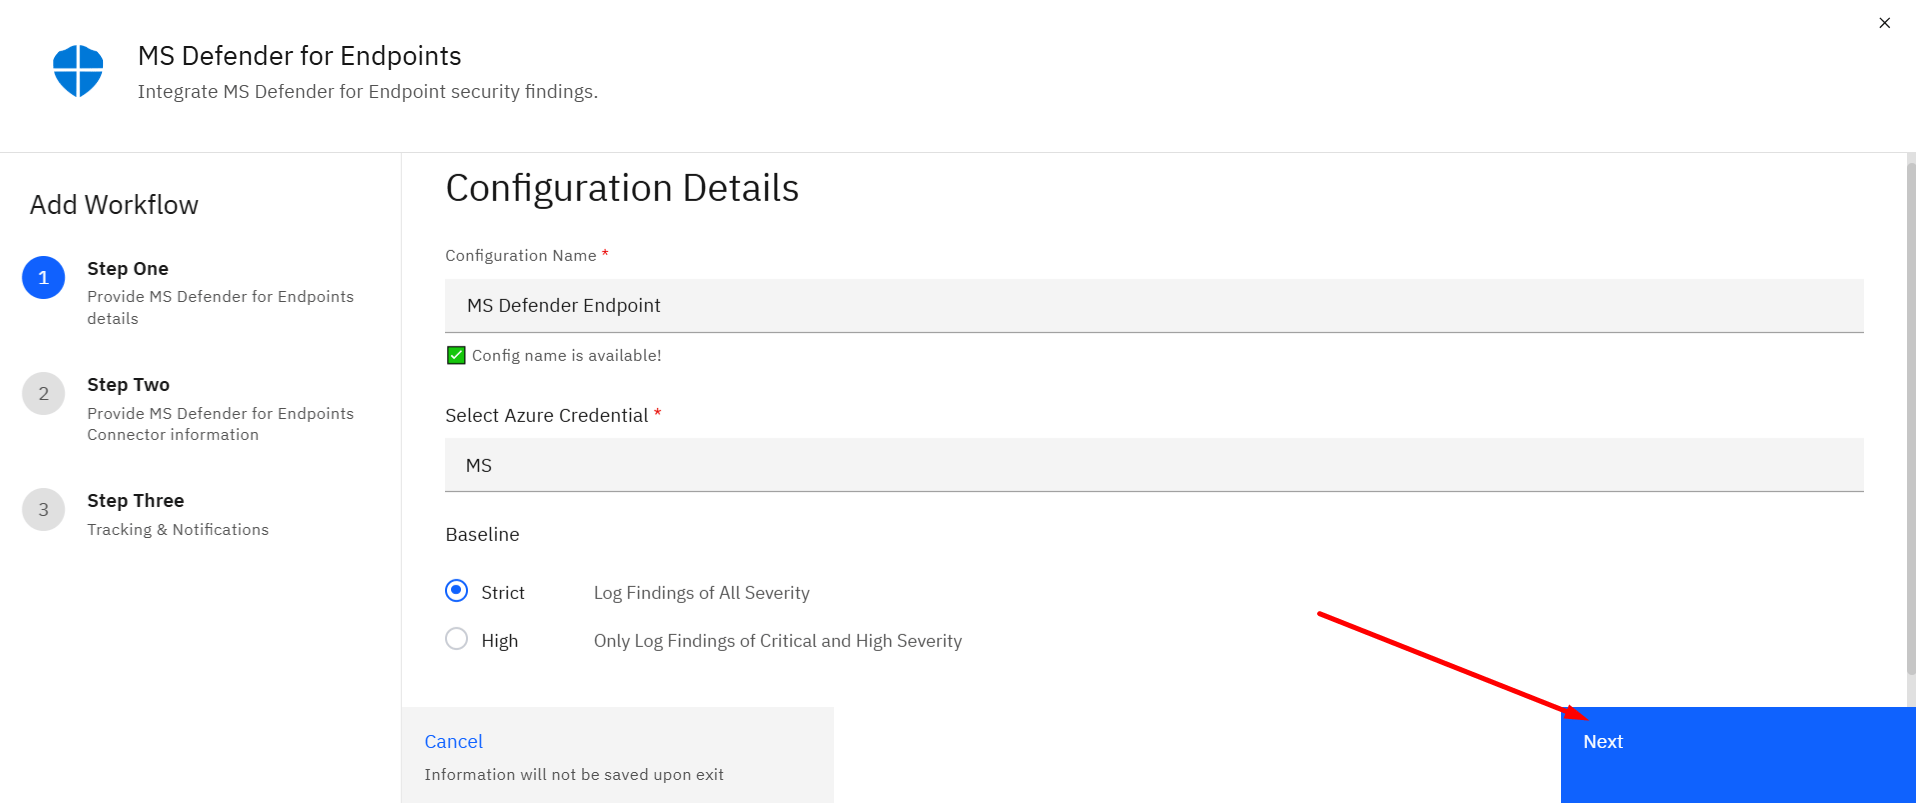
In the Configuration Name field, enter a unique name for the configuration. A green "Config name is available!" message confirms that the name is not already taken.
Step 5: Select MS Defender Credentials
Click on the Select MS Defender Credential dropdown. If you have an existing saved credential, select it from the list. If not, click Create Credential to add one now.
Step 6: Add a New Credential (if needed)
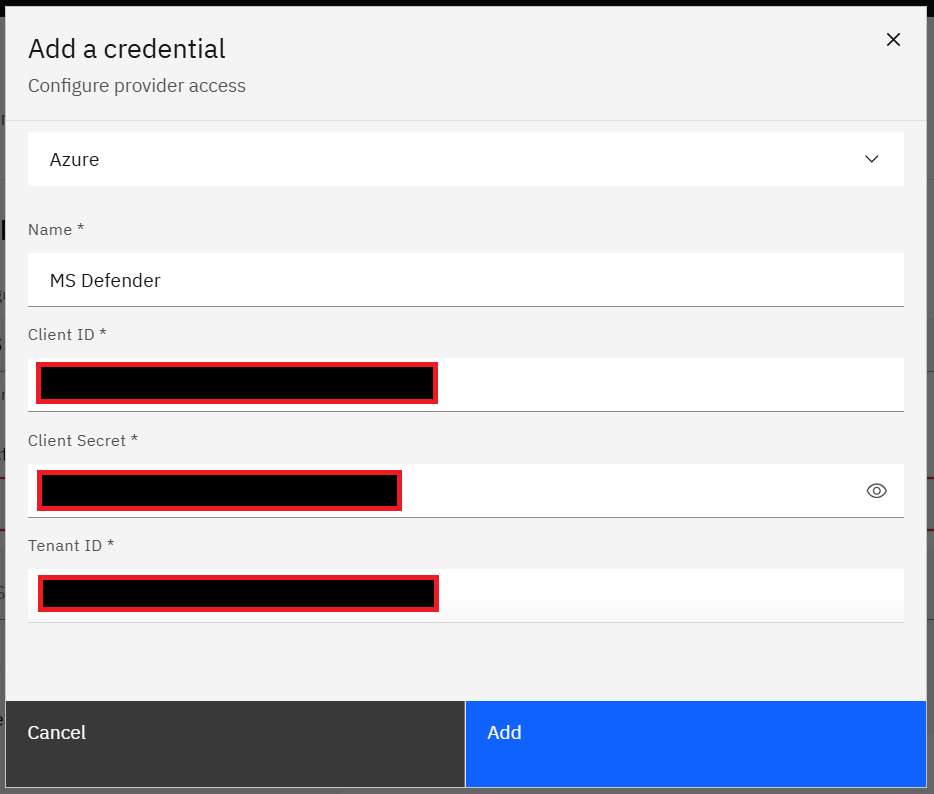
The Add a Credential modal opens. Select Azure as the provider and fill in the following fields:
- Name (required) — Enter a label for this credential set, used for internal reference only.
- Client ID (required) — Enter the Azure application Client ID.
- Client Secret (required) — Enter the Azure application Client Secret.
- Tenant ID (required) — Enter your Microsoft Entra ID Tenant ID.
Step 7: Save the Credential
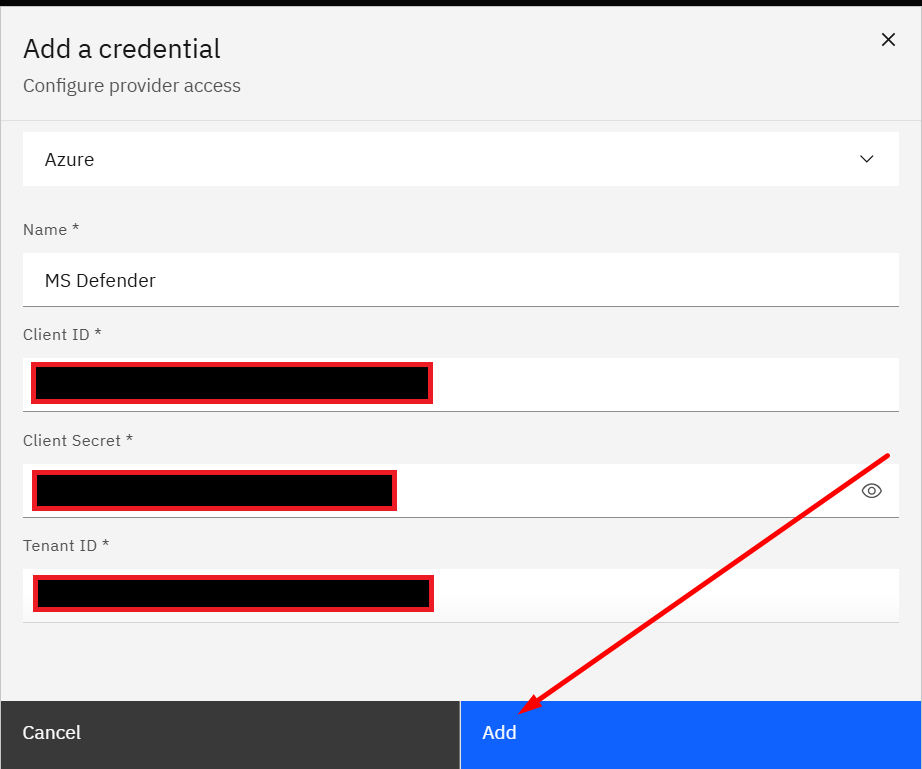
Click Add. The modal closes, and the newly created credential is automatically selected in the Configuration Details form.
Step 8: Choose a Baseline
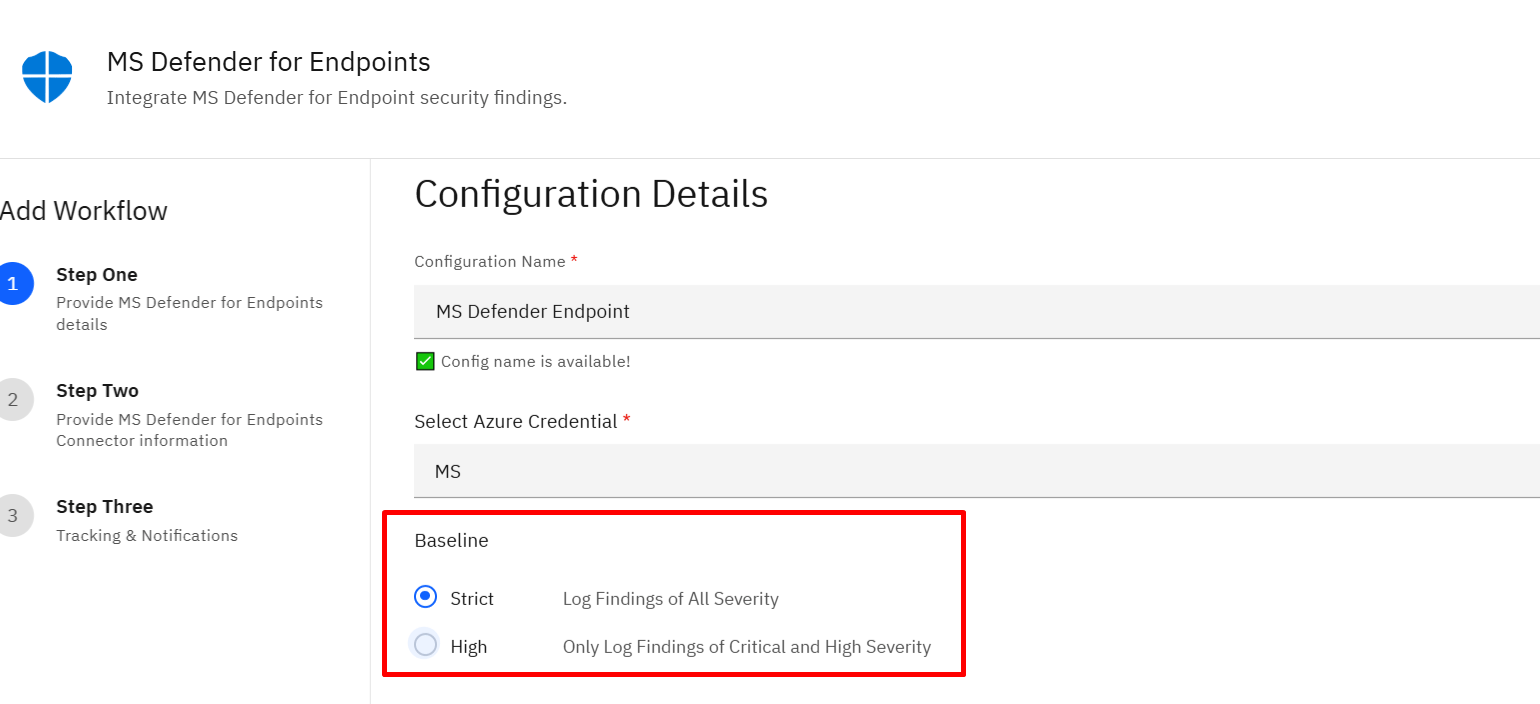
Under Baseline, select which findings to import from CrowdStrike:
Option | What it imports |
Strict | Findings of all severity levels |
High | Critical and High severity findings only |
Step 9: Proceed to Step Two
Click Next to proceed to the next configuration step.
Step 10: Select an Agent
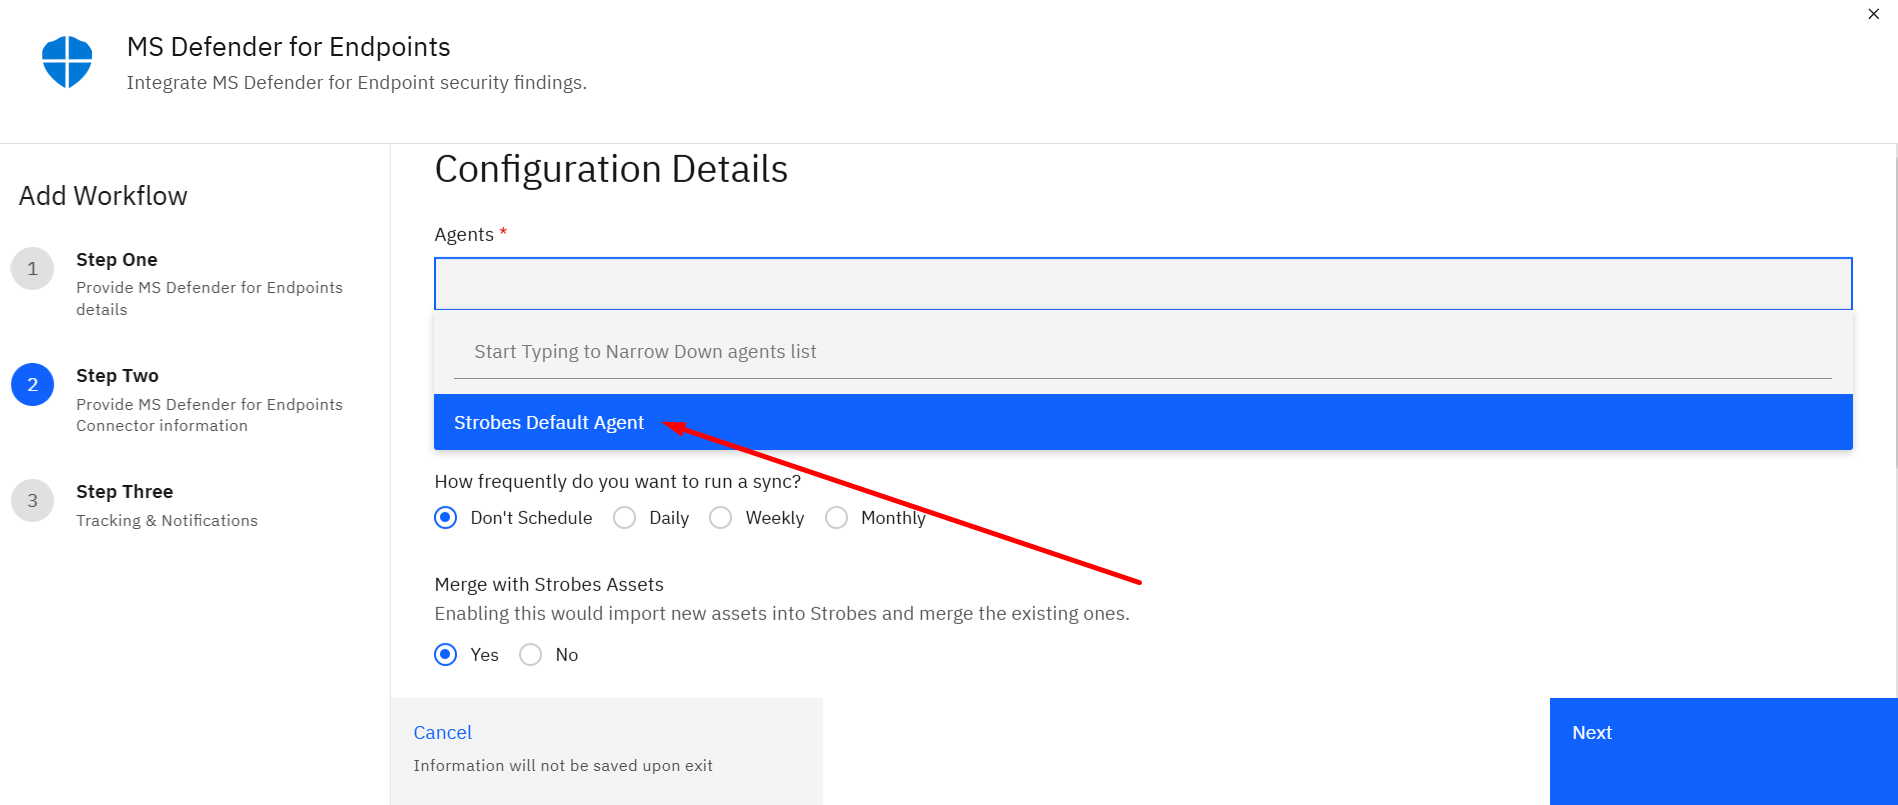
Click the Agents field and select the Strobes agent that will handle the connector's data. By default, Strobes Default Agent is selected.
Step 11: Add Tags (Optional)
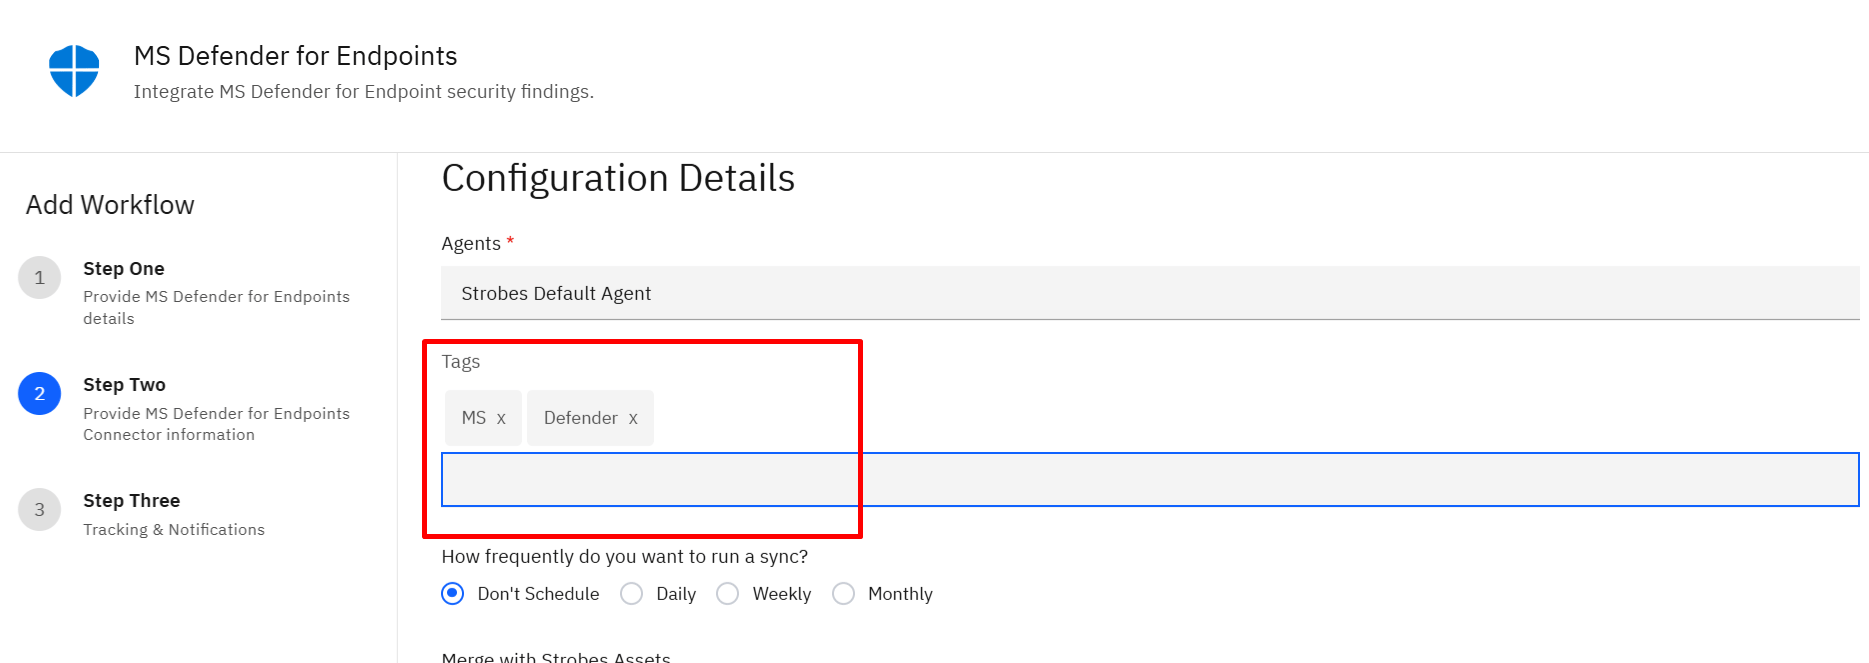
Click the Tags field and enter any tags you want to apply to the assets and findings imported by this connector. Tags help with filtering and scoping data within Strobes. Leave this field empty if no tags are needed.
Step 12: Set Sync Frequency
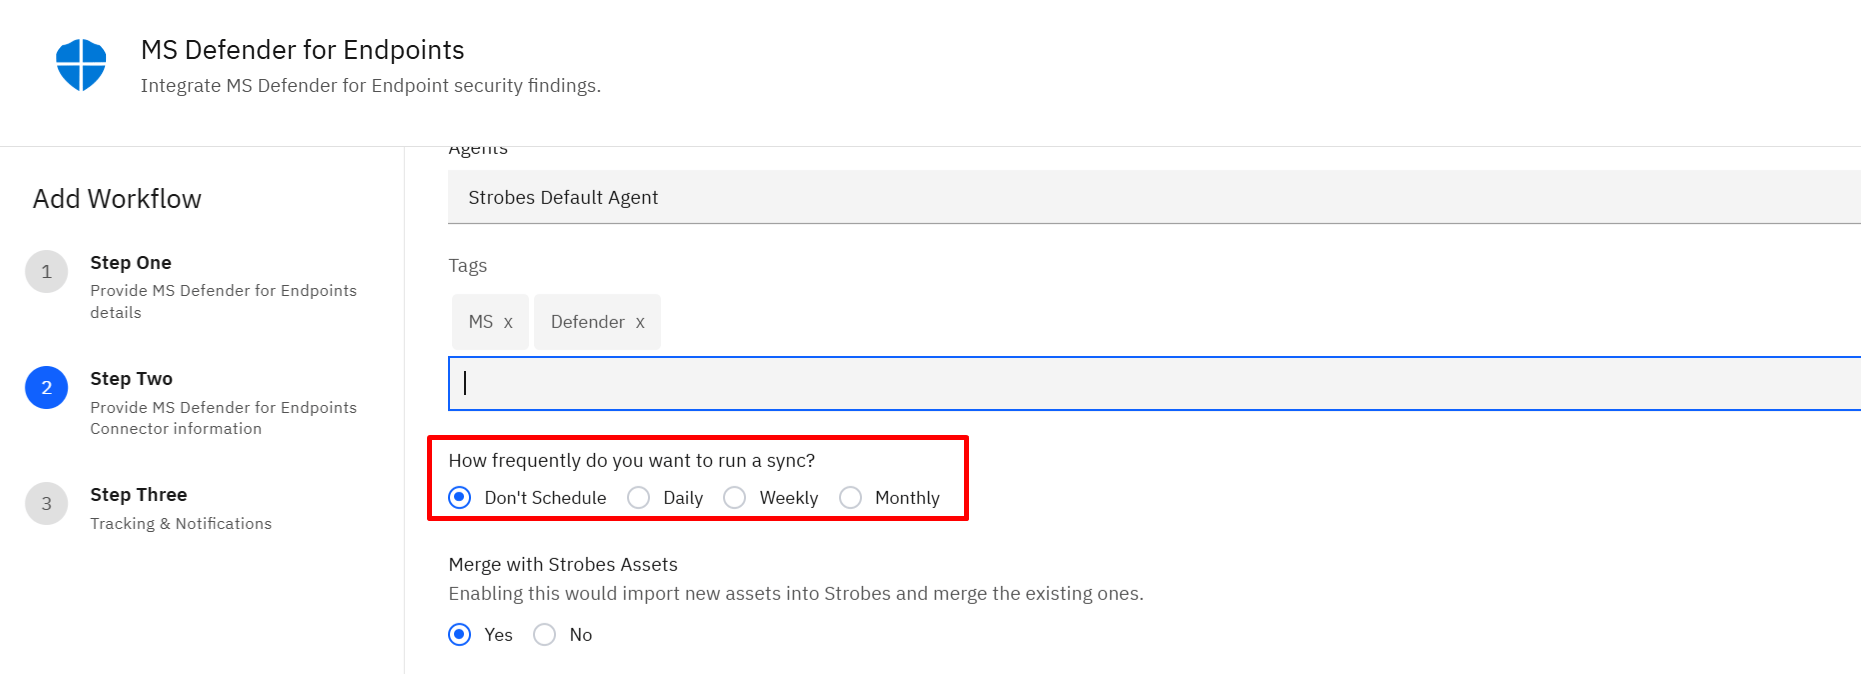
Under How frequently do you want to run a sync?, select the desired recurring sync schedule for importing findings from Tenable CS into Strobes.
Option | Description |
Don't Schedule | Run syncs manually only |
Daily | Sync once every day |
Weekly | Sync once every week |
Monthly | Sync once every month |
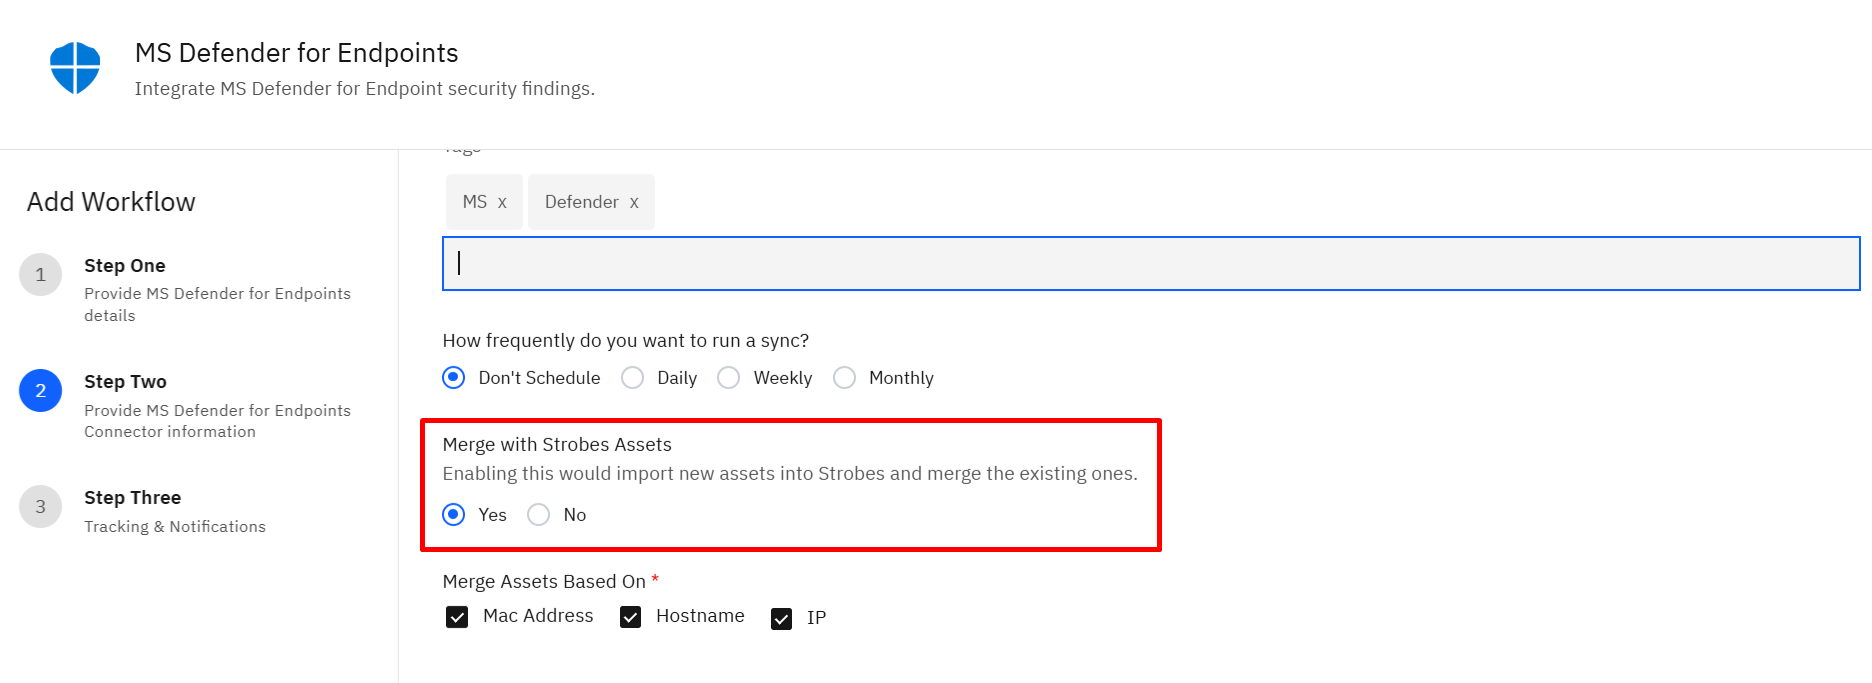
Step 13: Set Merge with Strobes Assets
Under Merge with Strobes Assets, select Yes to import new assets from Microsoft Defender for Endpoints and merge duplicates with existing Strobes asset records, or select No to create separate records for all incoming assets.
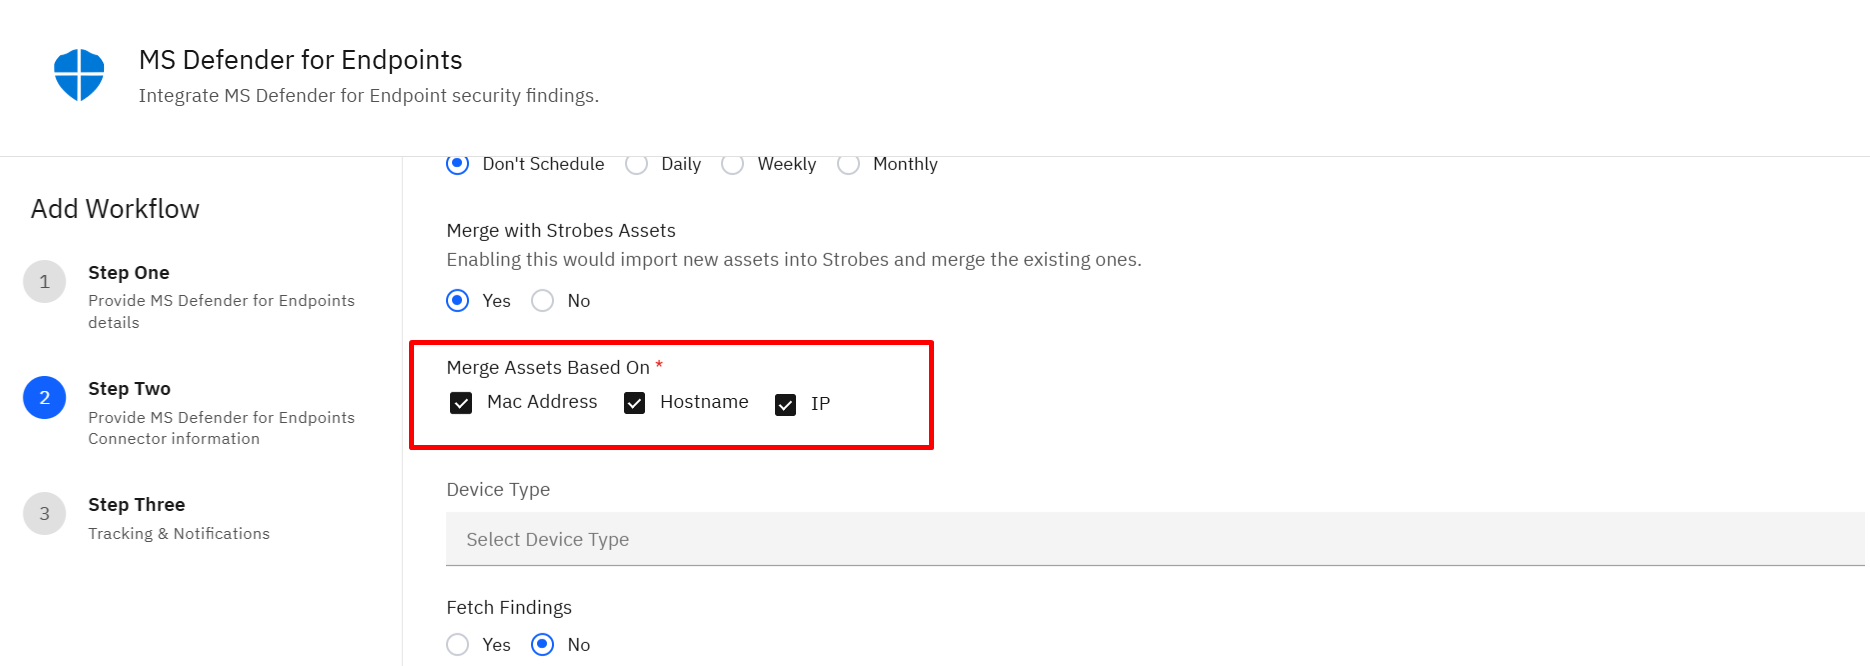
Step 14: Set Merge Assets Based On
Select the fields Strobes should use to identify and match duplicate assets. The available options are Mac Address, Hostname, and IP. All three options are selected by default.
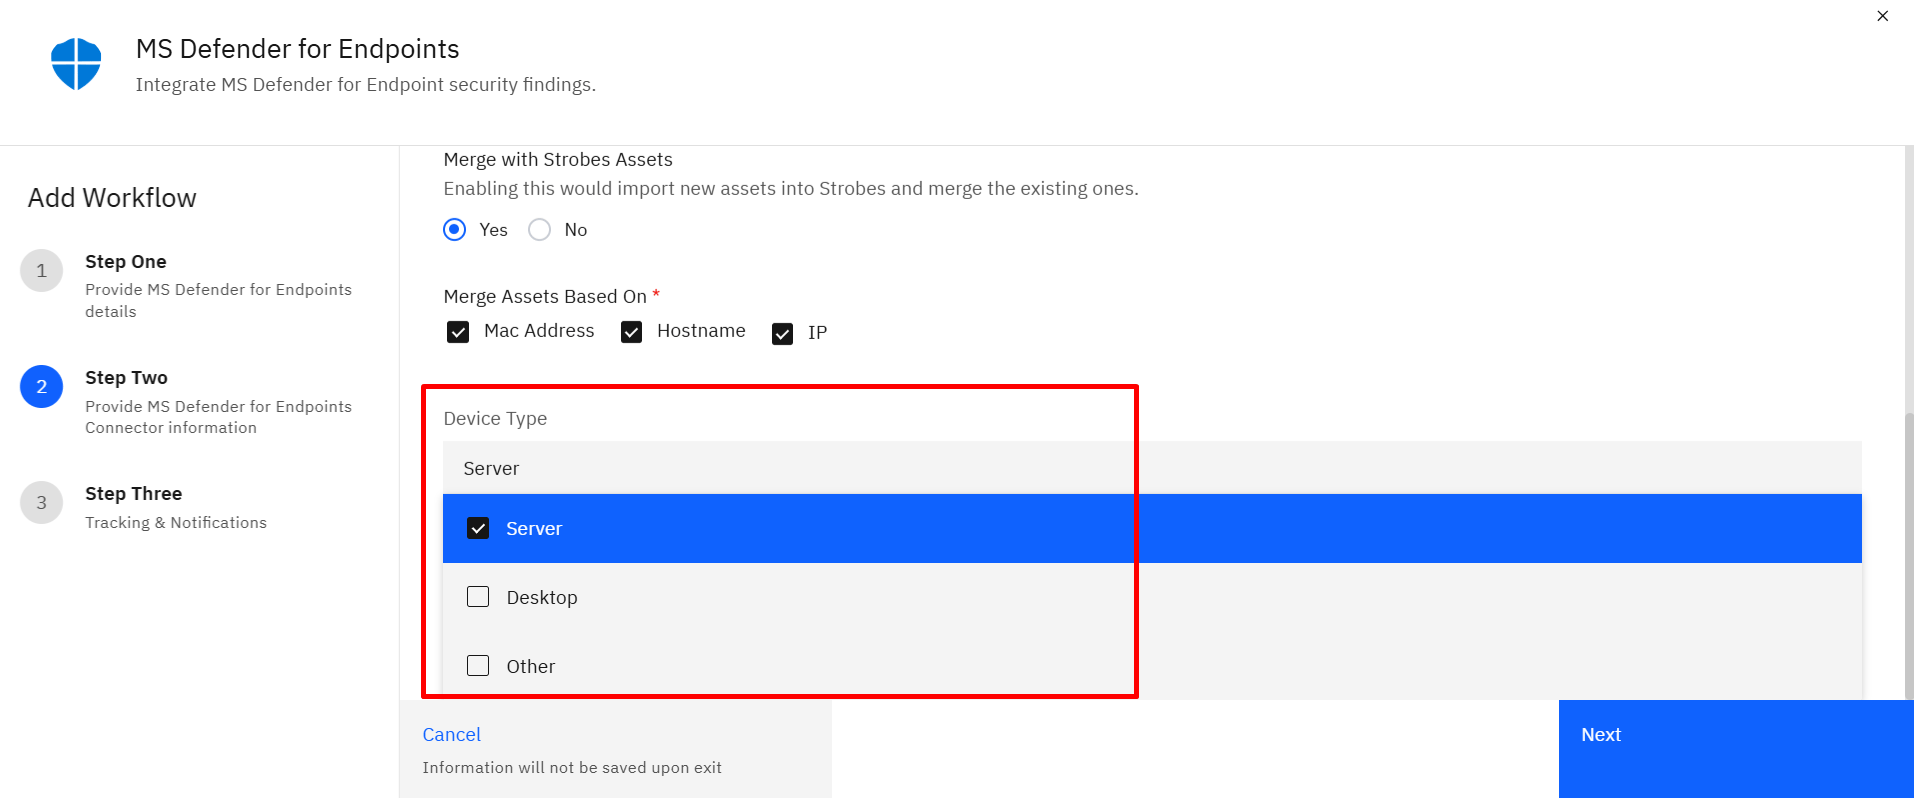
Step 15: Select the Device Type (Optional)
Under Device Type, select the device types to import from Microsoft Defender for Endpoint.
The available options include:
- Server
- Desktop
- Other
Select one or multiple device types based on the requirements. If left blank, the connector imports all available device types
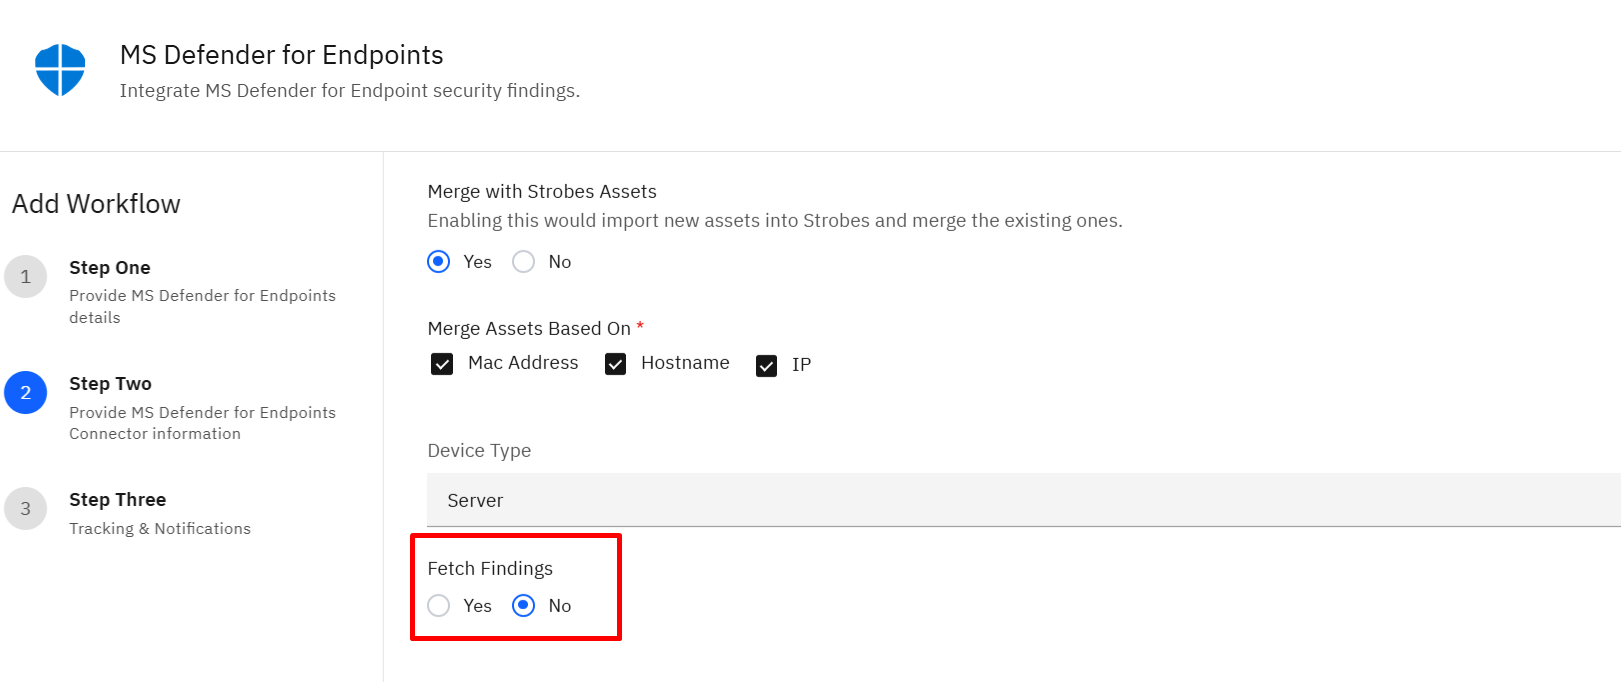
Step 16: Fetch Findings(Optional)
Under Fetch Findings, select whether vulnerabilities associated with the selected endpoint assets should be imported into Strobes.
- No (Default): Imports only the selected endpoint devices as assets. No vulnerability findings are created.
- Yes: Imports the vulnerabilities identified on those devices as findings along with the endpoint assets.
Step 17: Proceed to Step Three
Click Next to proceed to the third and final configuration step.
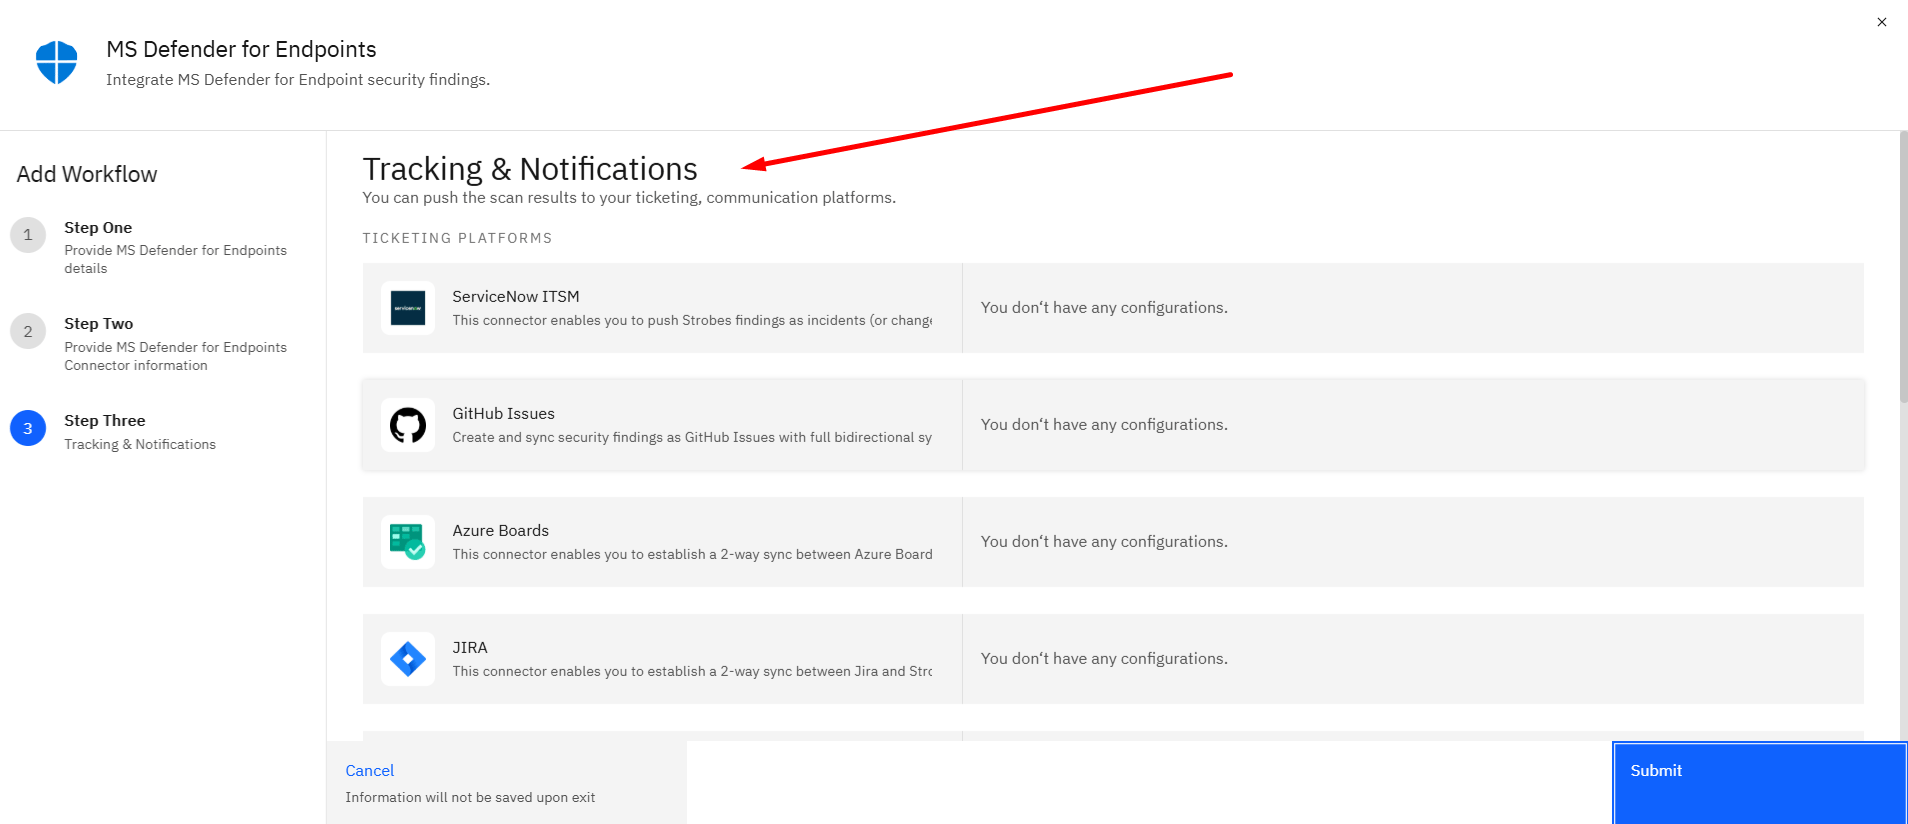
Step 18: Configure a Notification or Tracking Channel (Optional)
This step allows you to connect notification and tracking channels to the Microsoft Defender for Endpoint connector.
Notification Channels
Configure a notification channel to receive updates when the connector synchronizes endpoint assets or imports security findings. The available notification channels include:
- MS Teams
- Microsoft 365 Email
- Flock Messenger
- Slack
Tracking Tools
Connect tracking tools to receive imported Microsoft Defender for Endpoint findings as tickets for further tracking and remediation. The available tracking tools include:
- ServiceNow ITSM
- JIRA
- GitHub Issues
- Azure Boards
- Bugzilla – Strobes Sync Add-on
If notification or tracking configurations are already available in Strobes, they will appear in the respective lists and can be linked to this connector. This step is optional and can be skipped if no notification or tracking configuration is required.
Step 19: Submit the Configuration
Click Submit to save and activate the connector. Strobes will begin syncing endpoint assets and, if enabled, associated security findings from Microsoft Defender for Endpoint according to the configured sync schedule.
More in Cloud, endpoint & inventory
Was this page helpful?