
Connecting UpGuard to Strobes
9 min readEdit
On this page⌄
- Overview
- Supported Version
- UpGuard Connector Details
- Before You Start
- Required Credentials
- What Data Comes into Strobes
- Assets
- Findings
- How Status Is Kept in Sync
- Part 1 — Save the UpGuard Credential in Strobes
- Step 1 — Open Settings
- Step 2 — Click Credential Manager
- Step 3 — Click Add Credential
- Step 4 — Select UpGuard as the Credential Type
- Step 5 — Enter a Name for the Credential
- Step 6 — Paste the API Key
- Step 7 — Click Save
- Part 2 — Configure the UpGuard Connector in Strobes
- Step 8 — Navigate to Connectors
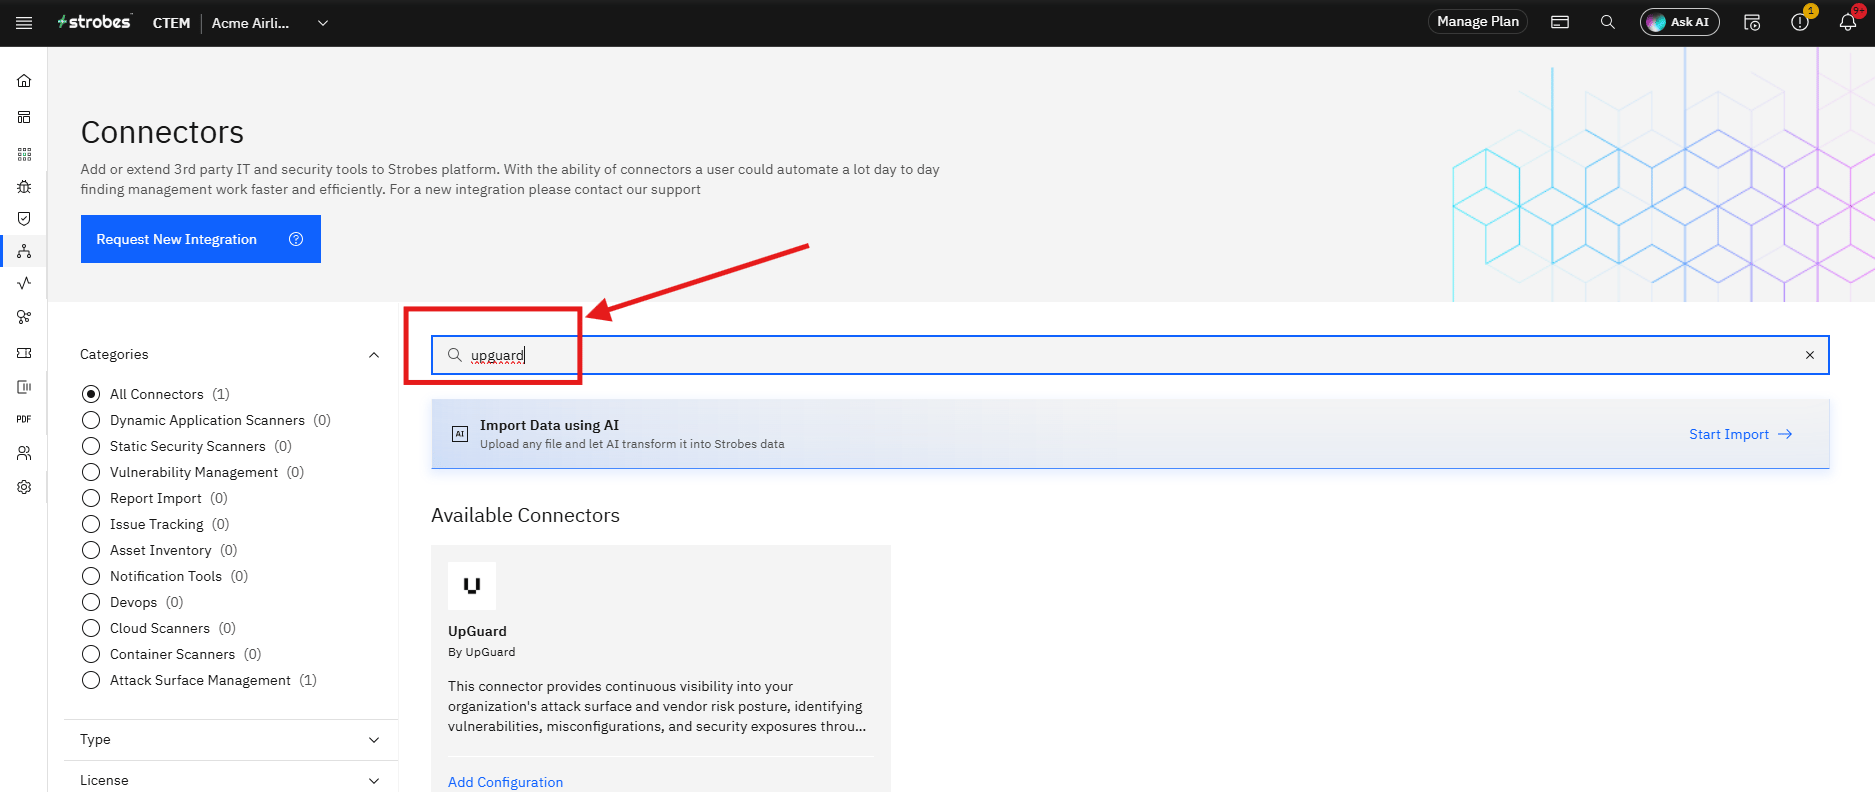
- Step 9 — Search for UpGuard
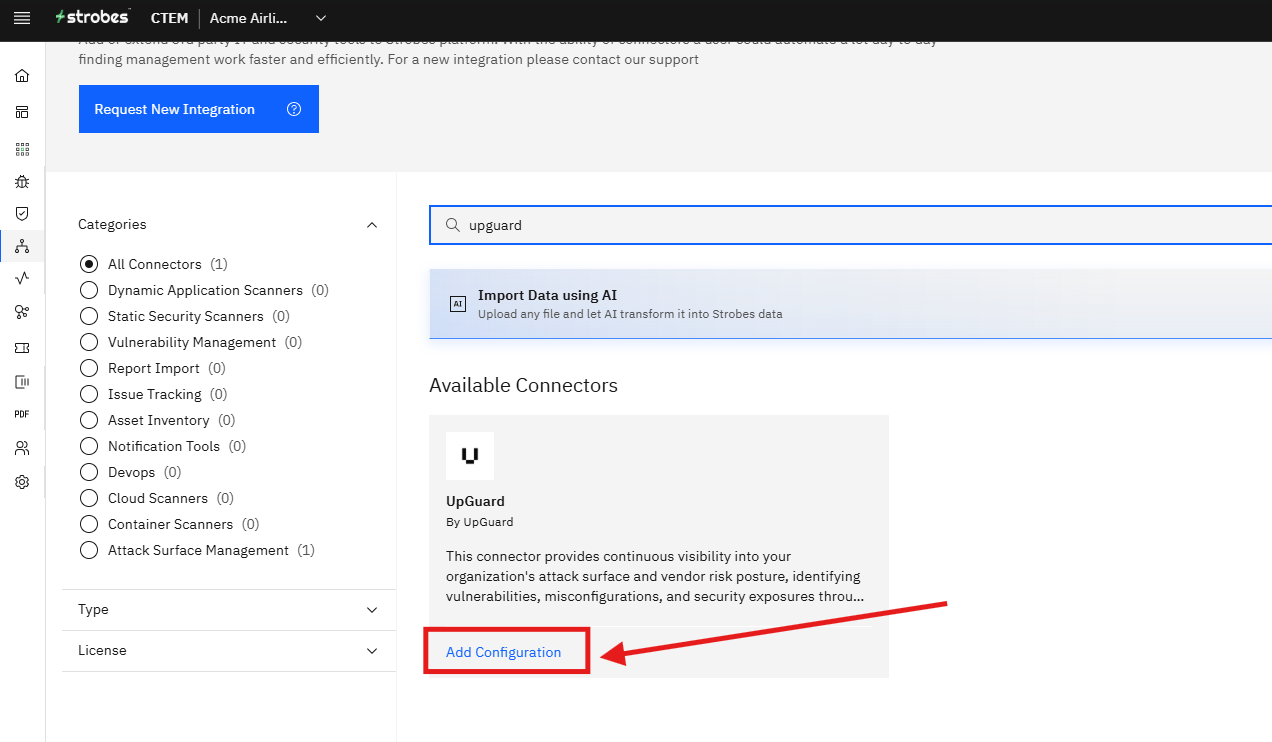
- Step 10 — Click Add Configuration
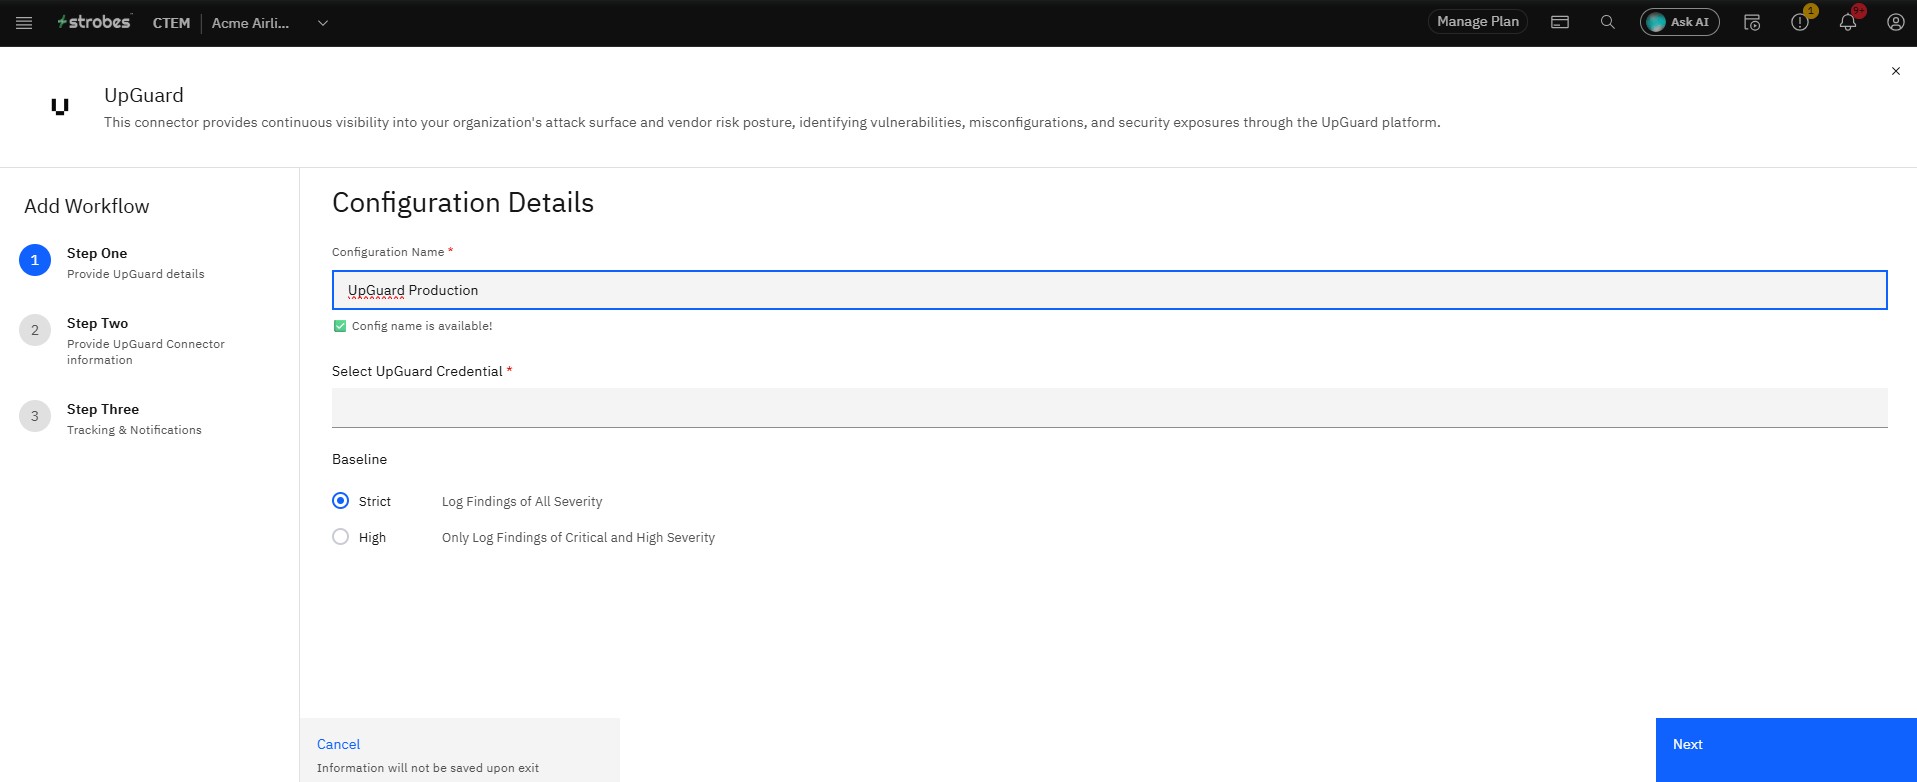
- Step 11 — Enter a Configuration Name
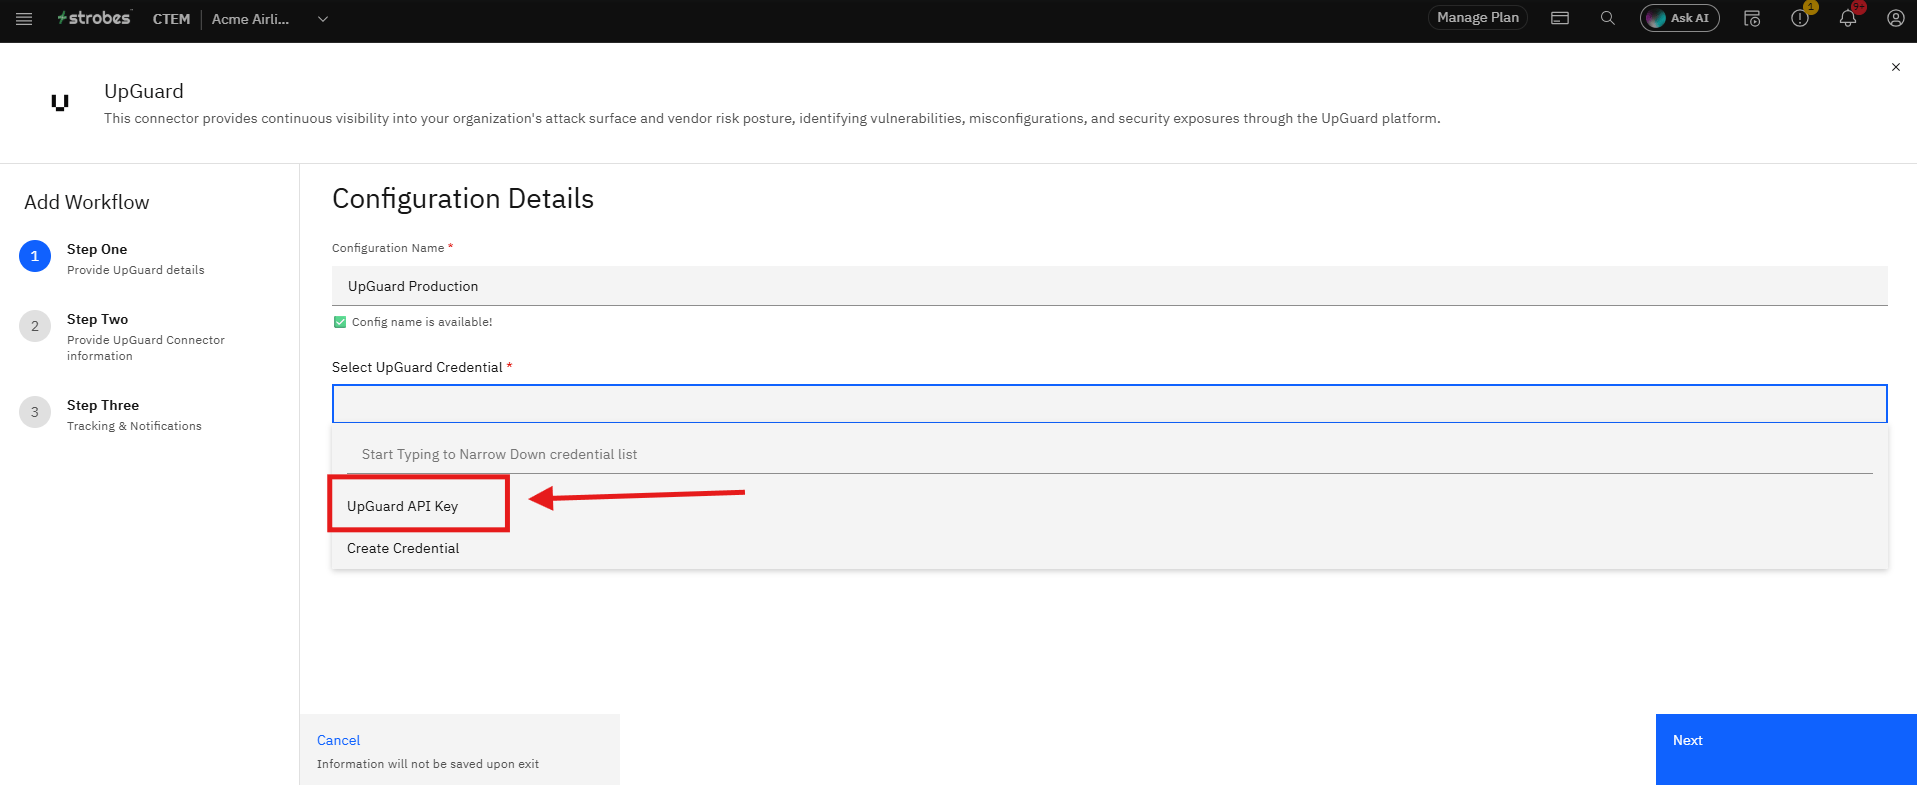
- Step 12 — Select the UpGuard Credential
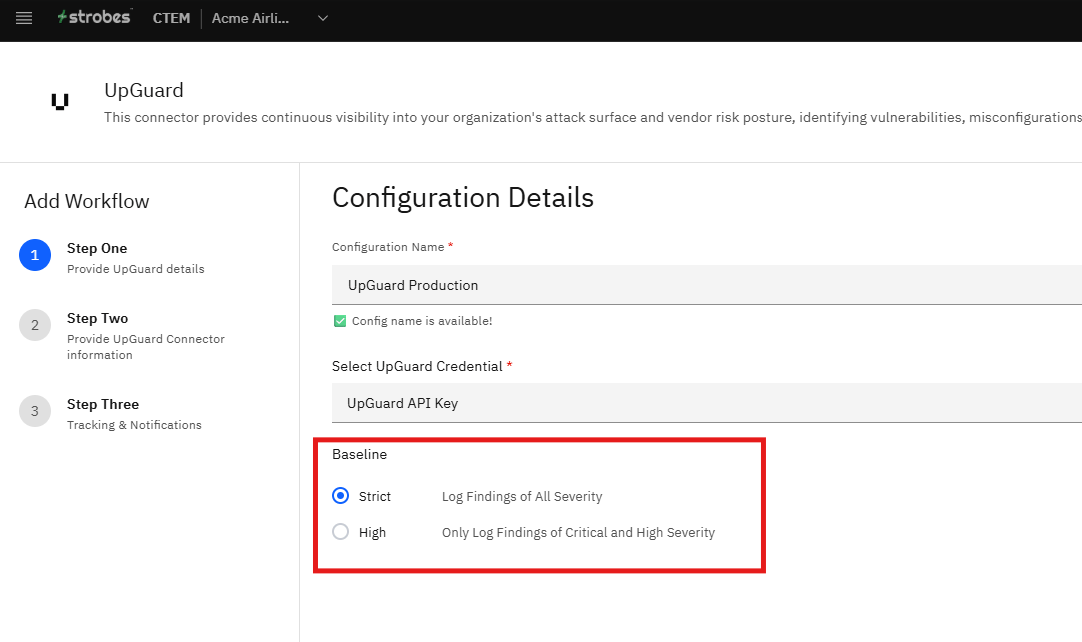
- Step 13 — Select the Baseline
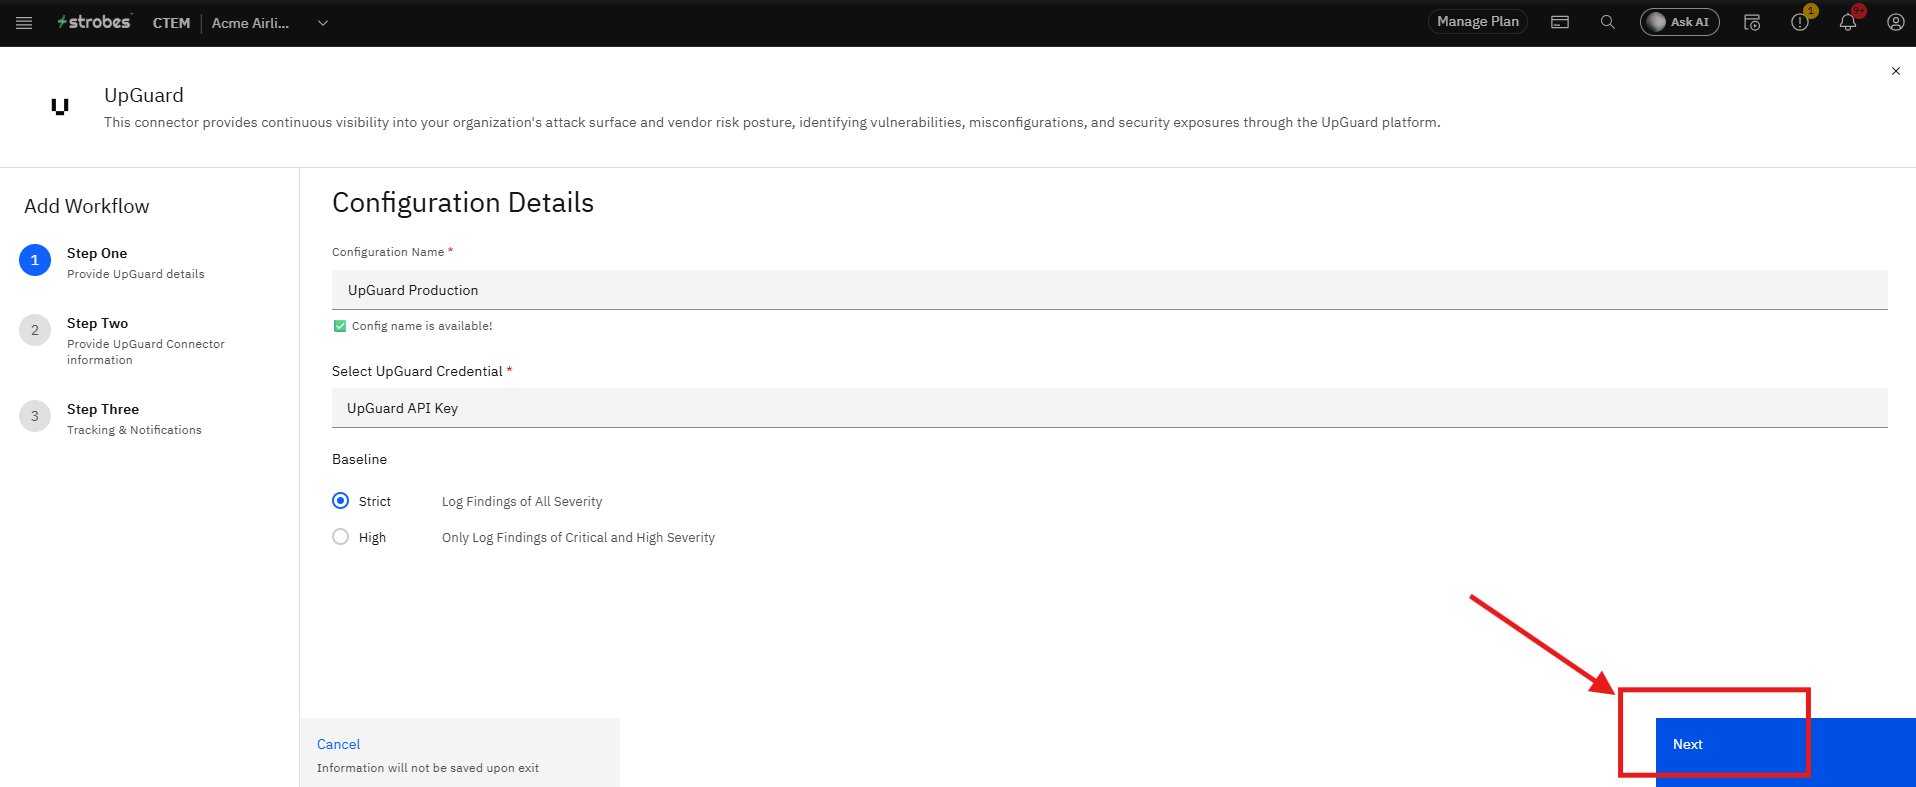
- Step 14 — Click Next to Proceed to Step Two
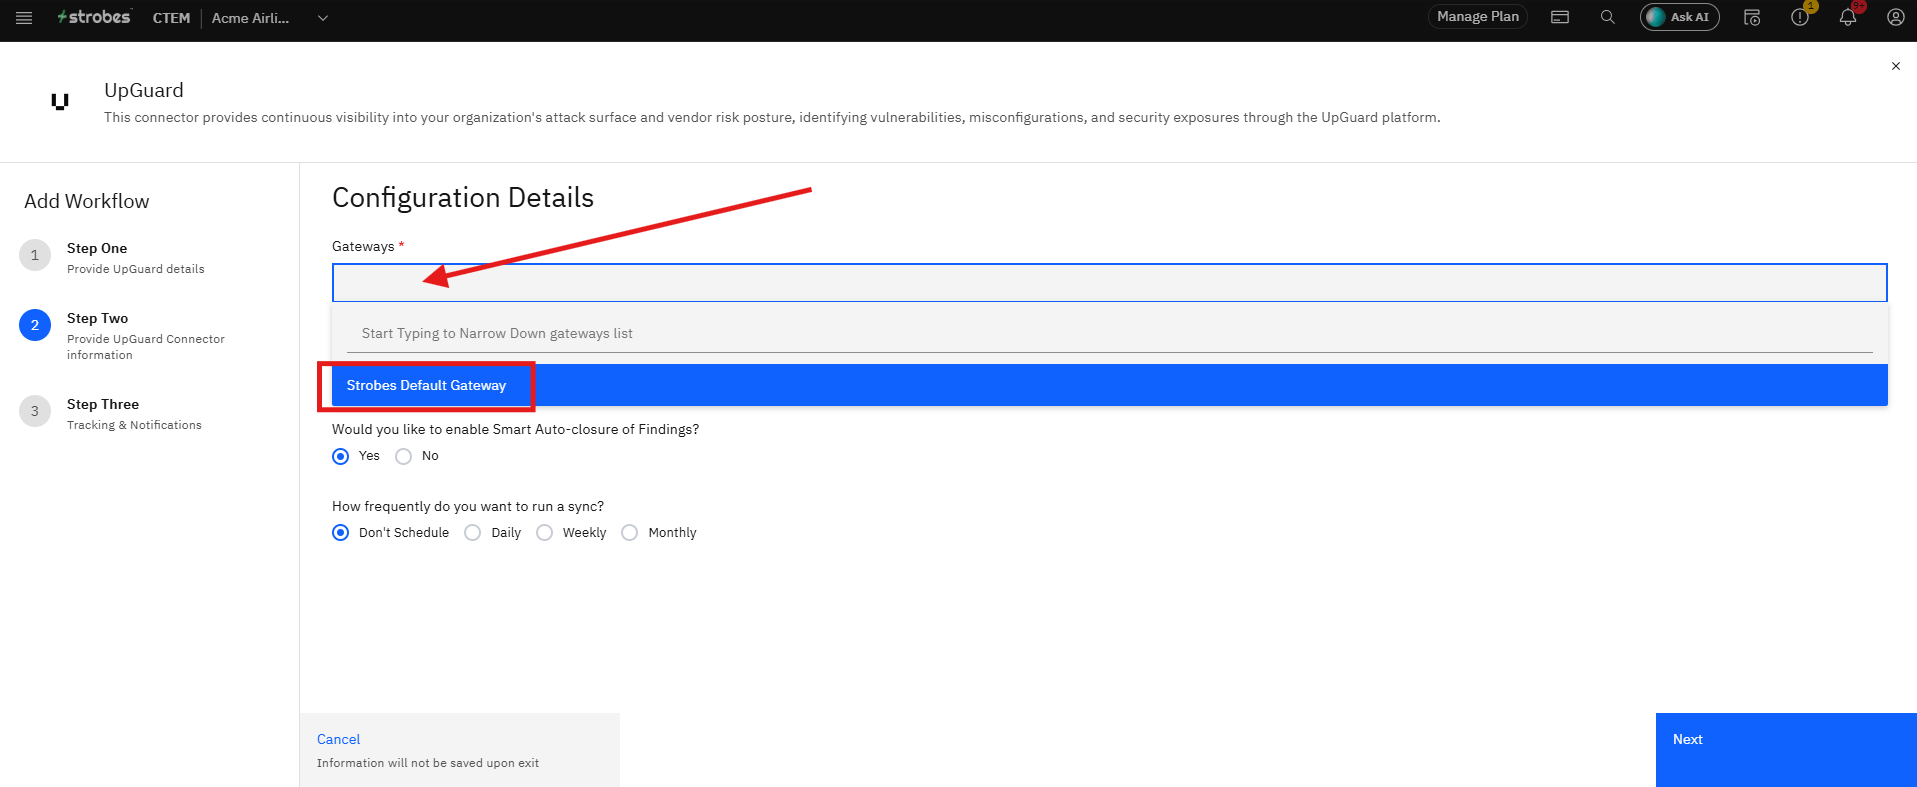
- Step 15 — Select a Gateway
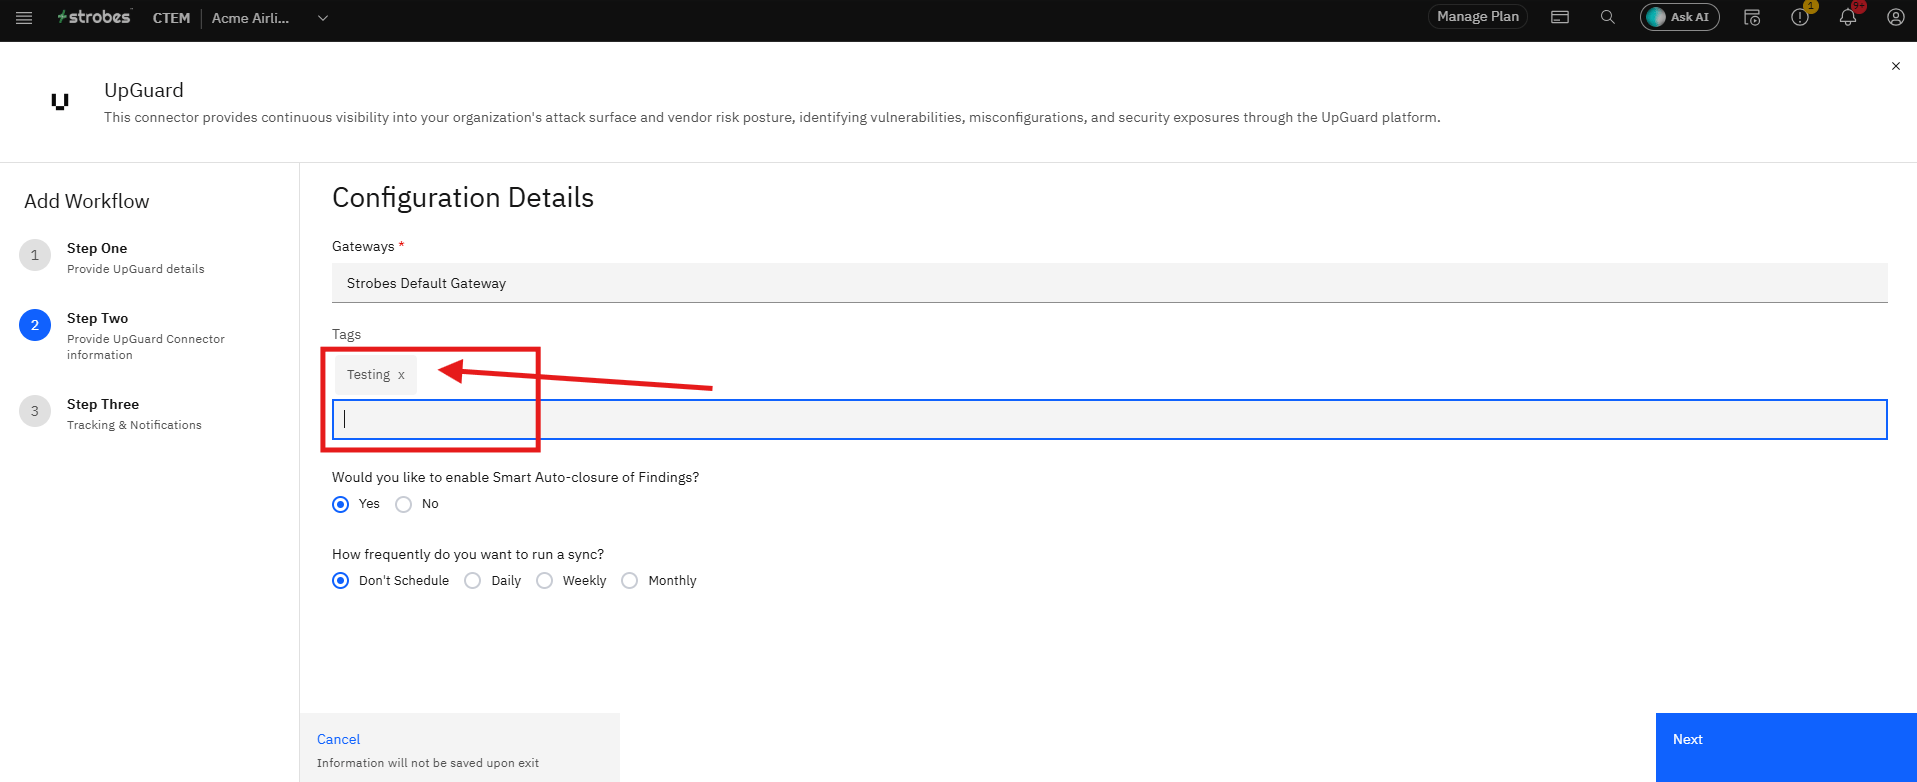
- Step 16 — Add Tags (Optional)
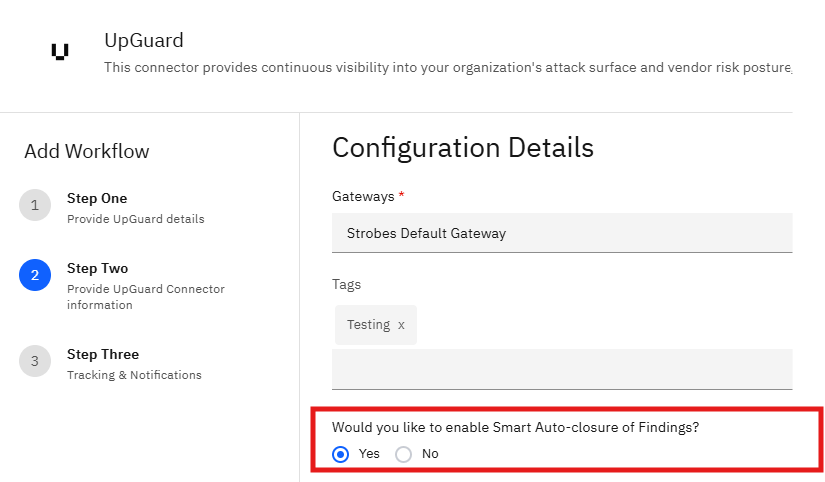
- Step 17 — Set Smart Auto-closure
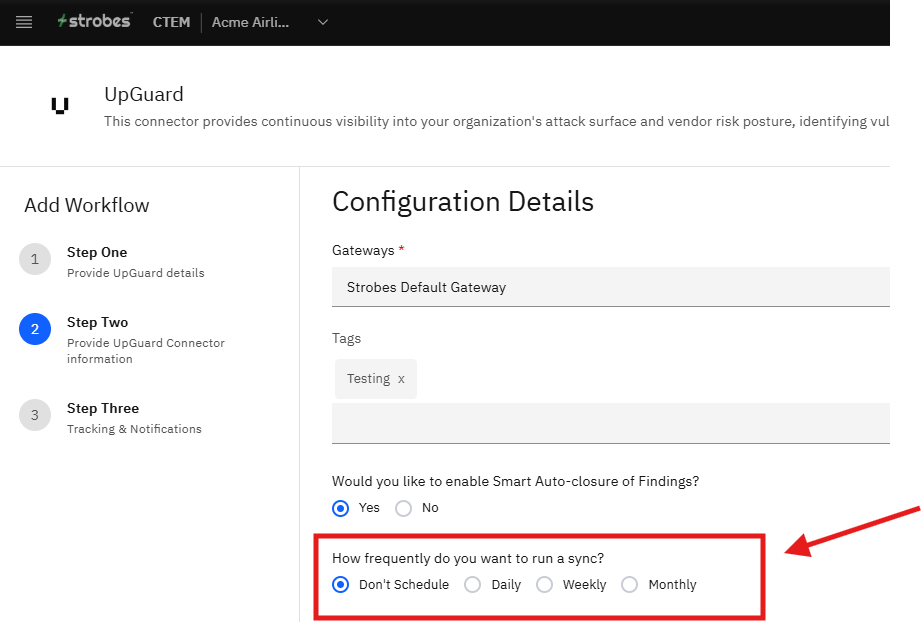
- Step 18 — Set Sync Frequency
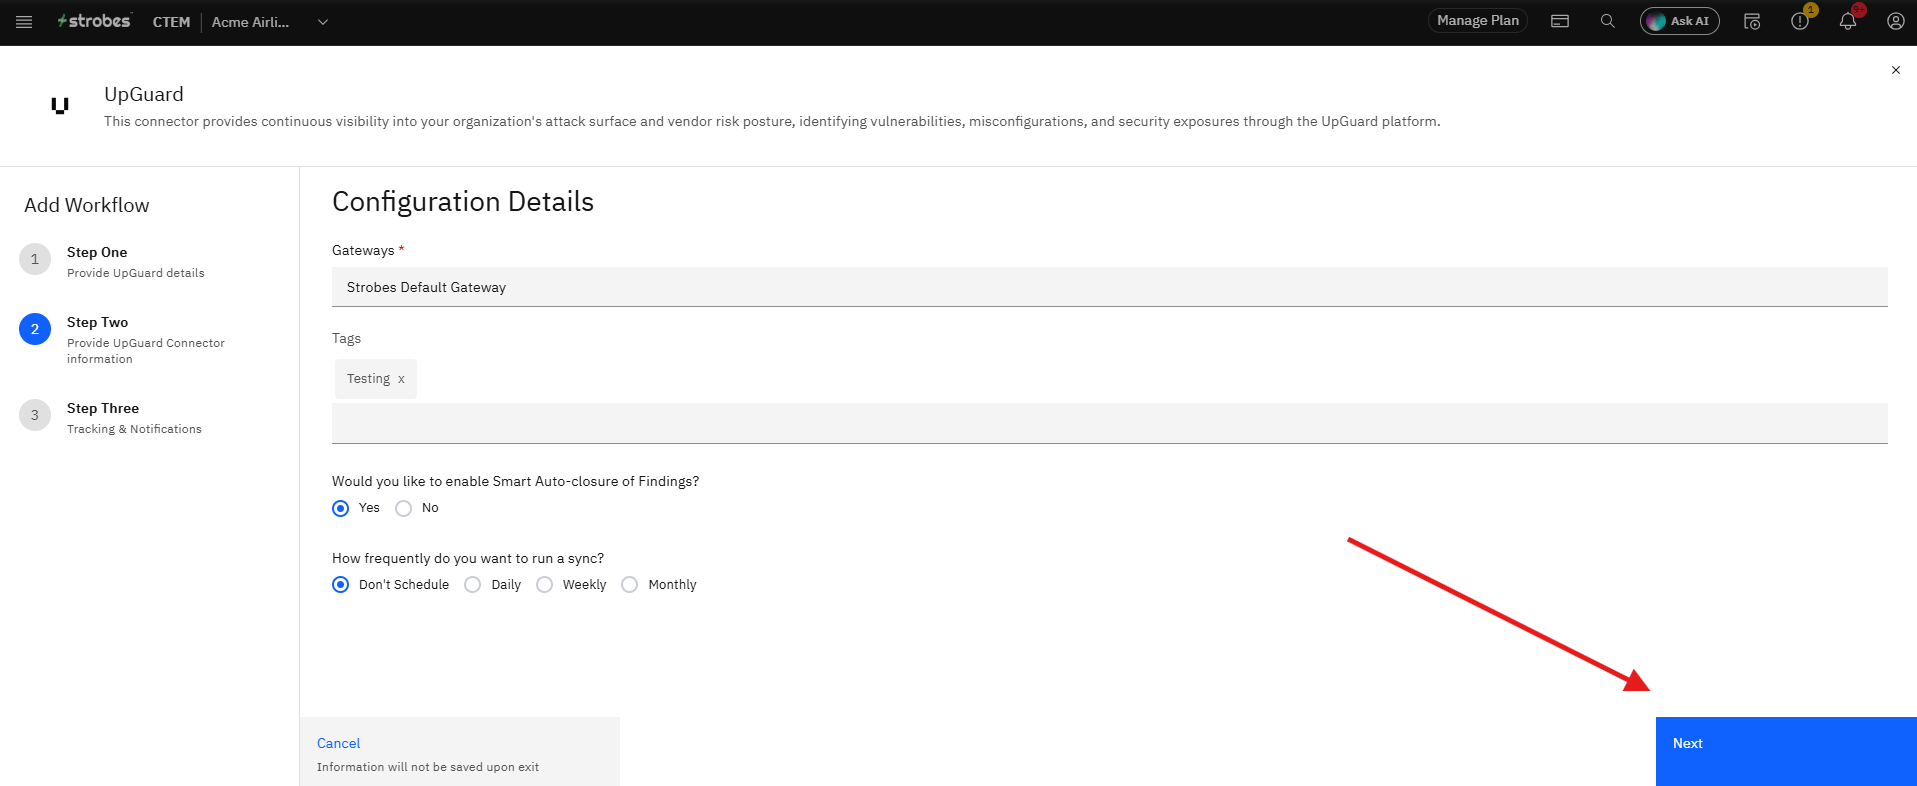
- Step 19 — Click Next to Proceed to Step Three
- Step 20 — Configure Trackers and Notifiers (Optional)
- Step 21 — Click Submit
- Step 22 — Initiate the First Sync
- Tips
Overview
The UpGuard connector pulls your organization's internet-facing domains and the CVE-based vulnerabilities UpGuard has found on them directly into Strobes as assets and findings. Once configured, Strobes automatically imports active domains and their associated vulnerabilities so your security team can track, prioritize, and remediate external exposure in one place without switching between platforms.
The connector is read-only on the UpGuard side. It never modifies data in UpGuard; it only reads domains and vulnerabilities. The only credential required is an UpGuard API key; there is no scanner or agent to install.
Supported Version
Cloud-based (SaaS)
Strobes connects to UpGuard over the UpGuard cyber risk API (cyberrisk.upguard.com). No on-premises installation or separate version tracking is required — the integration works with the current UpGuard SaaS environment. Both Strobes and the gateway must have outbound HTTPS access to cyberrisk.upguard.com for the integration to function.
UpGuard Connector Details
Field | Details |
|---|---|
Supported products | UpGuard |
Category | Attack Surface Management (ASM) |
Ingested asset type(s) | Domains (internet-facing hosts) |
Integration type | Unidirectional — data is read from UpGuard and imported into Strobes; nothing is written back to UpGuard |
Supported version and type | Cloud-based (SaaS) — latest |
Before You Start
Three things must be in place before creating the UpGuard connector in Strobes:
- UpGuard API key — Generated from your UpGuard account under Settings → API Keys. This is the only credential field.Steps to Generate an API Key in UpGuard
- Log in to UpGuard: Sign in to your UpGuard account.
- Open Settings: Click the Settings icon in the top-right corner of the dashboard.
- Navigate to the API tab: Locate and open the API section under Settings.
- Create an API key: Click Create new API key to generate a new key.
- Copy the API key: Copy the generated key and store it securely.
- Configure the integration: Use the API key in Strobes when setting up the UpGuard connector.
- Active gateway in Strobes — The gateway, not Strobes directly, makes the calls to UpGuard. An active gateway must exist before creating the configuration.
- Network access — Both Strobes (for API key validation) and the gateway (for syncing) must be able to reach
cyberrisk.upguard.comover HTTPS.
Required Credentials
- API Key — A key generated from your UpGuard account under Settings → API Keys. Paste it directly — the field is masked. Strobes tests the key against the UpGuard API when it is saved and rejects it if the test fails.
No username, secret key, or additional credential fields are required.
What Data Comes into Strobes
Assets
Every domain UpGuard marks as active is imported as a network asset in Strobes, named after its hostname. UpGuard labels on the domain become tags on the asset in Strobes. Inactive domains are skipped. If a vulnerability references a hostname not in the active domain list, Strobes creates the asset from the vulnerability record, using the first IP address and the CPEs provided.
Findings
Findings are imported for every CVE found on an active hostname. Only CVE-based vulnerabilities are imported; UpGuard risk scores, vendor risk data, and non-CVE risks such as misconfigurations are not brought into Strobes.
Each finding is mapped as follows:
UpGuard field | Strobes field | Notes |
|---|---|---|
CVE id | Title and CVE | Records with no CVE id are skipped |
CVE description | Description | Falls back to the CVE id when empty |
CVE severity (CVSS score) | CVSS score and Severity | See severity table below |
hostname | Asset | Records with no hostname are skipped |
| Tag: | |
is true | Tag: | |
CVE EPSS | Tag: | Only when UpGuard provides it |
Severity mapping. Strobes maps the CVSS score from UpGuard to its own severity scale. A missing score is treated as Medium.
CVSS score | Strobes severity |
|---|---|
9.0 – 10.0 | Critical |
7.0 – 8.9 | High |
4.0 – 6.9 | Medium |
Above 0 and below 4.0 | Low |
0 | Info |
How Status Is Kept in Sync
Every sync is a full pull: the gateway reads all active domains and all vulnerabilities from UpGuard, page by page, and Strobes imports the results. Findings are matched on CVE plus hostname — a repeat sync updates existing findings rather than creating duplicates. Assets that already exist in Strobes are matched and merged rather than added again.
- If Smart Auto-closure is enabled, Strobes automatically closes a finding when a later sync no longer reports it from UpGuard.
- If Smart Auto-closure is disabled, findings remain open in Strobes until manually closed.
Sync progress is reported in stages: sync started → sync in progress → sync complete → parsing complete → scan complete. After each run, the connector's Quick Stats show newly added assets, total assets, newly added findings, total findings, and the last synced time.
Part 1 — Save the UpGuard Credential in Strobes
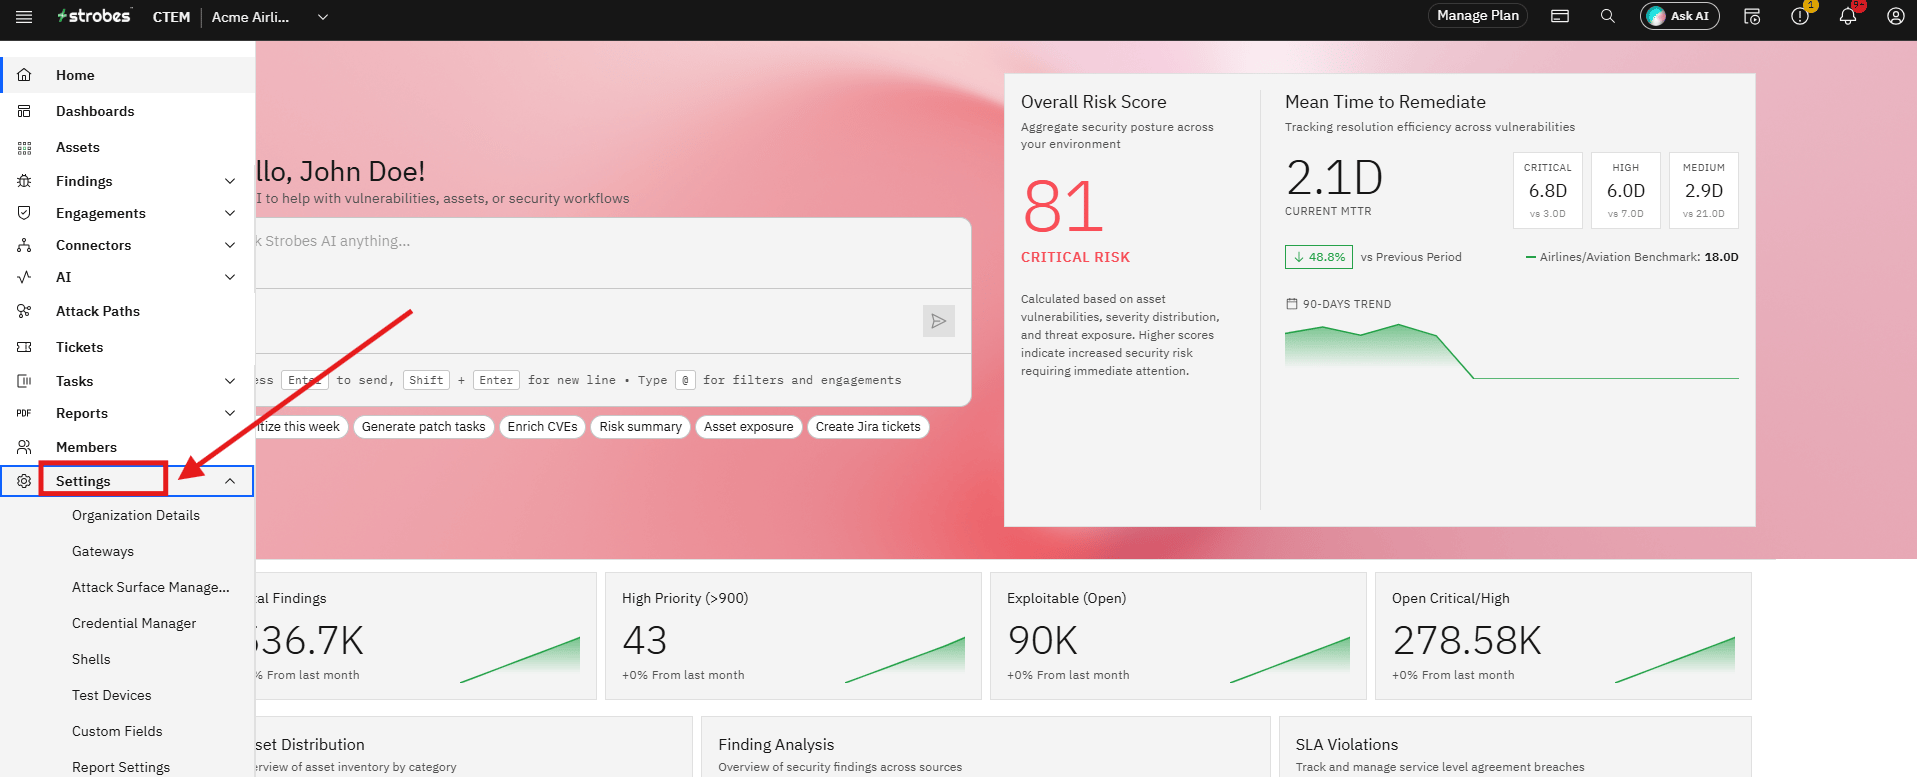
Step 1 — Open Settings
Click Settings in the left sidebar. The Settings section opens with a submenu of configuration options.
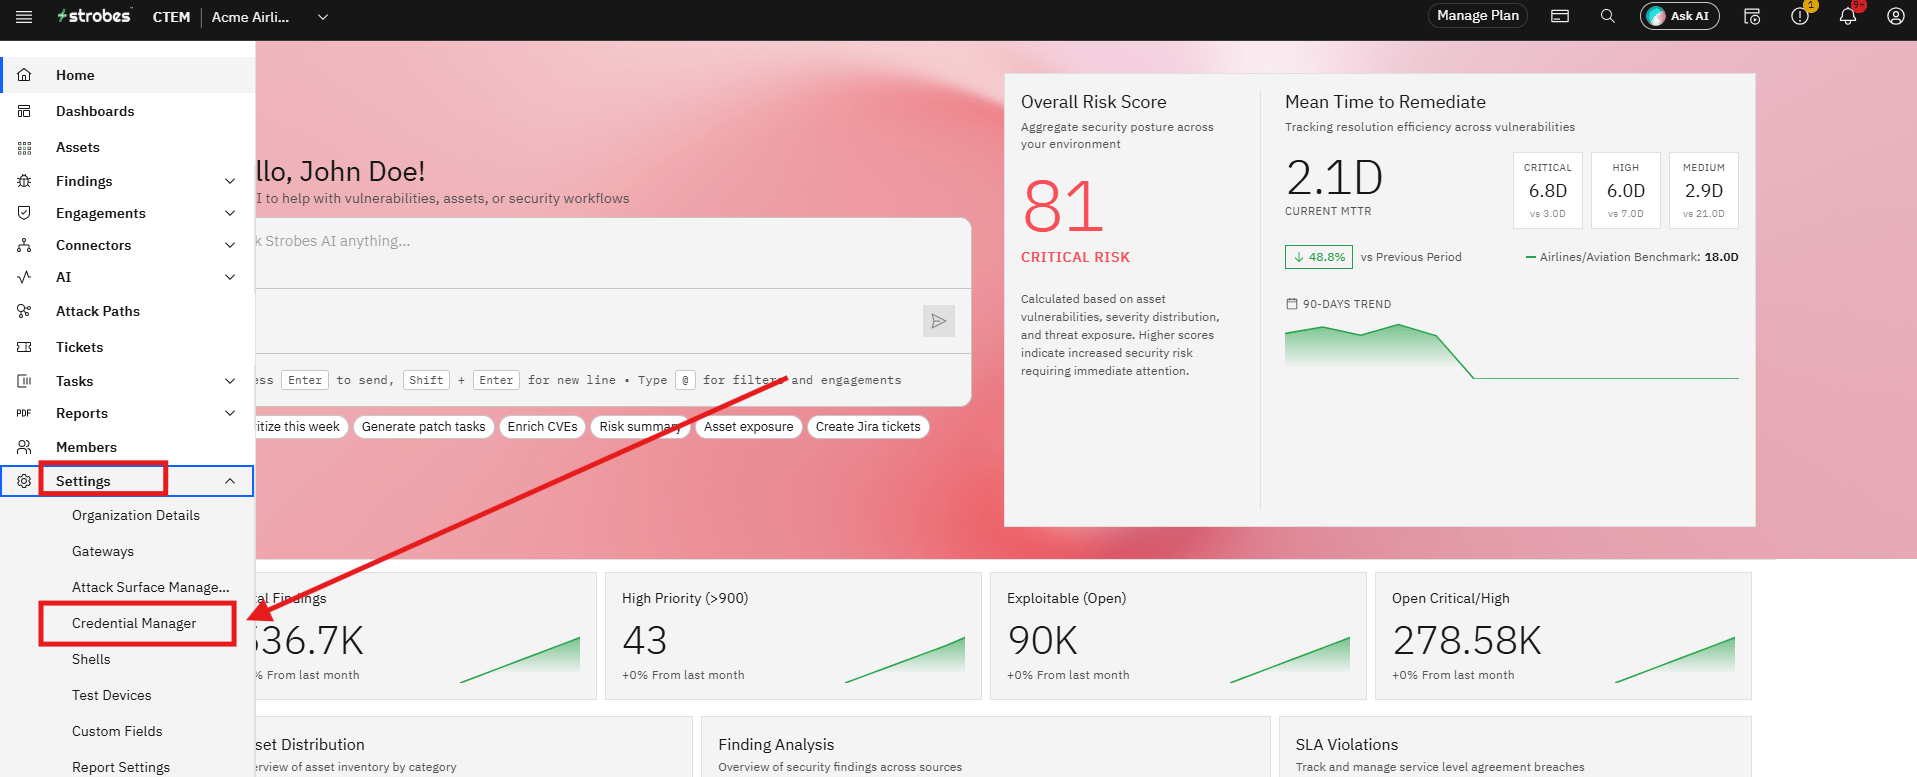
Step 2 — Click Credential Manager
Click Credential Manager in the Settings sidebar. The Credential Manager page opens, listing existing credentials and an option to add new ones.
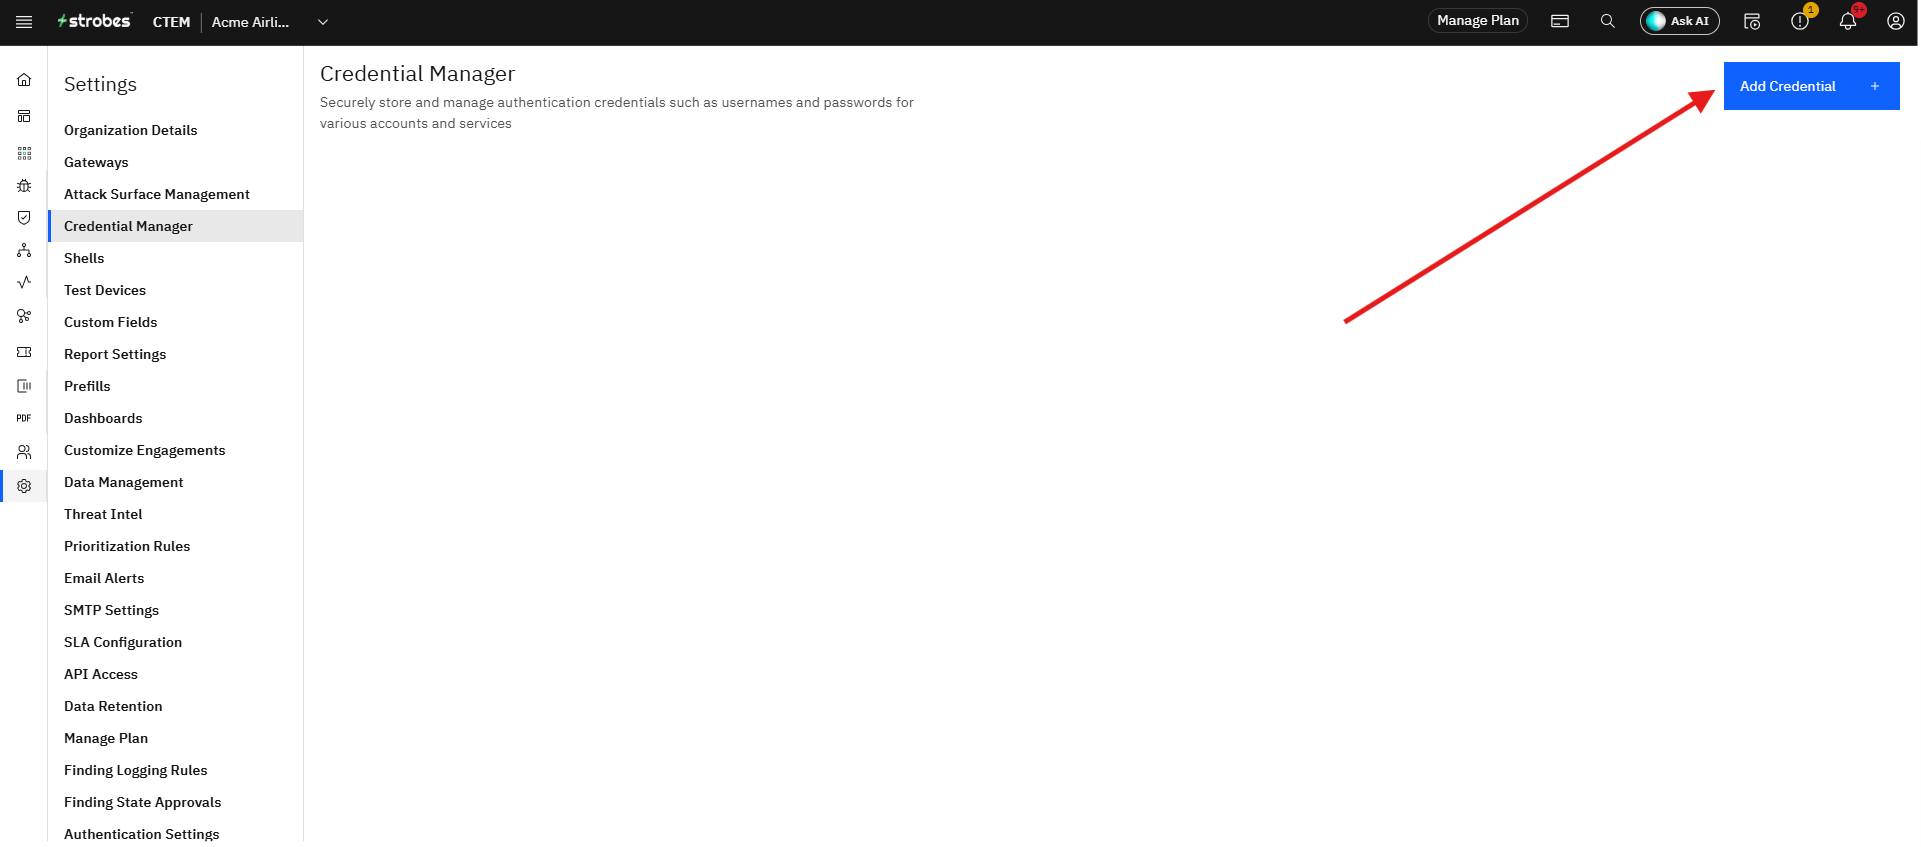
Step 3 — Click Add Credential
Click the Add Credential button. The Add Credential form opens.
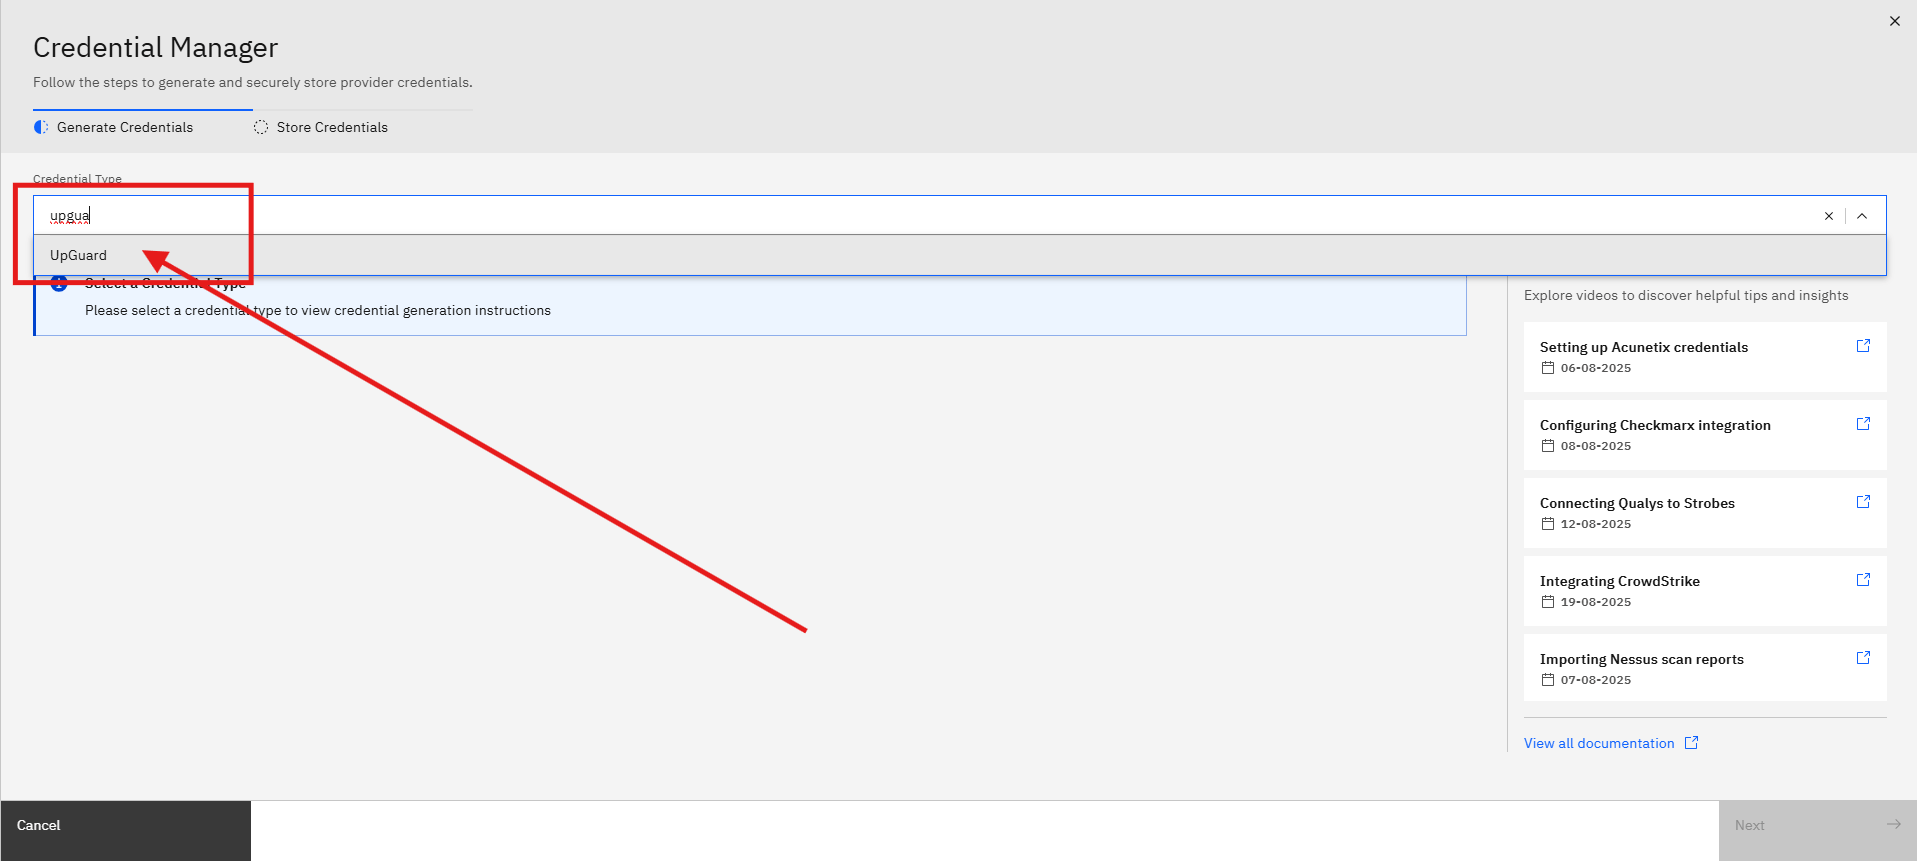
Step 4 — Select UpGuard as the Credential Type
Click the Credential Type dropdown and select UpGuard. The form updates to show the UpGuard-specific fields: Name and API Key.
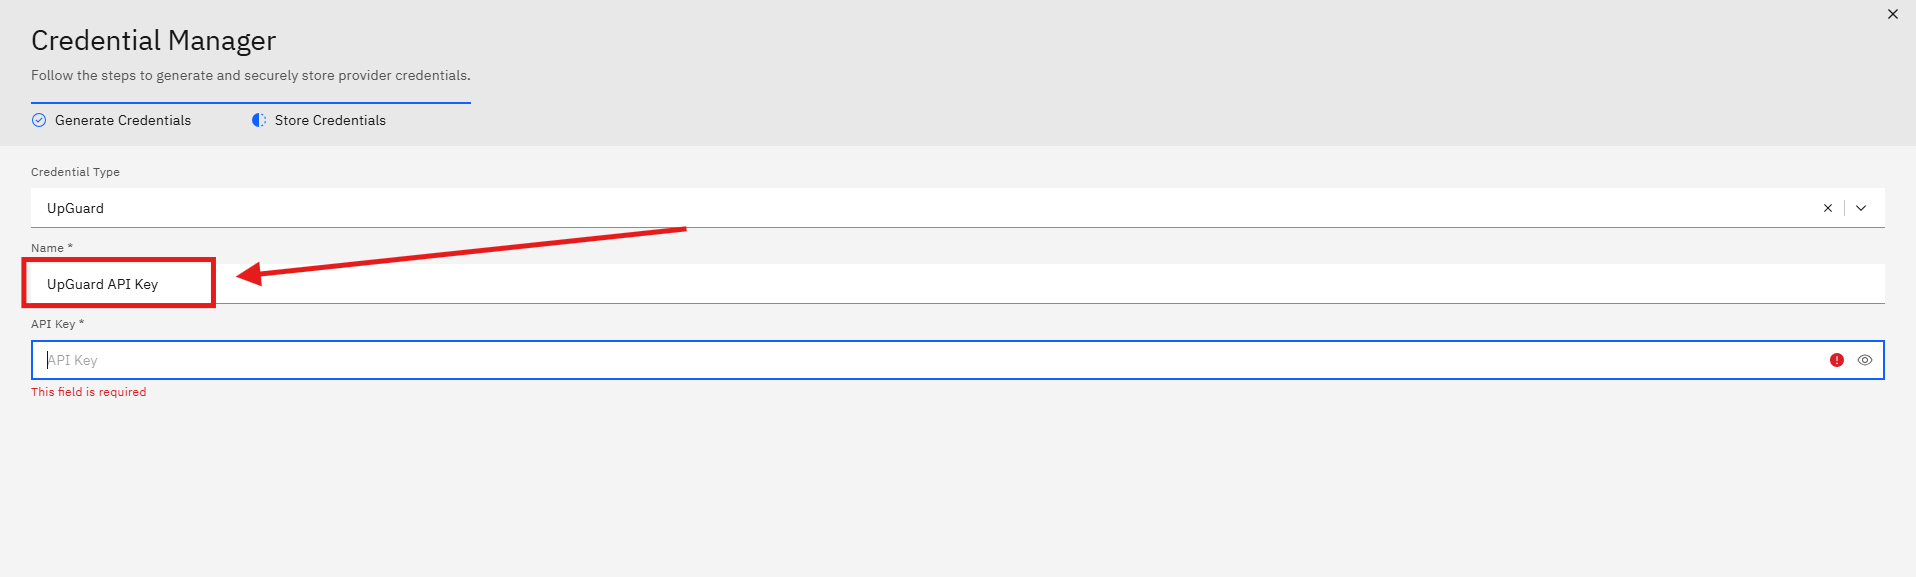
Step 5 — Enter a Name for the Credential
Click the Name field and type a name for this credential — for example, UpGuard API Key. This name appears in connector configuration dropdowns inside Strobes.
Step 6 — Paste the API Key
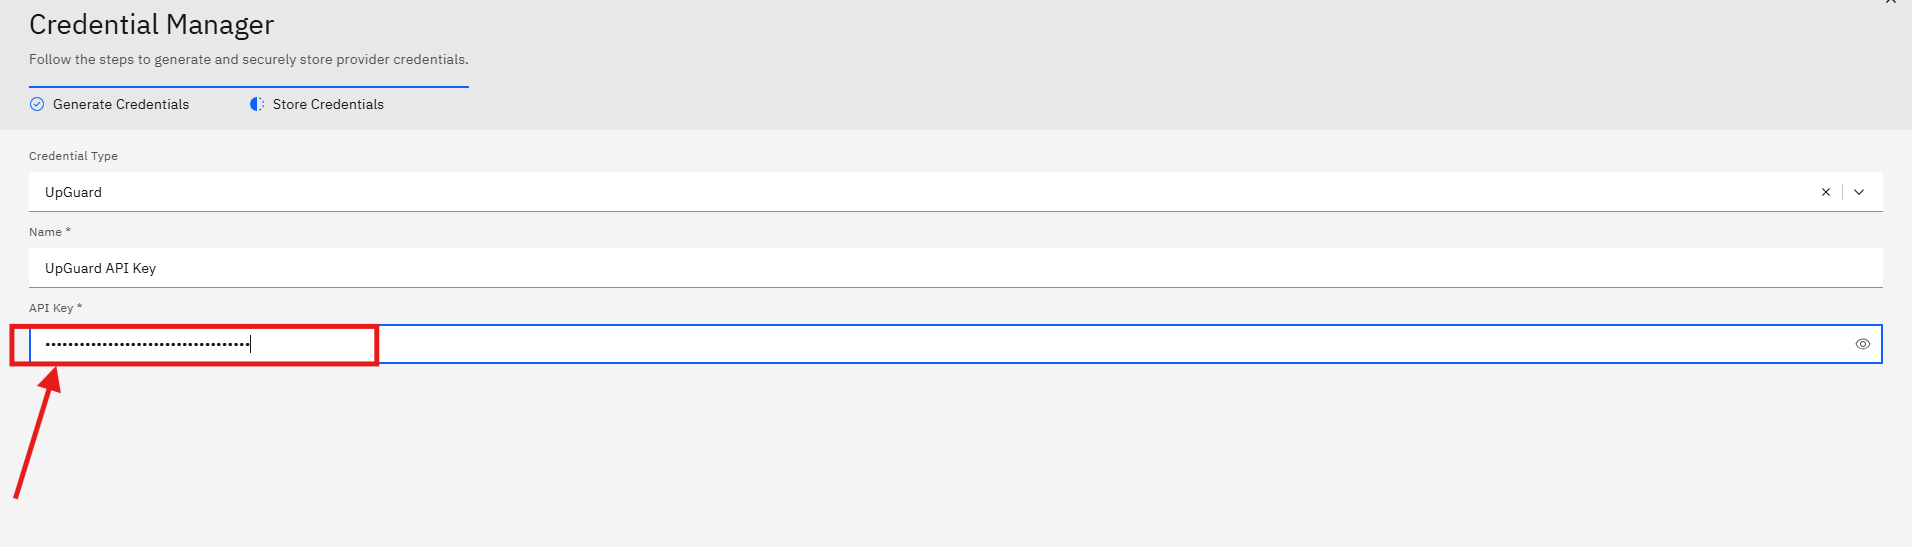
Click the API Key field and paste the API key you copied from UpGuard. The field is masked by default. Click the eye icon to reveal the value if you need to verify it before saving.
Step 7 — Click Save
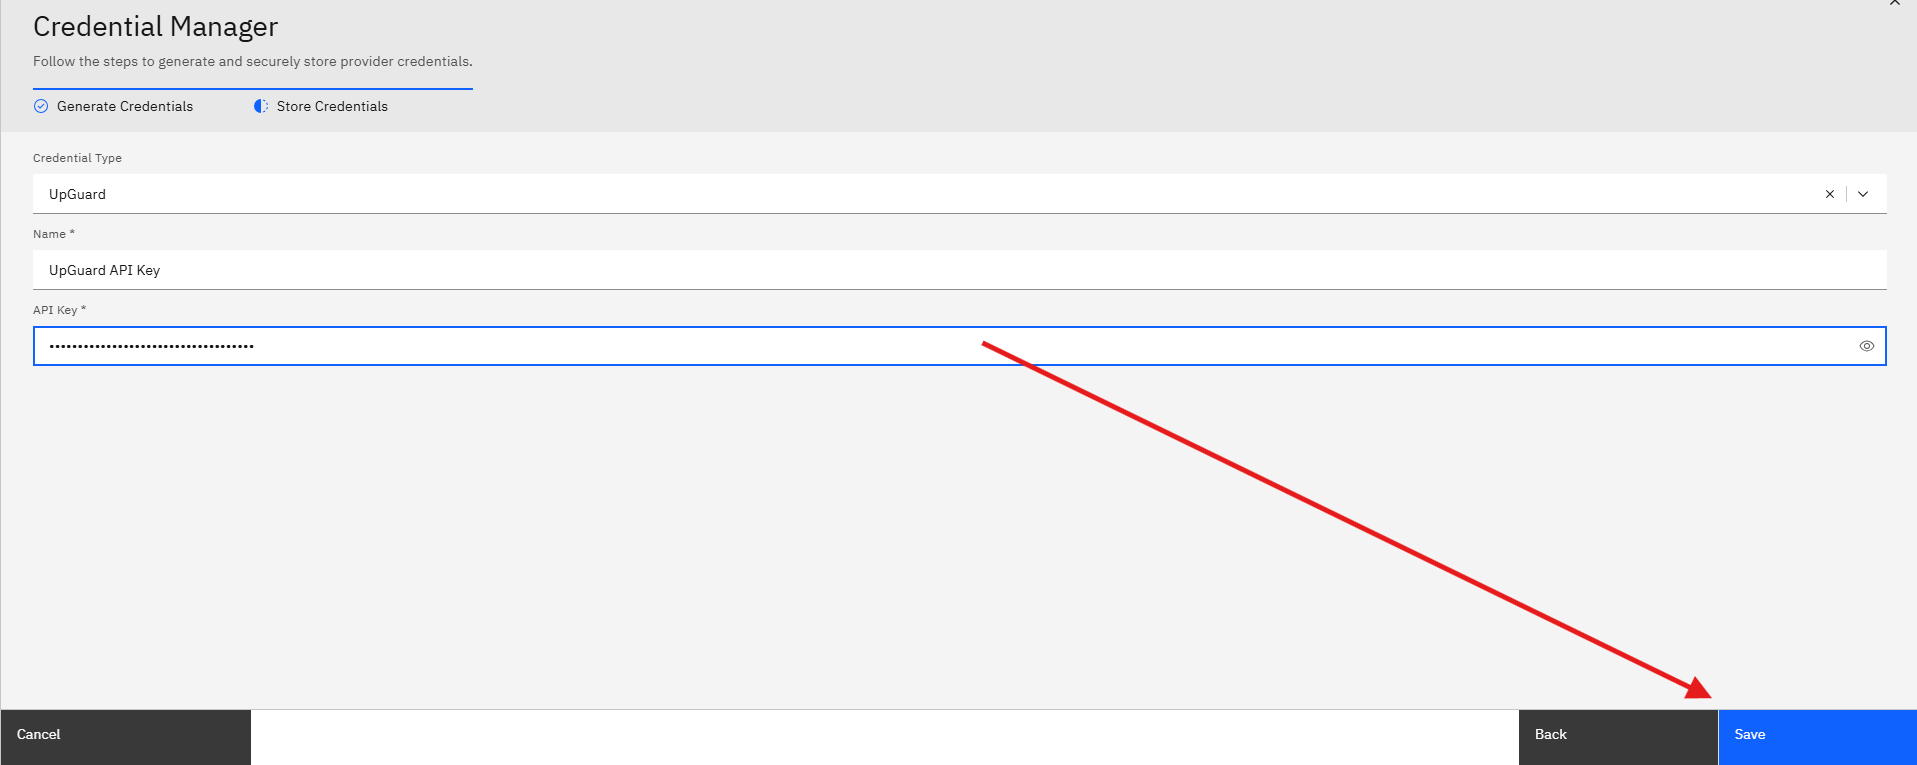
Click Save. Strobes calls the UpGuard API to validate the key. If the key is accepted, the credential is saved and becomes available in the connector configuration wizard.
Part 2 — Configure the UpGuard Connector in Strobes
Step 8 — Navigate to Connectors
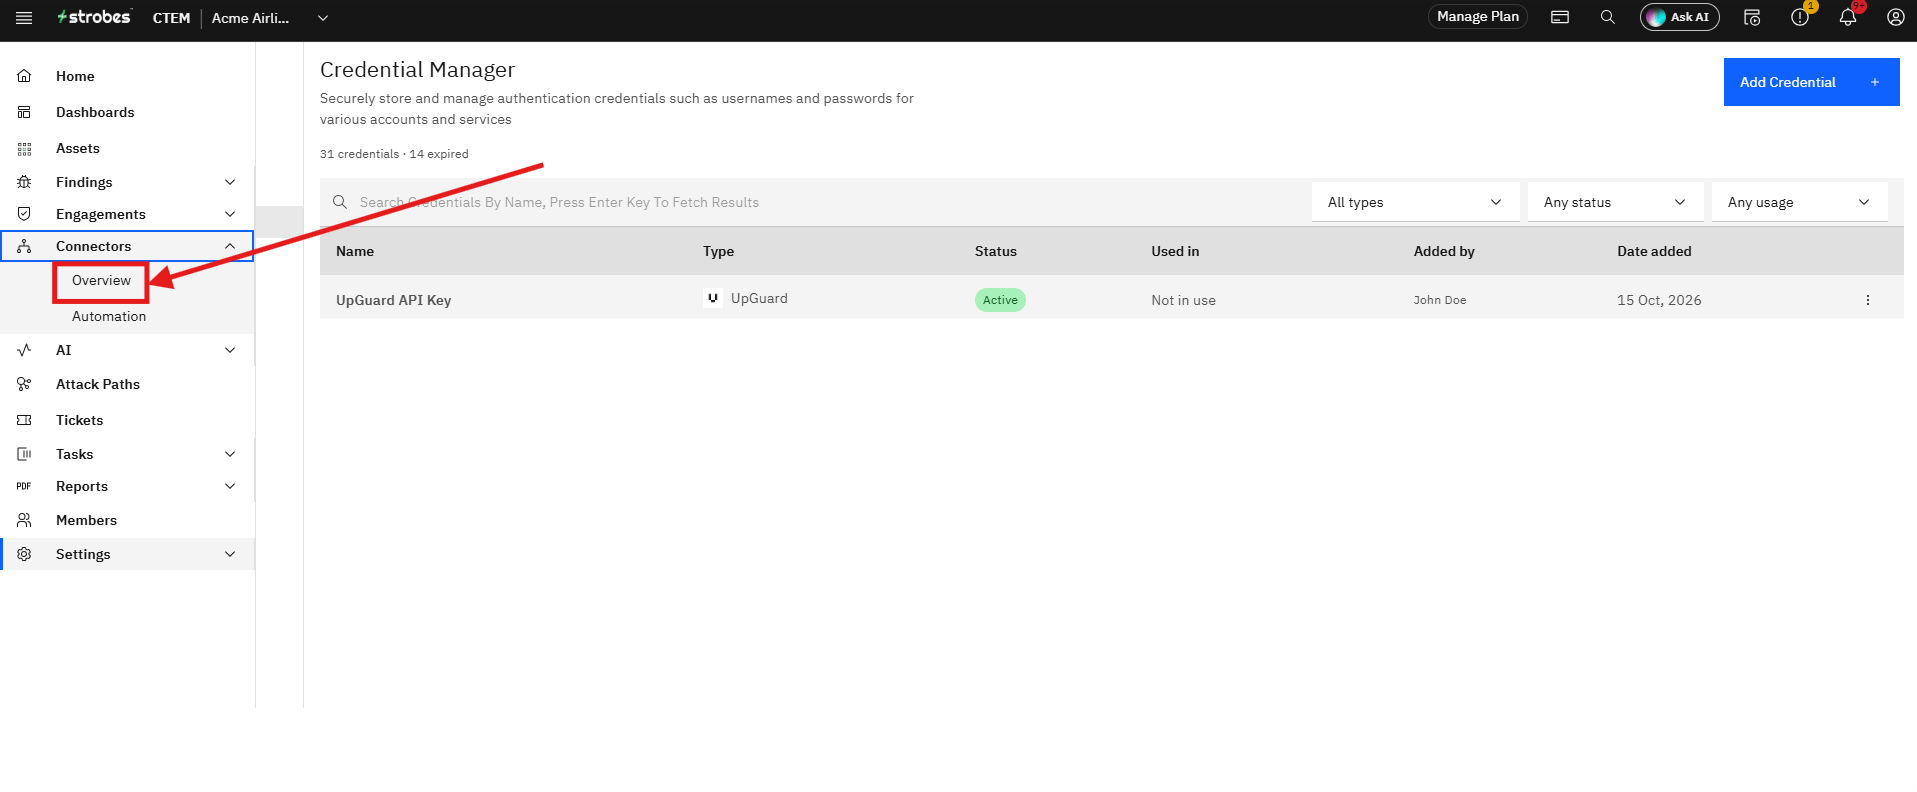
Click Connectors in the left sidebar. The Connectors page opens, listing all available and installed connectors.
Step 9 — Search for UpGuard
Click the search field and type upguard. The UpGuard connector card appears. The card description reads: "This connector provides continuous visibility into your organization's attack surface and vendor risk posture, identifying vulnerabilities, misconfigurations, and security exposures through the UpGuard platform."
Step 10 — Click Add Configuration
Click the Add Configuration link on the UpGuard card. The Add Workflow wizard opens at Step One; Configuration Details.
Step 11 — Enter a Configuration Name
Click the Configuration Name field and type a name for this configuration — for example, UpGuard Production. A green "Config name is available!" confirmation appears below the field once a valid name is entered.
Step 12 — Select the UpGuard Credential
Click the Select UpGuard Credential dropdown and select the credential saved in Part 1. If you skipped Part 1, click Create Credential in the dropdown to create one inline — enter a name and paste the API key, then click Add.
Step 13 — Select the Baseline
Select the Baseline that controls which severity findings are imported:
Option | What it imports |
|---|---|
Strict | Findings of all severity levels (default) |
High | Critical and High severity findings only |
Click the radio button next to your preferred option.
Step 14 — Click Next to Proceed to Step Two
Click Next. The wizard advances to Step Two — Connector Information.
Step 15 — Select a Gateway
Click the Gateways field and select the gateway that will make calls to UpGuard. For most setups, select Strobes Default Gateway. A gateway must be active before this step — if the list is empty, set up or activate a gateway first under Gateways in Settings.
Step 16 — Add Tags (Optional)
Click the Tags field and type any tags to apply to assets and findings imported from this configuration. Leave blank if tagging is not needed.
Step 17 — Set Smart Auto-closure
Click the radio button for your preferred Smart Auto-closure setting:
- Yes — Strobes automatically closes findings that a later sync no longer reports from UpGuard.
- No — Findings remain open until manually closed.
Step 18 — Set Sync Frequency
Click the radio button for how frequently Strobes should sync with UpGuard:
Option | Behavior |
|---|---|
Don't Schedule | Manual syncs only |
Daily | Automatic sync once per day |
Weekly | Automatic sync once per week |
Monthly | Automatic sync once per month |
Step 19 — Click Next to Proceed to Step Three
Click Next. The wizard advances to Step Three — Tracking & Notifications.
Step 20 — Configure Trackers and Notifiers (Optional)
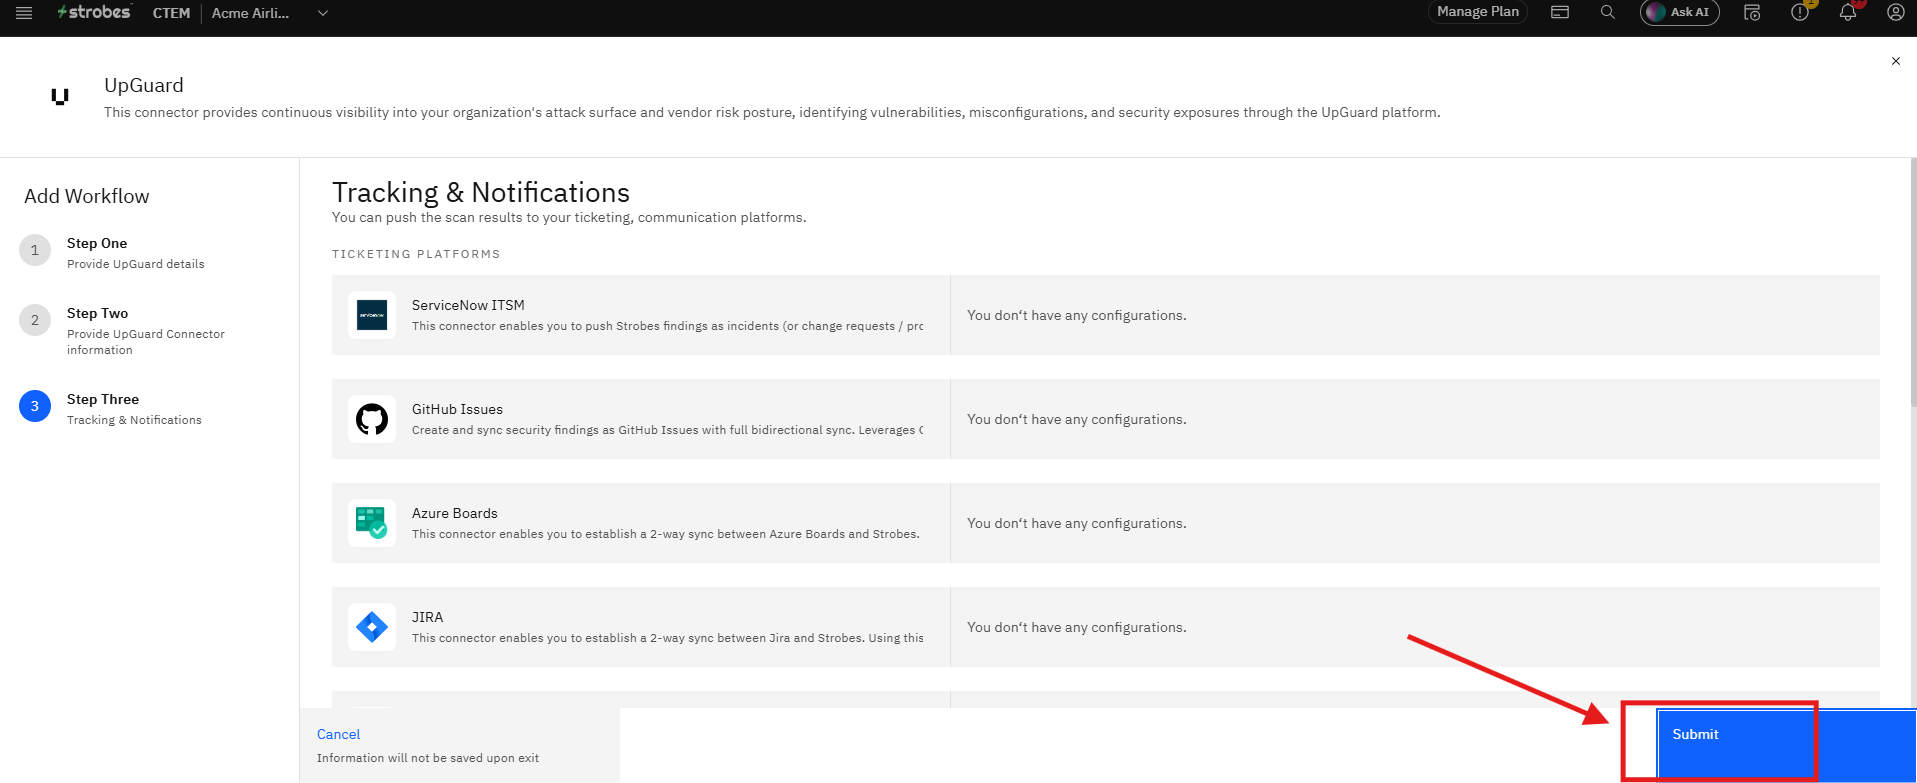
Connect any trackers or notifiers to receive alerts or create tickets when UpGuard findings sync into Strobes. You can also enable a CSV report to be sent with each sync summary. Leave this step blank if you do not need notifications.
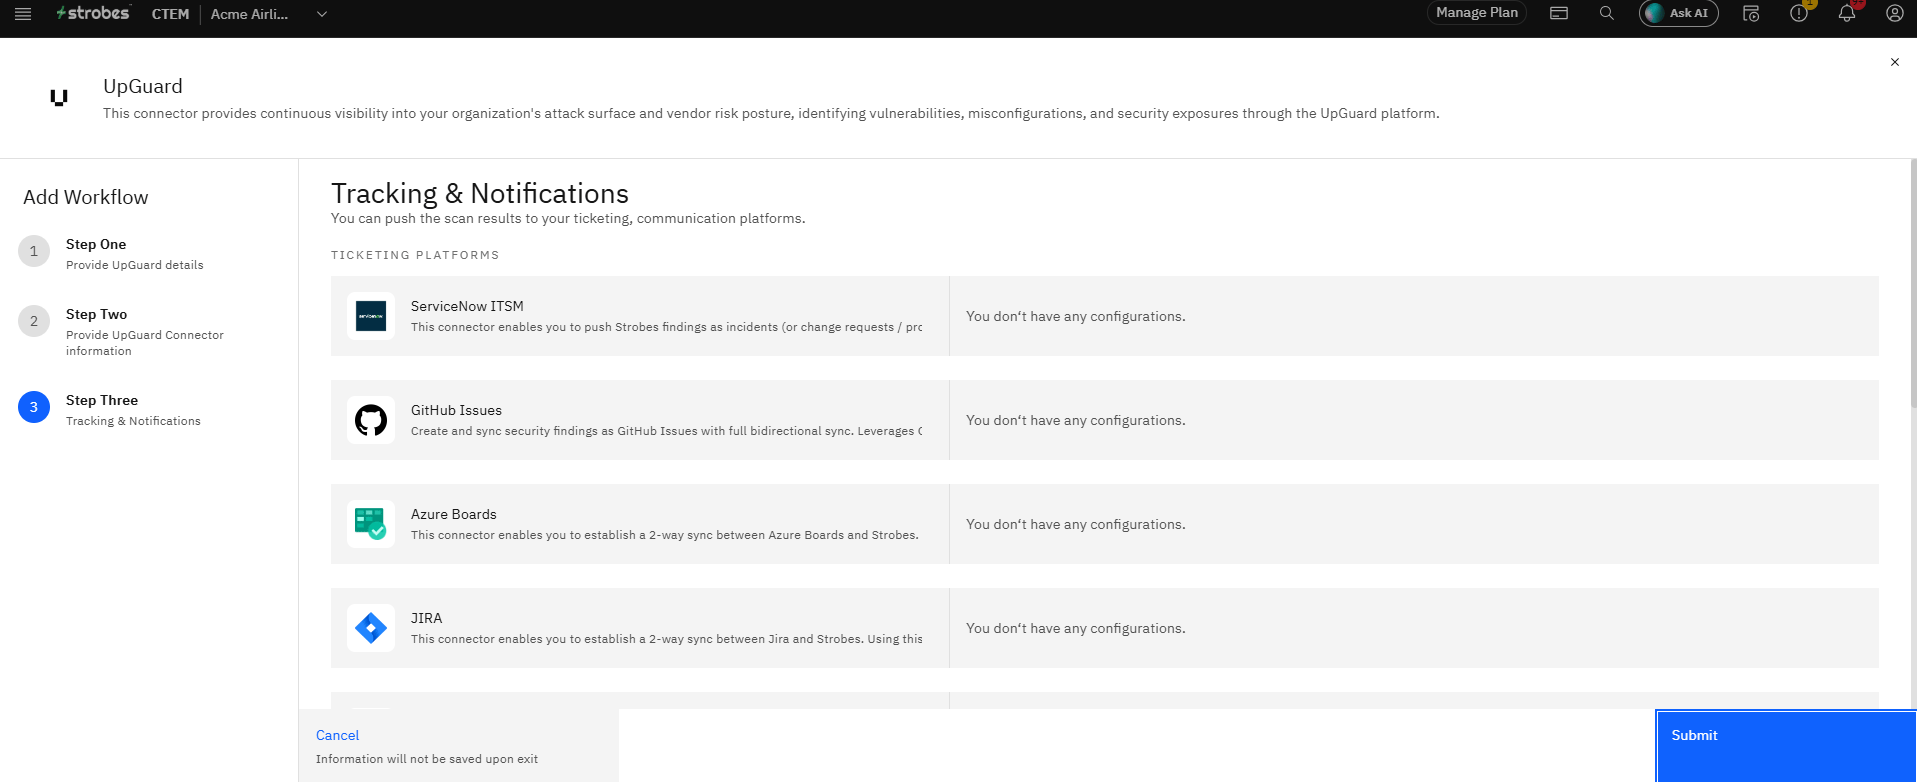
Step 21 — Click Submit
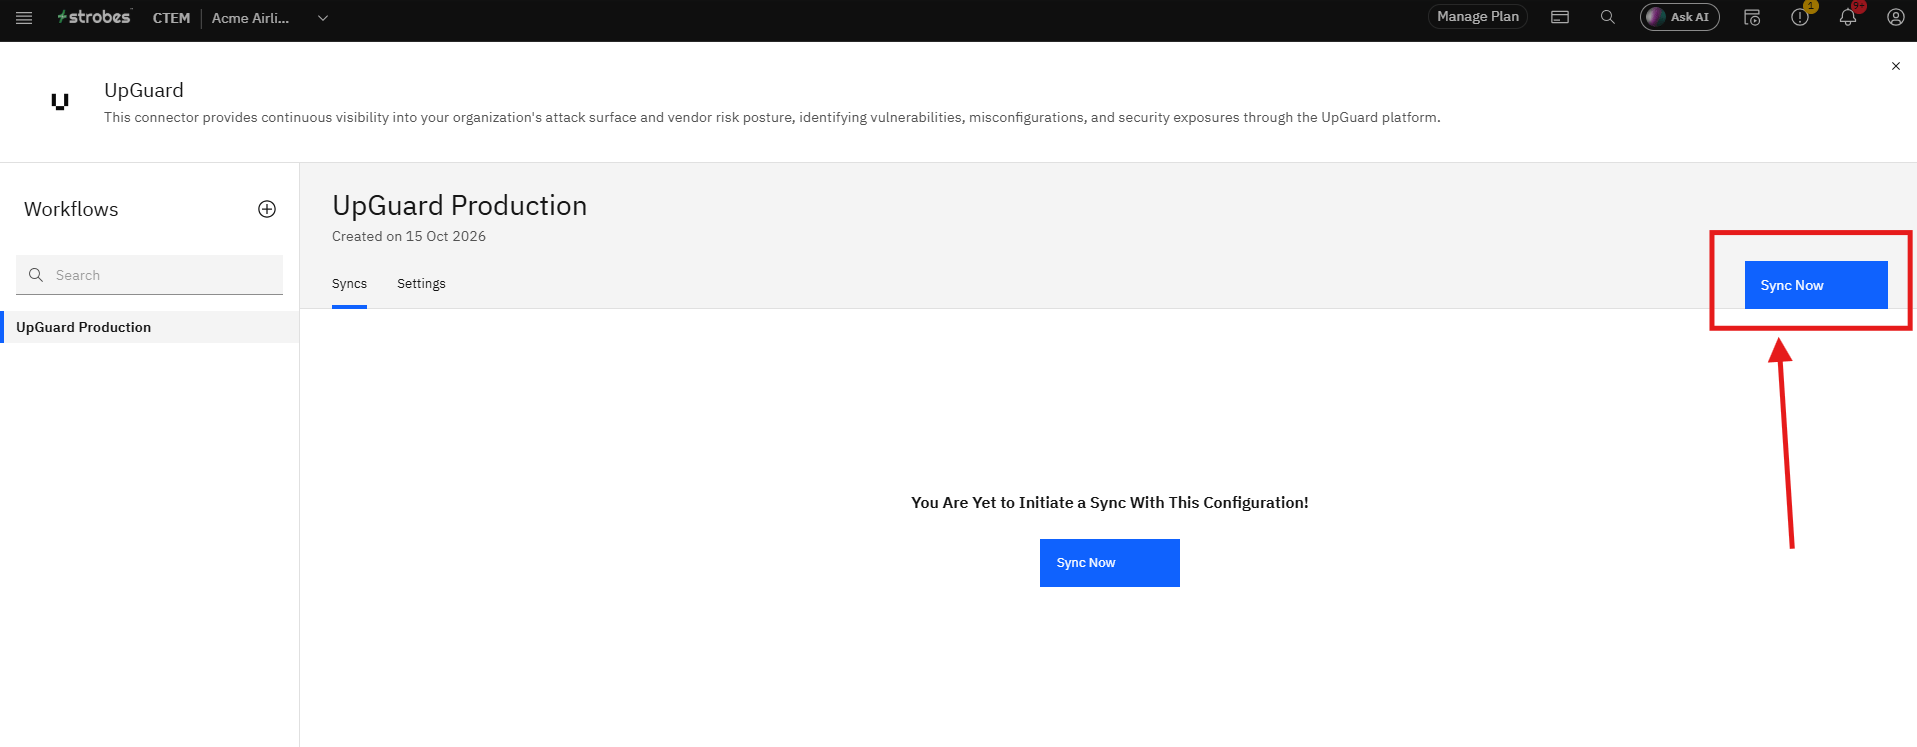
Click Submit to complete the wizard. Strobes saves the configuration and opens the UpGuard Workflows page, where your new configuration appears in the left panel.
Step 22 — Initiate the First Sync
Click Sync Now on the Workflows page to start the first sync. The page updates to show Sync Stats with the sync start time and current status. Sync progress moves through: sync started → sync in progress → sync complete → parsing complete → scan complete.
Tips
UpGuard imports only CVE-based vulnerabilities. Risk scores, vendor risk data, and non-CVE findings such as misconfigurations are not imported. If a finding appears in UpGuard but not in Strobes, it is likely because it has no associated CVE.
If you see fewer findings than in UpGuard, check the Baseline setting first. With Baseline set to High, only Critical and High findings are imported — Medium, Low, and Info findings are filtered out. Switch to Strict if you need full visibility.
Use a dedicated service account in UpGuard for API key generation. If the key is tied to a personal account and that account is deactivated, the integration will break. A dedicated API account avoids this dependency.
Re-syncing does not create duplicates. Findings are matched on CVE plus hostname, so a repeat sync updates existing findings and adds only new ones. Assets are matched and merged rather than duplicated.
Enable Smart Auto-closure to keep Strobes current with UpGuard resolutions. Without it, findings UpGuard no longer reports will remain open in Strobes until manually closed, which creates noise in your findings list.
Known exploited vulnerabilities are tagged automatically. Findings UpGuard marks as known exploited in the wild carry the known_exploited_vulnerability tag in Strobes. EPSS scores and verified status also appear as tags when UpGuard provides them.
If the gateway list is empty when creating the configuration, no active gateway exists for your organization. Set up or activate a gateway under Settings → Gateways before returning to the connector setup.
If the API key fails validation when saving, generate or copy a fresh key from UpGuard under Settings → API Keys and re-enter it in Strobes. Strobes rejects keys that UpGuard returns HTTP 401 or 403 for.
If a sync completes but imports no assets or findings, the gateway likely could not reach cyberrisk.upguard.com at the time of the sync. Confirm that outbound HTTPS access to that host is allowed from the gateway, then run the sync again.
Partial syncs are recoverable. If UpGuard stops responding mid-sync, Strobes keeps whatever was already fetched and marks the run as partial. Running the sync again normally fills in the gap.
More in Cloud, endpoint & inventory
Was this page helpful?