
Running a Red Team Engagement using Strobes AI
6 min readEdit
On this page⌄
- Overview
- Why Is It Needed?
- Prerequisites
- Choosing External or Internal
- Accessing the Red Team Engagement Template
- Configuring the Engagement Scope
- Step 1: Choose the Deployment Type
- Step 2: Provide a Workspace Name
- Step 3: Define the Scope and Rules of Engagement
- Step 4: Set the Objective (Optional)
- Step 5: Attach Rules of Engagement or Recon Material (Optional)
- Step 6: Add Credentials (Optional)
- Step 7: Proceed to Configuration
- Configuring the Run
- Step 8: Select an AI Model
- Step 9: Select the Execution Shell
- Step 10: Review the Browser
- Step 11: Select the Execution Mode
- Step 12: Select the Schedule
- Step 13: Click Next
- Step 14: Review and Launch the Workspace
- Tips
Overview
A Red Team Engagement in Strobes simulates a real attacker against your organization, from the first reconnaissance to the final objective. An AI agent gathers open-source intelligence (OSINT), attempts initial access, moves laterally, escalates privileges, and tries to reach a goal you define, such as a crown jewel system.
Every successful technique is documented with evidence and mapped to MITRE ATT&CK, and the engagement shows where your security controls failed to detect or block the attack. You receive attack findings with evidence mapped to MITRE ATT&CK, a list of detection gaps, and a report with the full attack story and a roadmap for improving your defenses. The engagement follows MITRE ATT&CK, the Cyber Kill Chain, and PTES. It typically takes 4 to 12 hours.
Why Is It Needed?
Vulnerability scans show what is weak. A red team engagement shows what an attacker can actually achieve, and whether your defences notice. Running one regularly helps you test your detection and response capabilities end to end, find the attack paths that matter most, and prioritize improvements based on real results.
The agent validates findings before submitting them, so your team works on proven issues instead of theoretical ones. It is a good fit for testing detection and response end to end, validating your defences against a realistic attack, and security programs that need more than a vulnerability scan.
Prerequisites
Before you start, make sure you have:
- Access to Strobes AI Workspaces: You must have access to AI Workspaces in your organization.
- Enough AI Credits: Each run uses AI credits. This is a long, multi-phase engagement, so plan for higher usage.
- Written authorization: Make sure you are authorized to run an adversarial simulation against the targets.
- A defined scope: The in-scope domains, IPs, or internal segments, any blackout windows, and any systems that must not be touched.
- An objective: The goal of the engagement, such as accessing a customer database or reaching Domain Admin.
- A Bridge shell (internal engagements only): A Bridge shell running inside your network.
Choosing External or Internal
The first choice in the wizard is the deployment type. It decides where the attack starts from.
External | Internal | |
|---|---|---|
Where the agent runs | Strobes cloud sandbox | A Bridge shell inside your network |
What it simulates | An attacker on the internet | An attacker who is already inside, such as through a compromised device or a malicious insider |
What it can reach | Internet-facing domains and IPs | Internal network segments and systems behind your firewall |
Setup | Nothing to install | Requires a Bridge shell running inside your network |
Choose it when | You want to test how far an outsider can get through your public attack surface | You want to test what happens after a breach, such as lateral movement toward Domain Admin or internal file shares |
If you are not sure, start with External to test your perimeter. Run Internal when you want to know how far an attacker could go once inside.
Accessing the Red Team Engagement Template
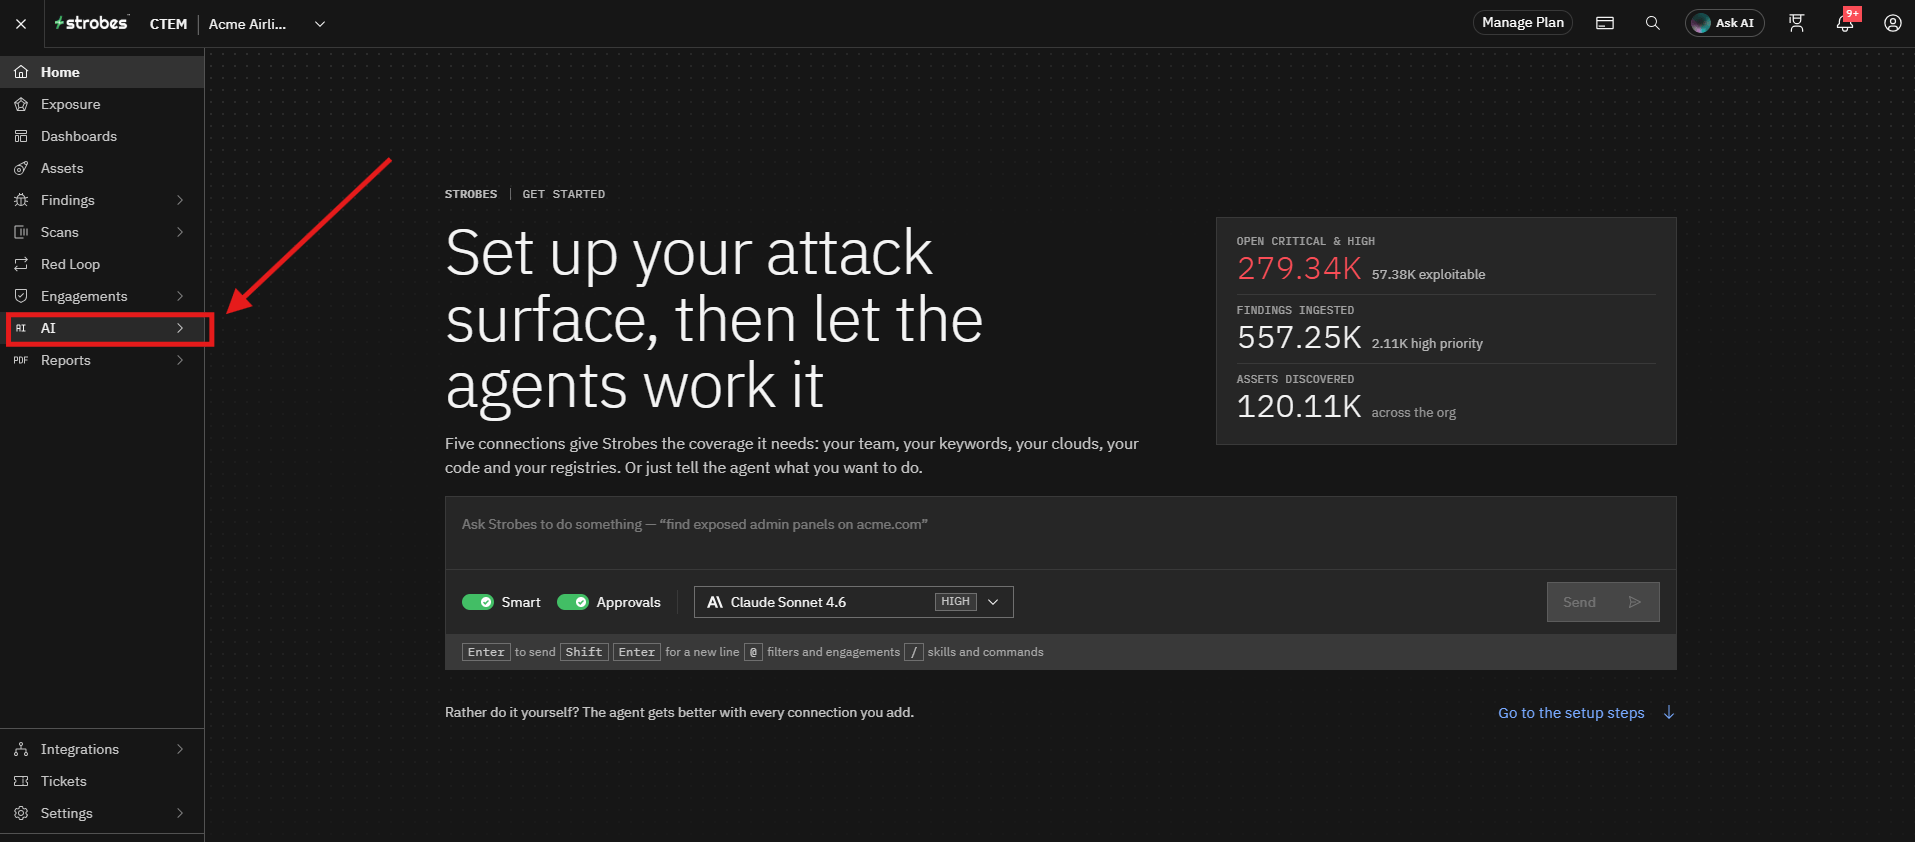
- Navigate to AI from the main navigation menu.
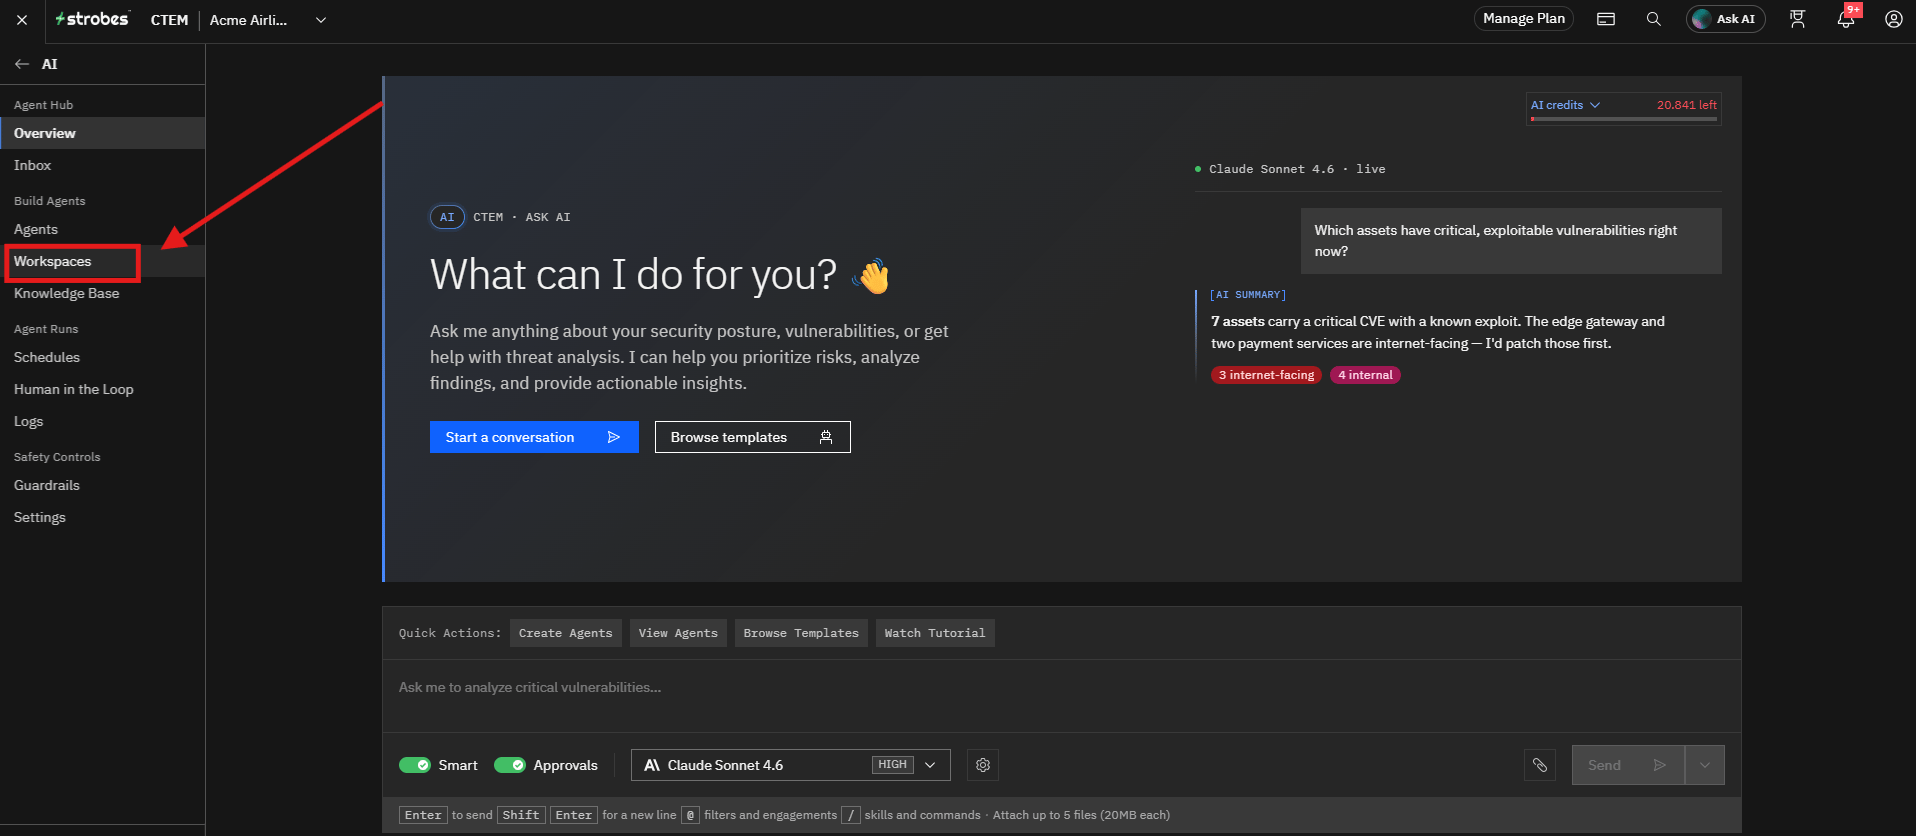
- Open the Workspaces page.
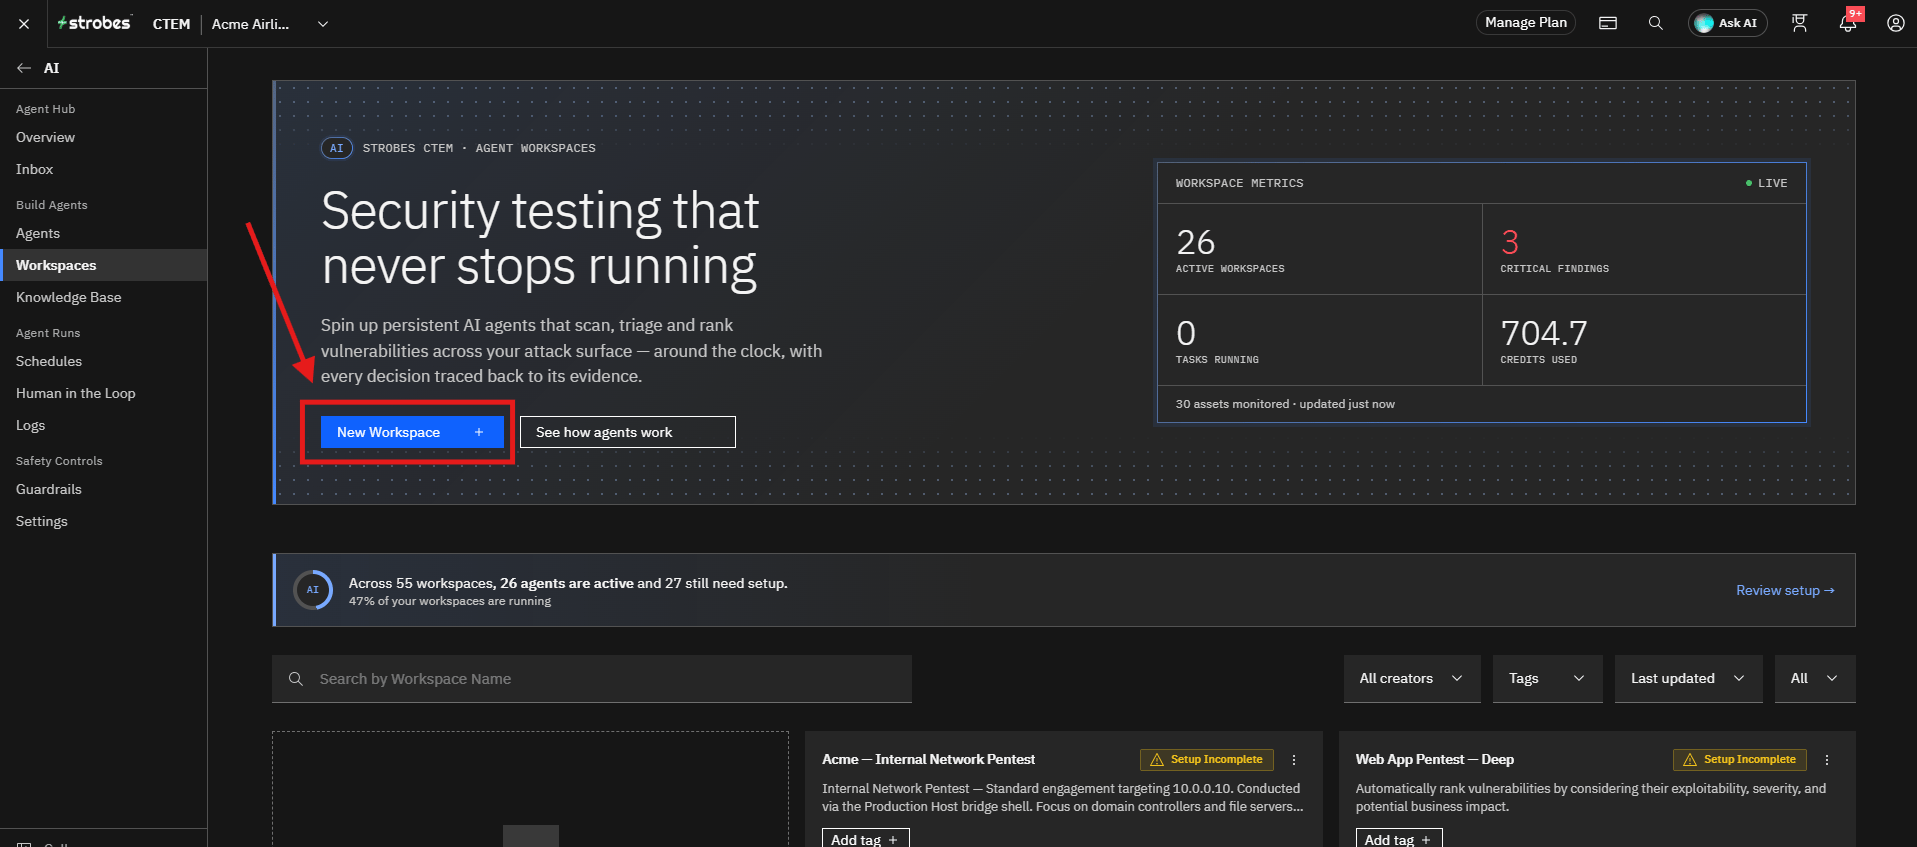
- Click New Workspace.
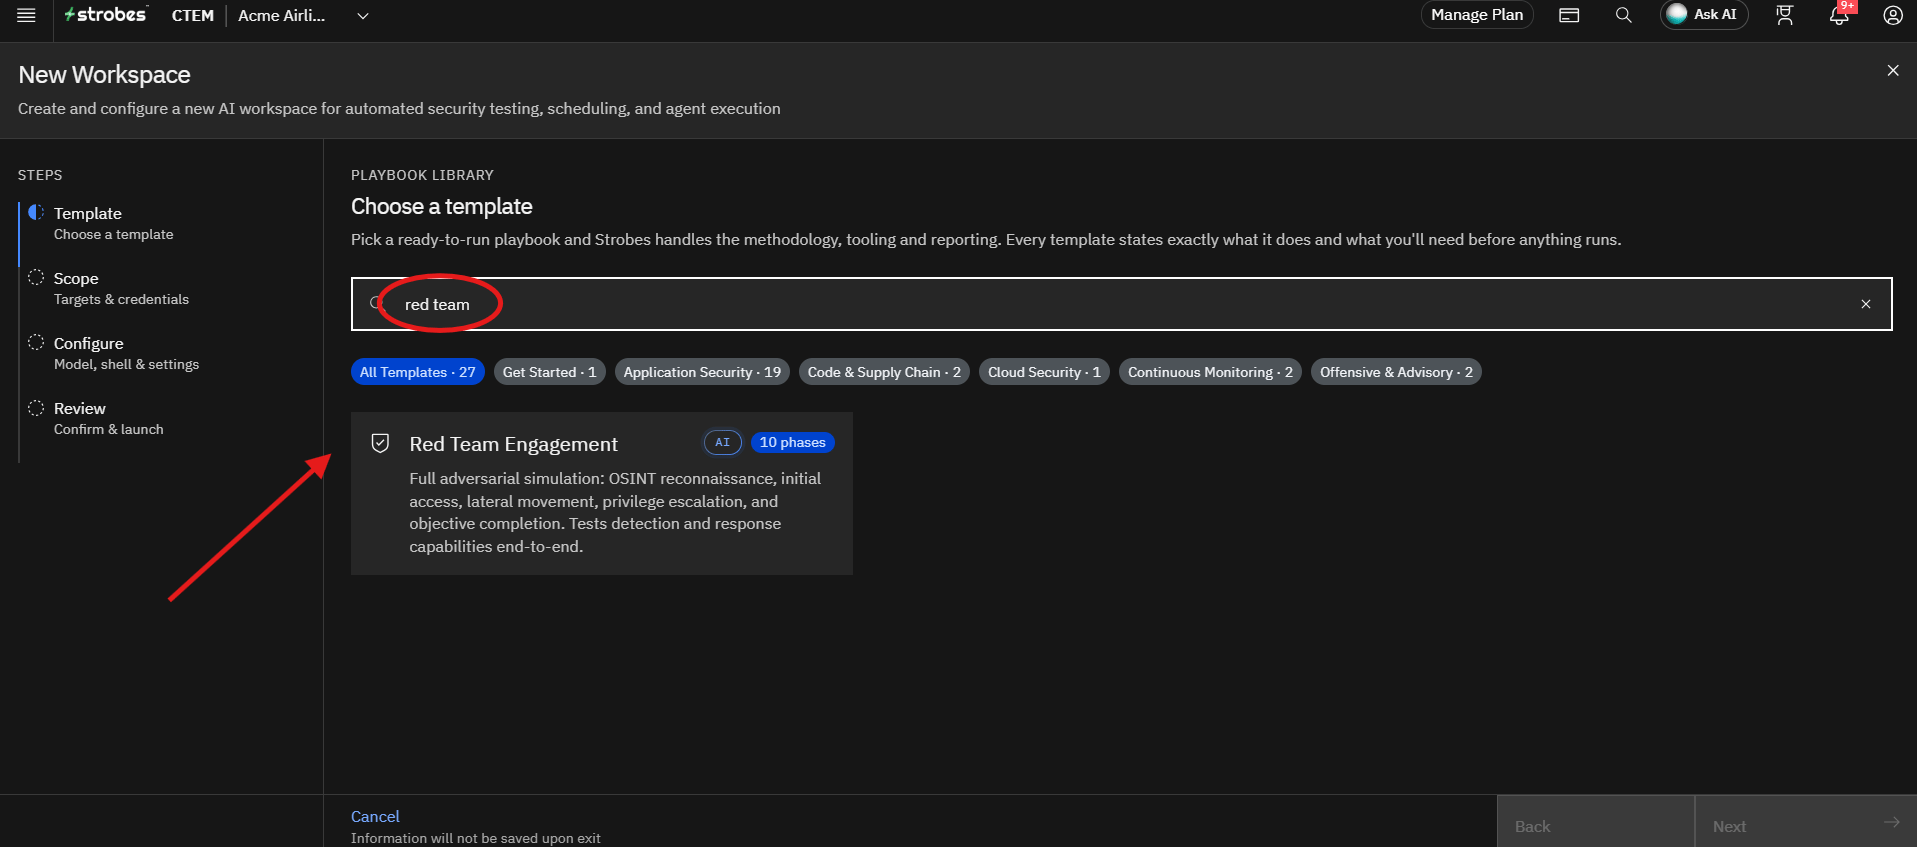
- In the Playbook Library, search for
red teamand select the Red Team Engagement template.
- Review the template details.
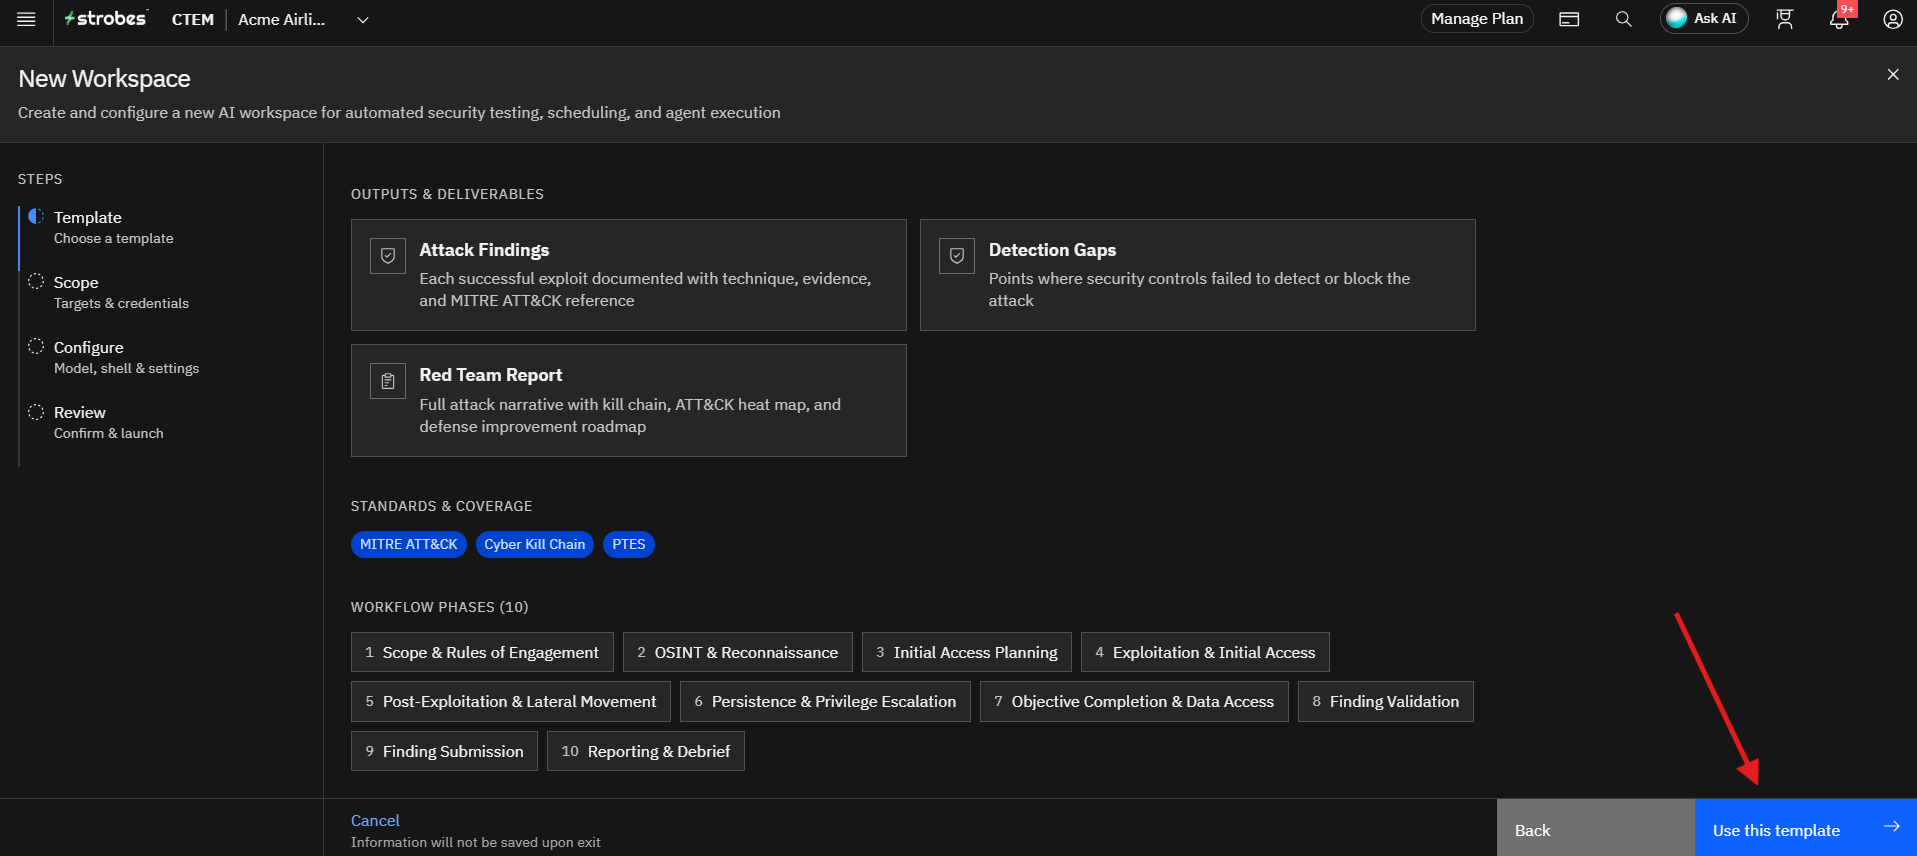
Selecting the template opens its details page, which shows:
- Tags: The category, number of phases, version, and expected duration.
- About: What the template does.
- What you'll need: The target scope.
- What to expect: A full adversarial simulation following real-world attacker methodology, OSINT reconnaissance, initial access attempts, lateral movement and privilege escalation, objective completion, every action documented with timestamps and MITRE ATT&CK mapping, and every successful technique reported in Strobes with detection-gap evidence.
- Outputs & deliverables: Attack Findings, Detection Gaps, and a Red Team Report.
- Standards & coverage: MITRE ATT&CK, Cyber Kill Chain, and PTES.
- Workflow phases: The 10 phases, in order.
To continue, select Use this template. To choose a different template, select Back or Back to templates.
- Click Use this template.
Configuring the Engagement Scope
After selecting the template, the wizard automatically moves to the Scope step.
Step 1: Choose the Deployment Type
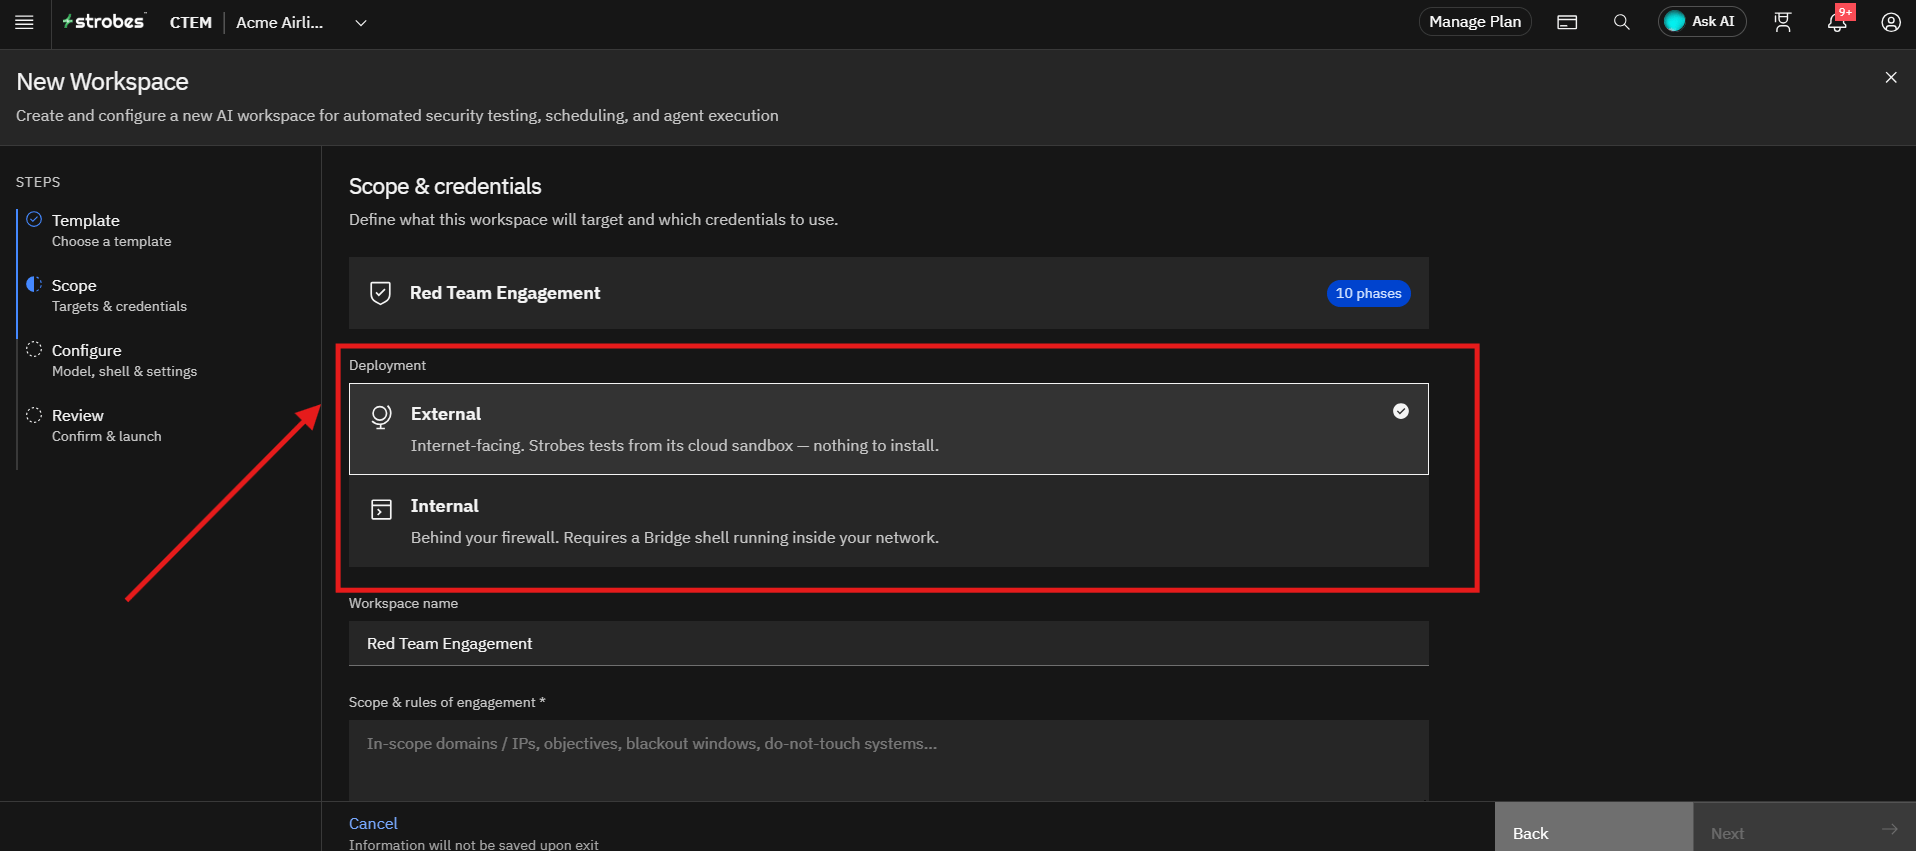
Under Deployment, select where the engagement runs from:
- External: Internet-facing. Strobes tests from its cloud sandbox and nothing needs to be installed. This is selected by default.
- Internal: Behind your firewall. This requires a Bridge shell running inside your network.
See "Choosing External or Internal" above for guidance.
Step 2: Provide a Workspace Name
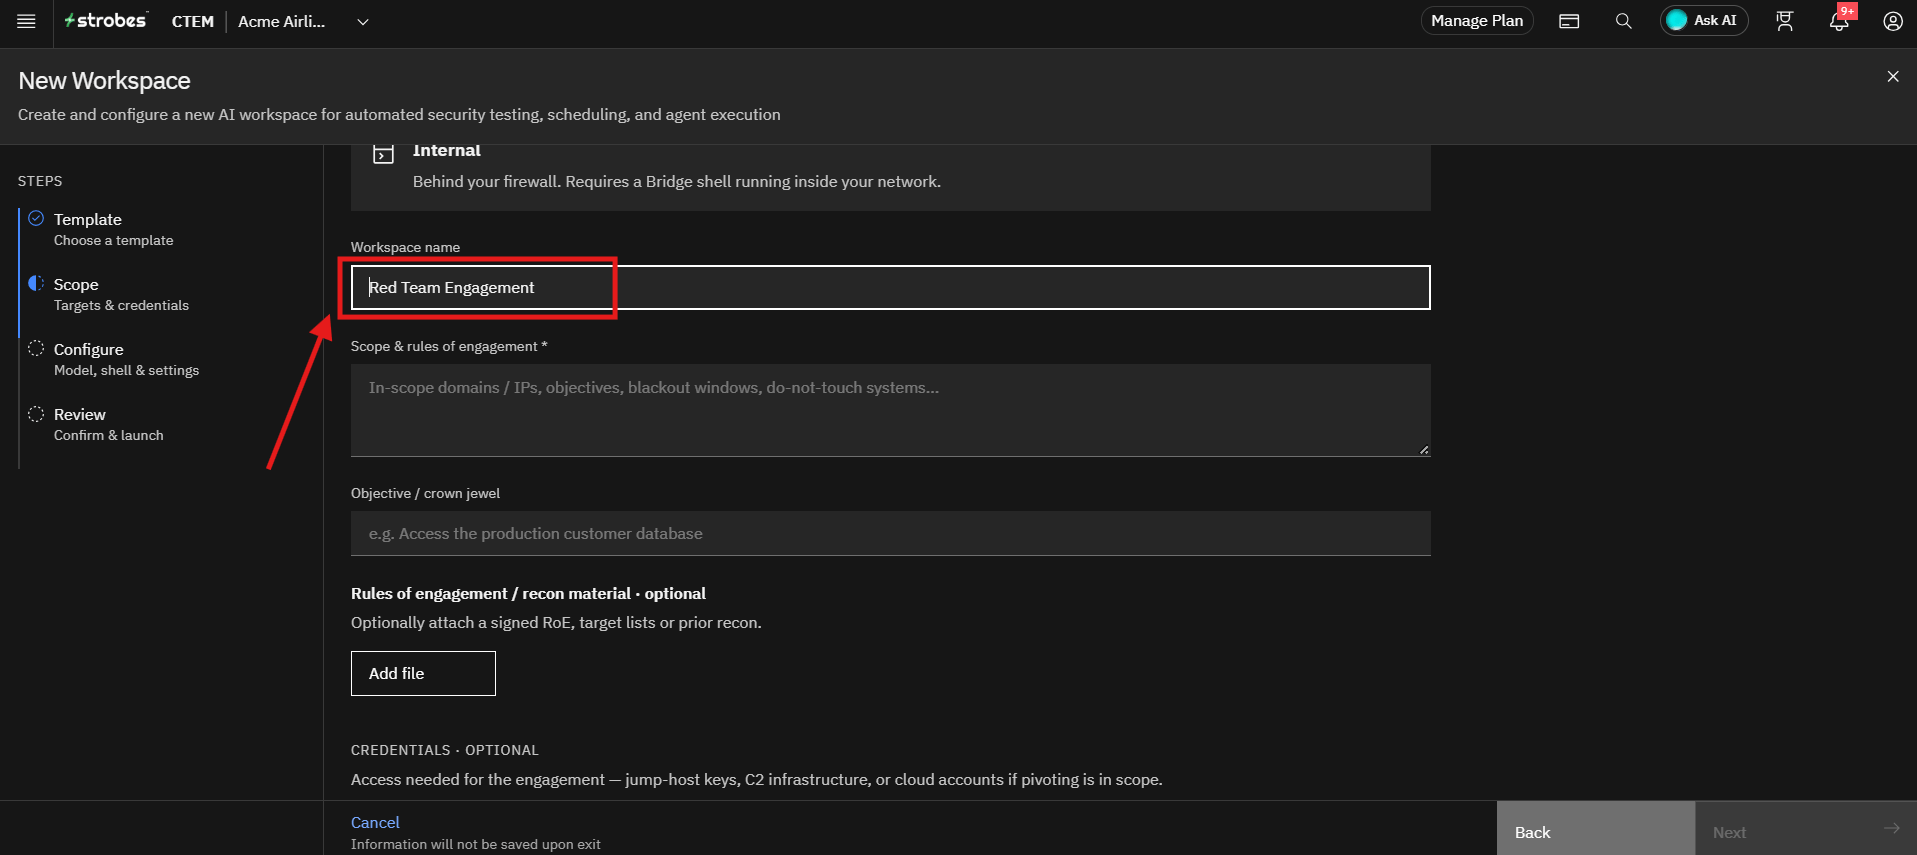
The workspace name is pre-filled with the template name. Enter a more meaningful name for the engagement if you want.
Step 3: Define the Scope and Rules of Engagement
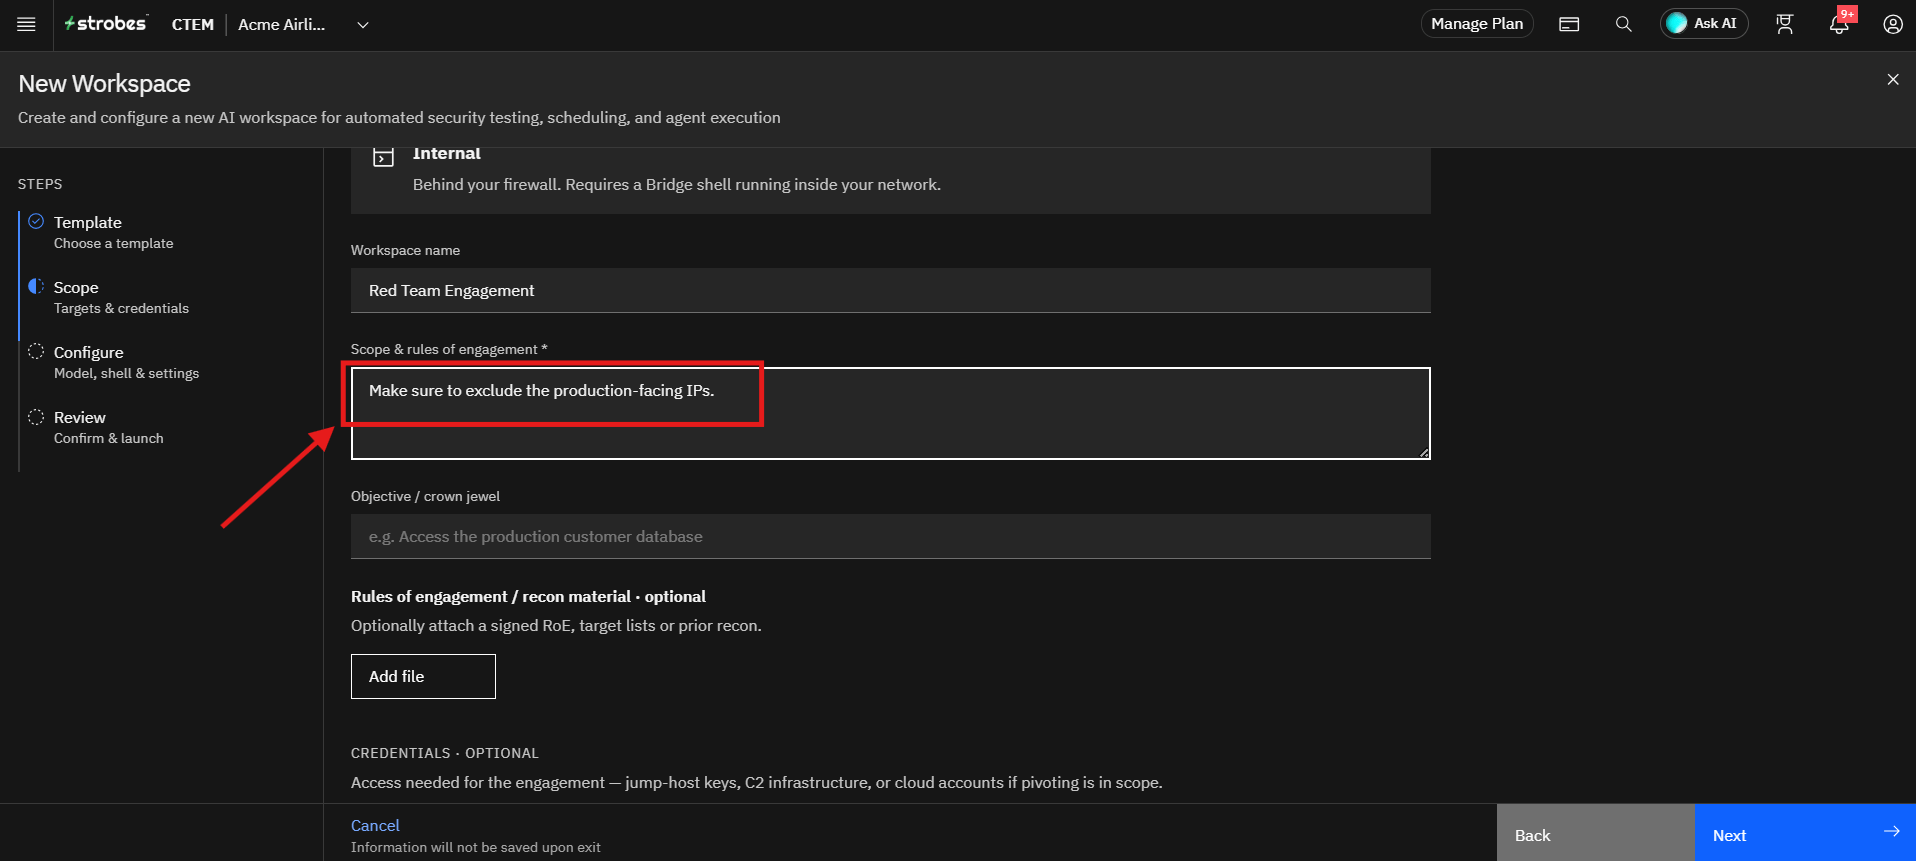
In Scope & rules of engagement (required), describe what the agent may and may not do. The hint changes with your deployment type:
- External: In-scope domains and IPs, objectives, blackout windows, and do-not-touch systems.
- Internal: In-scope internal segments, objectives, blackout windows, and do-not-touch systems.
Example: Make sure to exclude the production-facing IPs.
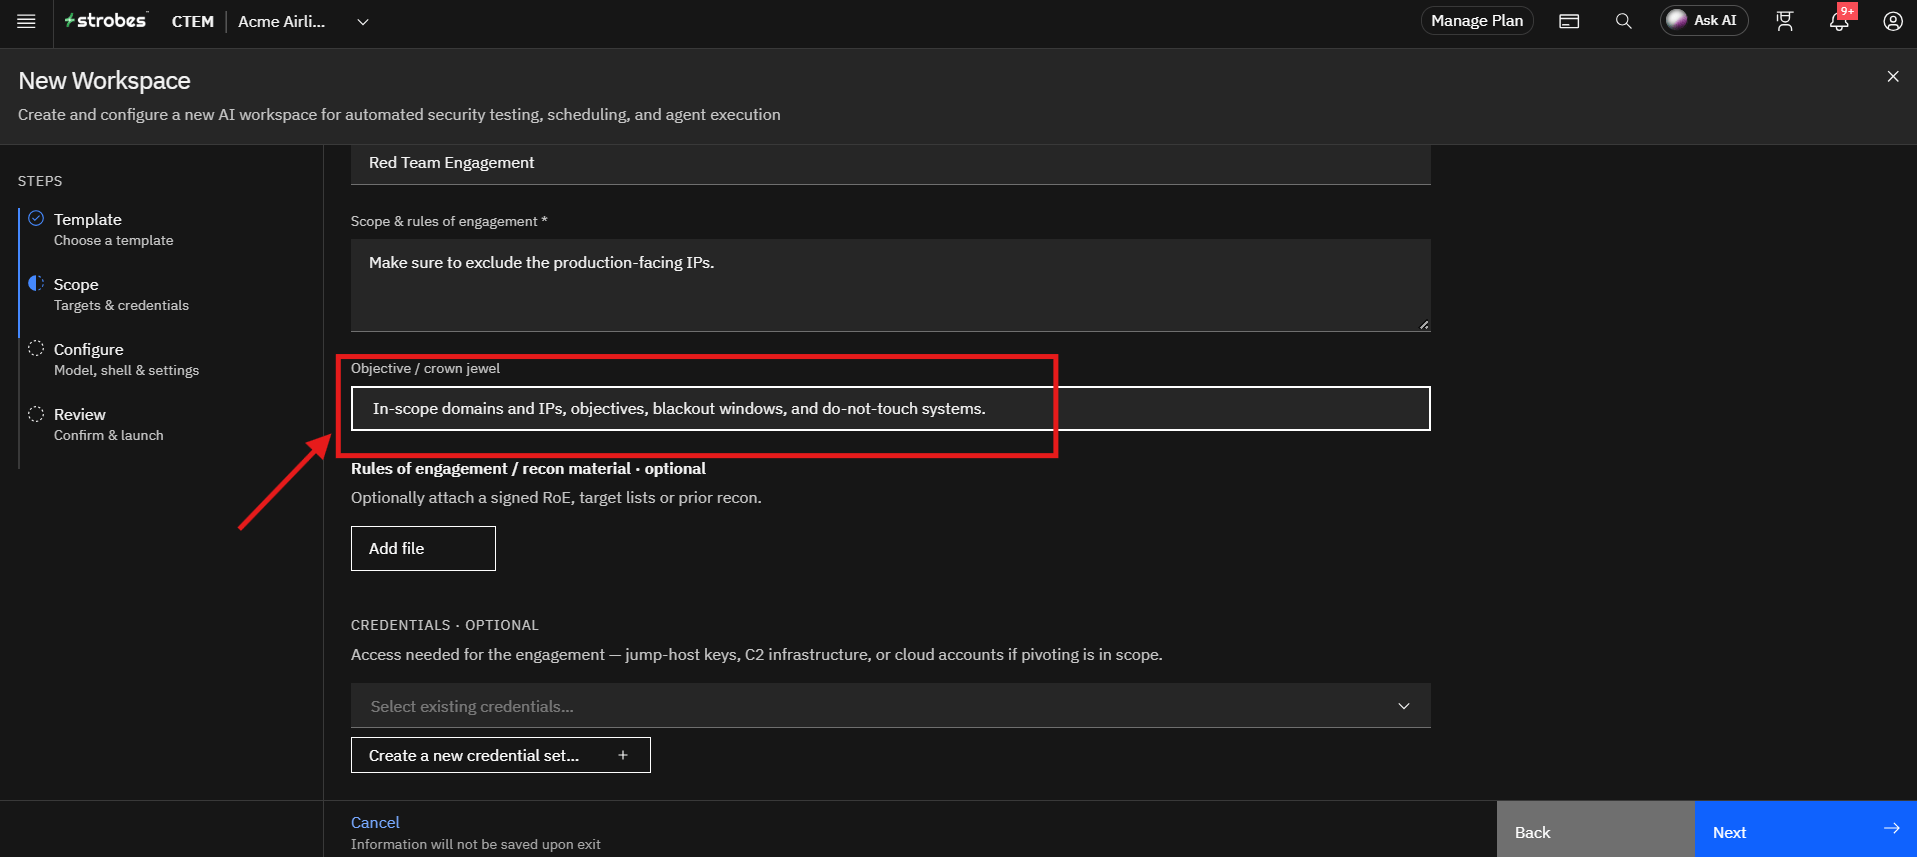
Step 4: Set the Objective (Optional)
In Objective / crown jewel, enter the goal the agent should work toward. The example changes with your deployment type:
- External: Access the production customer database.
- Internal: Reach Domain Admin, or access the finance file share.
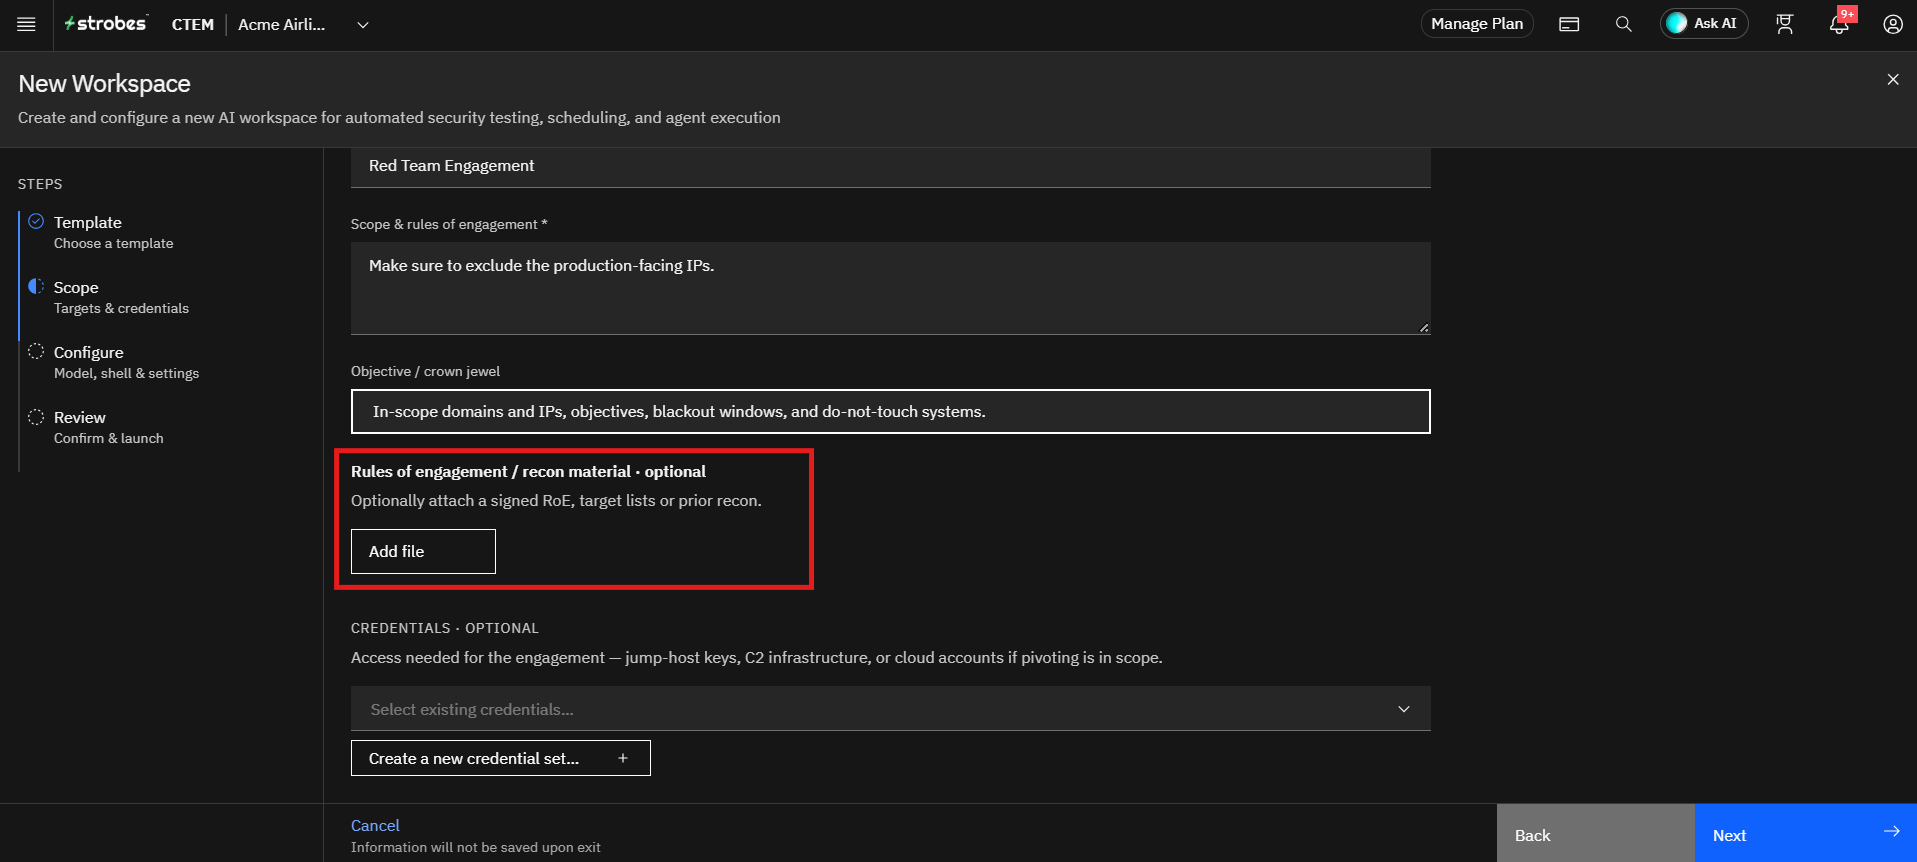
Step 5: Attach Rules of Engagement or Recon Material (Optional)
Under Rules of engagement / recon material, click Add file to attach a signed rules of engagement document, target lists, or prior reconnaissance.
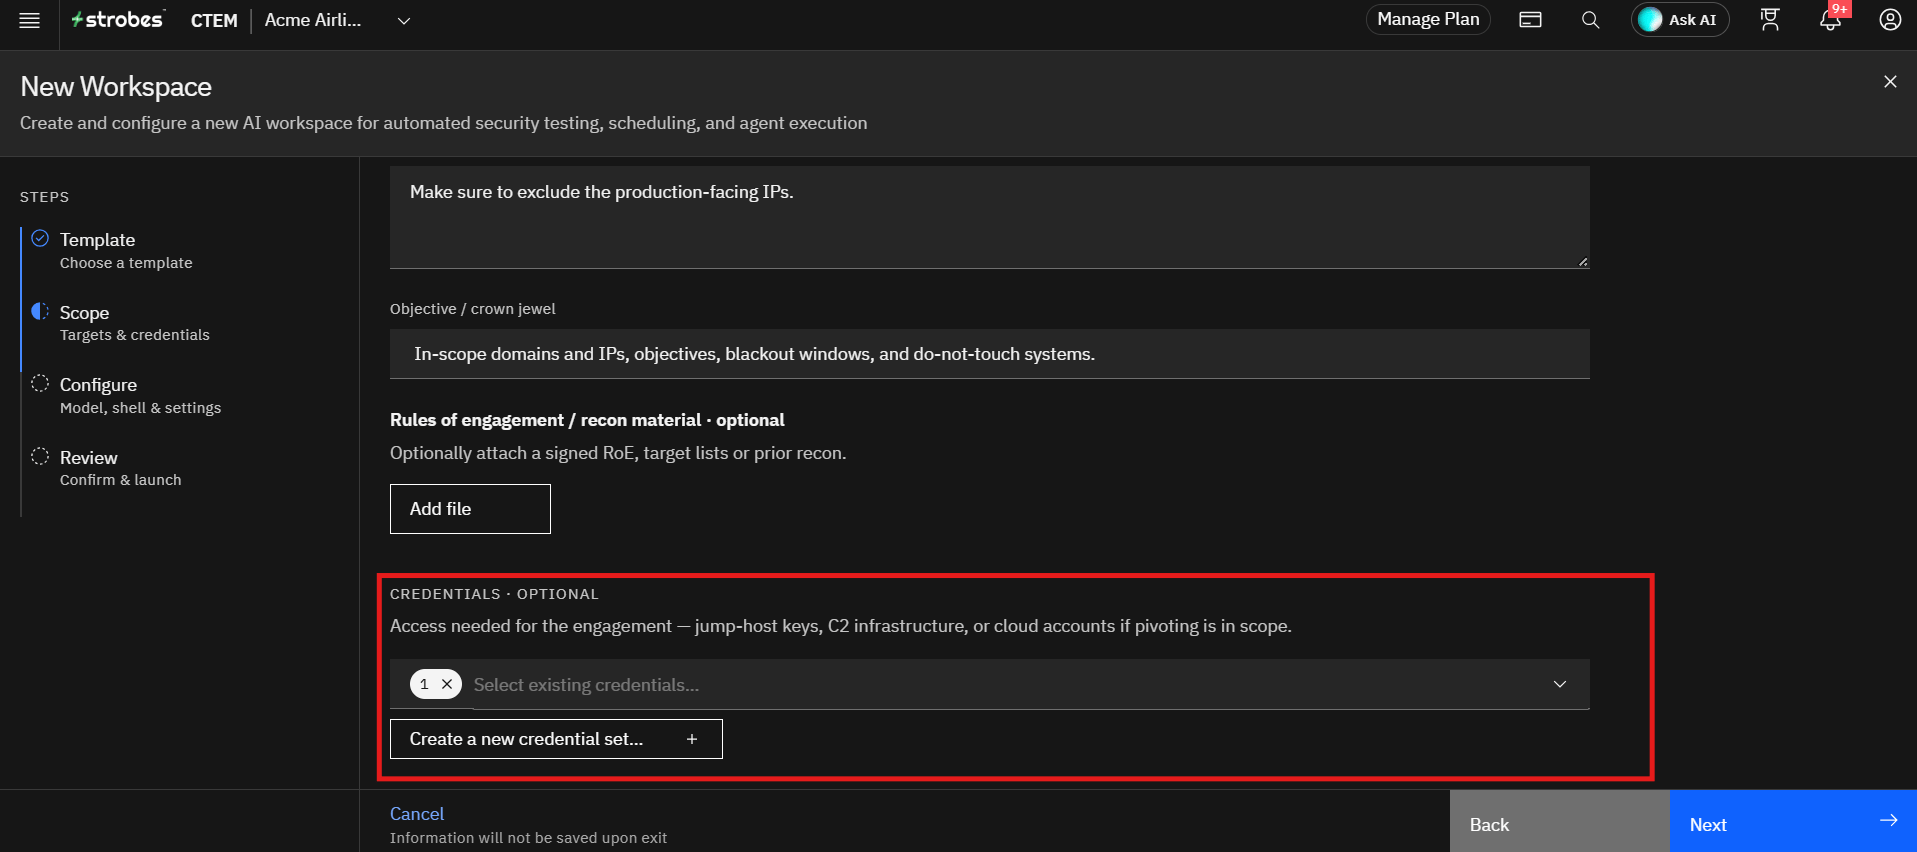
Step 6: Add Credentials (Optional)
Under Credentials, select existing credentials from the credential manager, or click Create a new credential set to add them. Use this for access the engagement needs, such as jump-host keys, C2 infrastructure, or cloud accounts if pivoting is in scope.
Step 7: Proceed to Configuration
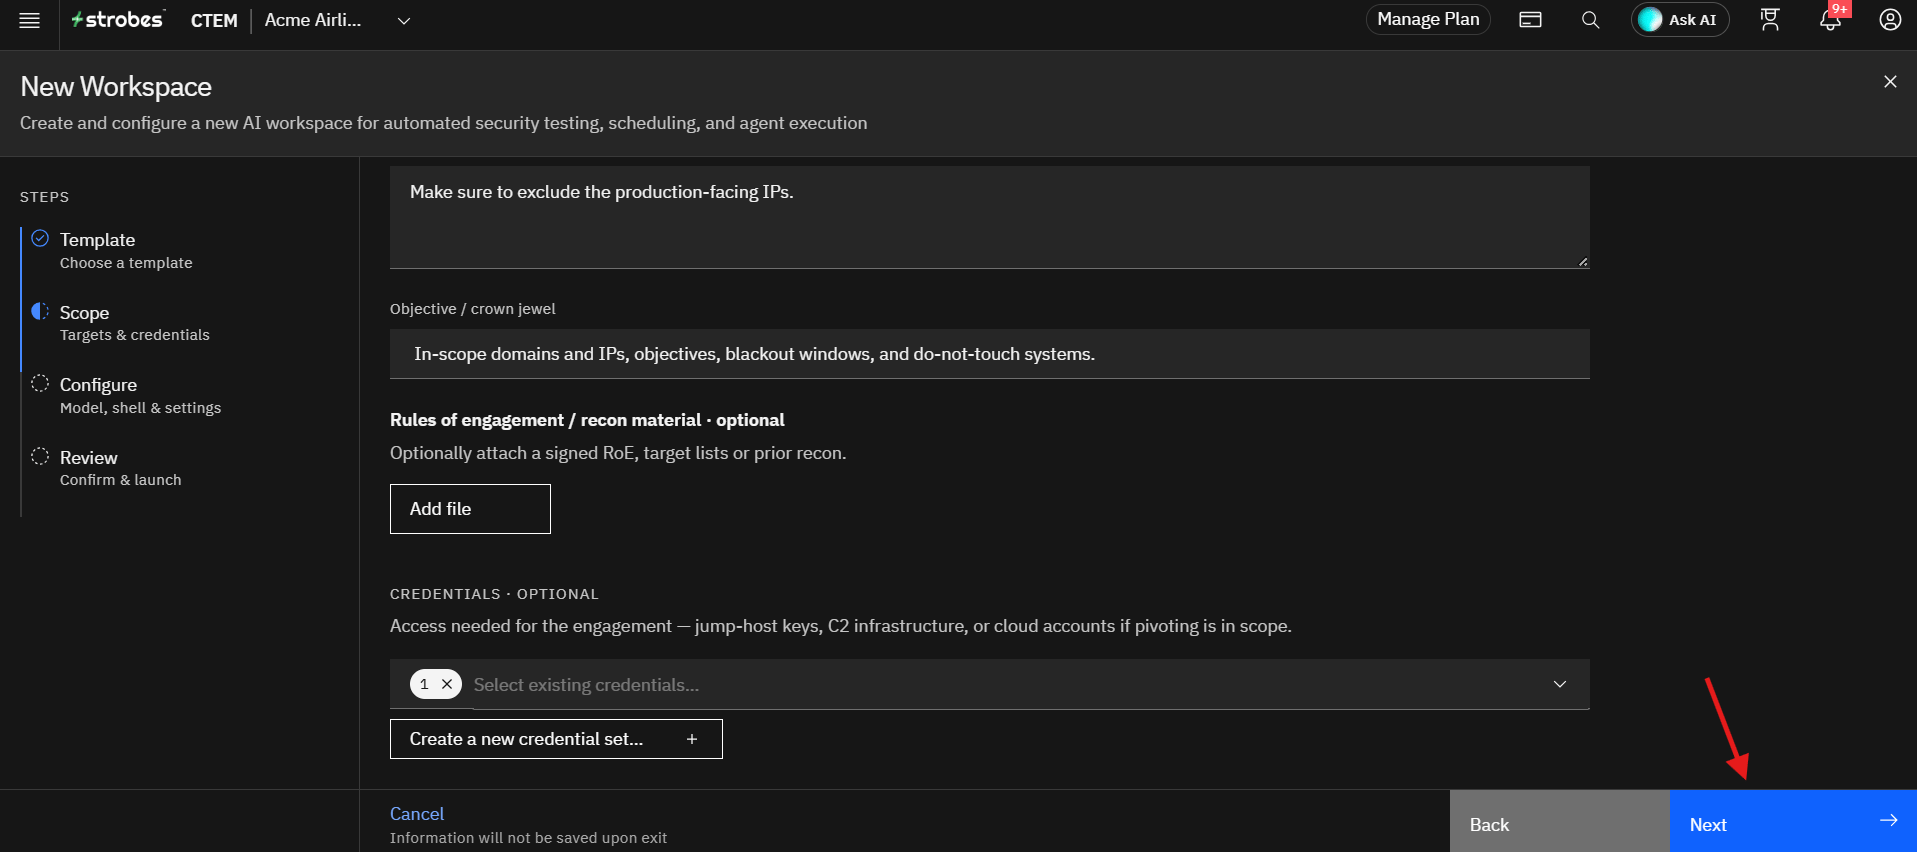
After completing the scope details:
- Verify the deployment type, scope, and objective.
- Click Next.
The wizard proceeds to the Configure step. The Next button stays unavailable until the scope is entered.
Configuring the Run
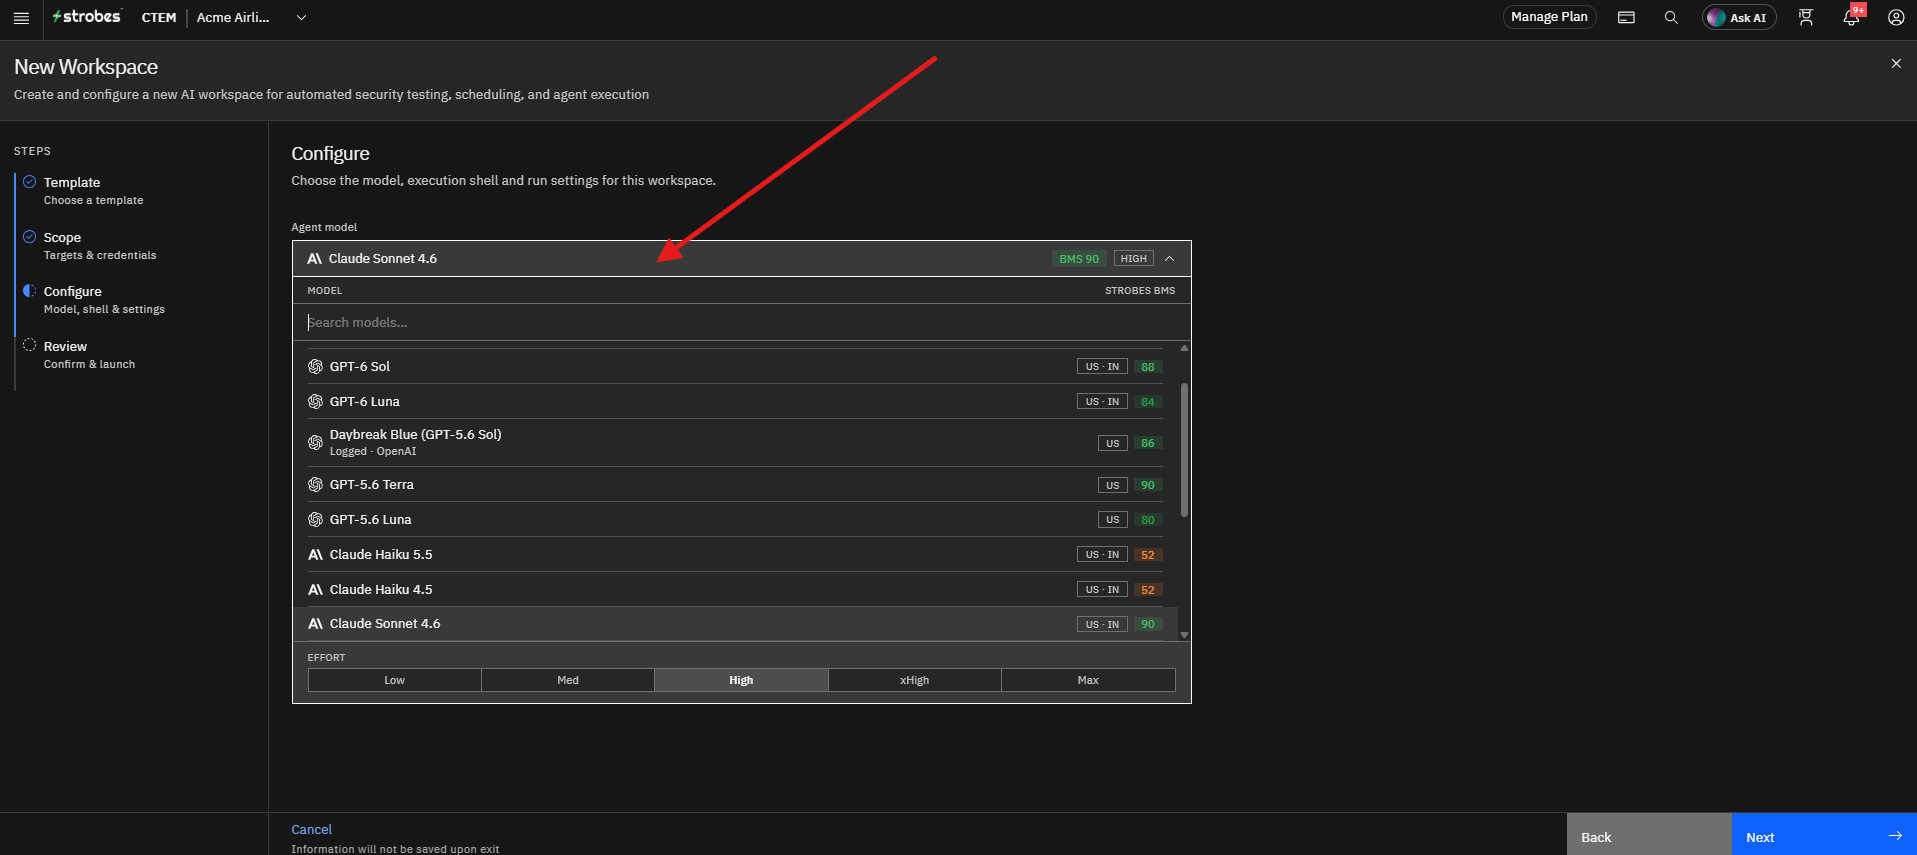
Step 8: Select an AI Model
The Agent model determines the Large Language Model (LLM) used during the engagement.
- Open the Agent model dropdown.
- Review the available models and their Strobes BMS scores.
- Select the model that best fits your requirements, or choose Smart Router to let Strobes pick the best model for each task.
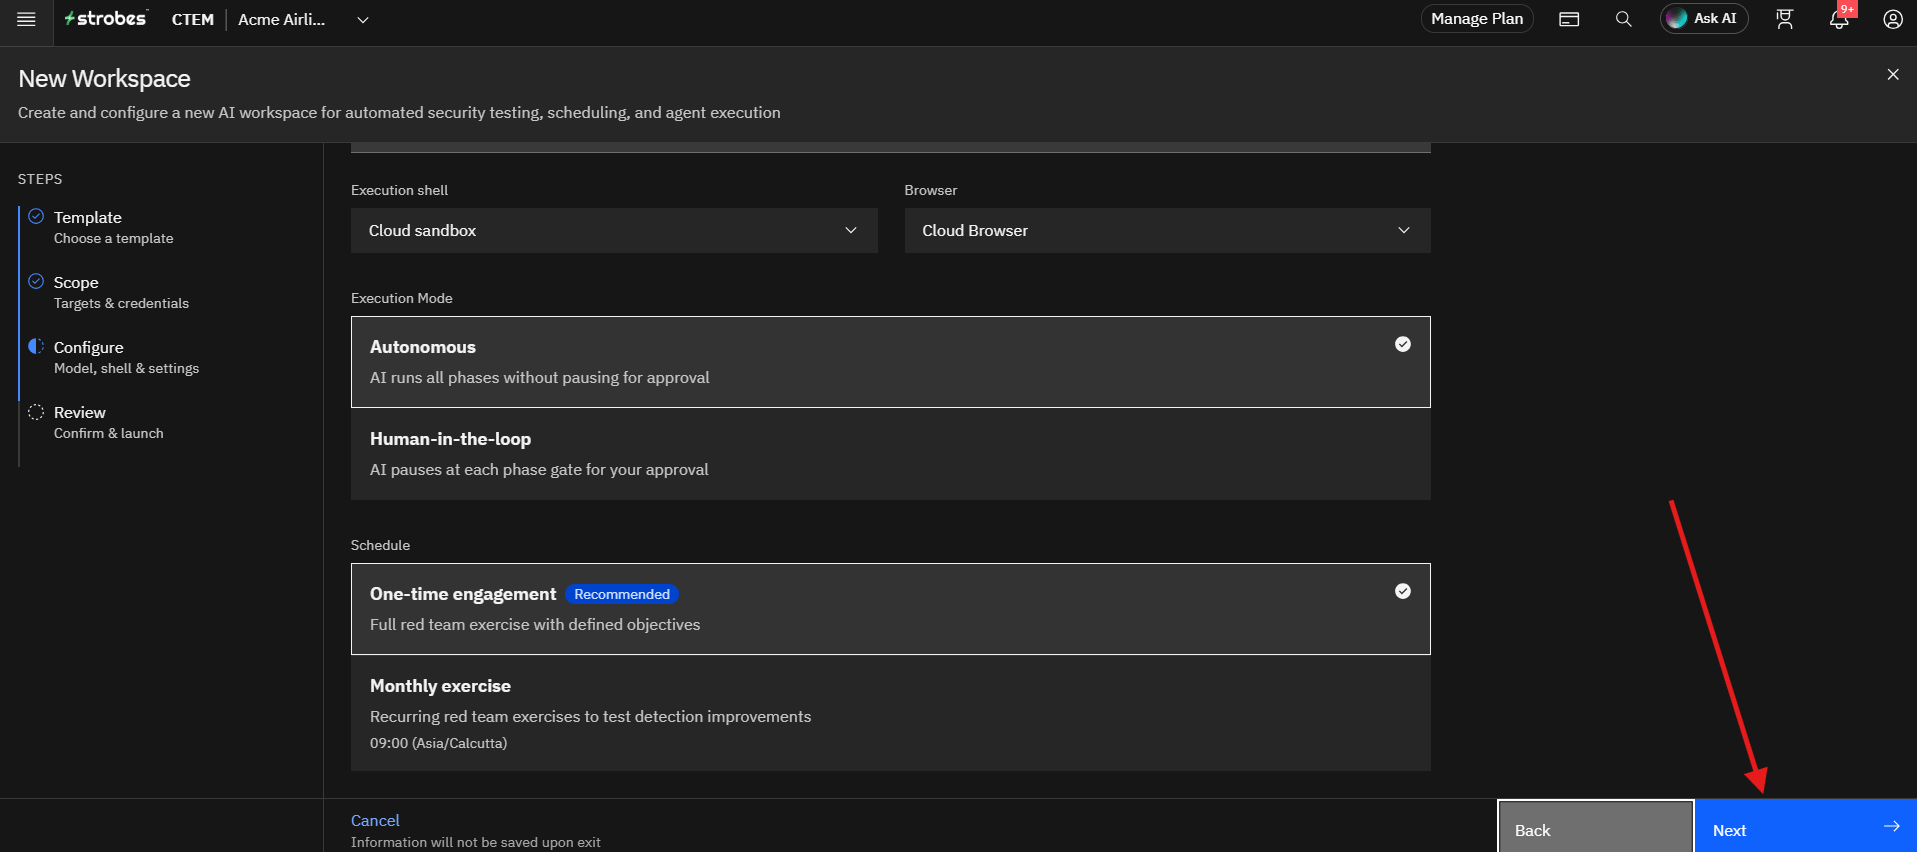
Step 9: Select the Execution Shell
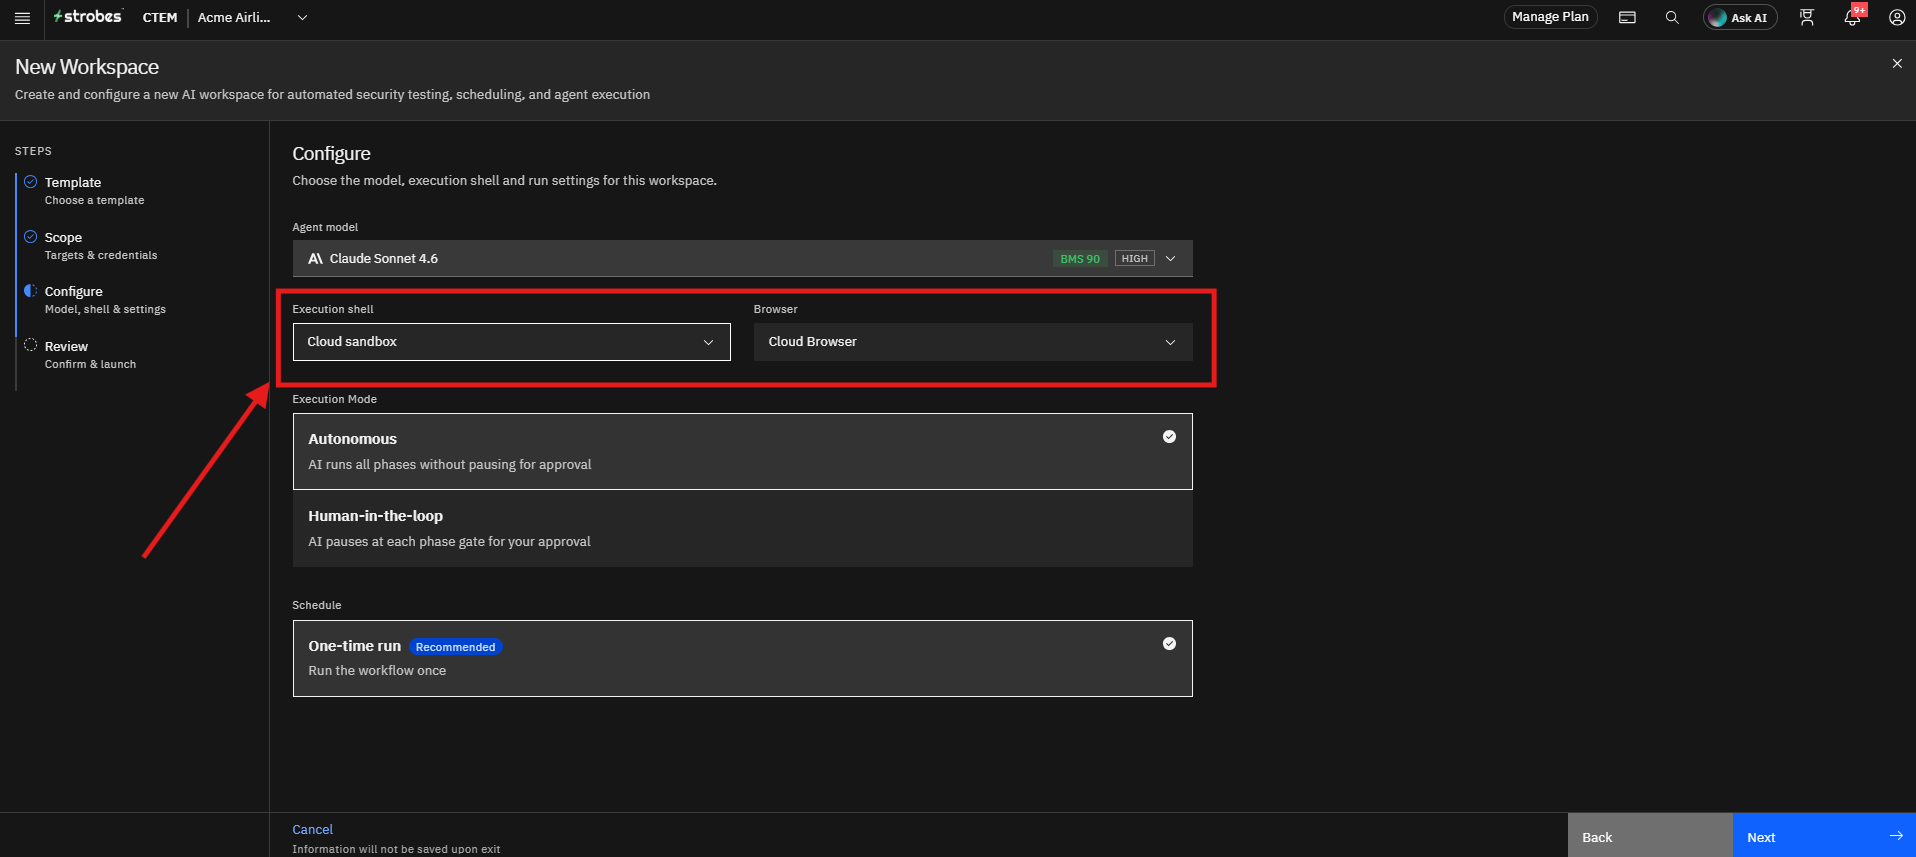
The Execution shell defines where the agent runs its commands:
- Cloud sandbox: Choose this for External engagements.
- Bridge shell: Choose your Bridge shell for Internal engagements.
Step 10: Review the Browser
The Browser is Cloud Browser by default. Keep the default.
Step 11: Select the Execution Mode
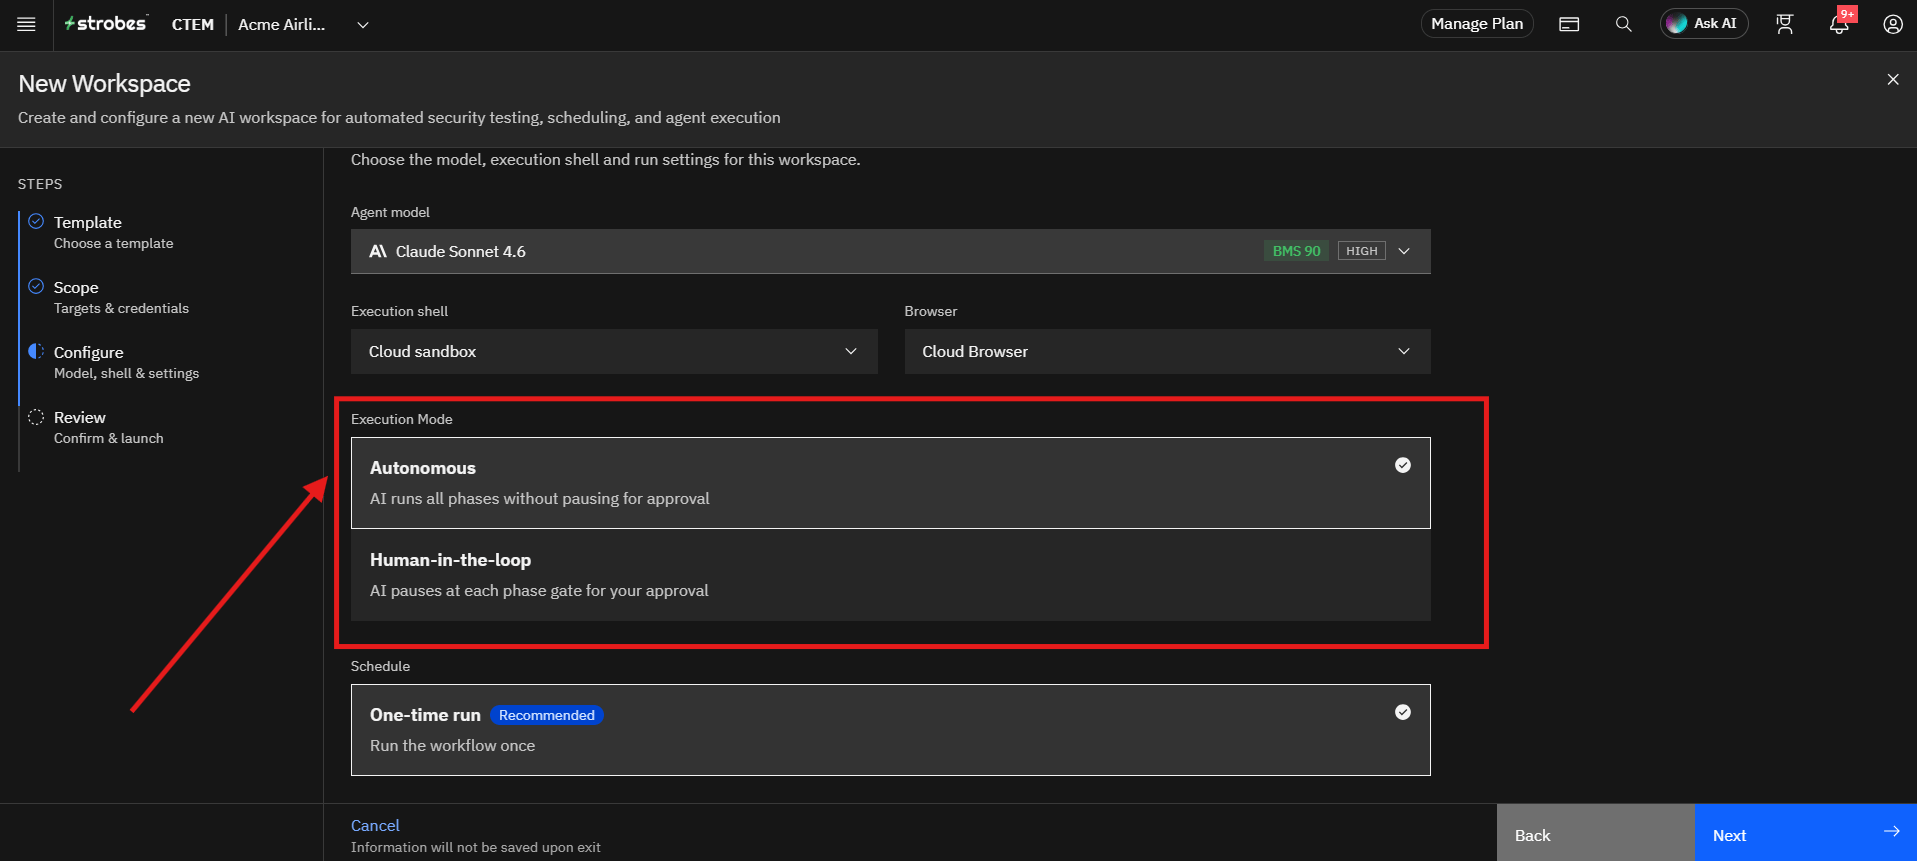
Choose how the AI runs the engagement. Autonomous is selected by default.
- Autonomous: The AI runs all phases without pausing for approval.
- Human-in-the-loop: The AI pauses at each phase gate and waits for your approval before continuing.
Because a red team engagement takes real offensive actions, Human-in-the-loop is a good choice when you want to approve each phase before it continues.
Step 12: Select the Schedule
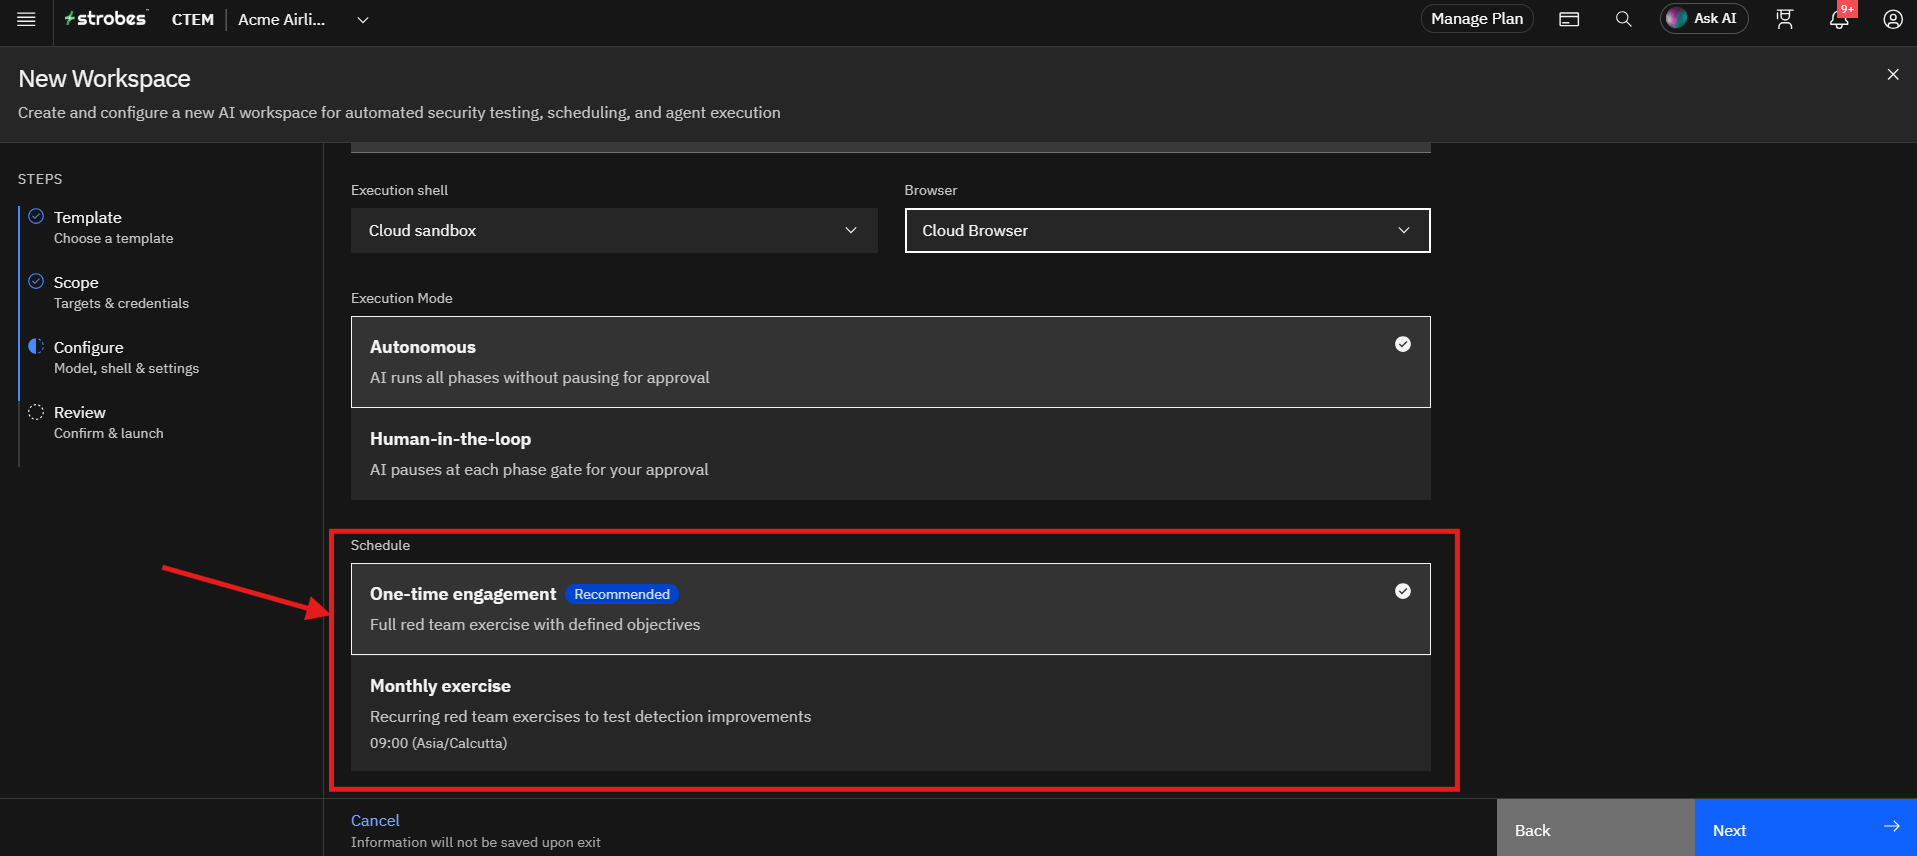
Choose how often the engagement runs:
Option | Behaviour |
|---|---|
One-time engagement (Recommended) | A full red team exercise with defined objectives. |
Monthly exercise | A recurring red team exercise to test detection improvements. |
Step 13: Click Next
Once all configuration settings have been verified, click Next. The wizard opens the Review page.
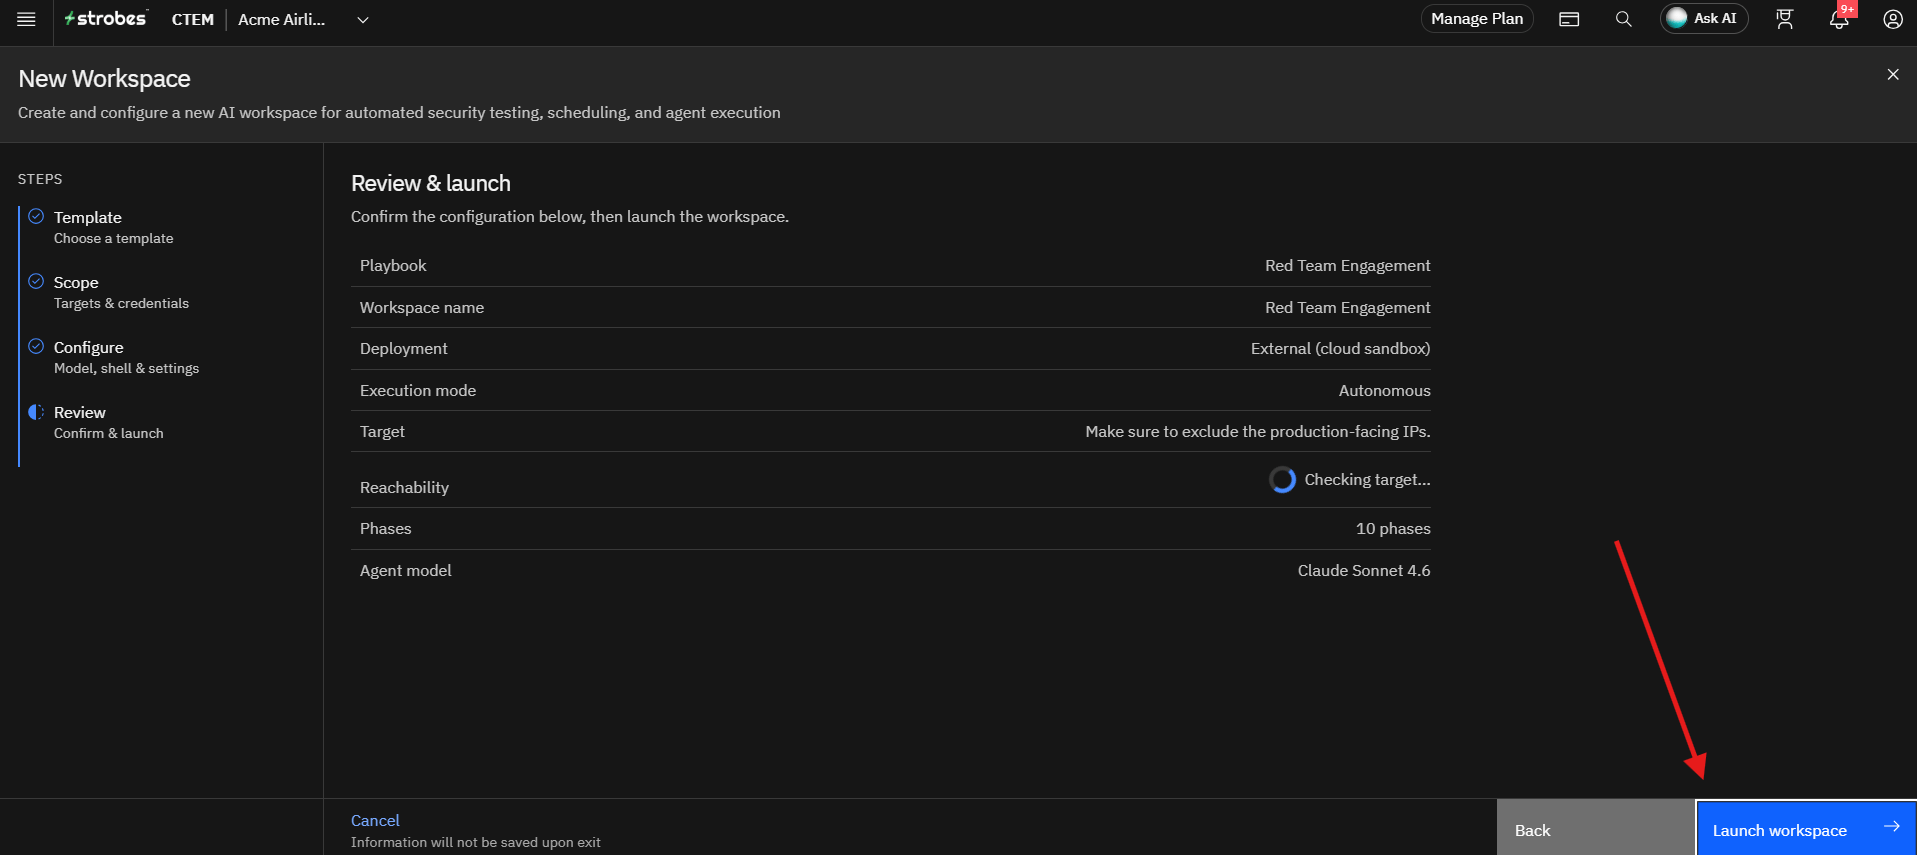
Step 14: Review and Launch the Workspace
Review the configuration summary, including the playbook, workspace name, deployment, execution mode, target, phases, and agent model.
Once everything looks correct, click Launch workspace to start the engagement. When it completes, attack findings and detection gaps appear in Strobes, and the Red Team Report is available in the workspace.
Tips
- Get written authorization before you launch. A red team engagement takes real offensive actions against the targets.
- Be specific in the rules of engagement. List blackout windows and do-not-touch systems, such as production-facing IPs, so the agent stays inside safe boundaries.
- Set a clear objective. A concrete goal, such as reaching Domain Admin, gives the engagement a measurable result.
- Use Internal to learn how far an attacker could go after a breach, and External to test your perimeter.
- For Internal engagements, make sure the Bridge shell is running inside your network and select it as the Execution shell.
- Use Human-in-the-loop if you want to approve each phase before it continues.
- Choose Monthly exercise to track whether your detection improves over time.
- The engagement typically takes 4 to 12 hours, depending on scope.
- Review the Detection Gaps output, as it shows exactly where your security controls missed the attack.
More in Workspace configuration
- Running an LLM / Agentic Chatbot Pentest using Strobes AI
- Running a Code Remediation Campaign using Strobes AI
- Running AWS Cloud Security Review using Strobes AI
- Running Mobile App Pentest (Android) using Strobes AI
- Running Azure Cloud Security Review using Strobes AI
- Running External Network Pentest using Strobes AI
Was this page helpful?