
Connecting CrowdStrike Falcon Surface to Strobes
Overview
The CrowdStrike Falcon Surface connector lets you pull attack surface data from CrowdStrike's Attack Surface Analyzer directly into Strobes. Once configured, Strobes imports assets and findings from your CrowdStrike environment, merges them with existing records, and keeps them in sync on a schedule you define.
Before You Start
You will need your CrowdStrike API credentials: Client ID, Client Secret, and Base URL. These are available from your CrowdStrike Falcon console under API Clients & Keys. Have them ready before starting.
Step 1 — Navigate to Connectors
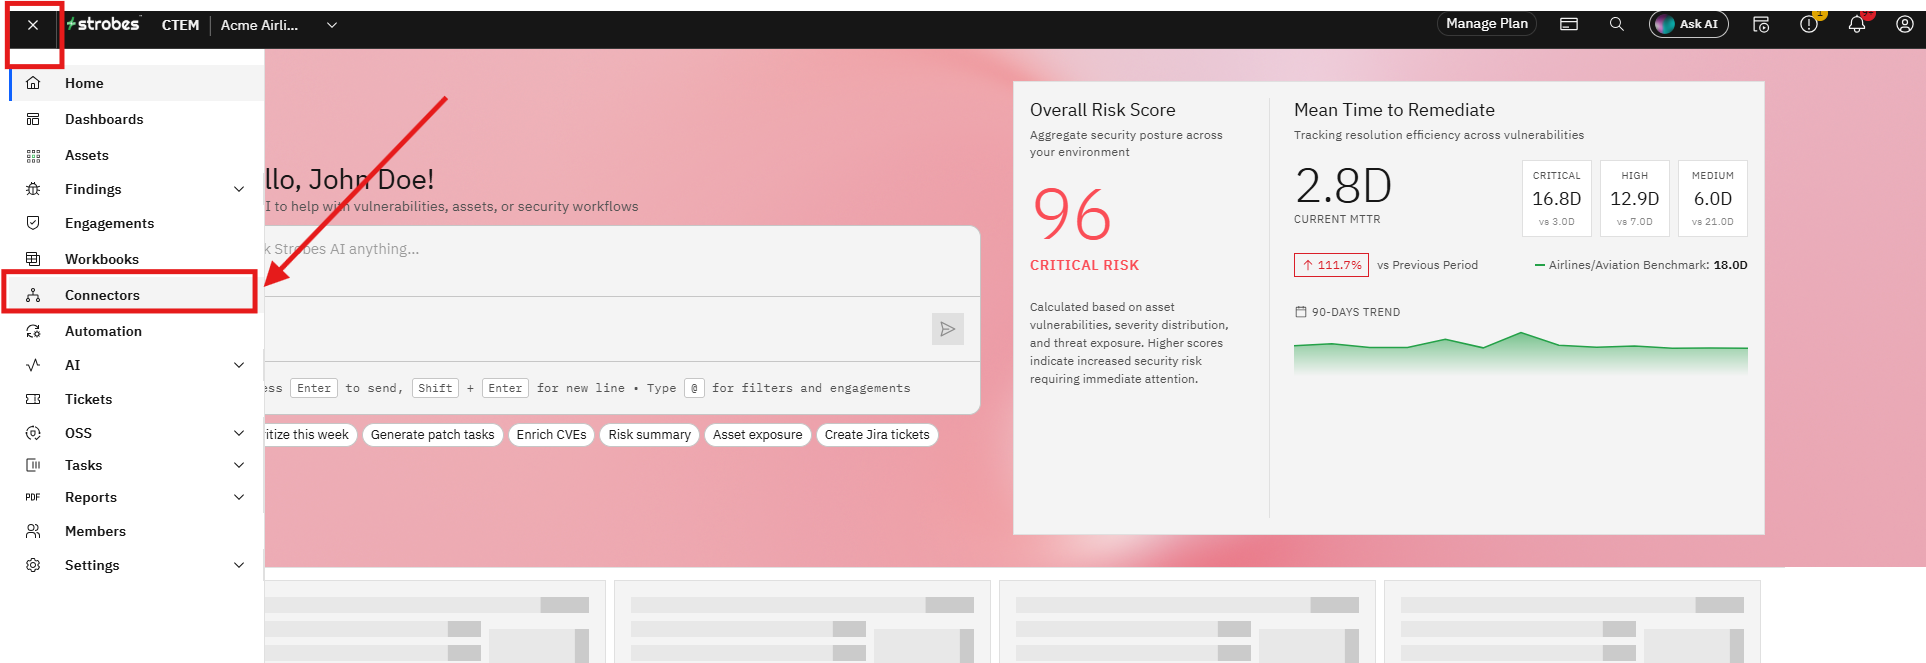
Click Connectors in the left sidebar. The Connectors page opens, showing all installed and available connectors organized by category.
Step 2 — Search for the Connector
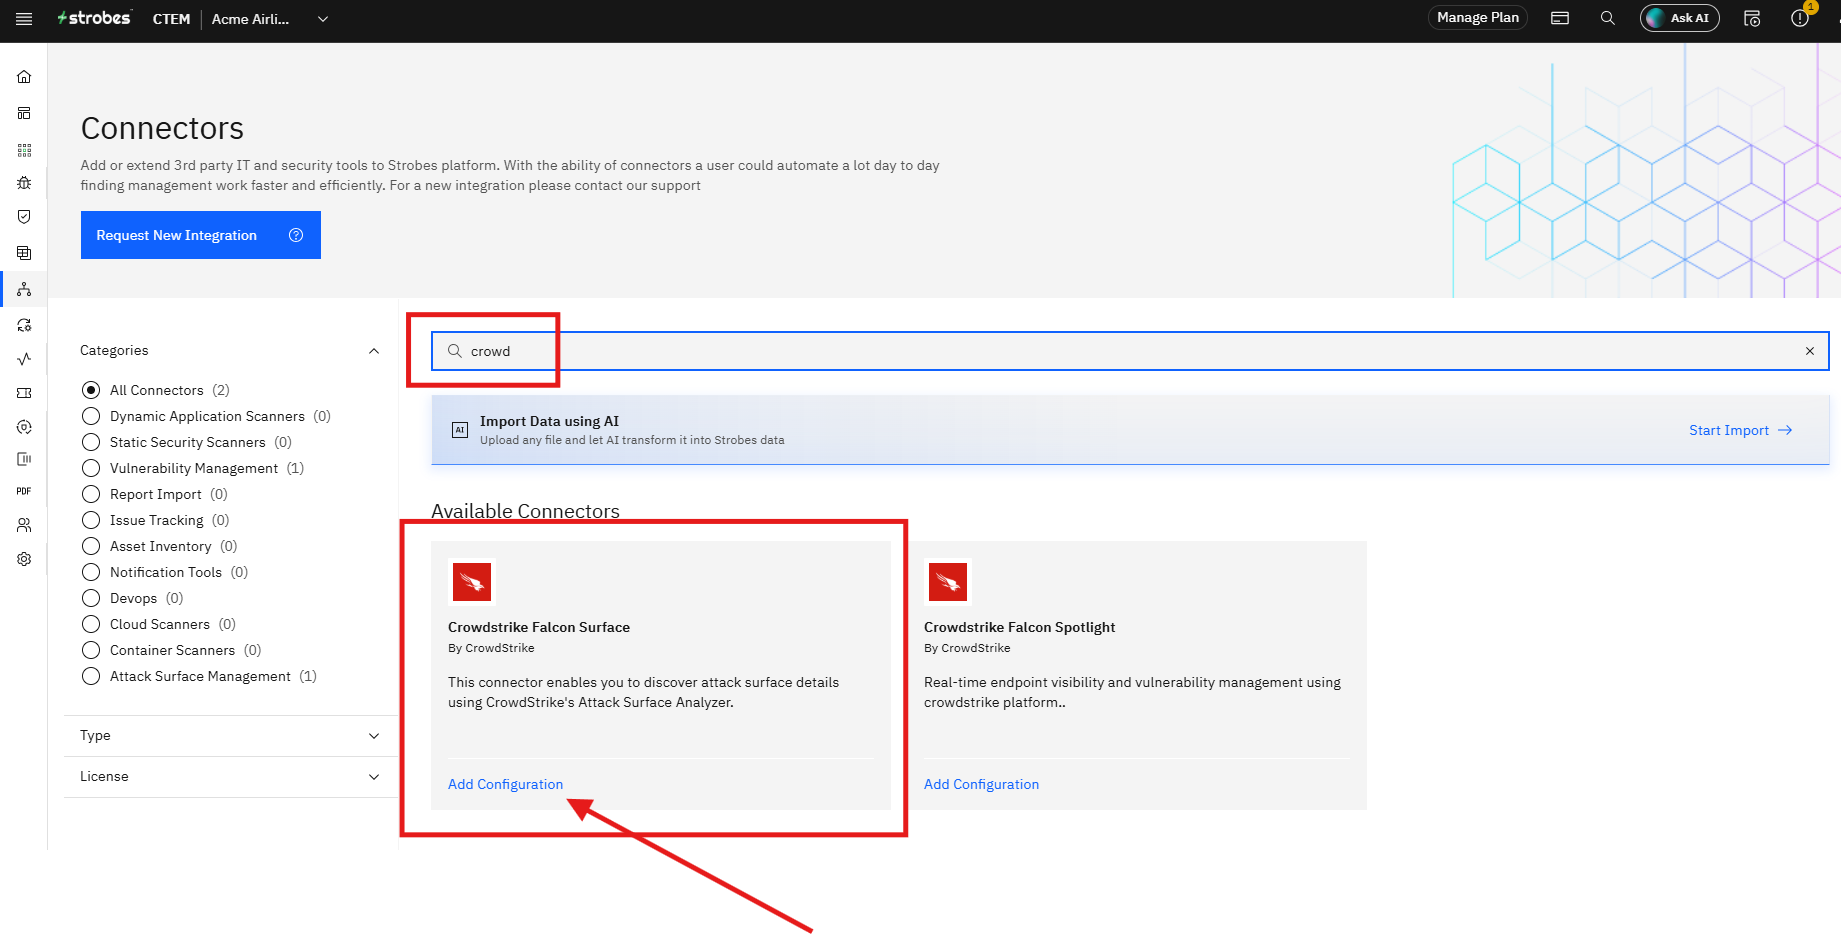
Click the Look for Connectors search bar and type crowd. Two CrowdStrike connectors appear under Available Connectors: Crowdstrike Falcon Surface and Crowdstrike Falcon Spotlight.
Step 3 — Open the Connector
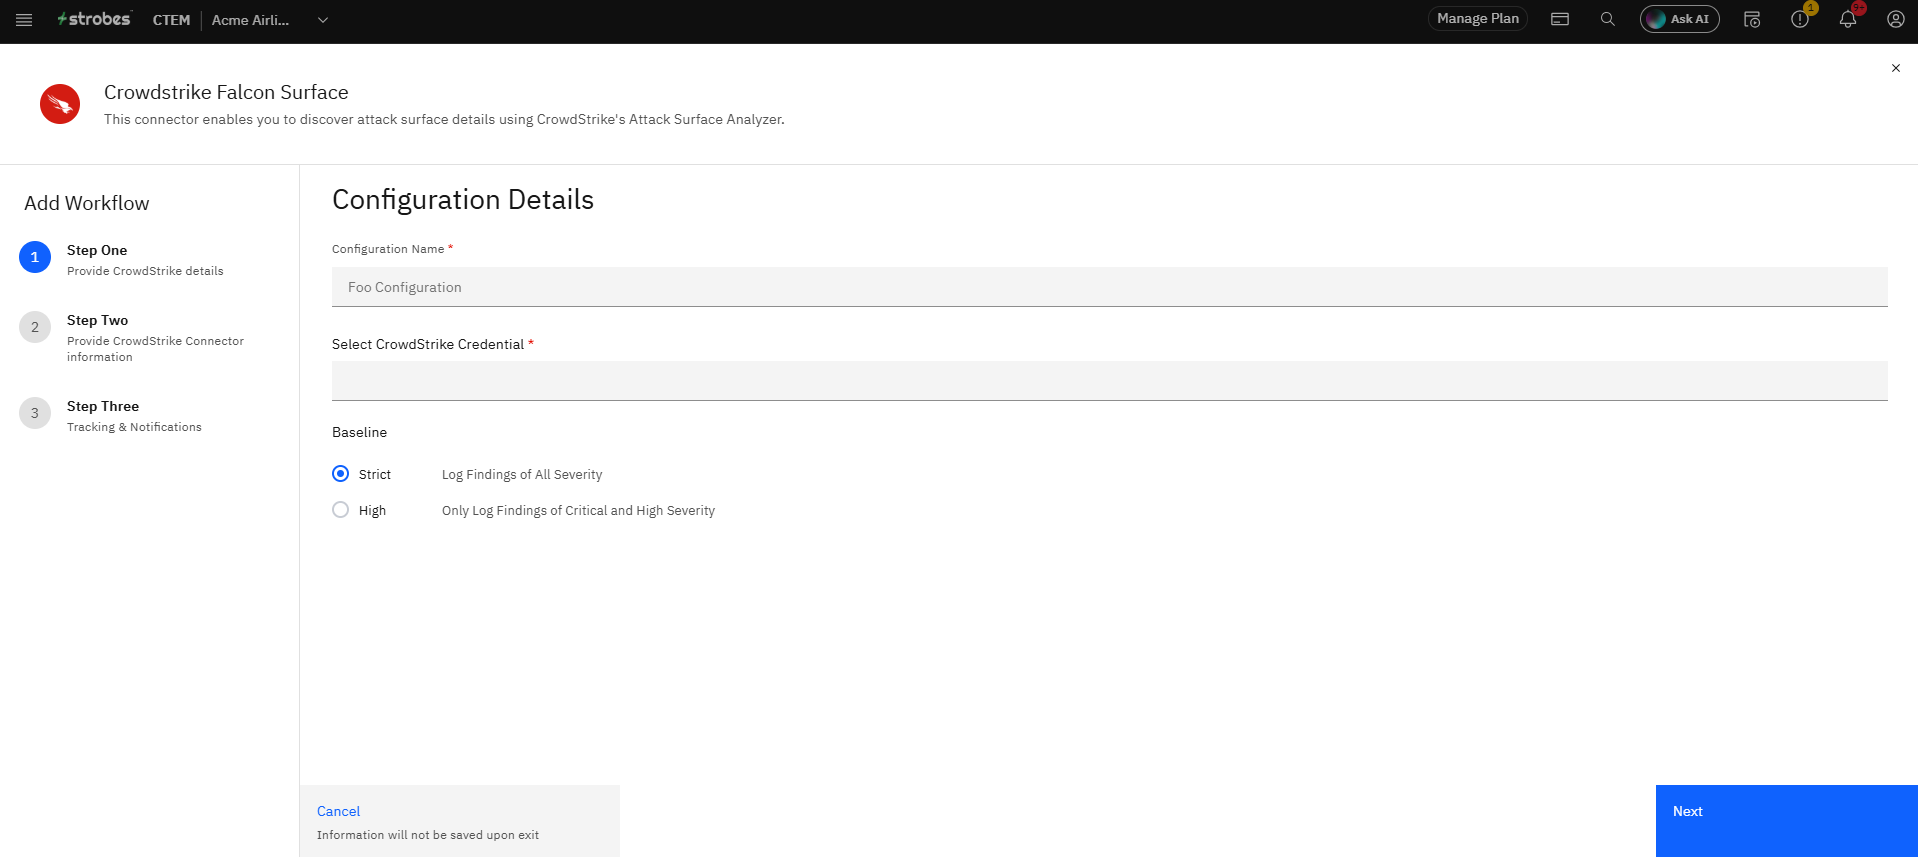
Click Add Configuration on the Crowdstrike Falcon Surface card. The Add Workflow panel opens with three steps listed in the left sidebar.
Step 4 — Enter a Configuration Name
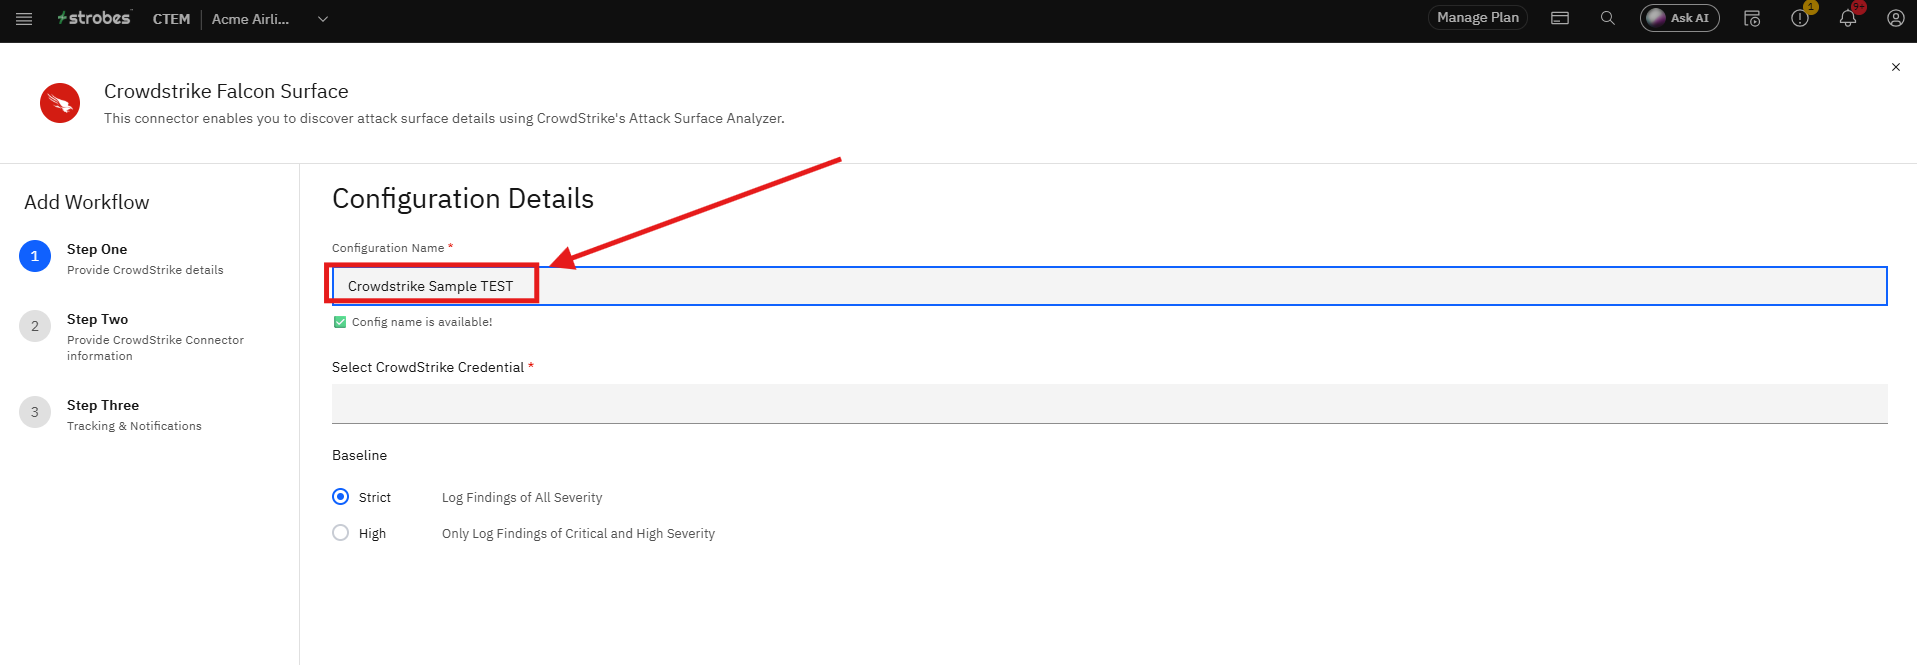
In the Configuration Name field, enter a unique name for this configuration. A green "Config name is available!" message confirms the name is not already taken.
Step 5 — Select a CrowdStrike Credential
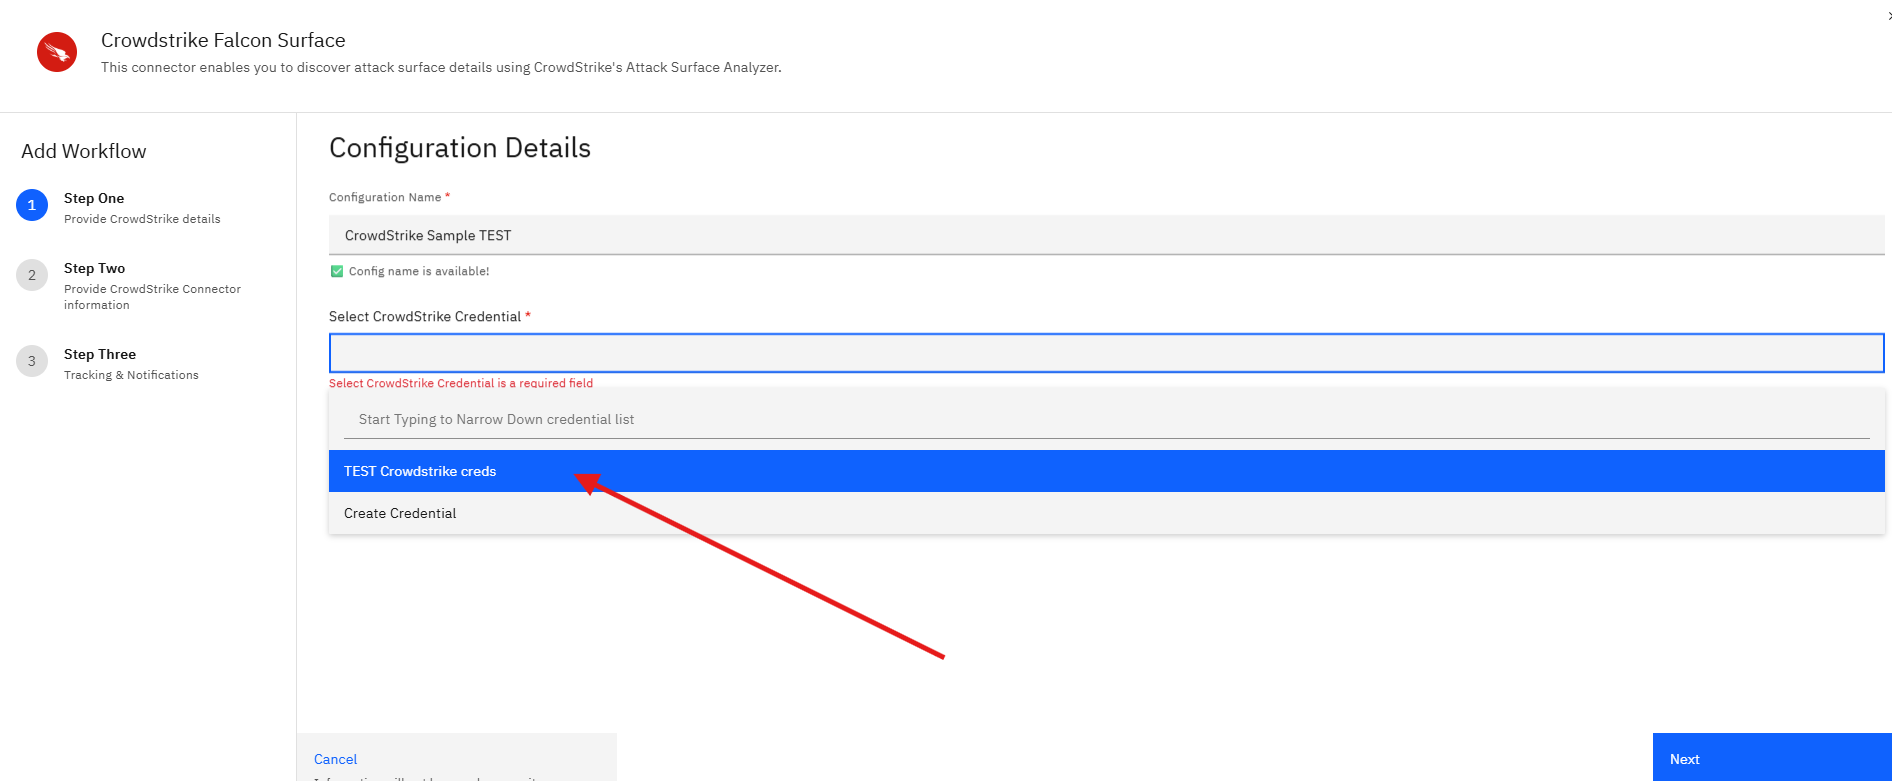
Click the Select CrowdStrike Credential dropdown. If you have an existing saved credential, select it from the list. If not, click Create Credential to add one now.
Step 6 — Add a New Credential (if needed)
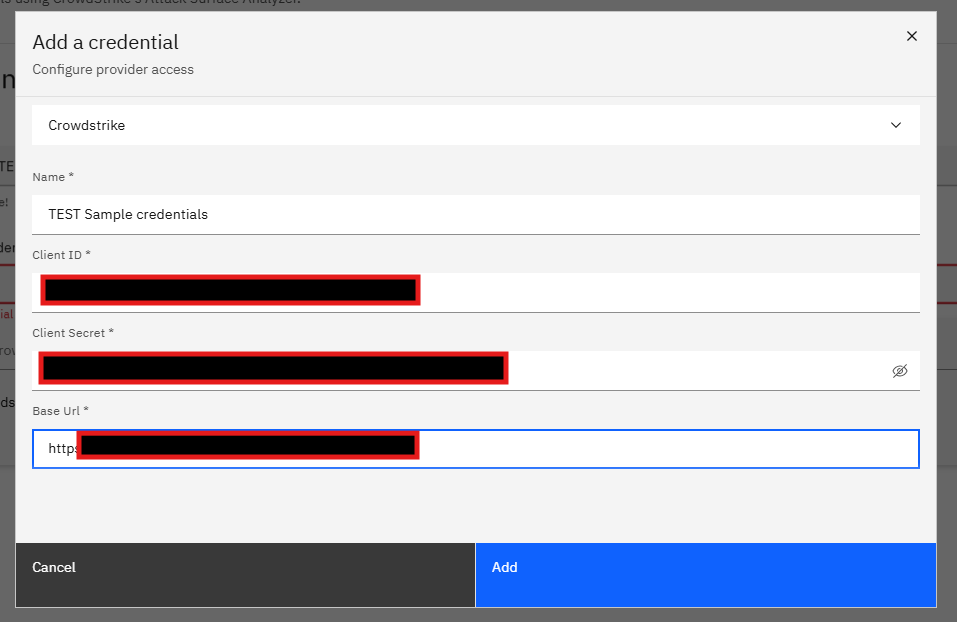
The Add a credential modal opens. Fill in all four fields:
Name (required) A label for this credential set, used for internal reference only.
Client ID (required) Your CrowdStrike API Client ID.
Client Secret (required) Your CrowdStrike API Client Secret.
Base URL (required) Your CrowdStrike API Base URL.
Step 7 — Save the Credential
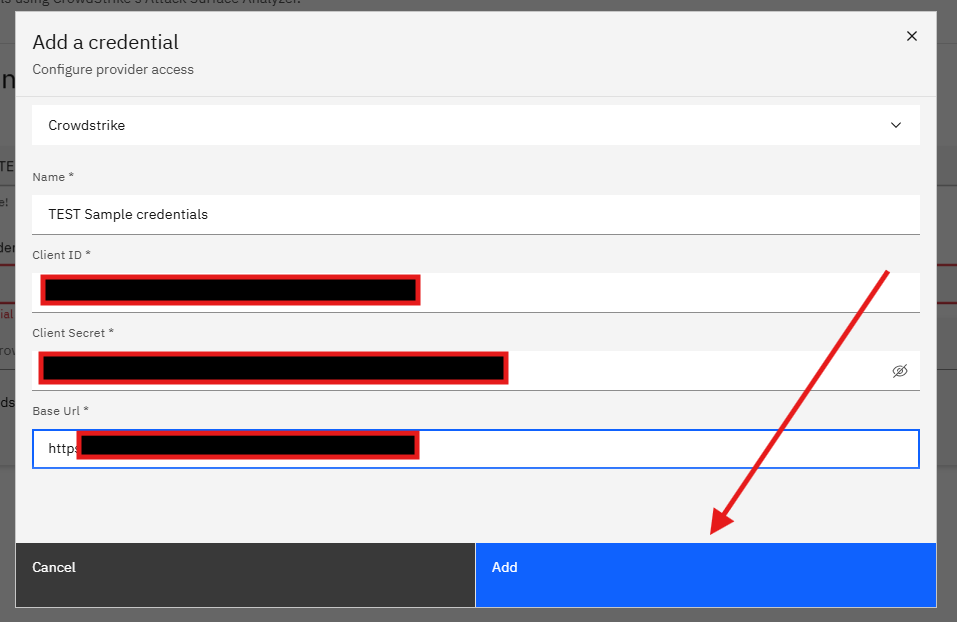
Click Add. The modal closes and the new credential is automatically selected in the Configuration Details form.
Step 8 — Choose a Baseline
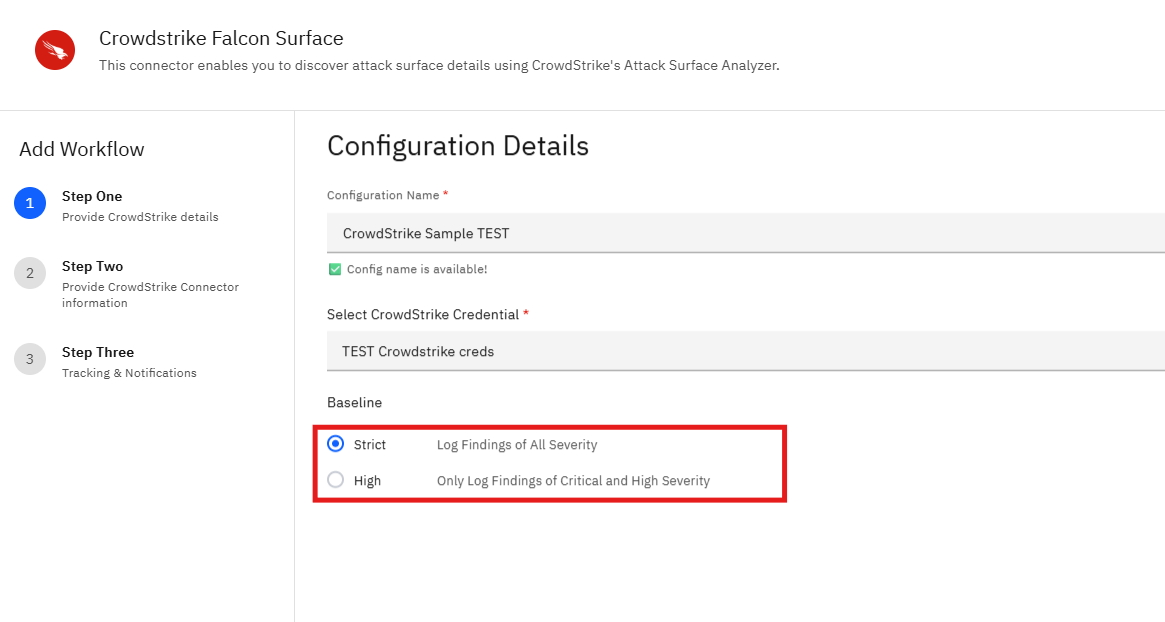
Under Baseline, select which findings to import from CrowdStrike:
Option | What it imports |
|---|---|
Strict | Findings of all severity levels |
High | Critical and High severity findings only |
Step 9 — Proceed to Step Two
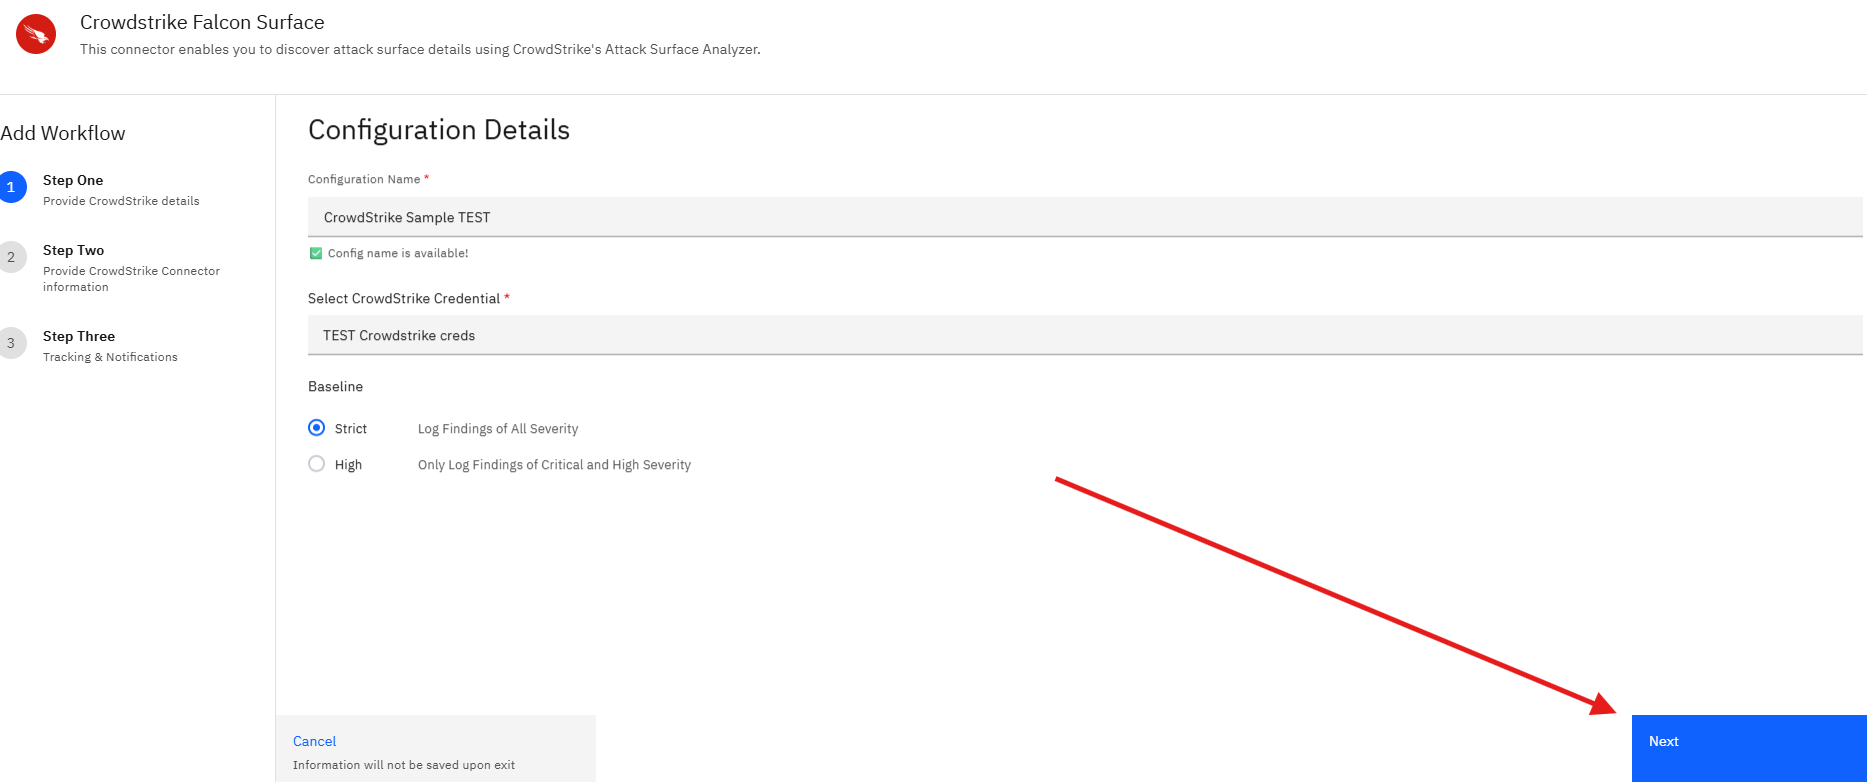
Click Next. The wizard moves to Step Two: Provide CrowdStrike Connector information.
Step 10 — Select an Agent
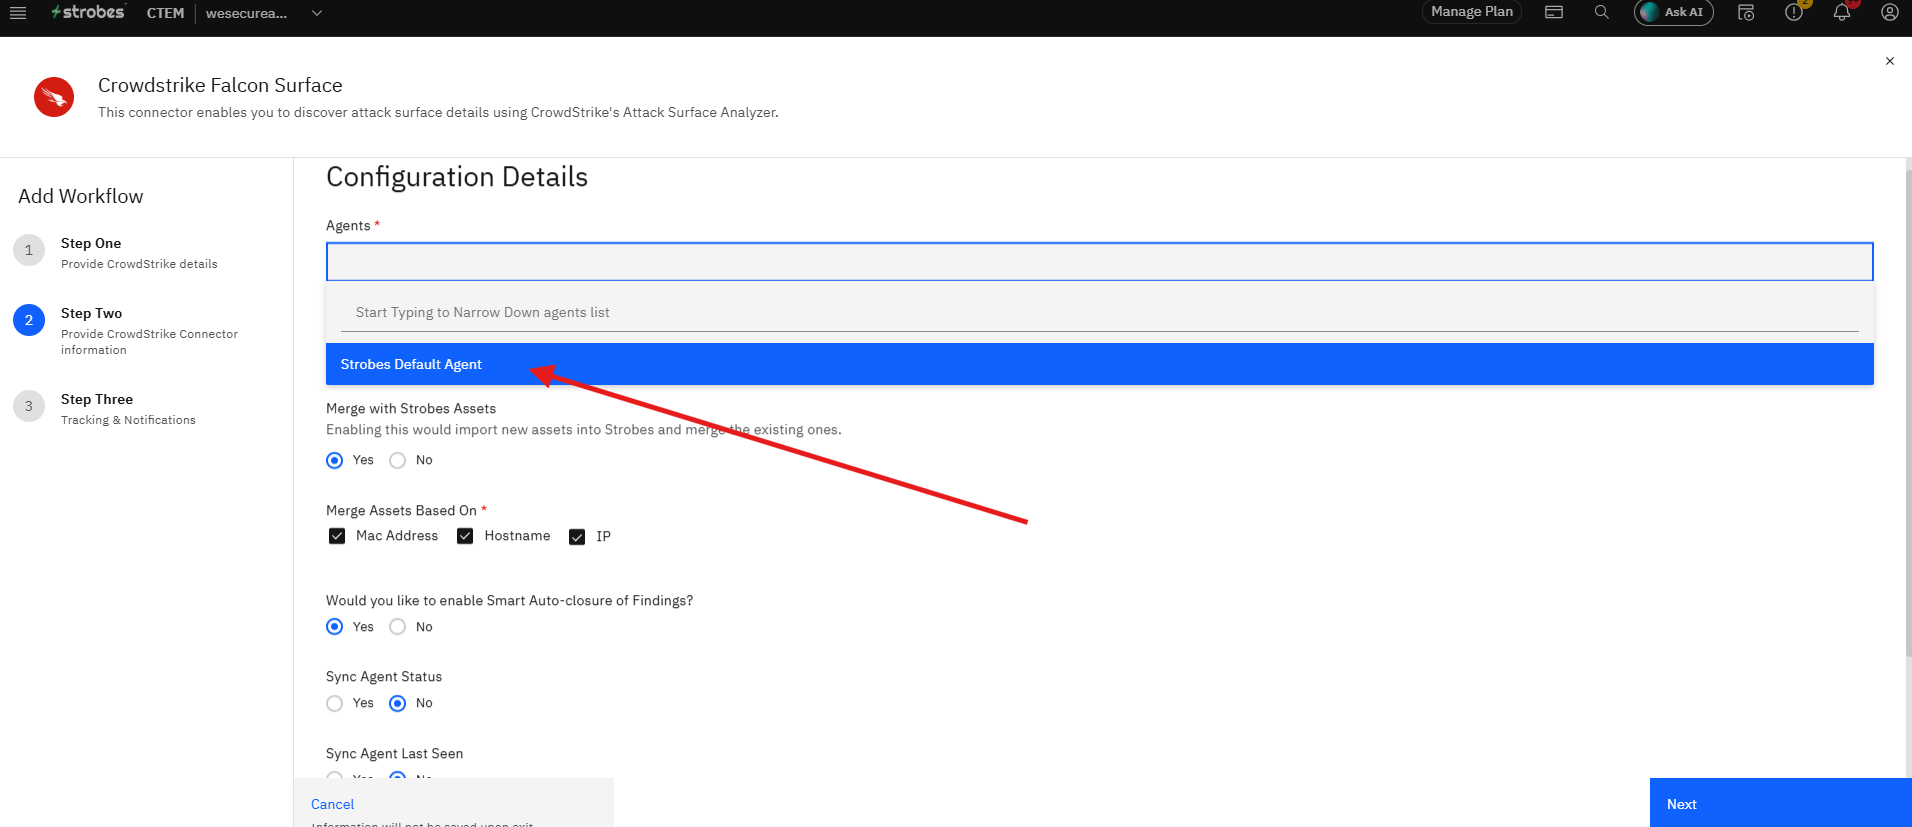
Click the Agents field and select the Strobes agent that will handle this connector's data. The default selection is Strobes Default Agent.
Step 11 — Add Tags (Optional)
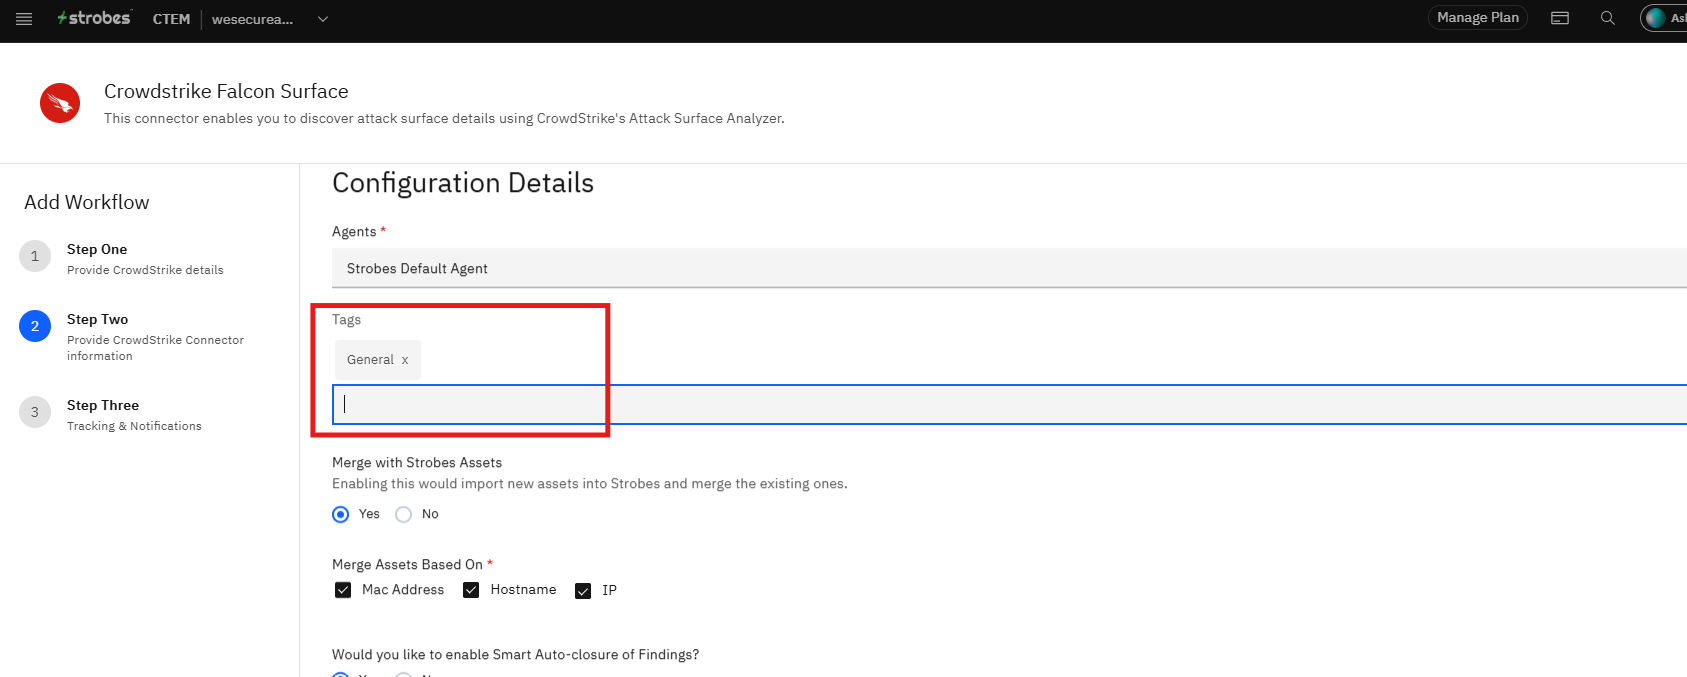
Click the Tags field and type any tags you want to apply to the assets and findings imported by this connector. Tags help with filtering and scoping data inside Strobes. Leave this field empty if no tags are needed.
Step 12 — Set Merge with Strobes Assets
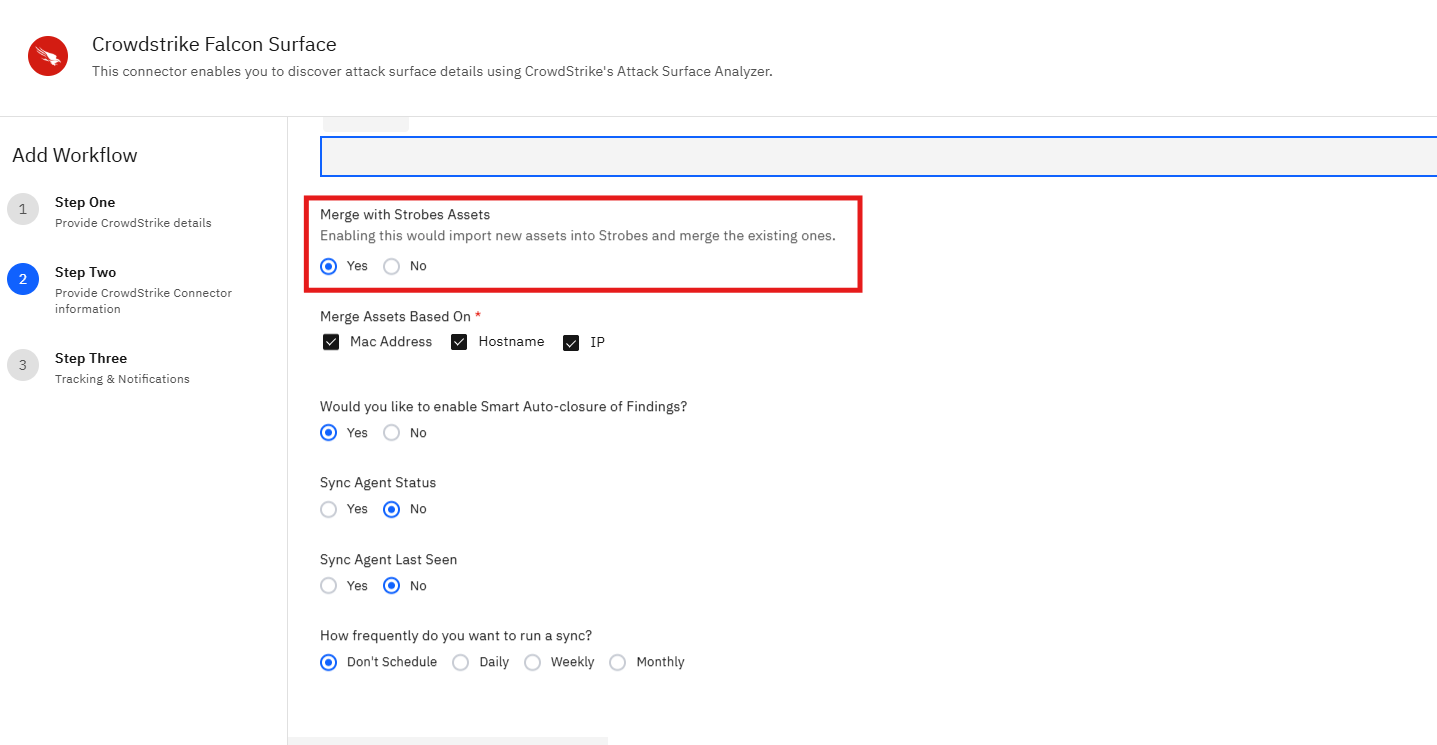
Under Merge with Strobes Assets, select Yes to import new assets from CrowdStrike and merge duplicates with existing Strobes asset records, or No to create separate records for all incoming assets.
Step 13 — Set Merge Assets Based On
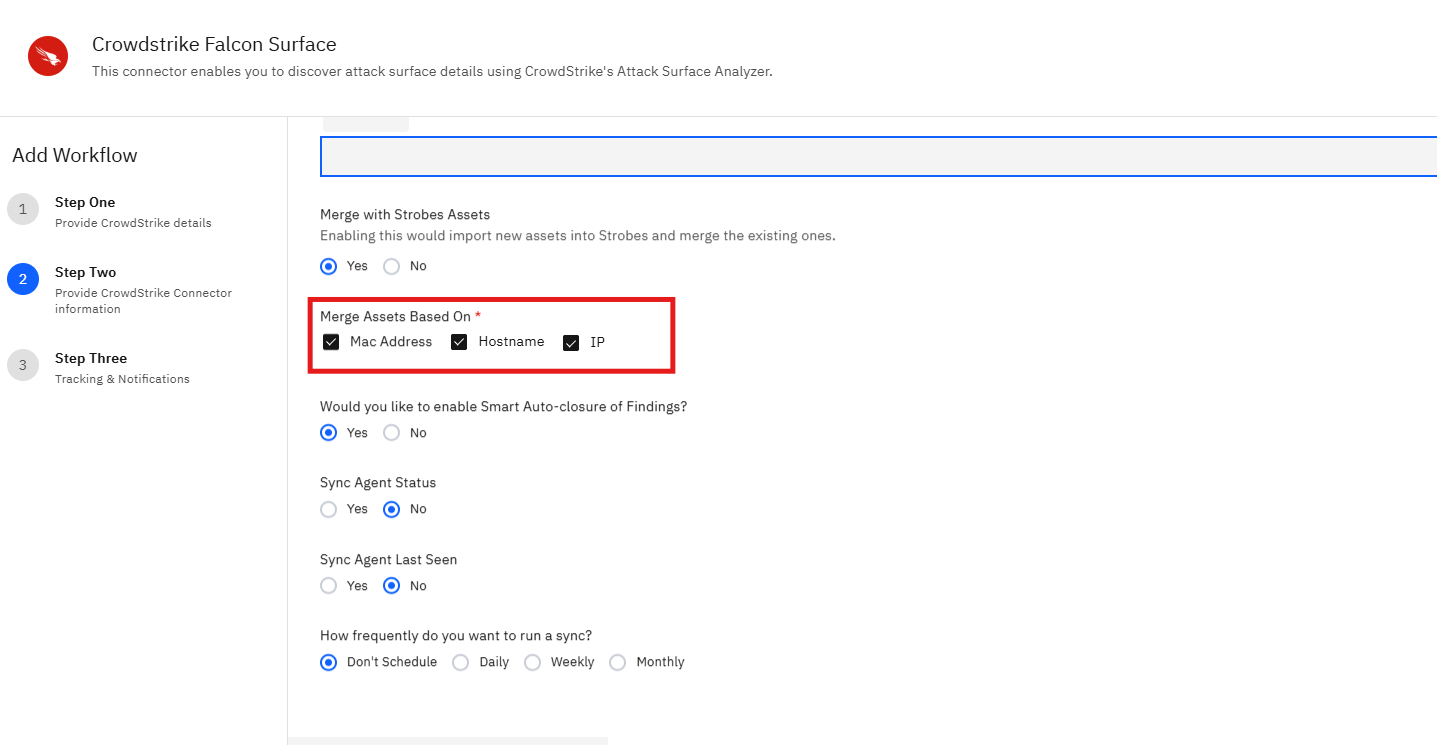
Check the fields Strobes should use to identify and match duplicate assets. The available options are Mac Address, Hostname, and IP. All three are checked by default.
Step 14 — Enable Smart Auto-closure
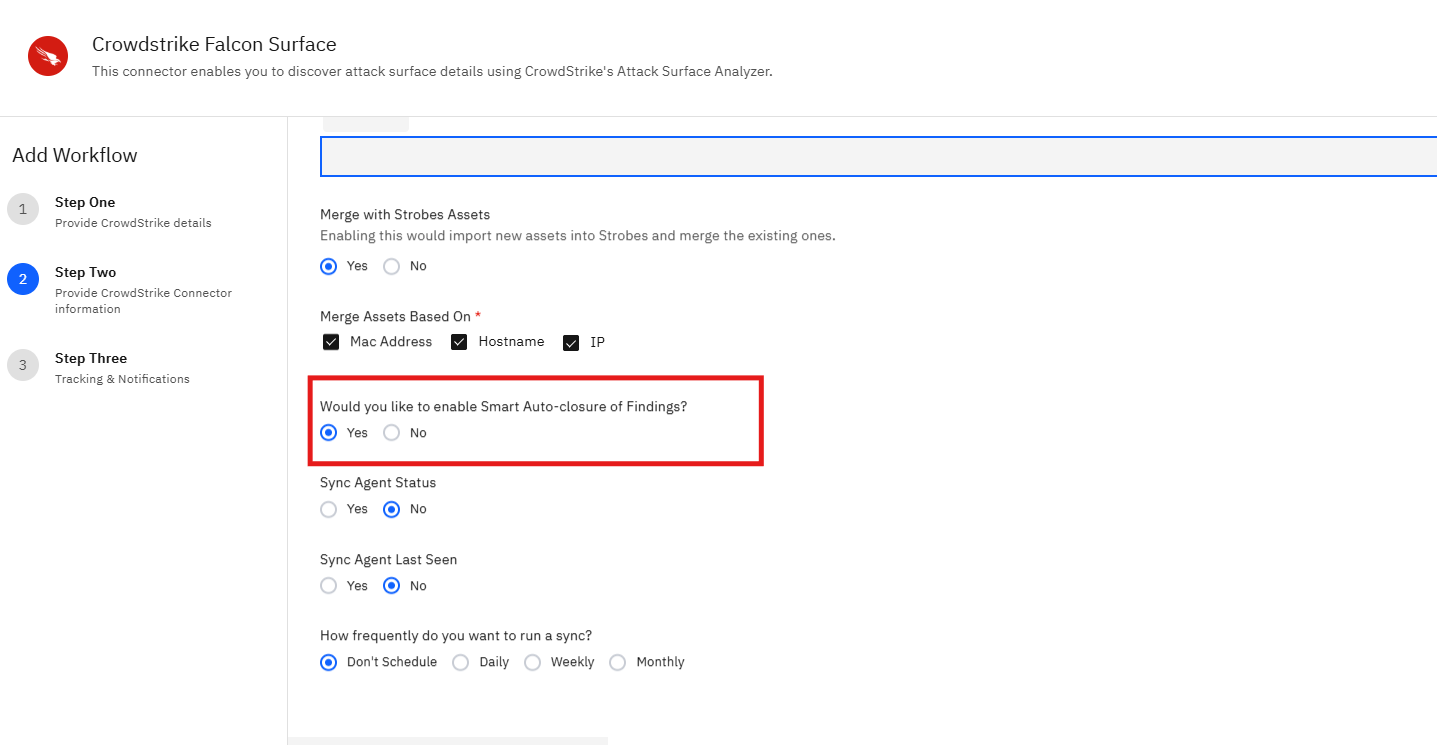
Under Would you like to enable Smart Auto-closure of Findings?, select Yes to have Strobes automatically close findings that no longer appear in the latest CrowdStrike sync, or No to manage finding states manually.
Step 15 — Set Sync Agent Status
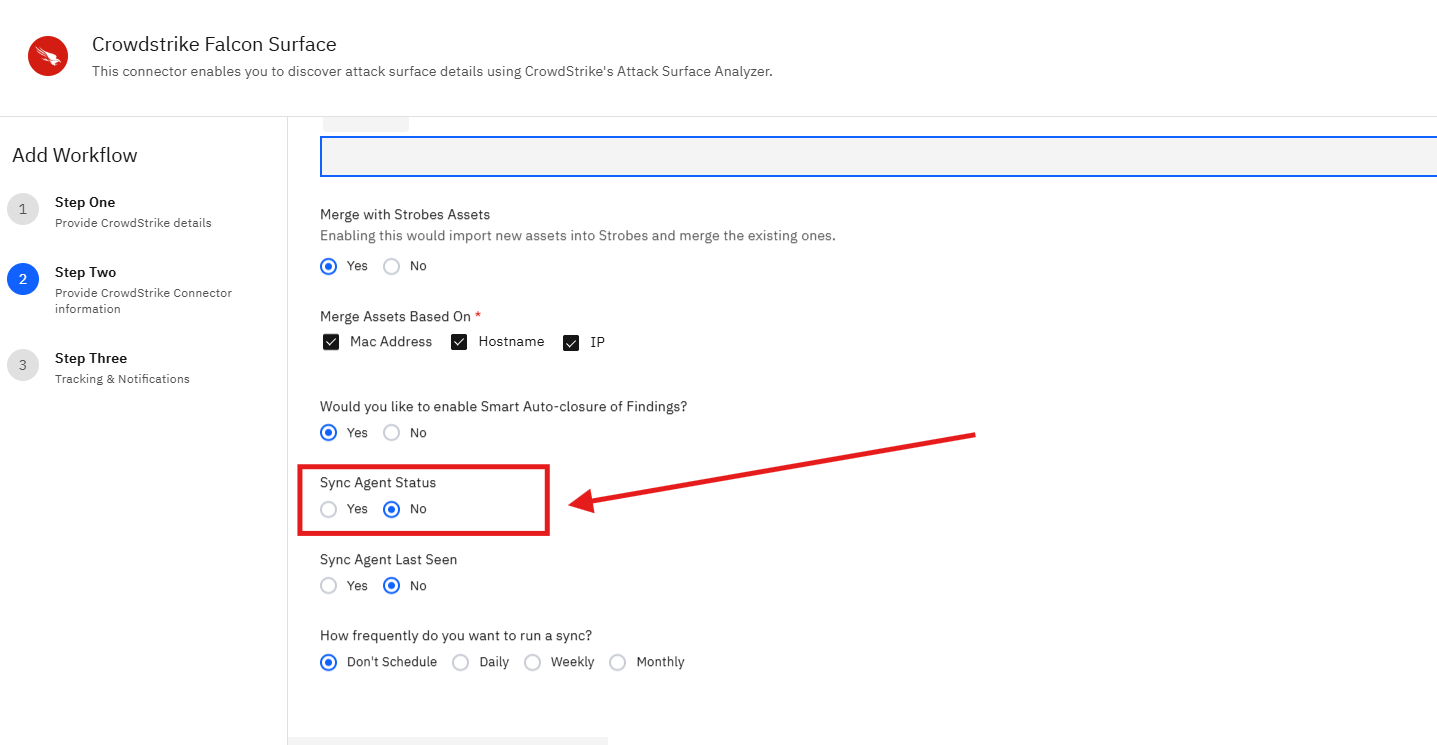
Under Sync Agent Status, choose whether to pull the CrowdStrike agent status into Strobes asset records. Select Yes or No.
Step 16 — Set Sync Agent Last Seen
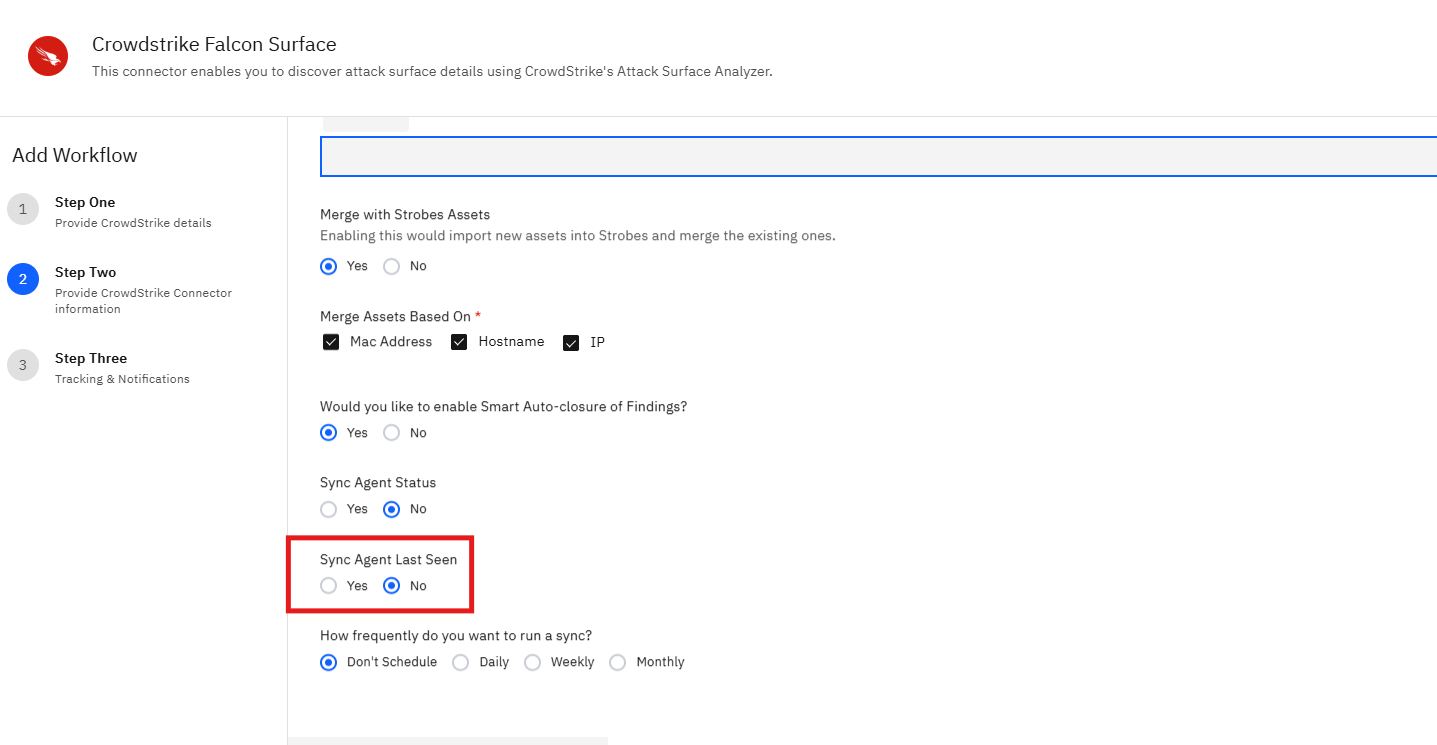
Under Sync Agent Last Seen, choose whether to sync the last-seen timestamp of the CrowdStrike agent. Select Yes or No.
Step 17 — Set Sync Frequency
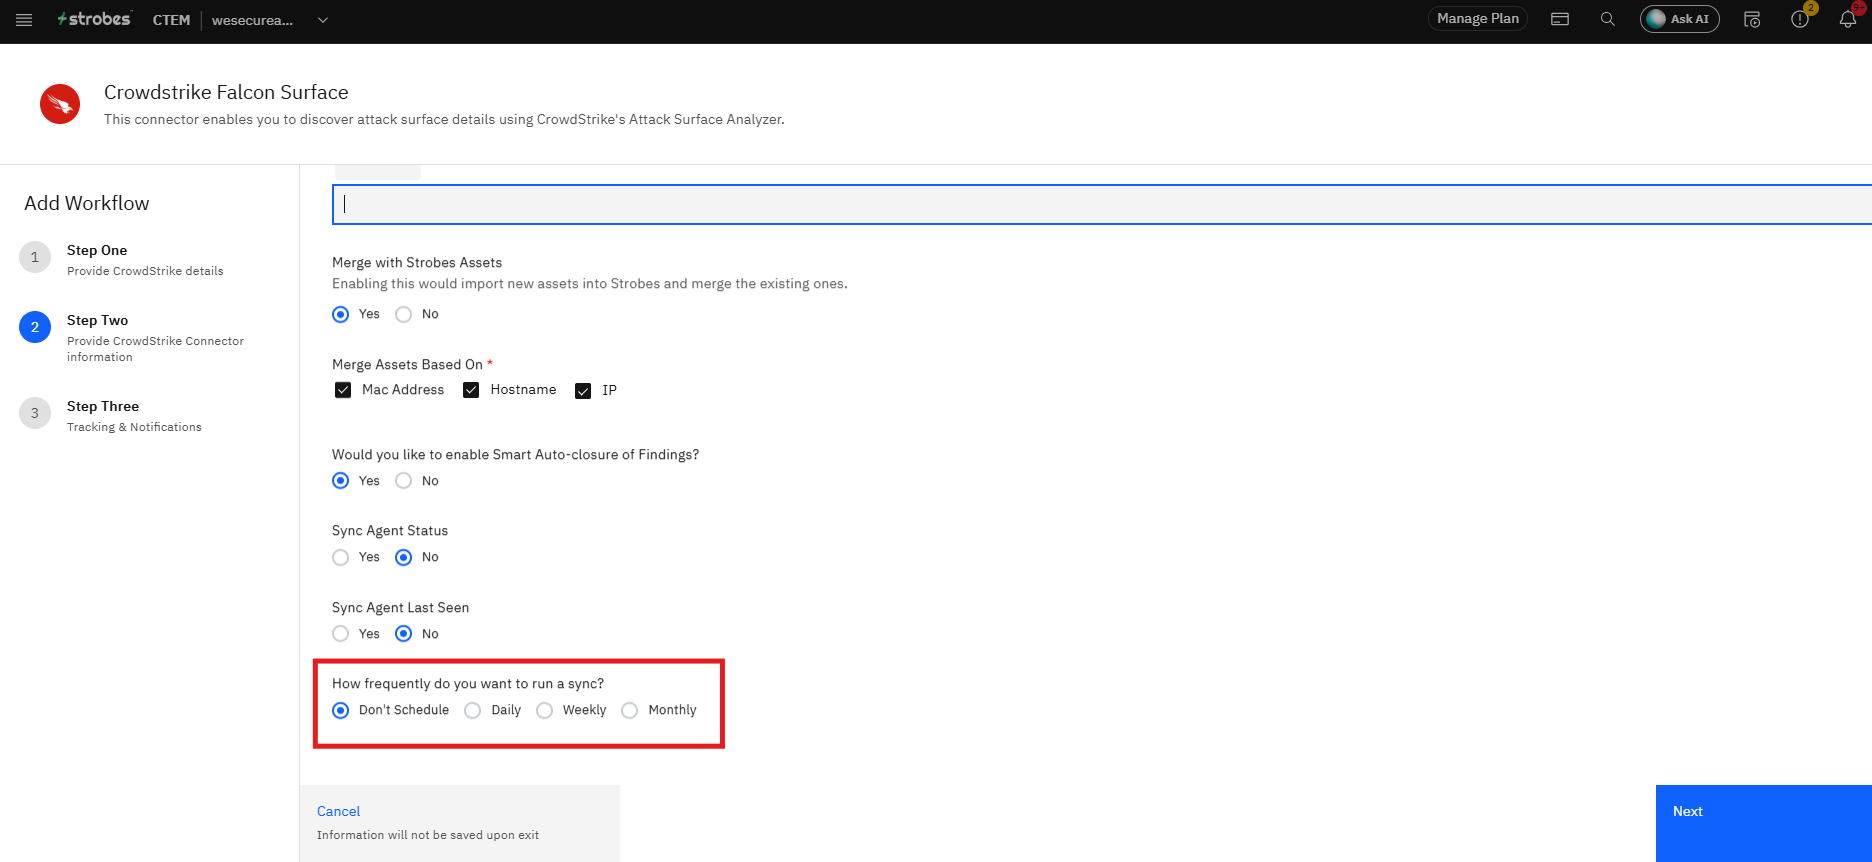
Under How frequently do you want to run a sync?, select a recurring sync schedule:
Option | Description |
|---|---|
Don't Schedule | Run syncs manually only |
Daily | Sync once every day |
Weekly | Sync once every week |
Monthly | Sync once every month |
Step 18 — Proceed to Step Three
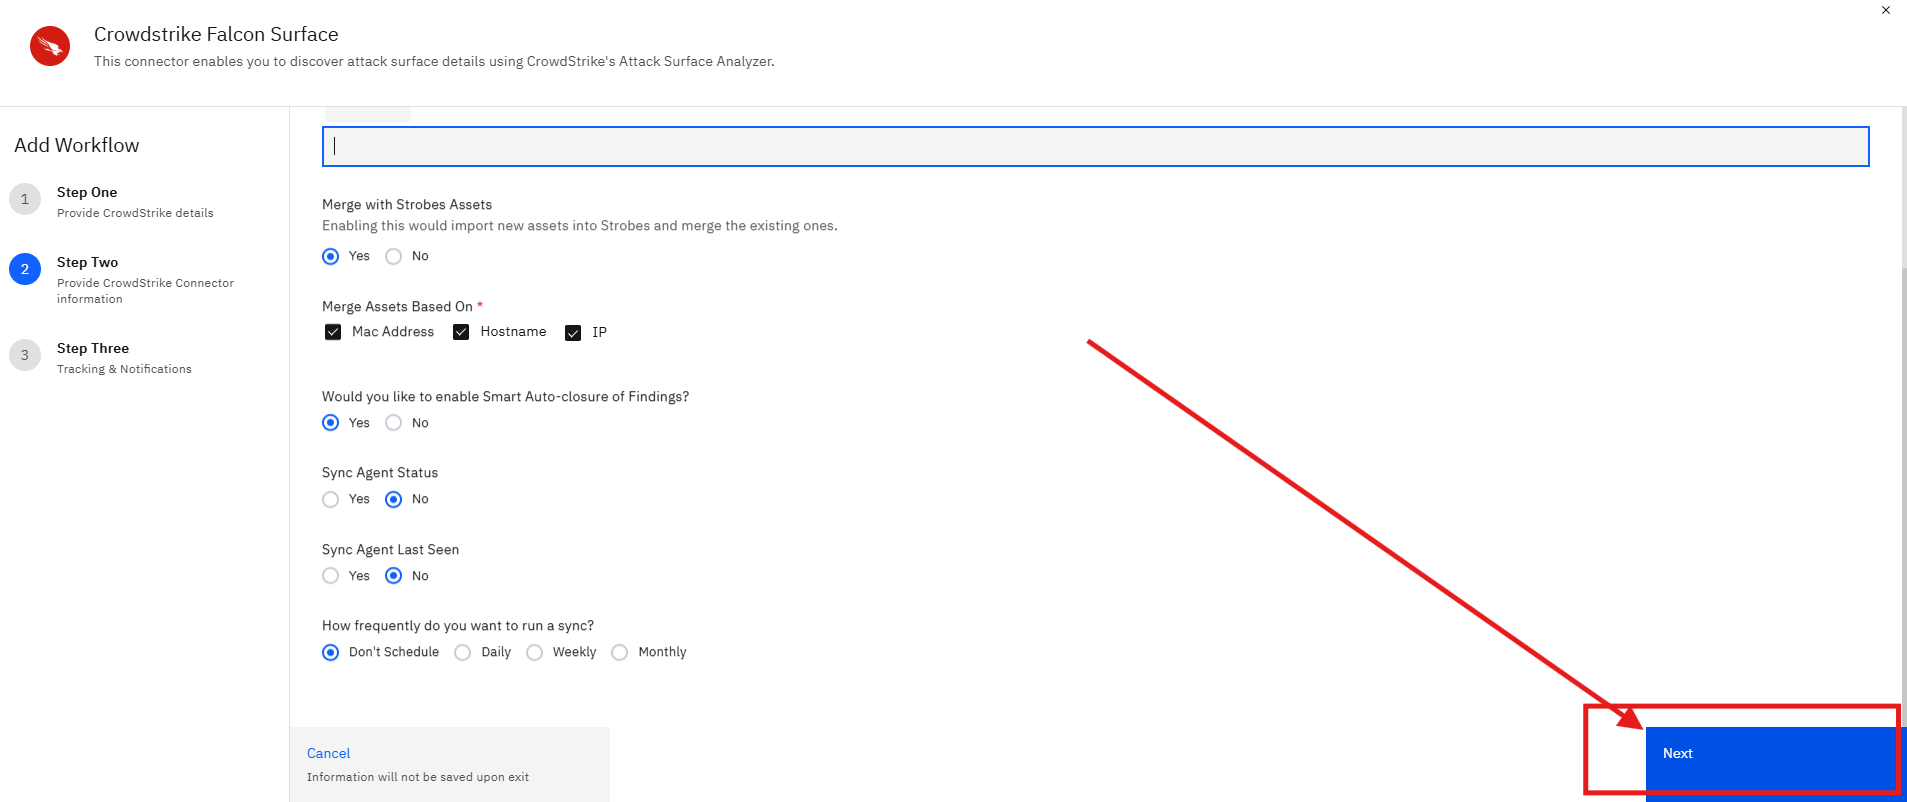
Click Next. The wizard moves to Step Three: Tracking & Notifications.
Step 19 — Configure a Notification Channel (Optional)
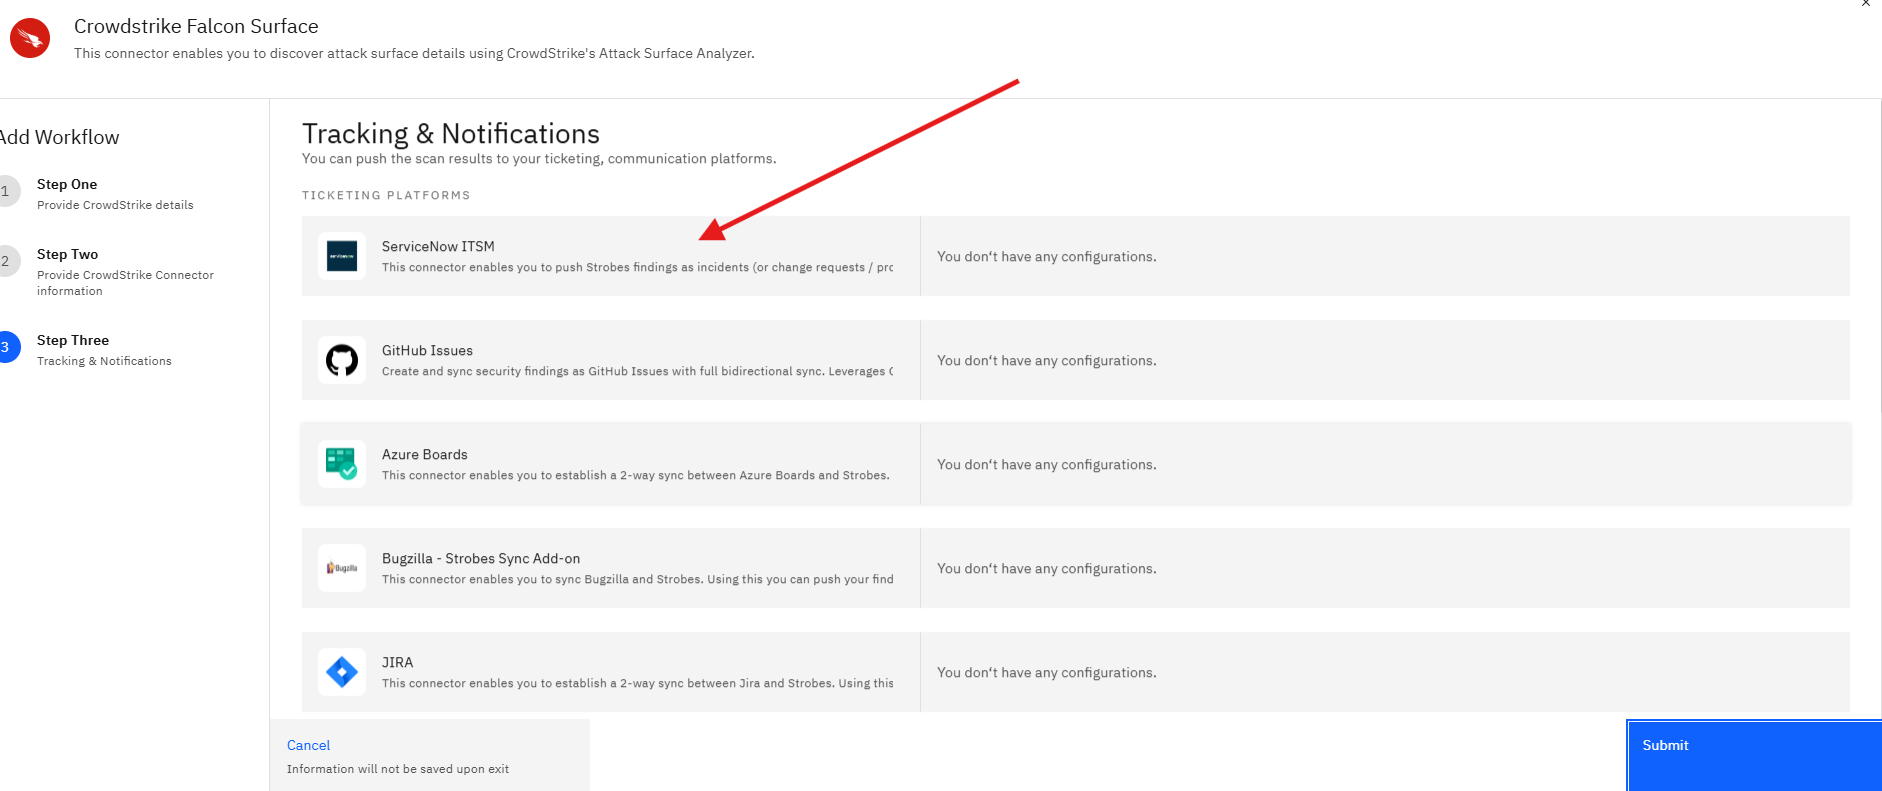
This step lets you connect a notification channel to receive alerts when this connector syncs or detects new findings. The available channels are MS Teams, Email, Microsoft 365 Email, Flock Messenger, and Slack.
If a channel is already configured elsewhere in Strobes, it appears here and can be linked to this connector. If no channels are set up yet, you can skip this step and configure notifications later.
Step 20 — Submit the Configuration
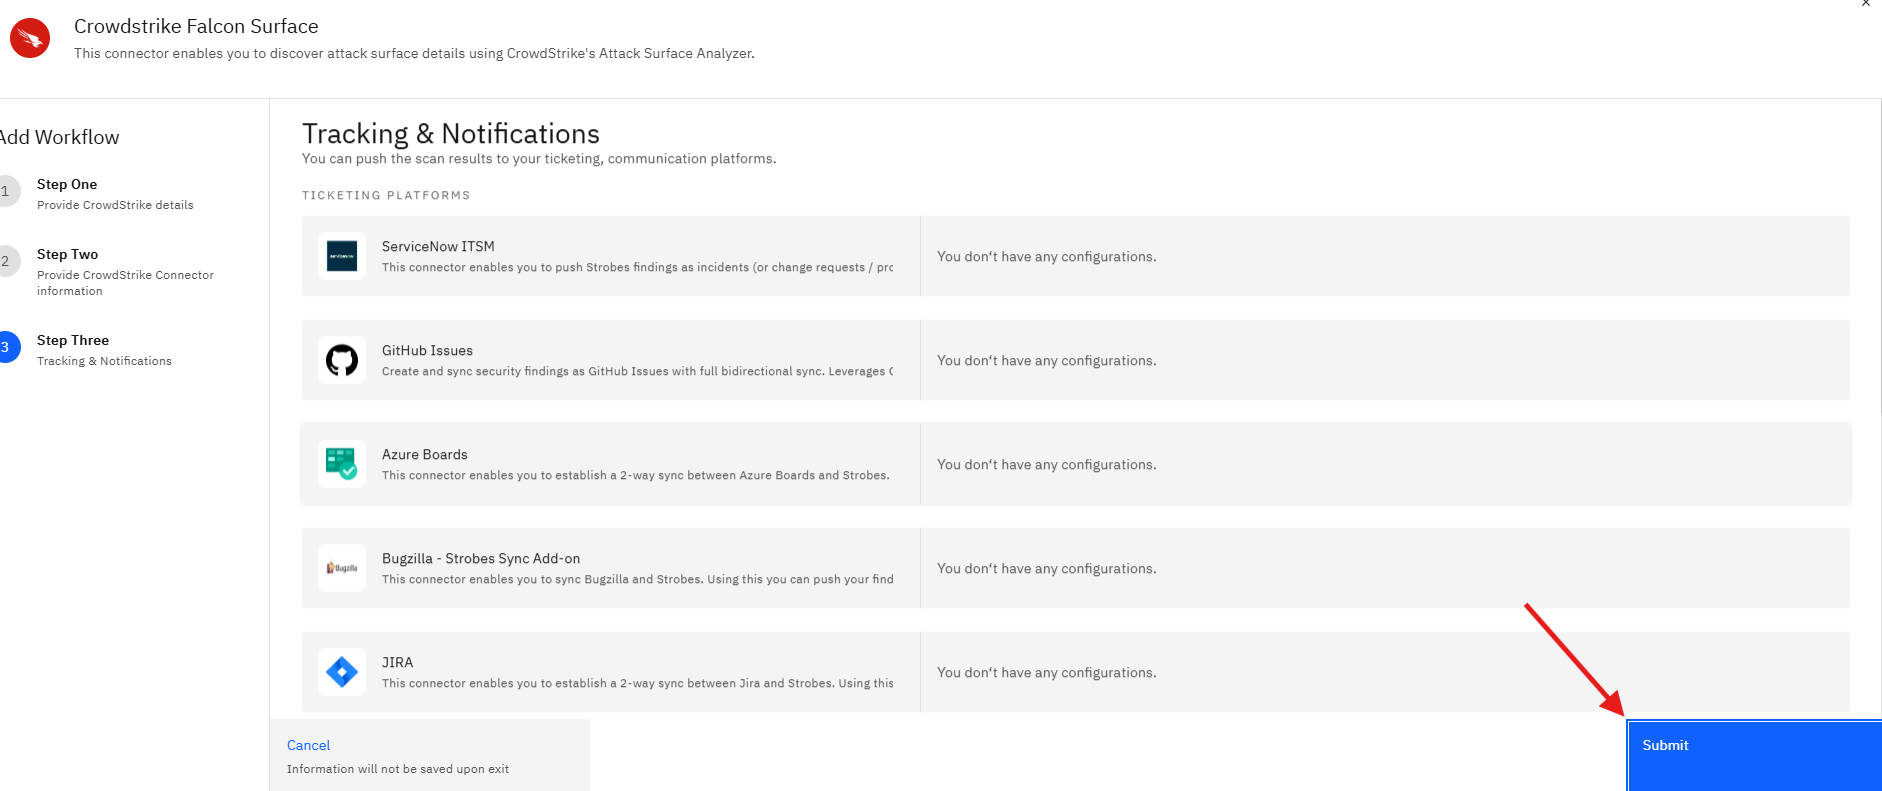
Click Submit to save and activate the connector. Strobes will begin syncing data from CrowdStrike Falcon Surface according to the schedule you configured.
Tips
Use Strict baseline during initial setup. Importing all severity levels gives you the full picture of your attack surface from the start. You can narrow it to High only after reviewing the data volume.
Enable Merge with Strobes Assets from the start. Without merging, every sync can produce duplicate asset records. Enabling merge with all three identifiers (Hostname, IP, Mac Address) keeps your inventory clean.
Enable Smart Auto-closure to reflect remediation automatically. When CrowdStrike no longer reports a finding, Strobes will close it on the next sync rather than leaving stale open records.
Credentials are reusable. A saved CrowdStrike credential can be selected for other CrowdStrike connector configurations without re-entering the Client ID and Secret each time.
Set the sync schedule to match your scan cadence. If CrowdStrike scans run daily, a daily sync keeps Strobes in step. If scans are less frequent, weekly or monthly may be more appropriate.