
Understanding and Managing Assets in Strobes
What Is an Asset?
An asset is a digital inventory item in your organization — anything through which you deliver IT services to customers or internal employees. Assets in Strobes include:
- Web applications
- Code repositories
- API services
- Mobile applications
- Network hosts
- Container images
- Cloud environments
Strobes uses assets as the foundation for risk scoring and prioritization. Every finding is tied to an asset, and the properties you set on an asset — its business sensitivity and exposure level — directly influence how findings against it are ranked in your queue.
Business Sensitivity
Business sensitivity describes how critical an asset is to your organization's operations.
Strobes uses five levels:
- Critical — Core business services carrying highly sensitive data such as transactional information or PII.
- High — Important services that carry sensitive data or support core operations.
- Medium — Supporting assets that do not directly handle sensitive data, such as internal tools.
- Low — Assets with minimal business impact, such as static websites or test environments.
- None — No business sensitivity assigned. This is the default when assets are imported via CSV or XML-based connectors.
Business sensitivity is a direct input into the Strobes prioritization engine. A critical vulnerability on a Critical asset will score differently from the same vulnerability on an asset classified as Low.
Asset Exposure
Asset exposure describes how reachable an asset is from outside your organization. Strobes uses three levels — replacing the older Public/Private binary with a spectrum that reflects real-world reachability:
- High — The asset is reachable directly from the open internet with no complementary security controls in front of it. Anyone on the internet can reach the service and start interacting with it. This is what most people mean when they say an asset is "exposed."
- Medium — The asset is reachable from outside but is gated. It sits behind a VPN, WAF, authentication layer, IP allowlist, or jump host, or is exposed only to a limited set of partner or vendor networks. There is a path in from outside, but an attacker must get through a control first.
- Low — The asset has no path in from outside. It is internal only, network-segmented, and reachable only after something else in the environment has already been compromised.
Why this matters: A critical vulnerability on a High exposure asset and the same vulnerability on a Low exposure asset are not the same risk, but the old Public/Private flag had no way to express that difference — everything internet-facing looked equally urgent. The three-level model lets the risk score reflect real reachability, so what surfaces at the top of your queue is much closer to what an attacker would actually prioritize.
Exposure is editable per asset at any time. If an auto-classified value does not match your environment, adjust it and the risk scoring will follow immediately.
Asset Tags
Tags are free-form labels you can attach to any asset for grouping, filtering, and reporting. You can add tags when creating an asset manually or from the asset's detail page. Multiple tags can be applied to a single asset, separated by pressing Enter after each one.
Before You Start
- Role required: Owner or Manager access on your Strobes account.
- Asset URL: For web assets, have the full application URL ready (for example,
https://example.com).
Part 1 — Navigate to the Assets Page
Step 1 — Click Assets in the Left Sidebar
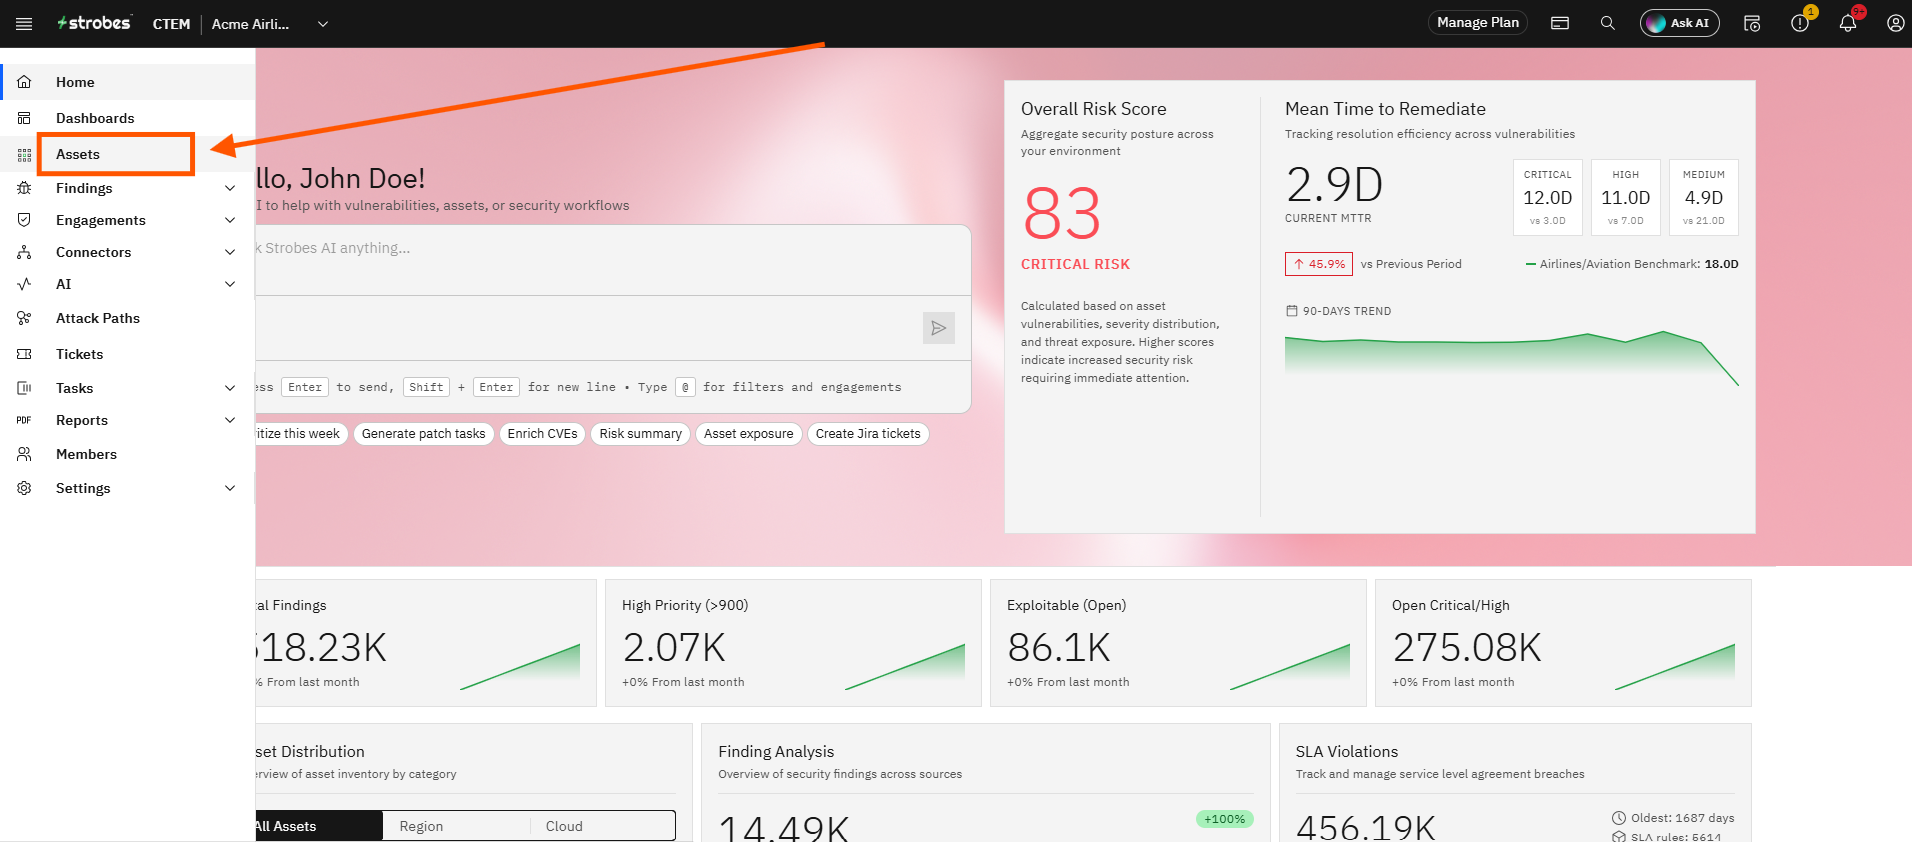
Click Assets in the left sidebar. The Assets Overview page opens.
Step 2 — Review the Assets Overview Page
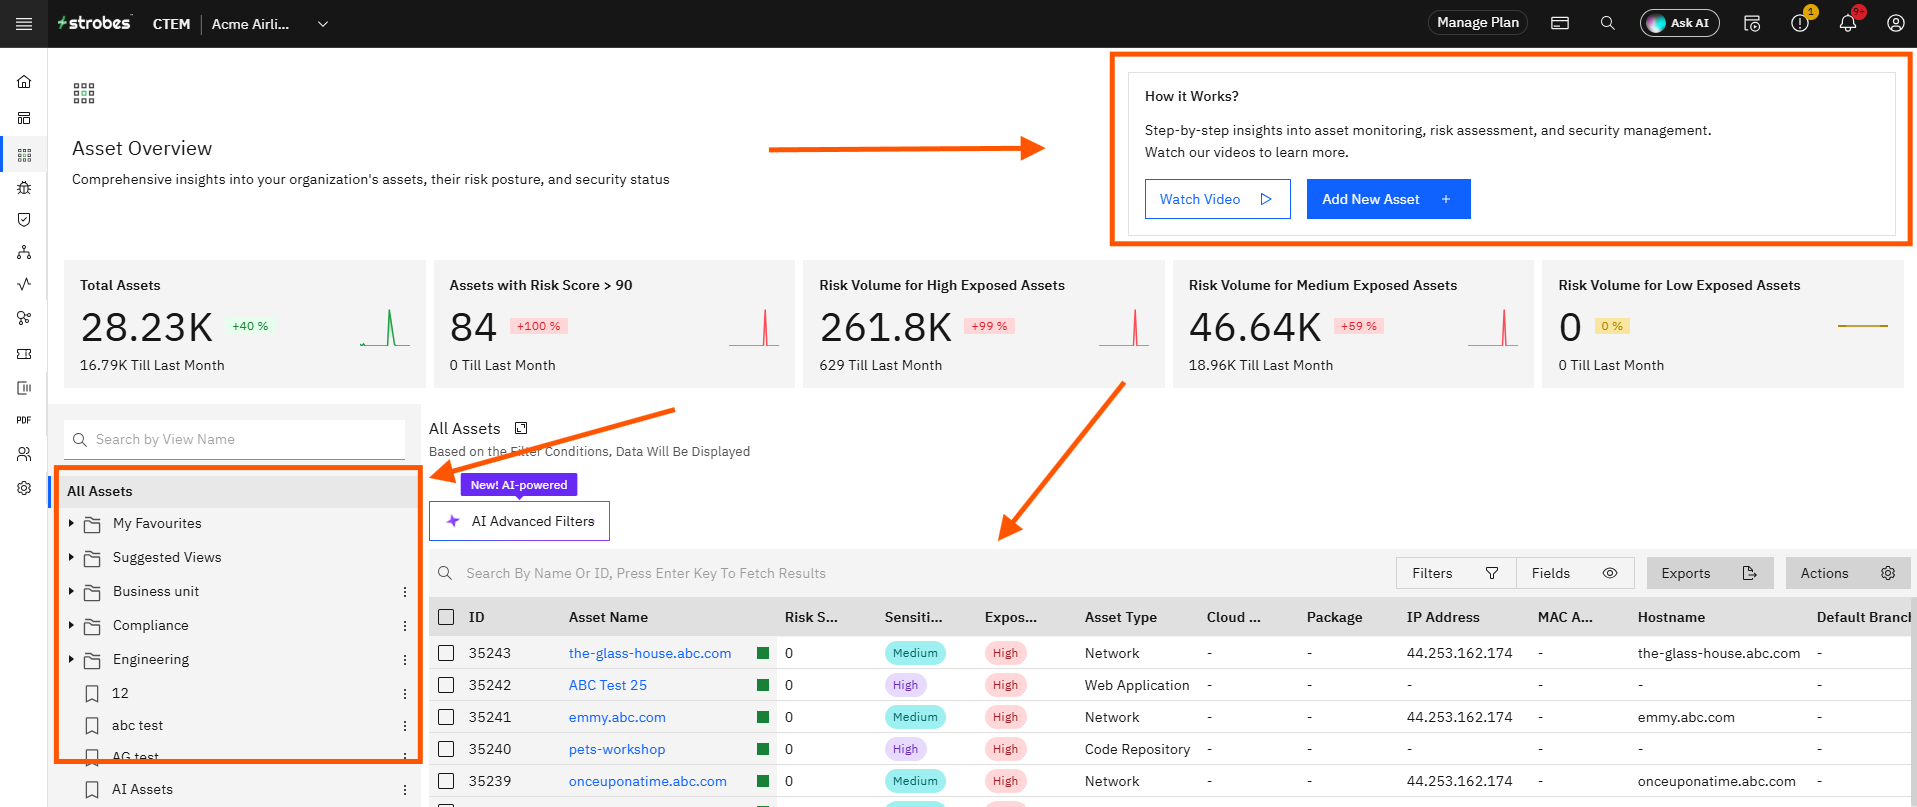
Review the Assets Overview page. The page is organized into three areas:
- Left sidebar — Lists saved asset views. Views are organized into grouped folders (such as My Favourites, Suggested Views, Engineering, Compliance, Business unit) and flat individual views. Click any view to filter the asset table to that view's conditions.
- Top-right panel — Shows a "How it Works?" description with a Watch Video button and the Add New Asset + button.
- Main area — Contains the stat cards at the top and the asset table below.
Step 3 — Review the Stat Cards
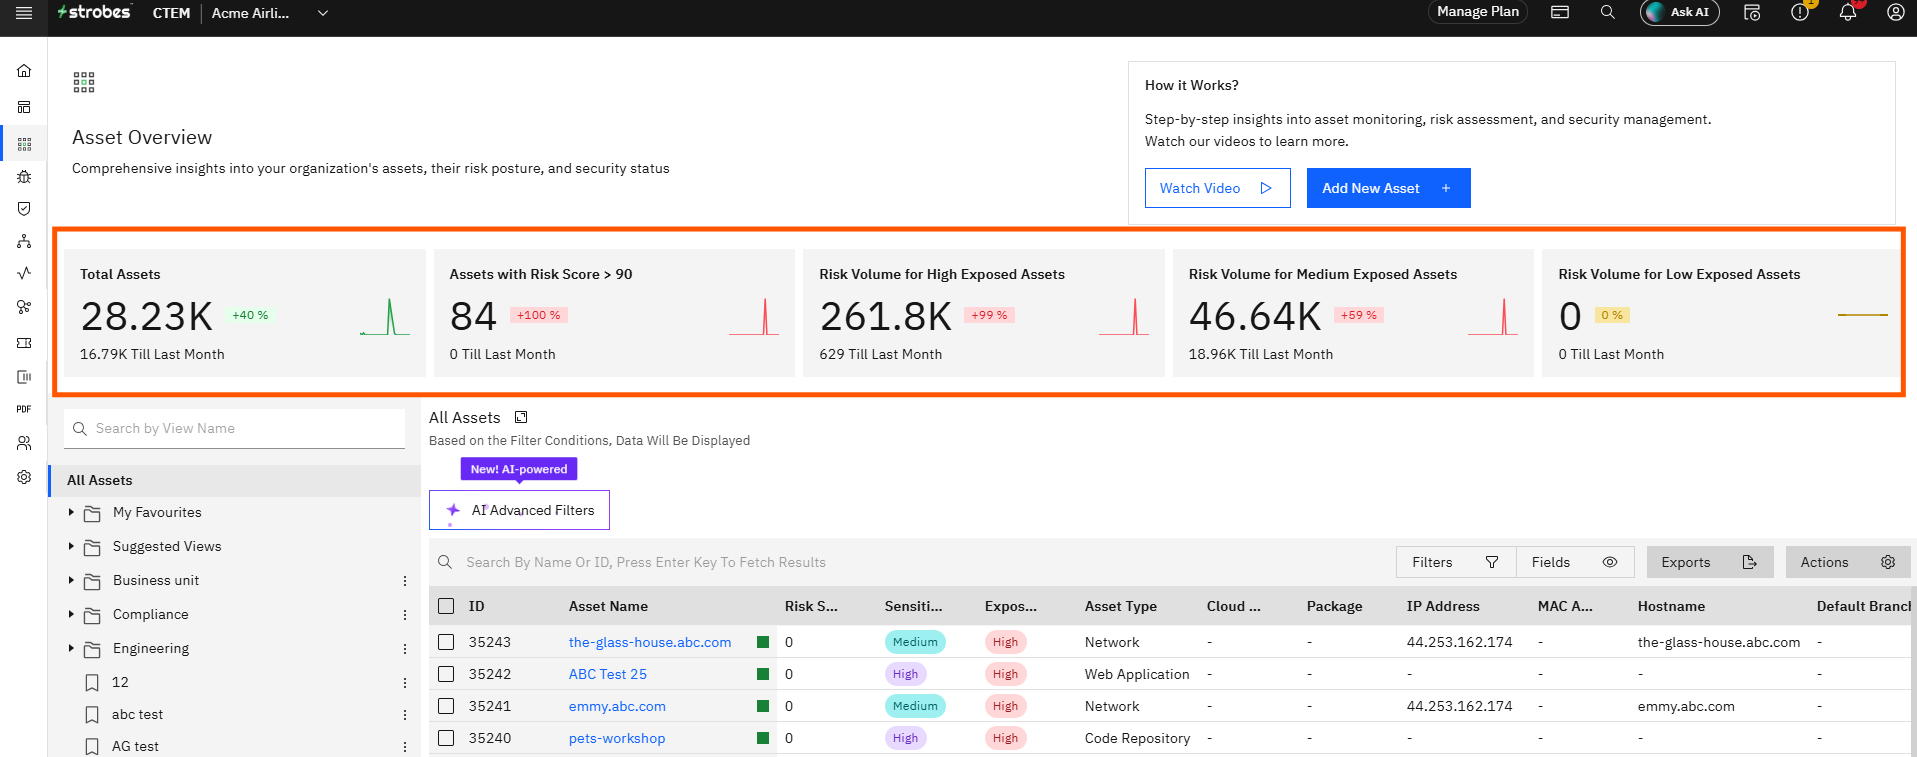
Review the five stat cards at the top of the page. Each card shows the current count, a percentage change compared to the previous period, the previous period value, and a sparkline trend chart:
- Total Assets — The total number of assets in your organization's inventory.
- Assets with Risk Score > 90 — The number of assets carrying a risk score above 90, indicating high-risk items requiring immediate attention.
- Risk Volume for High Exposed Assets — The aggregate risk volume across all assets classified with High exposure.
- Risk Volume for Medium Exposed Assets — The aggregate risk volume across all assets classified with Medium exposure.
- Risk Volume for Low Exposed Assets — The aggregate risk volume across all assets classified with Low exposure.
Step 4 — Review the Asset Table
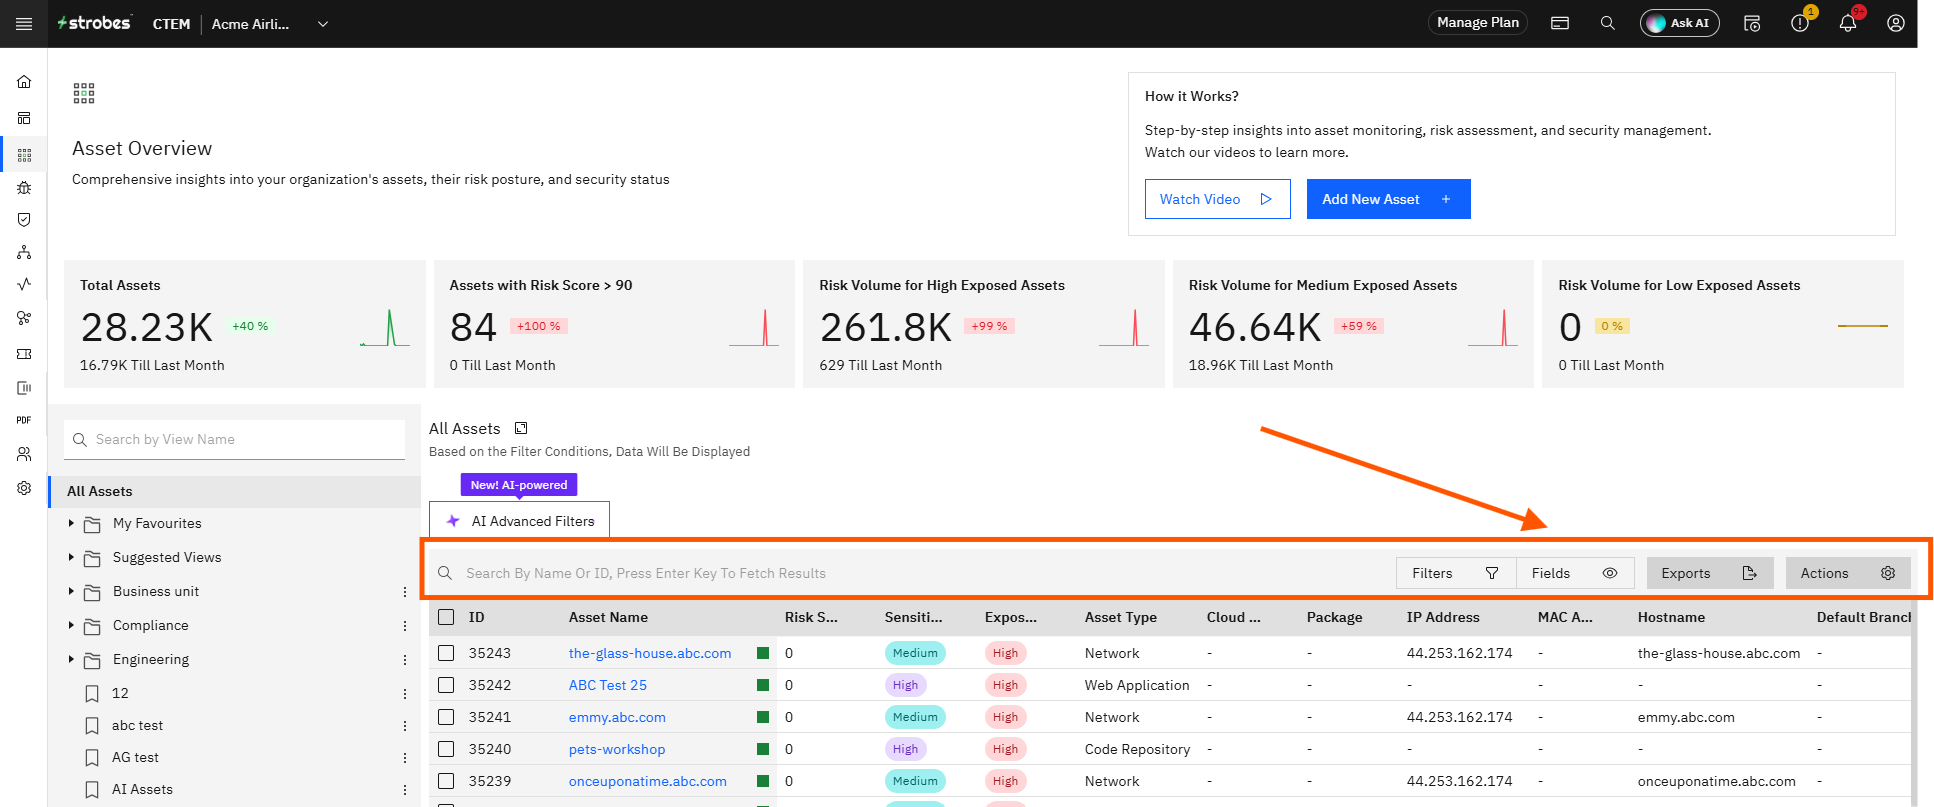
Review the asset table below the stat cards. The table toolbar contains four controls:
- Search bar — Search assets by name or ID. Press Enter to fetch results.
- Filters — Apply conditions to narrow down which assets are shown.
- Fields — Show or hide table columns.
- Exports — Export the current asset list.
- Actions — Perform bulk actions on selected assets.
The table displays columns including ID, Asset Name, Risk Score, Sensitivity (business sensitivity badge), Exposure (High/Medium/Low badge), Asset Type, IP Address, and Hostname. Click any asset name to open its detail page.
The + AI Advanced Filters button above the table lets you describe what you are looking for in natural language and the AI will build the filter for you.
Part 2 — Add a New Asset Individually
Step 5 — Click Add New Asset
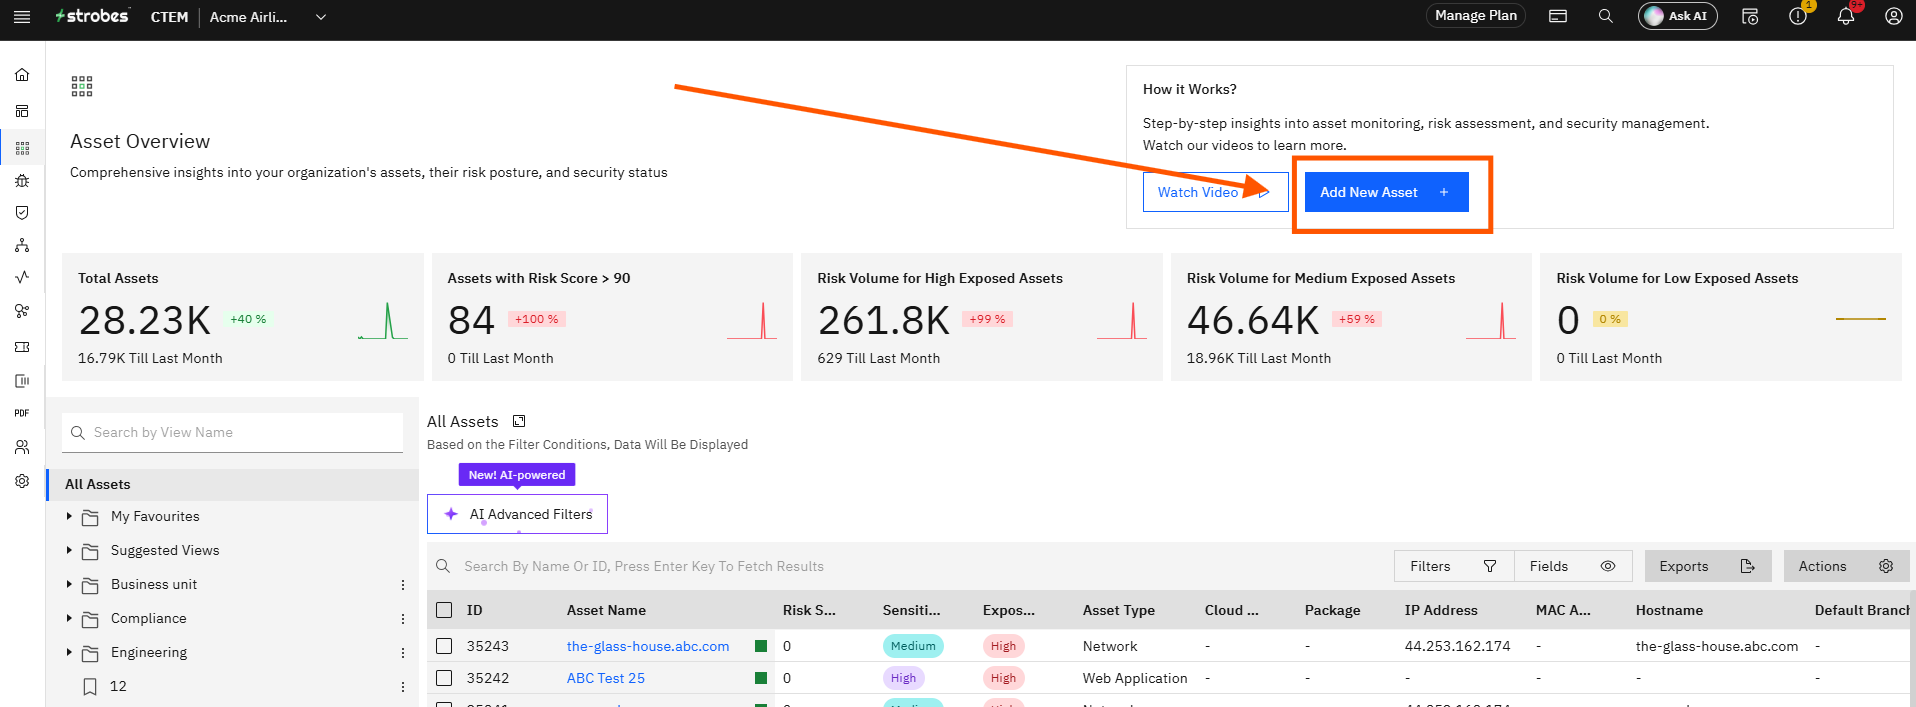
Click the Add New Asset + button in the top-right area of the page. The Add New Assets drawer slides open from the right.
Step 6 — Click the Add Individually Tab
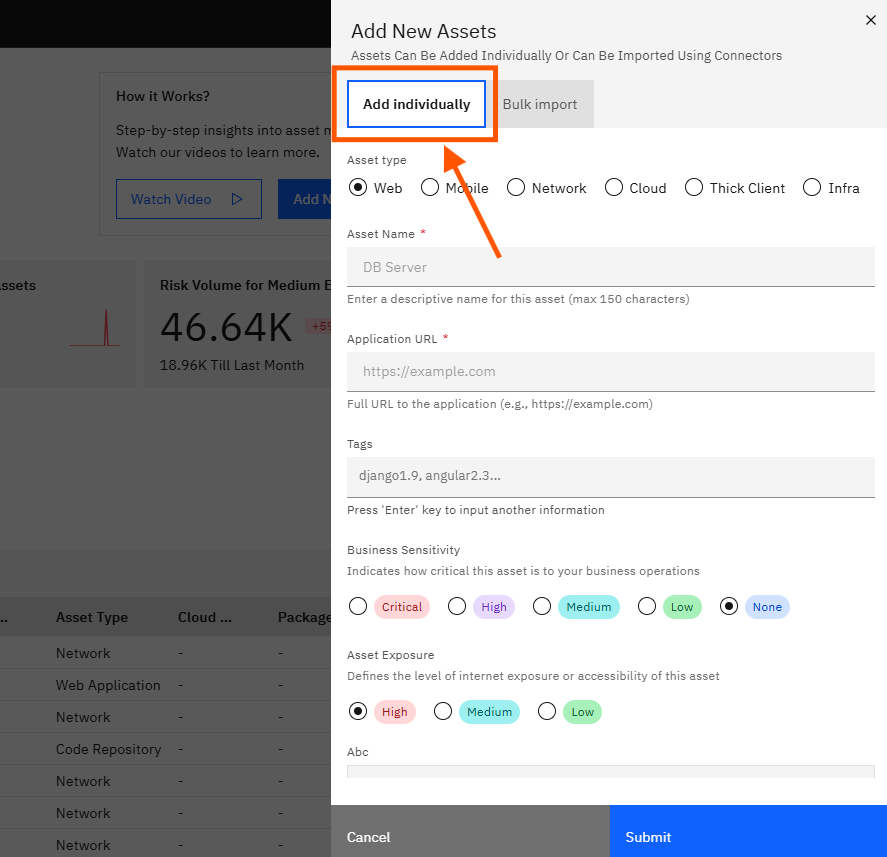
Click the Add individually tab at the top of the drawer. The tab is active by default when the drawer opens. The form for adding a single asset appears below.
Step 7 — Select the Asset Type
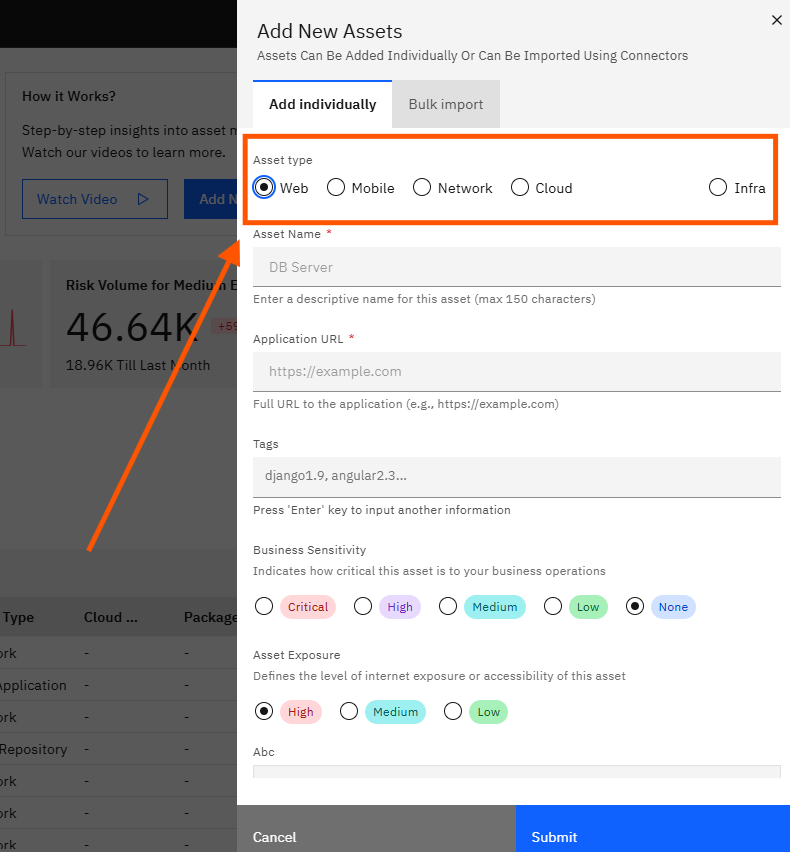
Click the radio button for the asset type that matches the asset you are adding. The available asset types are:
- Web — Web applications and web services.
- Mobile — Mobile applications (iOS or Android).
- Network — Network hosts, devices, and infrastructure.
- Cloud — Cloud environments and cloud-hosted resources.
- Infra — Infrastructure components.
The selected asset type determines which fields appear in the form. For example, selecting Web shows an Application URL field.
Step 8 — Click the Asset Name Field and Enter a Name
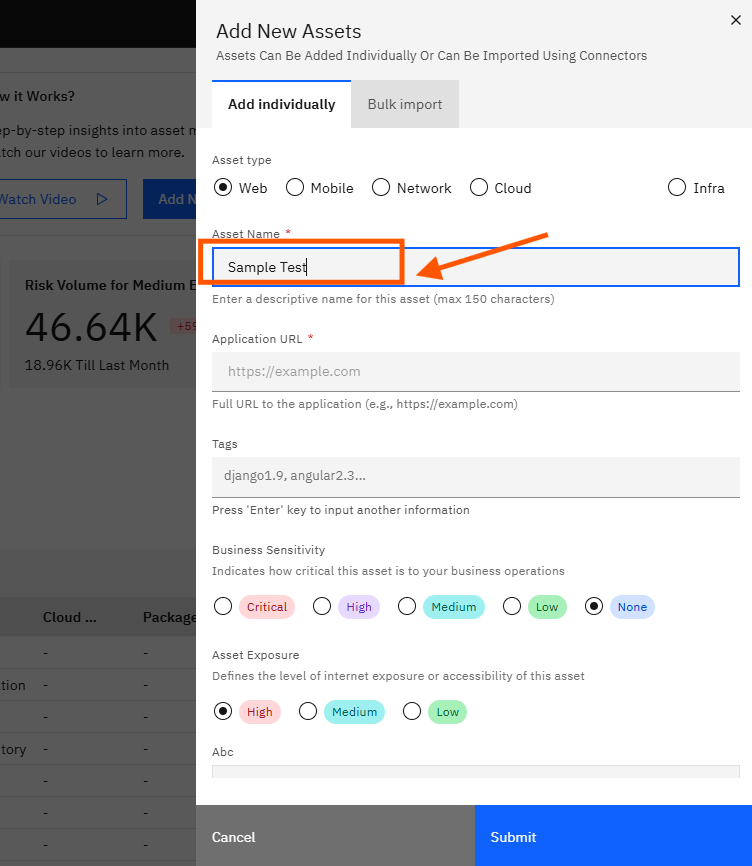
Click the Asset Name field and type a descriptive name for this asset. The field accepts up to 150 characters. Use a name that clearly identifies the asset — for example, the application name, service name, or host identifier.
Step 9 — Click the Application URL Field and Enter the URL
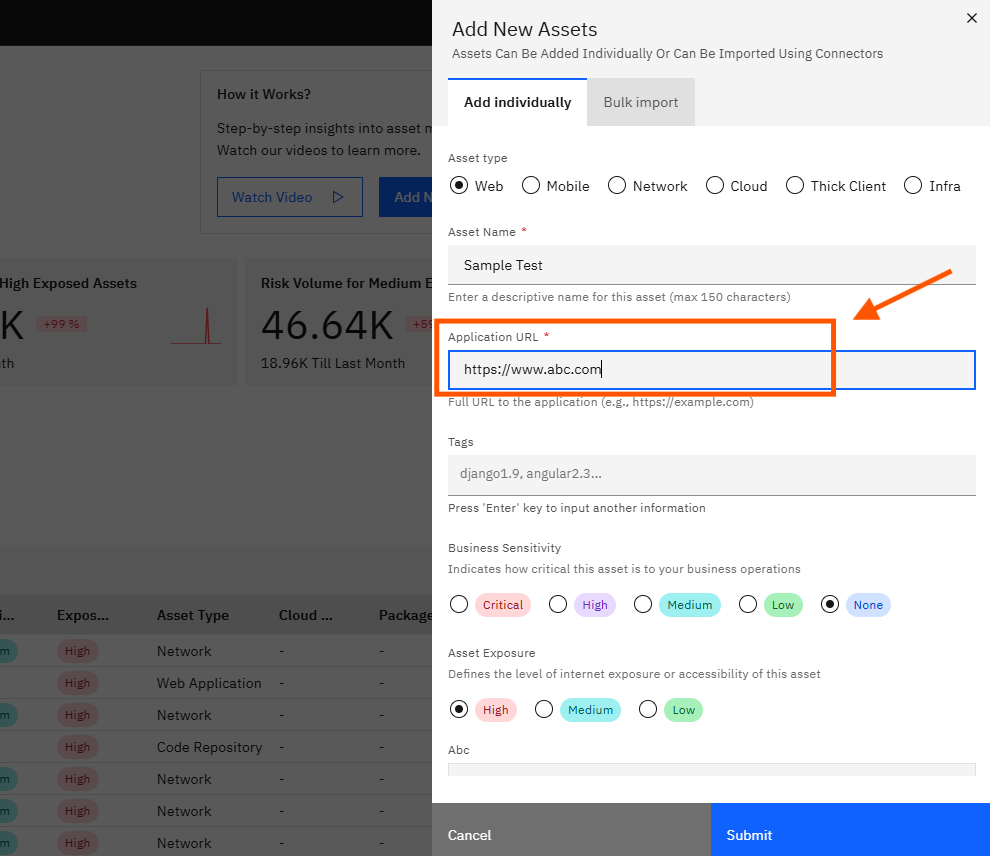
Click the Application URL field and type the full URL of the asset (for example, https://example.com). This field is required for Web assets.
Step 10 — Click the Tags Field and Add Tags
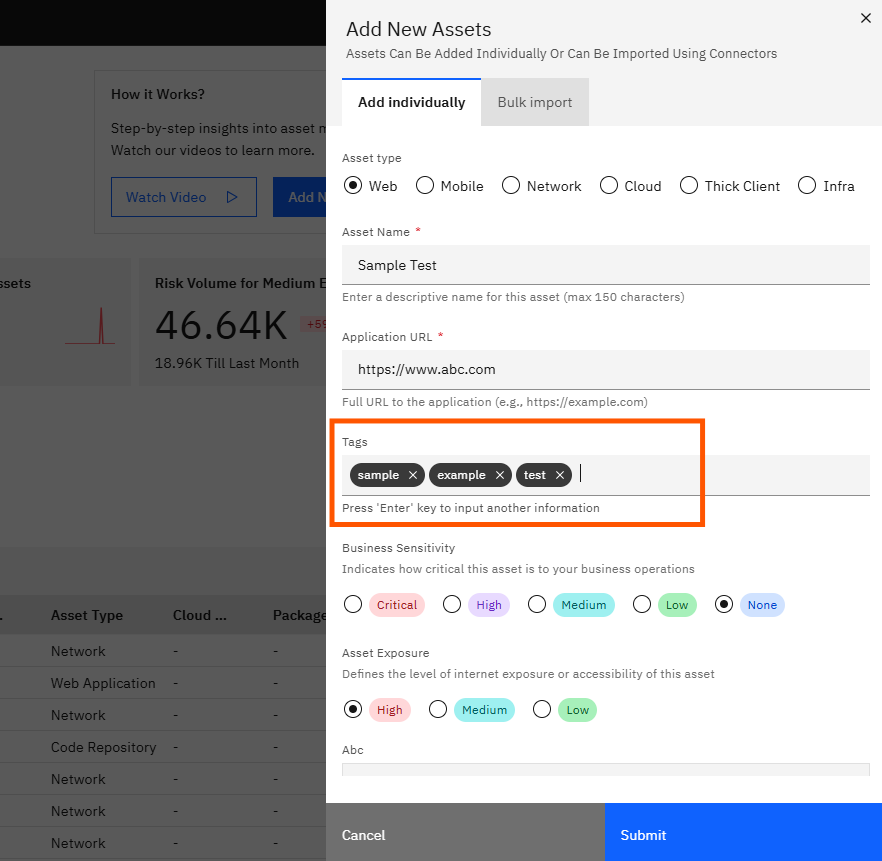
Click the Tags field and type a tag name. Press Enter after each tag to add it. You can add multiple tags to a single asset. Tags are used to group and filter assets across the platform.
Step 11 — Select the Business Sensitivity
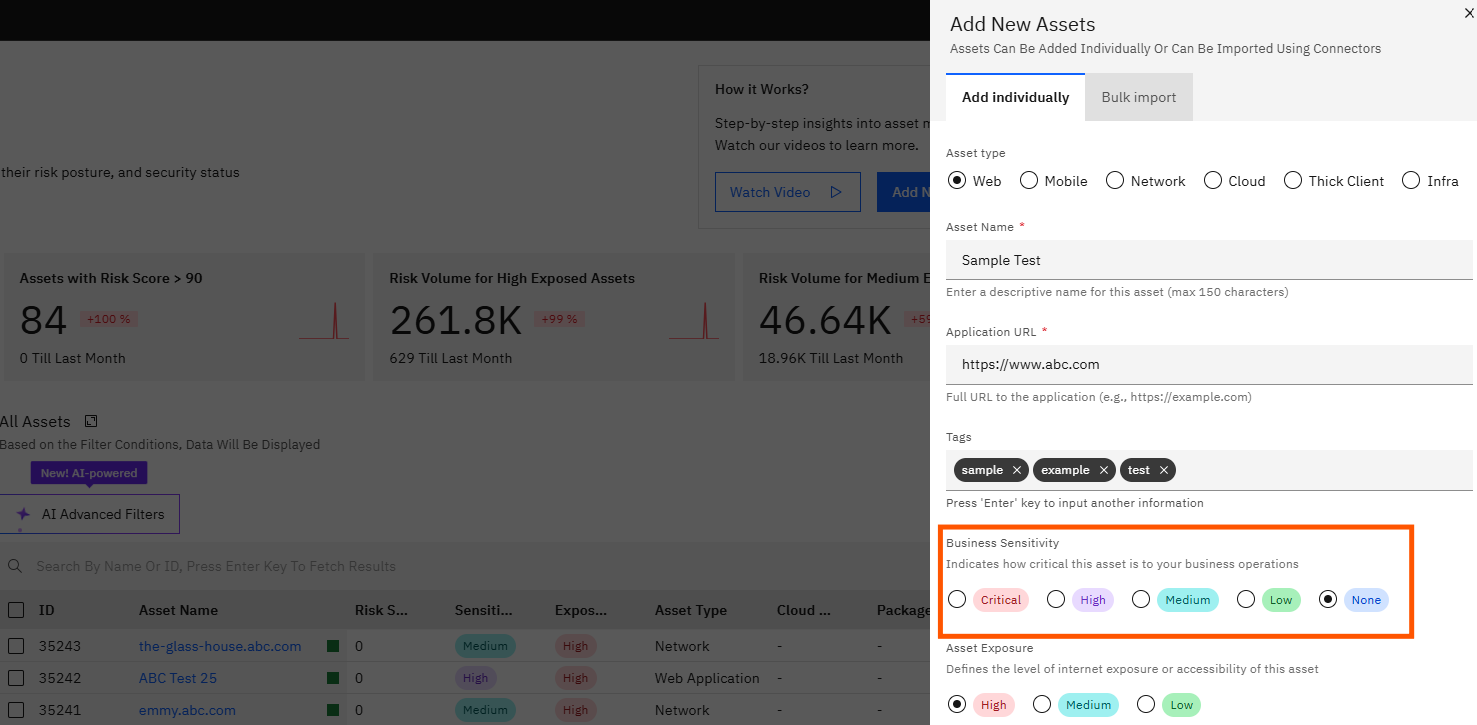
Click the Business Sensitivity radio button that best describes how critical this asset is to your business operations. The options are Critical, High, Medium, Low, and None. If you are unsure, refer to the Business Sensitivity definitions at the top of this article. The default is None.
Step 12 — Select the Asset Exposure
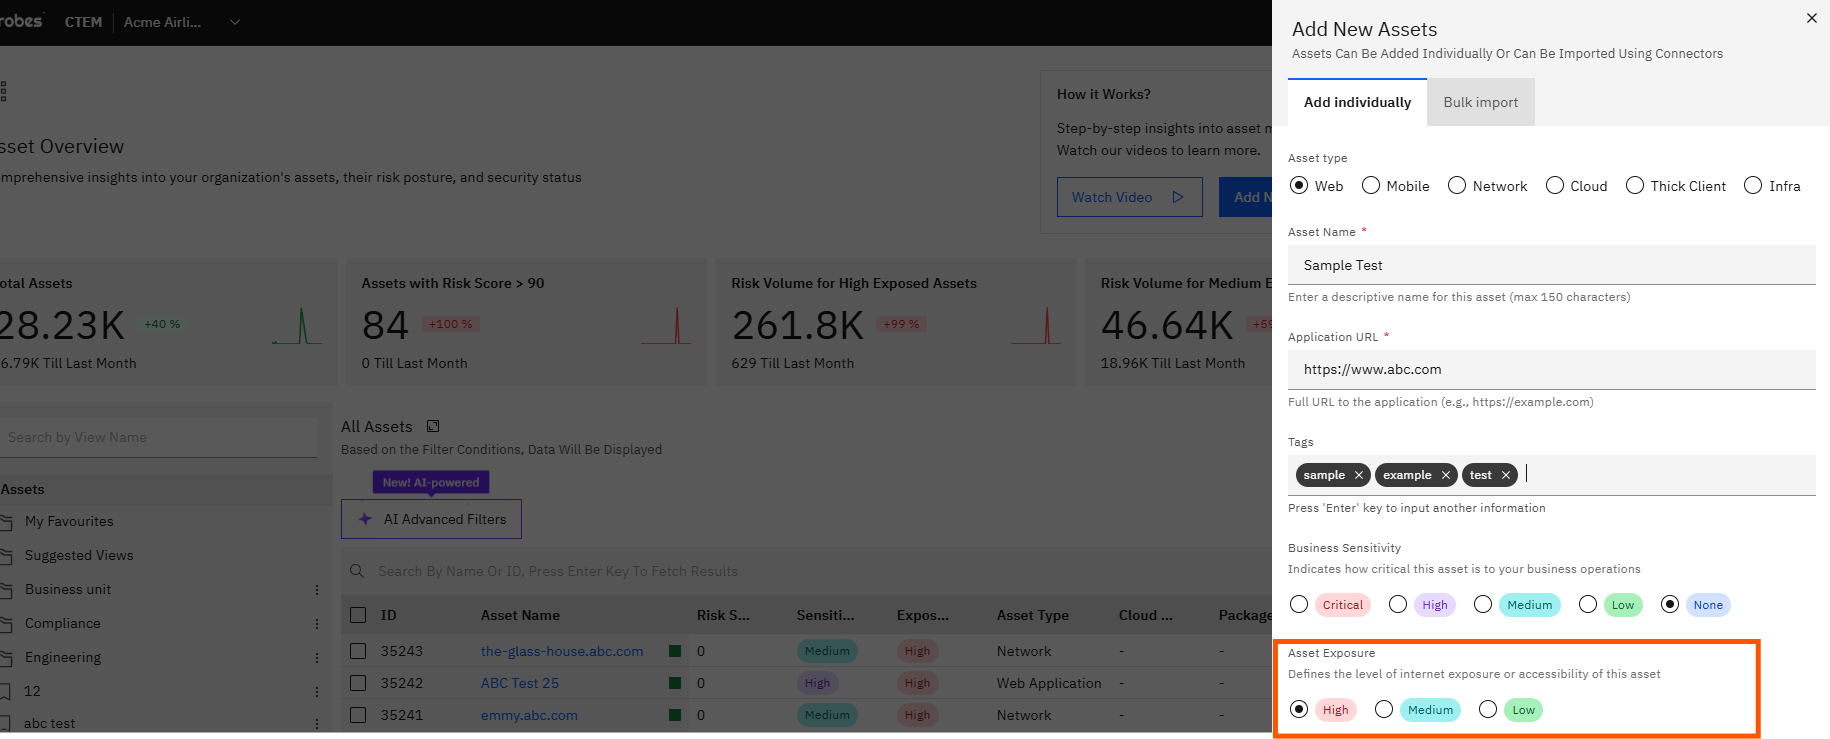
Click the Asset Exposure radio button that best describes how reachable this asset is from outside your organization. The options are:
- High — Directly reachable from the internet with no security controls in front of it.
- Medium — Reachable from outside but protected by a VPN, WAF, authentication layer, IP allowlist, or similar control.
- Low — No external path in. Internal only and reachable only from within a trusted network.
The default selection is High.
Step 13 — Click Submit
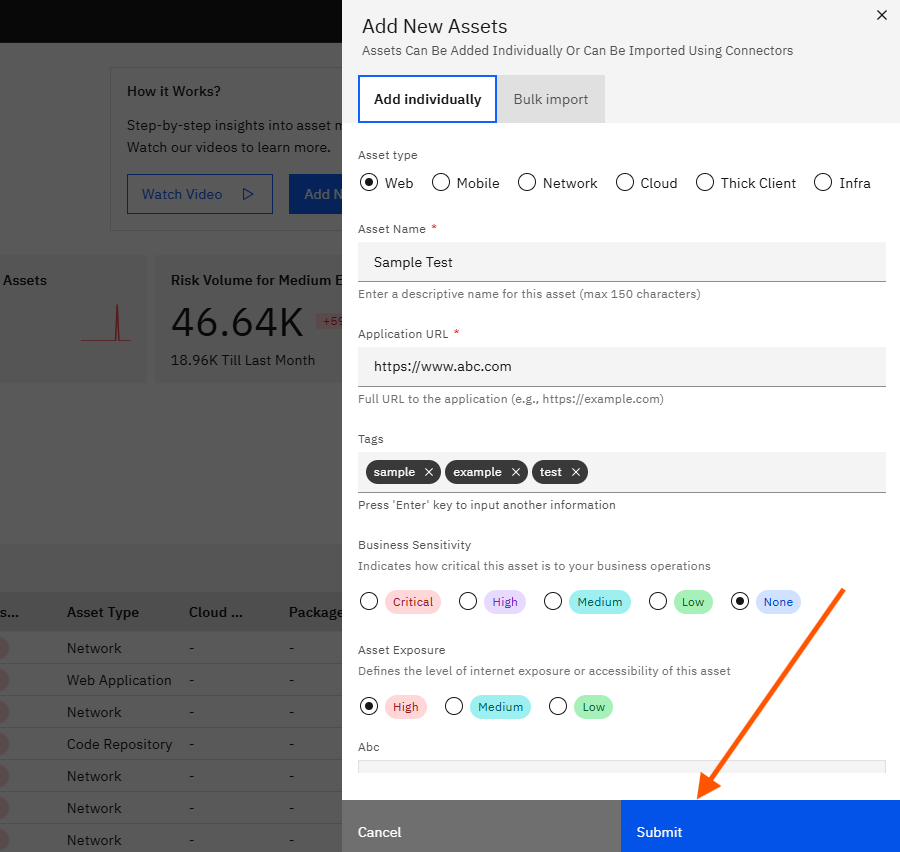
Click Submit. Strobes creates the asset and adds it to your inventory. The drawer closes and the new asset appears in the asset table.
Part 3 — Bulk Import Assets via a Connector
Step 14 — Click the Bulk Import Tab
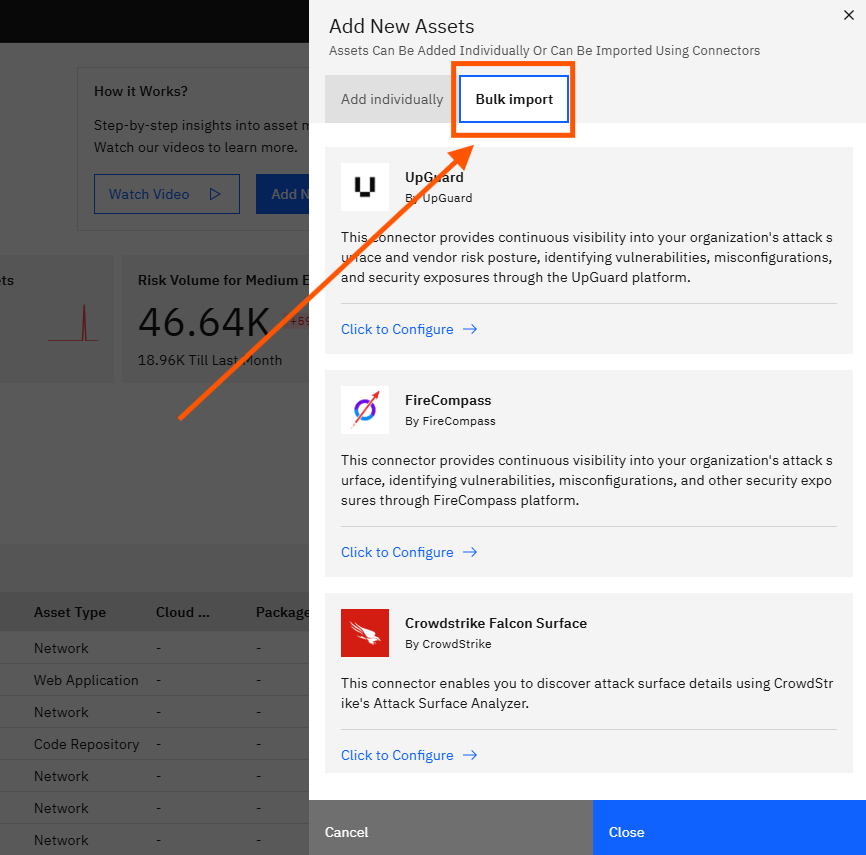
Click the Bulk import tab at the top of the Add New Assets drawer. The form switches to a list of available connectors that can be used to import assets in bulk.
Step 15 — Review the Available Connectors
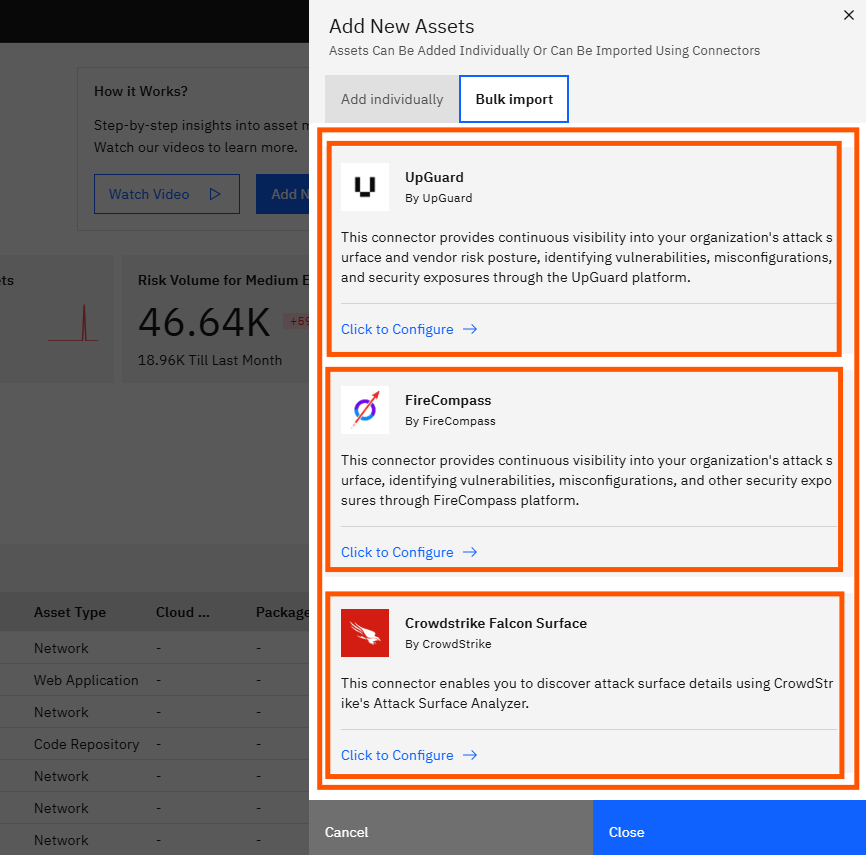
Review the connector list. Each connector card shows the connector name, provider, and a short description. Available connectors for bulk asset import include:
- UpGuard — Provides continuous visibility into your organization's attack surface and vendor risk posture, identifying vulnerabilities, misconfigurations, and security exposures.
- FireCompass — Provides continuous visibility into your attack surface, identifying vulnerabilities, misconfigurations, and other security exposures through the FireCompass platform.
- CrowdStrike Falcon Surface — Enables discovery of attack surface details using CrowdStrike's Attack Surface Analyzer.
- And Many more..
Step 16 — Click a Connector to Configure It
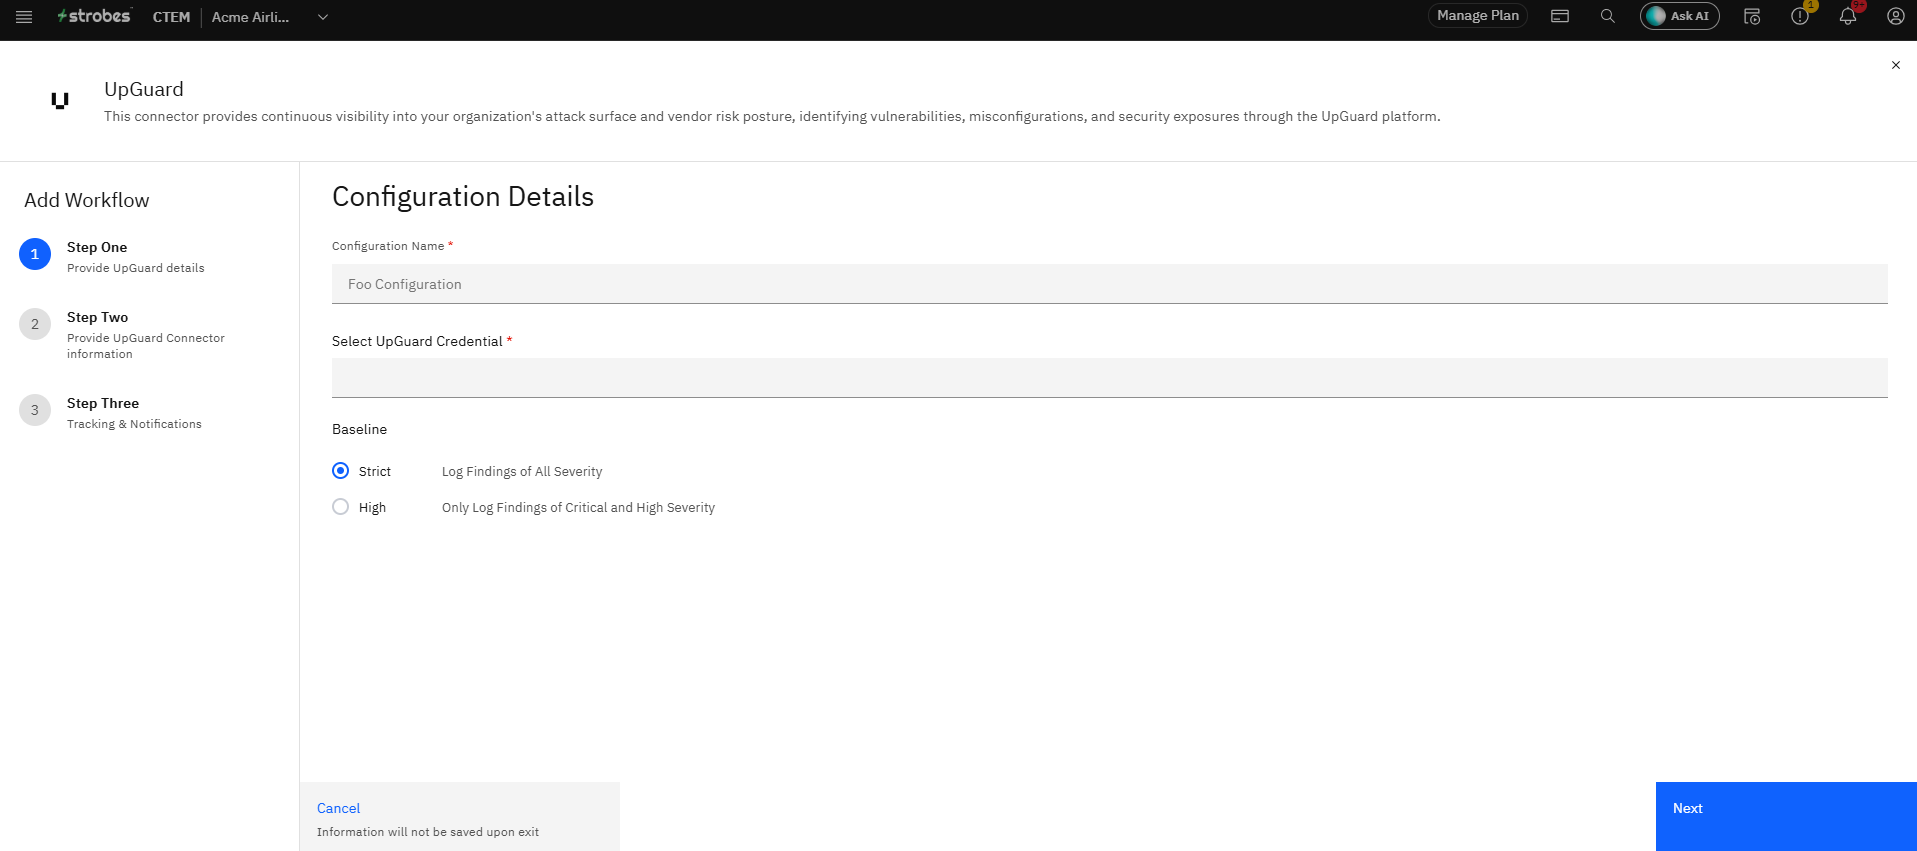
Click the Click to Configure → link on the connector you want to use. You will be taken to the connector configuration page where you can set up your credentials and import settings. Once the connector is configured and synced, assets from that source will appear automatically in your Strobes inventory.
Tips
Business sensitivity defaults to None for connector and CSV imports. If you import assets via a connector or CSV file, Strobes assumes a business sensitivity of None unless the import source provides this value. Review imported assets after a sync and update their sensitivity to ensure accurate risk scoring.
Exposure defaults to High for connector and CSV imports. Imported assets are treated as High exposure by default. Review and adjust the exposure level for each imported asset to reflect its real-world reachability, especially for internal or gated assets that should be classified as Medium or Low.
The three exposure levels replace the old Public/Private model. If you previously classified assets as Public, evaluate whether they belong in High (no controls in front of them) or Medium (gated by a WAF, VPN, auth layer, or similar control). Assets previously classified as Private should now be Low.
Adjusting an asset's exposure immediately updates its risk scores. Exposure is a live input to the prioritization engine. Correcting a mis-classified asset's exposure will re-rank the findings associated with it — useful if a previously public-facing asset has been placed behind a VPN or access control.
Asset Name is required and must be descriptive. The name is how the asset appears across the platform — in findings, connectors, reports, and dashboards. Use a name that is recognizable to your team without needing to look up the ID.
Tags are useful for grouping assets by team, product, or region. Once tagged, assets can be filtered by tag in the asset table and used in saved views. Plan a consistent tagging convention across your team for best results.