
SAML - Configuring Okta SSO in Strobes
Overview
This article walks through setting up SAML 2.0 Single Sign-On (SSO) between Okta and Strobes. By the end of the setup, users in your Okta organization can log in to Strobes with their Okta credentials, and new accounts can be provisioned automatically through Just-in-Time (JIT) Provisioning.
The workflow spans two applications across six parts: create the SAML app integration in Okta, add an Identity Provider in Strobes, retrieve the Strobes Service Provider URLs, paste those URLs back into Okta and finish the app, retrieve the Okta metadata, then update the Identity Provider in Strobes with that metadata.
Before You Start
- Role required: Owner access on your Strobes account.
- Okta access: Okta Administrator access on your Okta organization.
- MFA: If your Okta organization enforces multi-factor authentication, have your MFA device ready before logging in.
Part 1 — Create a SAML App Integration in Okta
Step 1 — Log In to the Okta Admin Console
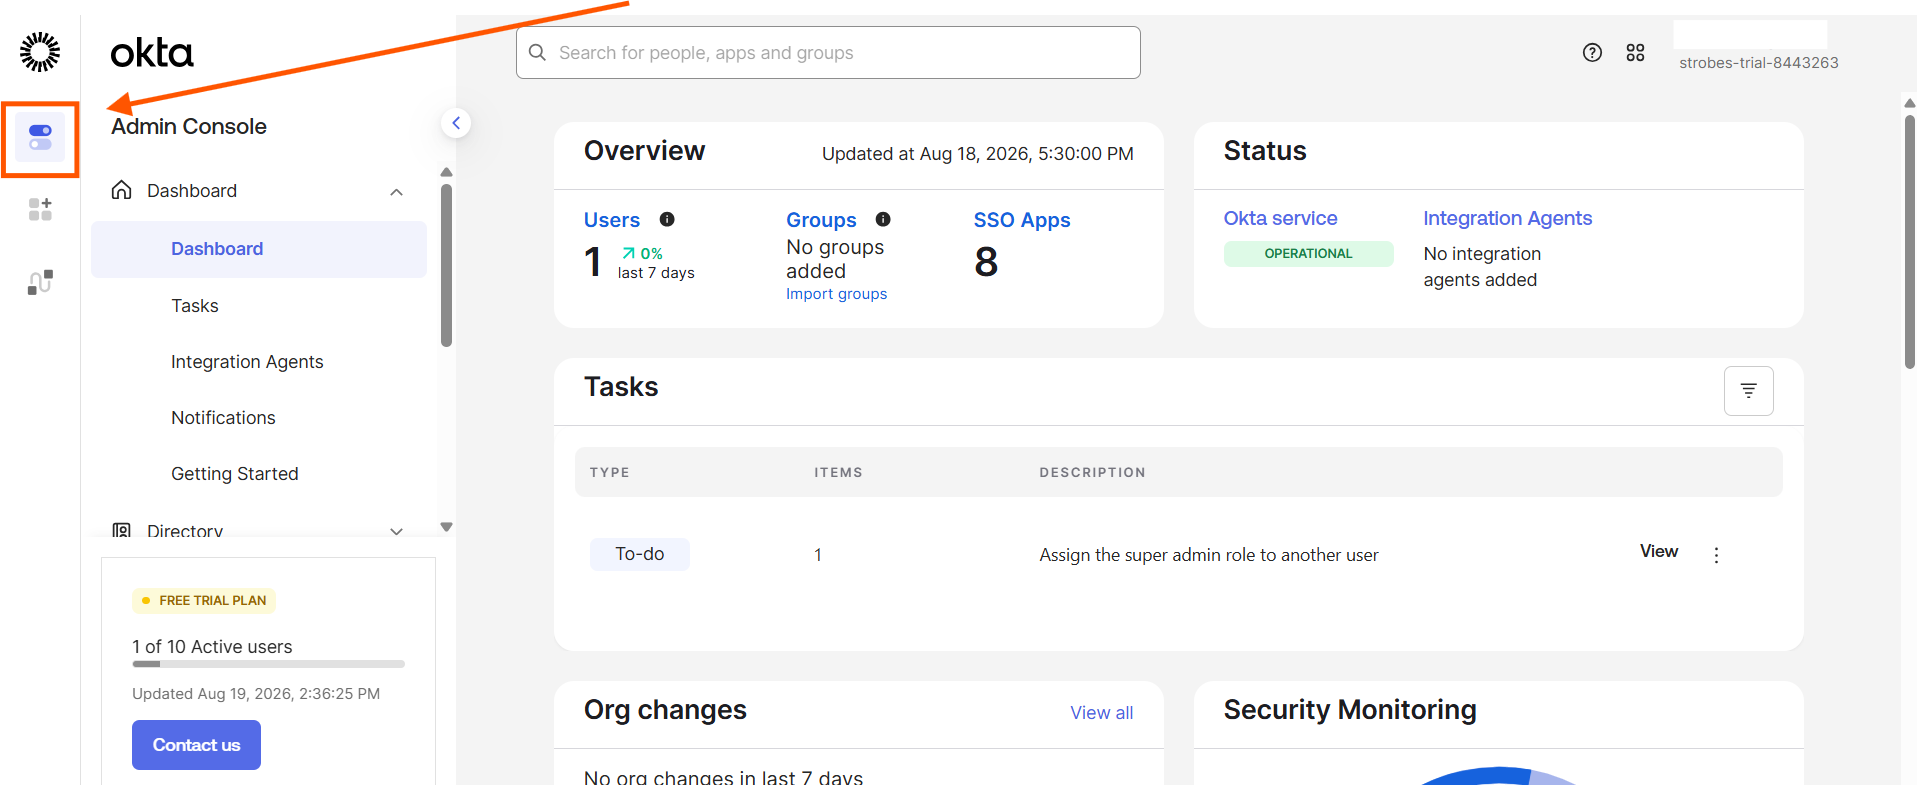
Log in to your Okta Admin Console. If your organization requires MFA, complete the verification step when prompted. The Okta Admin Console dashboard opens after a successful login.
Step 2 — Navigate to Applications
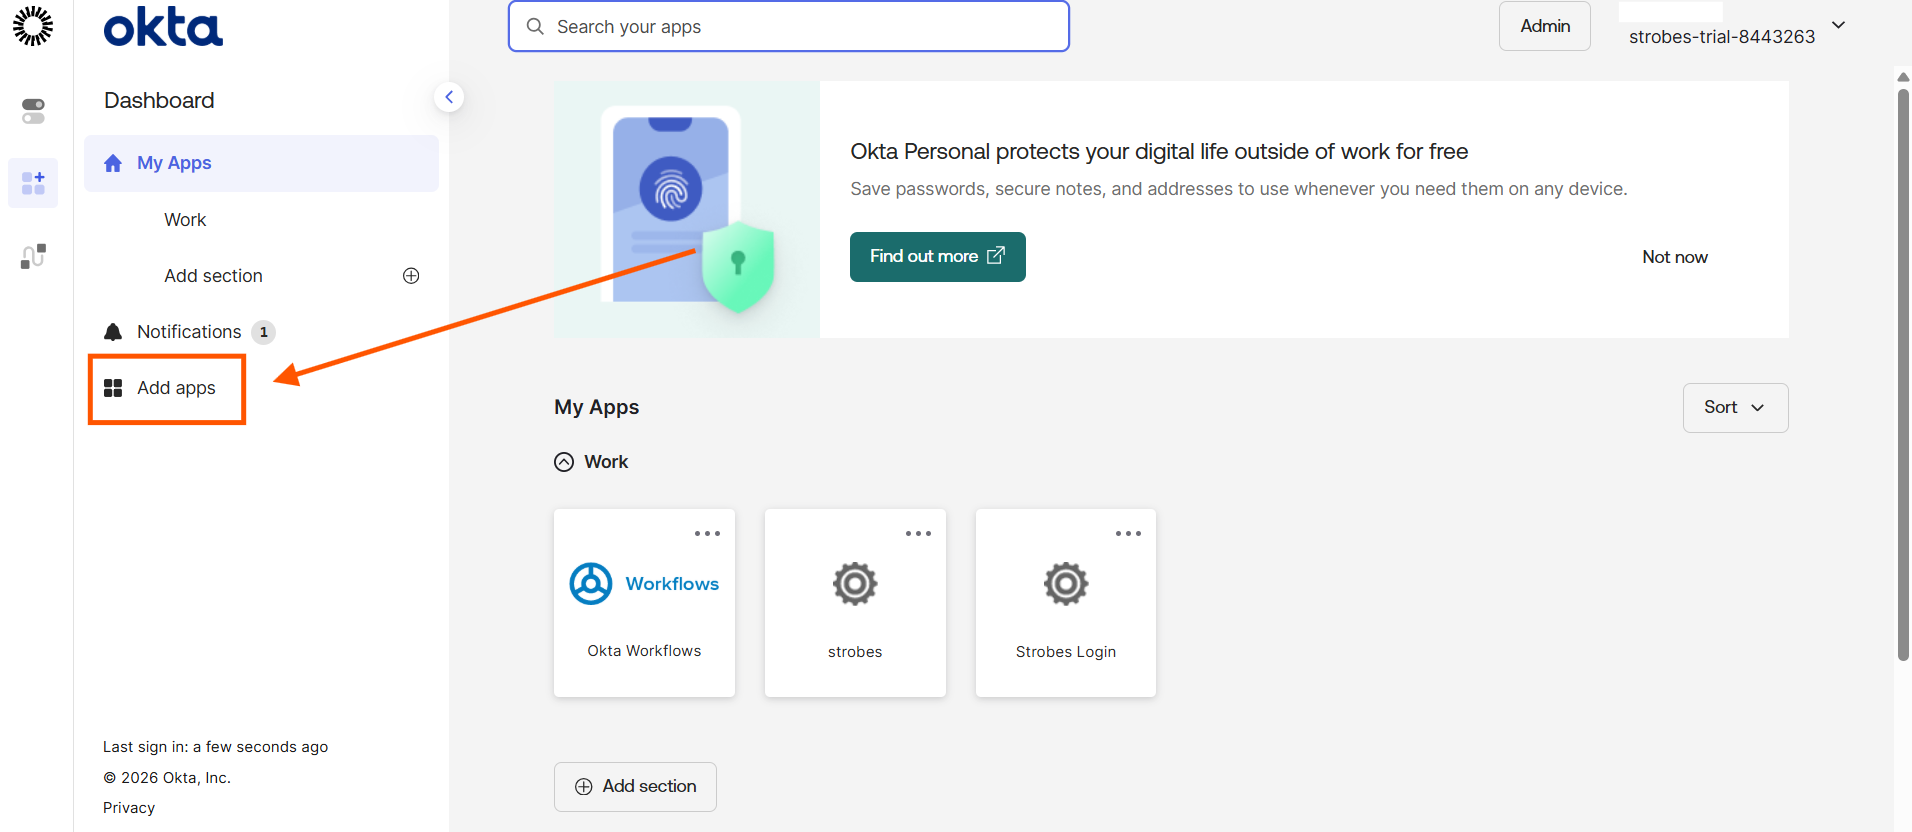
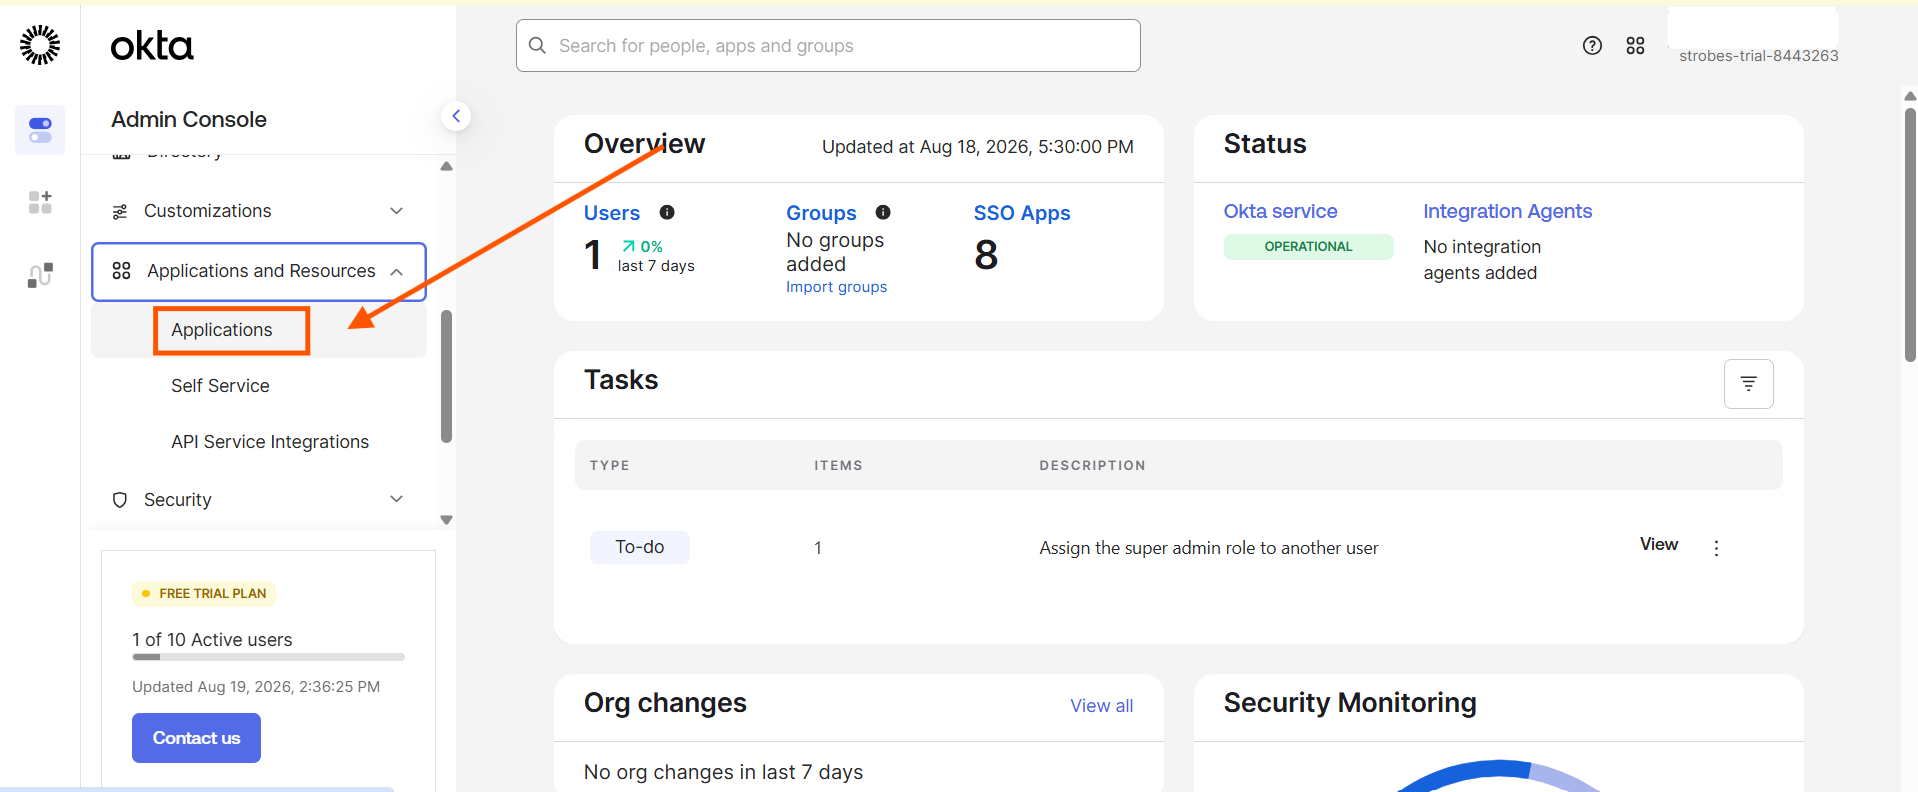
In the left sidebar, expand Applications and Resources and click Applications. The Applications page opens with the Create App Integration and Browse App Catalog buttons at the top, along with a list of any existing app integrations.
Step 3 — Click Create App Integration
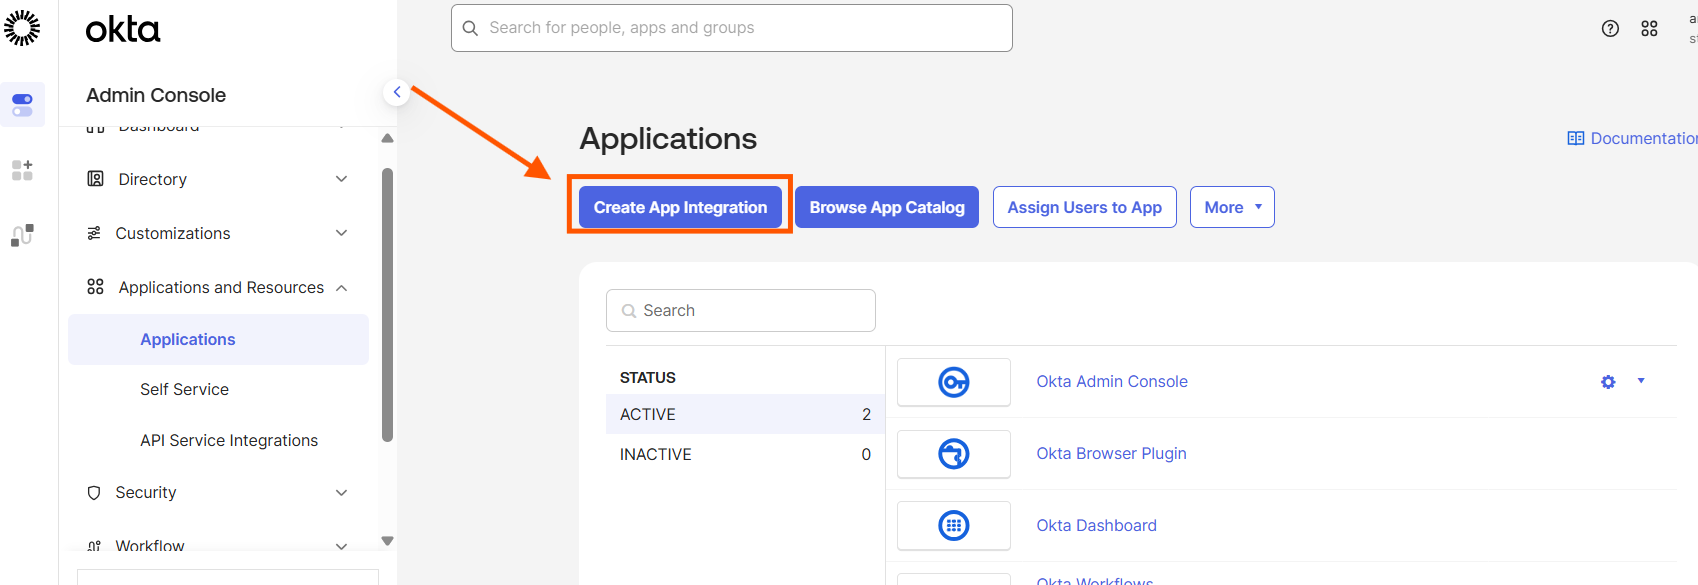
Click the Create App Integration button. The Create a new app integration dialog opens, displaying the available sign-in method options.
Step 4 — Select SAML 2.0 and Click Next
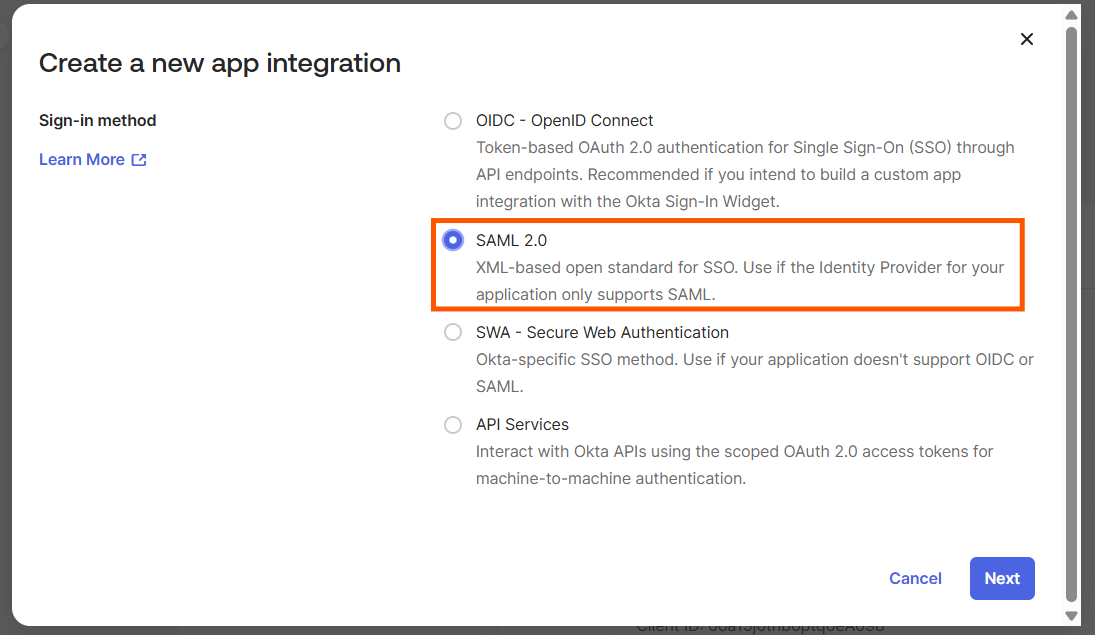
Select SAML 2.0 as the Sign-in method and click Next. SAML 2.0 is the protocol Strobes uses for its SSO integration with Okta. The wizard advances to Step 1: General Settings.
Step 5 — Enter the App Name and Click Next
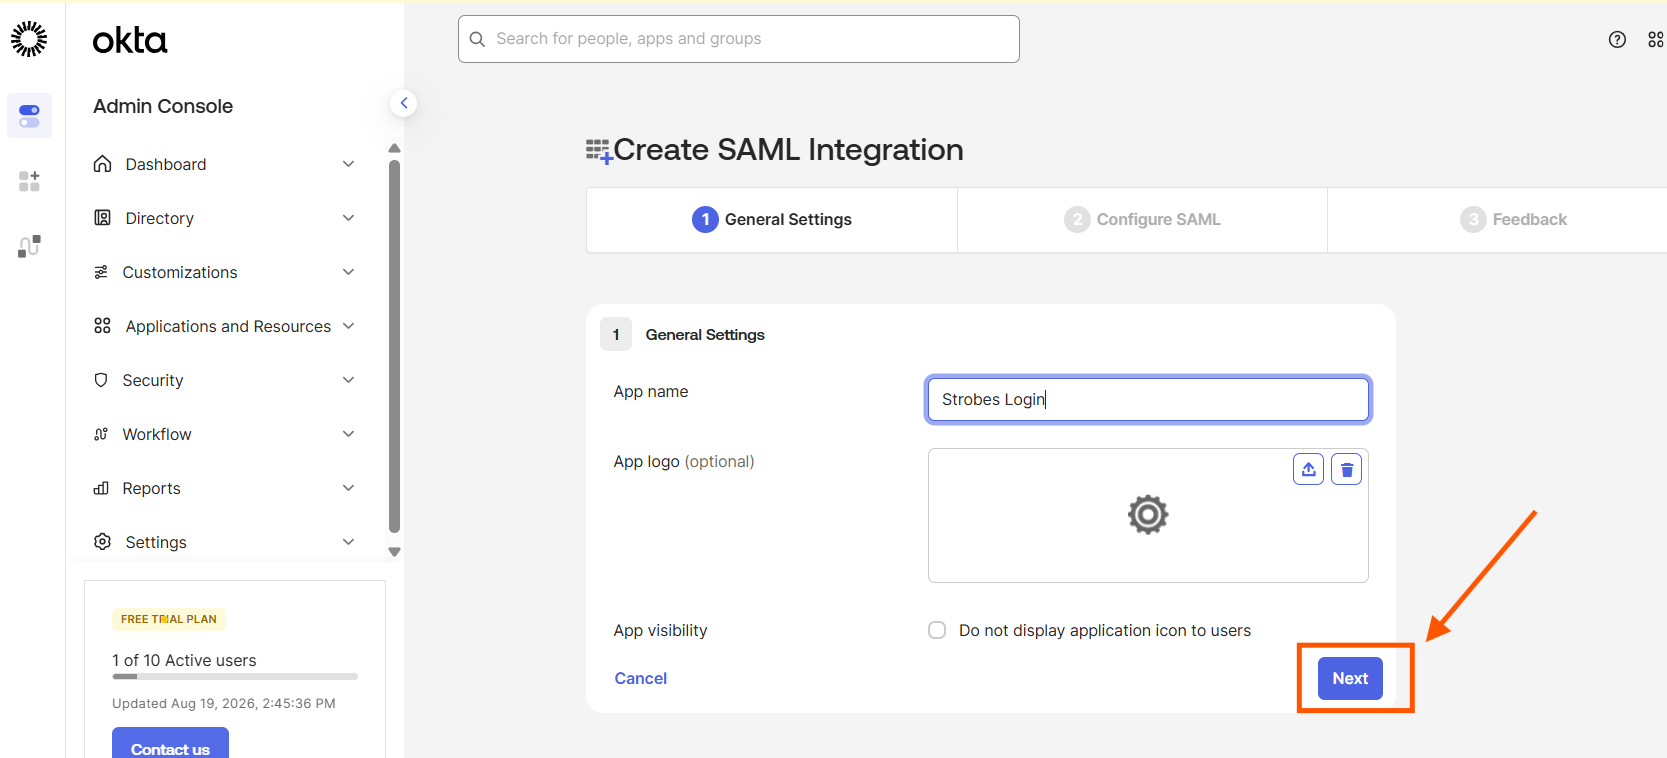
Click the App name field, type Strobes Login, and click Next. This name identifies the app integration in your Okta Admin Console and in the Okta dashboard for your users. The wizard advances to Step 2: Configure SAML. Leave this browser tab open — you will return here after retrieving the Service Provider URLs from Strobes.
Part 2 — Add the Identity Provider in Strobes
Step 6 — Navigate to Authentication Settings in Strobes
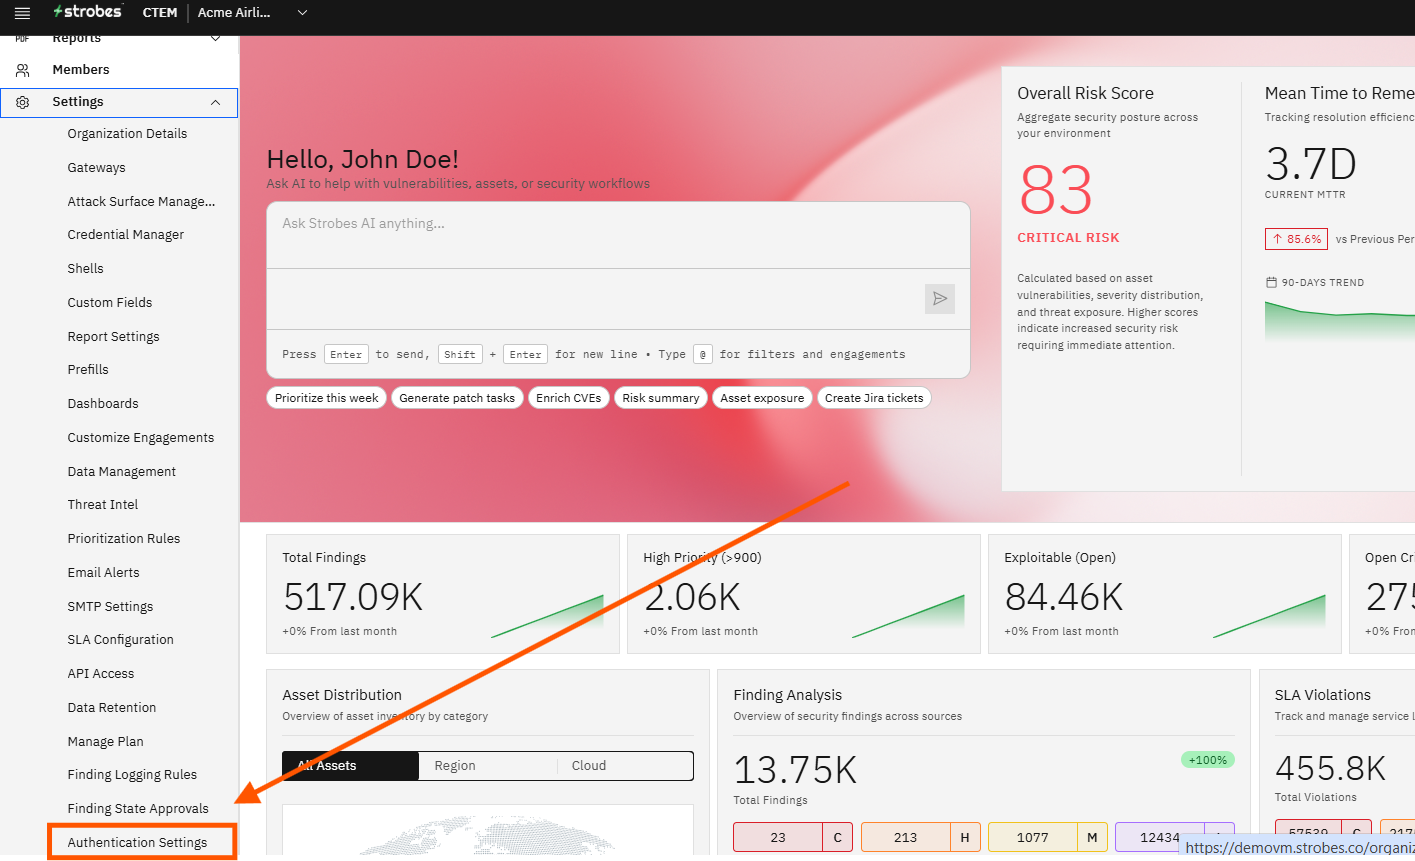
In Strobes, click Settings in the left sidebar and then click Authentication Settings. The Authentication Settings page opens. The top section shows Quick Setup Guides for Okta, Azure AD, and Google Workspace. The bottom section shows the Single Sign-On (SAML) table where configured Identity Providers are listed.
Step 7 — Review the Quick Setup Guide for Okta
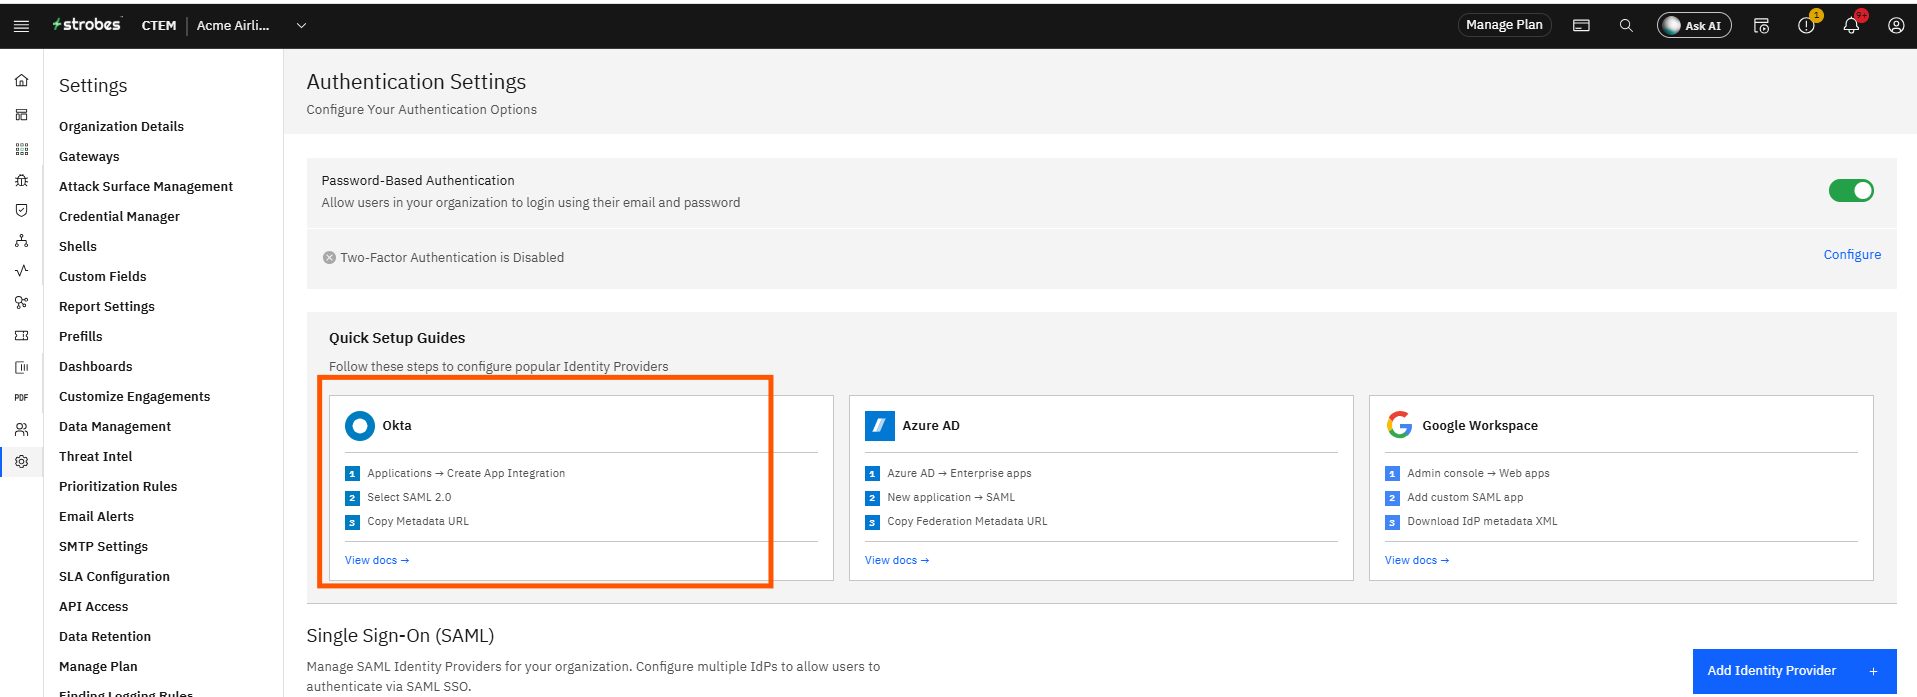
Review the Okta Quick Setup Guide. The guide outlines the three high-level steps for the Okta integration: navigate to Applications in Okta, create an app integration with SAML 2.0 selected, and copy the Metadata URL. These steps correspond to what you completed in Part 1 and will complete in Parts 4 and 5 of this article.
Step 8 — Click Add Identity Provider
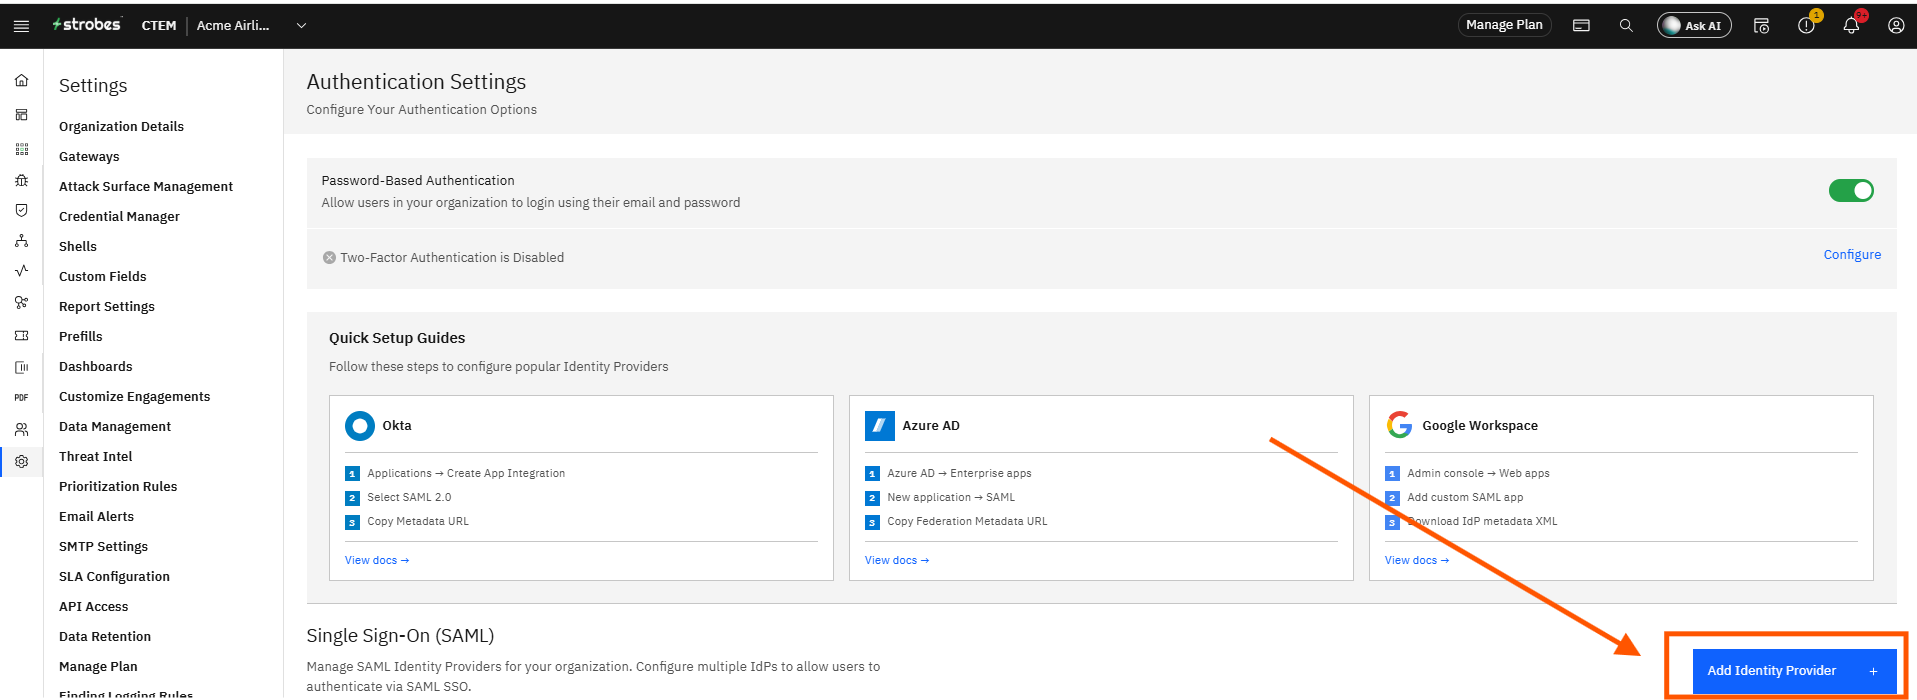
Click the + Add Identity Provider button in the Single Sign-On (SAML) section. The Add Identity Provider modal opens on the Basic Info tab.
Step 9 — Enter a Name and Click Next
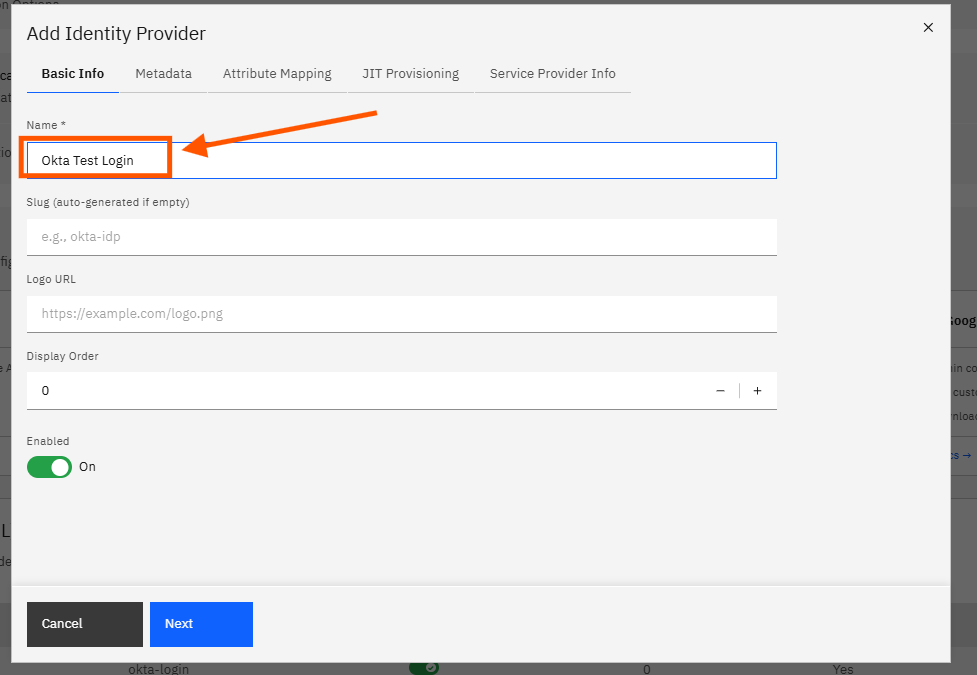
Click the Name field, type Okta login, verify the Enabled toggle is turned on, and click Next. The name appears in the Strobes SAML table and on the Strobes login page for users to identify the SSO option. When enabled, the Identity Provider is active and available immediately. The modal advances to the Metadata tab.
Step 10 — Leave the Metadata Tab with dummy XML text and Click Next
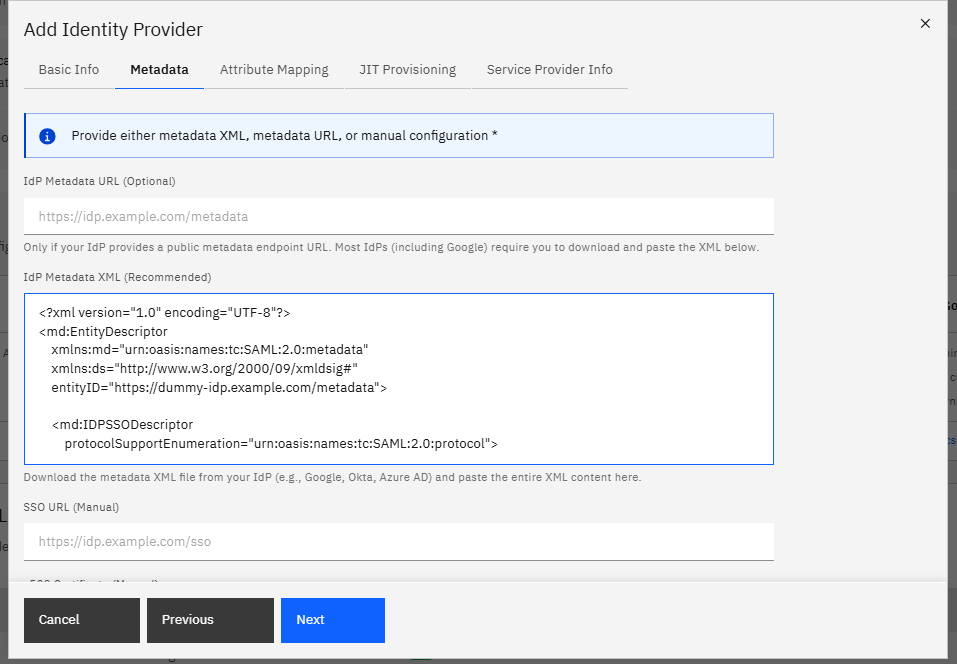
On the Metadata tab, leave all fields with some dummy XML text (to edit later) and click Next. The Metadata tab allows you to supply the Okta Identity Provider metadata by URL, by pasting raw XML, or by entering the SSO URL and x509 certificate manually. You will return to fill in this information after completing the Okta app configuration in Parts 4 and 5. The modal advances to the Attribute Mapping tab.
Step 11 — Review Attribute Mapping and Click Next
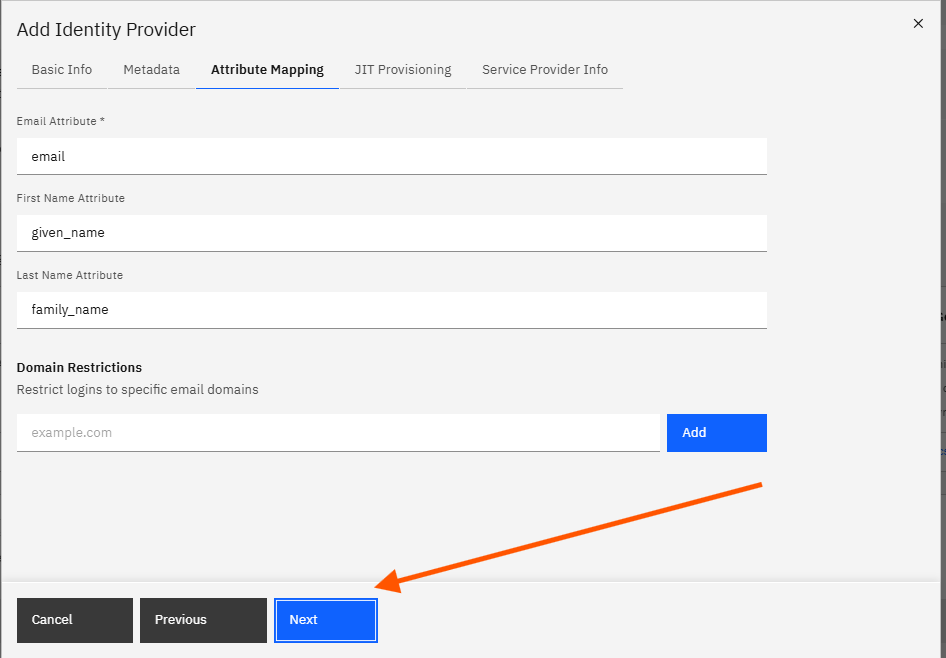
Review the Attribute Mapping tab and click Next. The default values map Okta SAML assertion attributes to Strobes user profile fields:
- Email Attribute:
email - First Name Attribute:
given_name - Last Name Attribute:
family_name
These defaults match Okta's standard user profile attribute names and do not need to be changed for a typical setup. The modal advances to the JIT Provisioning tab.
Step 12 — Enable JIT Provisioning and Review the Default Role
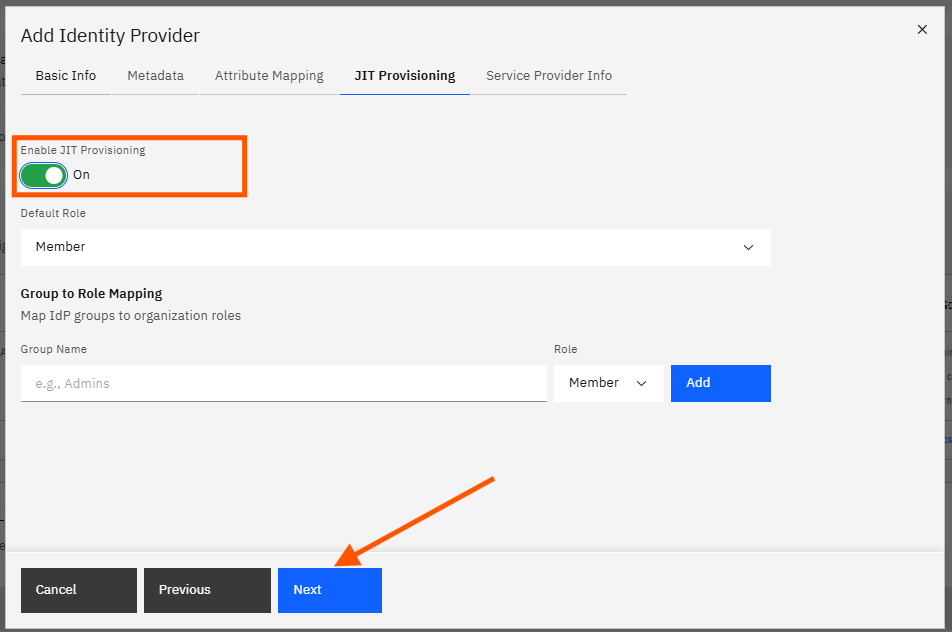
On the JIT Provisioning tab, click the Enable JIT Provisioning toggle to turn it on. When enabled, Strobes automatically creates a user account the first time a user logs in through Okta SSO — no prior invitation is required. The Default Role is set to Member. Adjust this if your organization requires a different starting role for SSO-provisioned users. Click Next to advance to the Service Provider Info tab.
Step 13 — Click Create on the Service Provider Info Tab
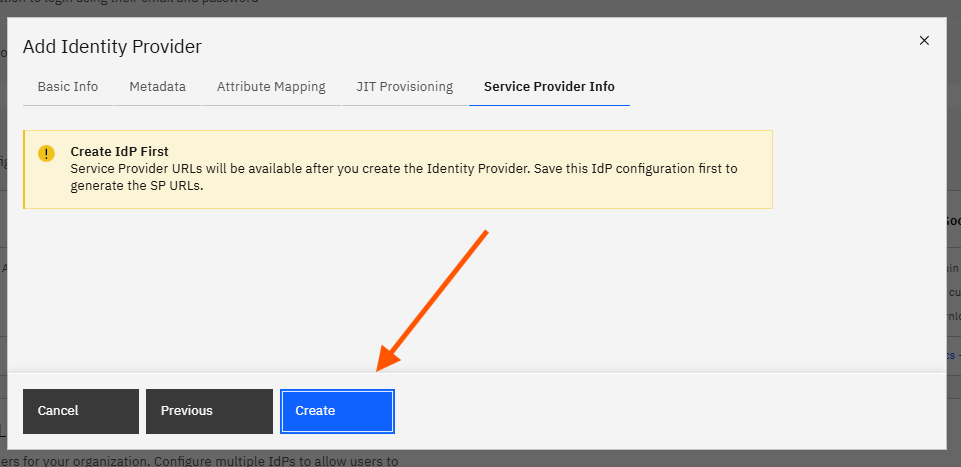
On the Service Provider Info tab, click Create. The tab displays a notice explaining that the Service Provider URLs are only generated after the Identity Provider record exists. Clicking Create saves the Identity Provider and makes the SP URLs available for the next step.
Part 3 — Copy the Service Provider URLs from Strobes
Step 14 — Confirm the Identity Provider Was Created
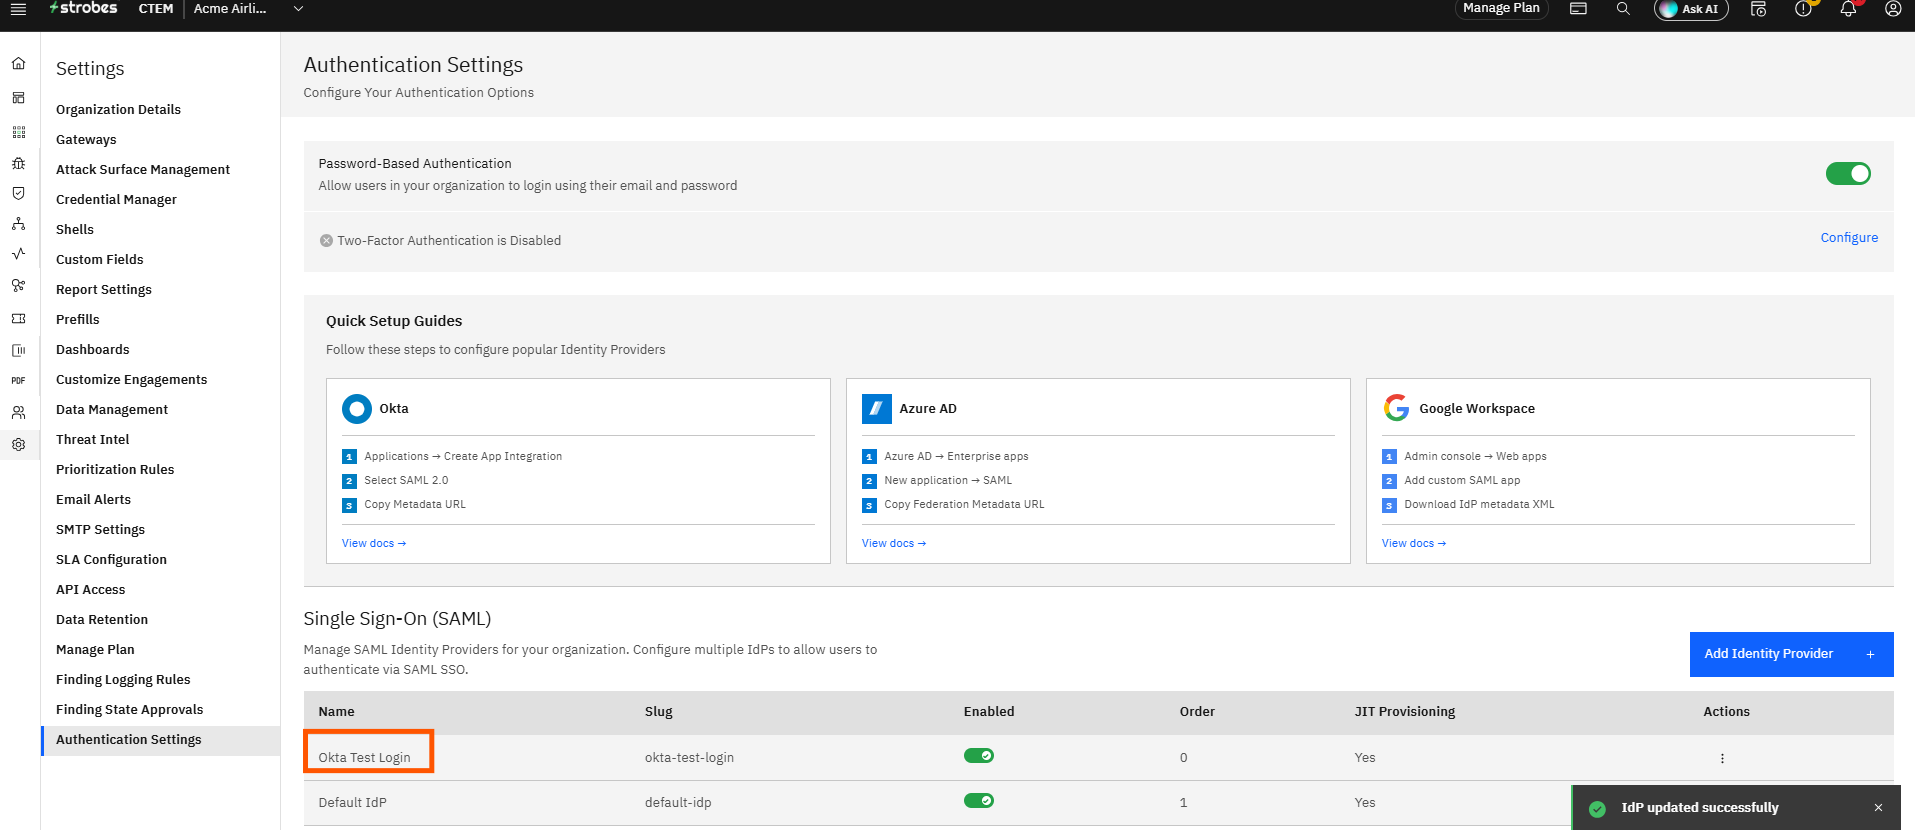
Confirm that the "IdP created successfully" message appears. The Authentication Settings page now lists Okta login in the Single Sign-On (SAML) table, showing its slug, Enabled status, and JIT Provisioning setting.
Step 15 — Open the Three-Dot Menu and Click View SP URLs
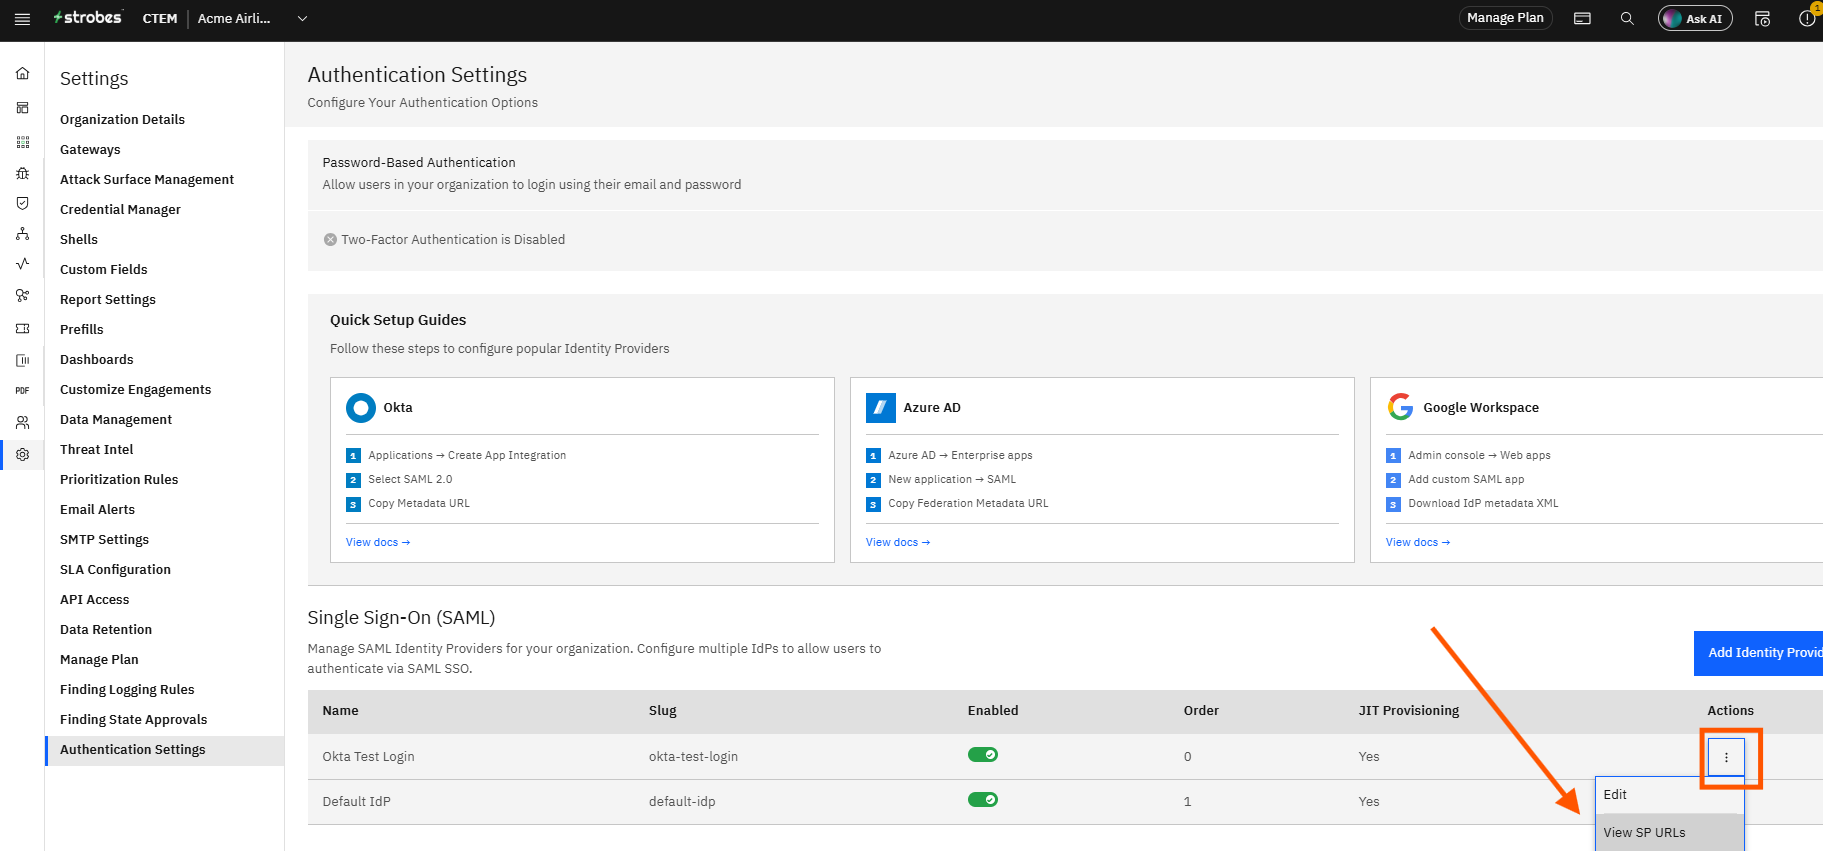
Click the three-dot (⋮) actions menu at the right end of the Okta login row and click View SP URLs. The SP URLs modal opens, displaying the three Service Provider endpoint values that Okta requires to complete its SAML configuration.
Step 16 — Copy the ACS URL and the SP Entity ID
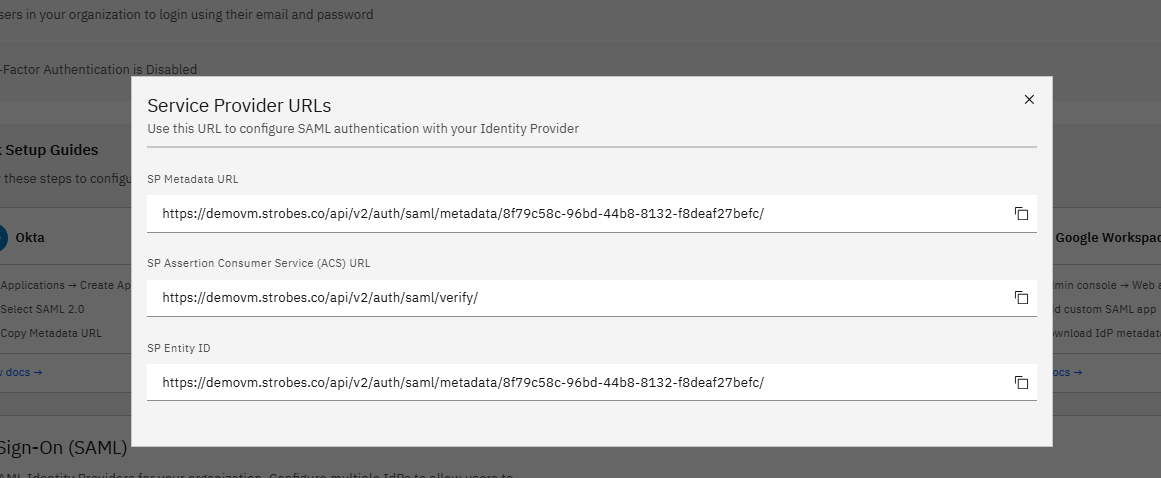
In the SP URLs modal, copy the SP Assertion Consumer Service (ACS) URL and then copy the SP Entity ID. Click the copy icon next to each value. Keep both values available — you will paste them into the Okta Configure SAML step in the next part.
Part 4 — Complete the SAML Configuration in Okta
Step 17 — Paste the ACS URL into the Single Sign-On URL Field
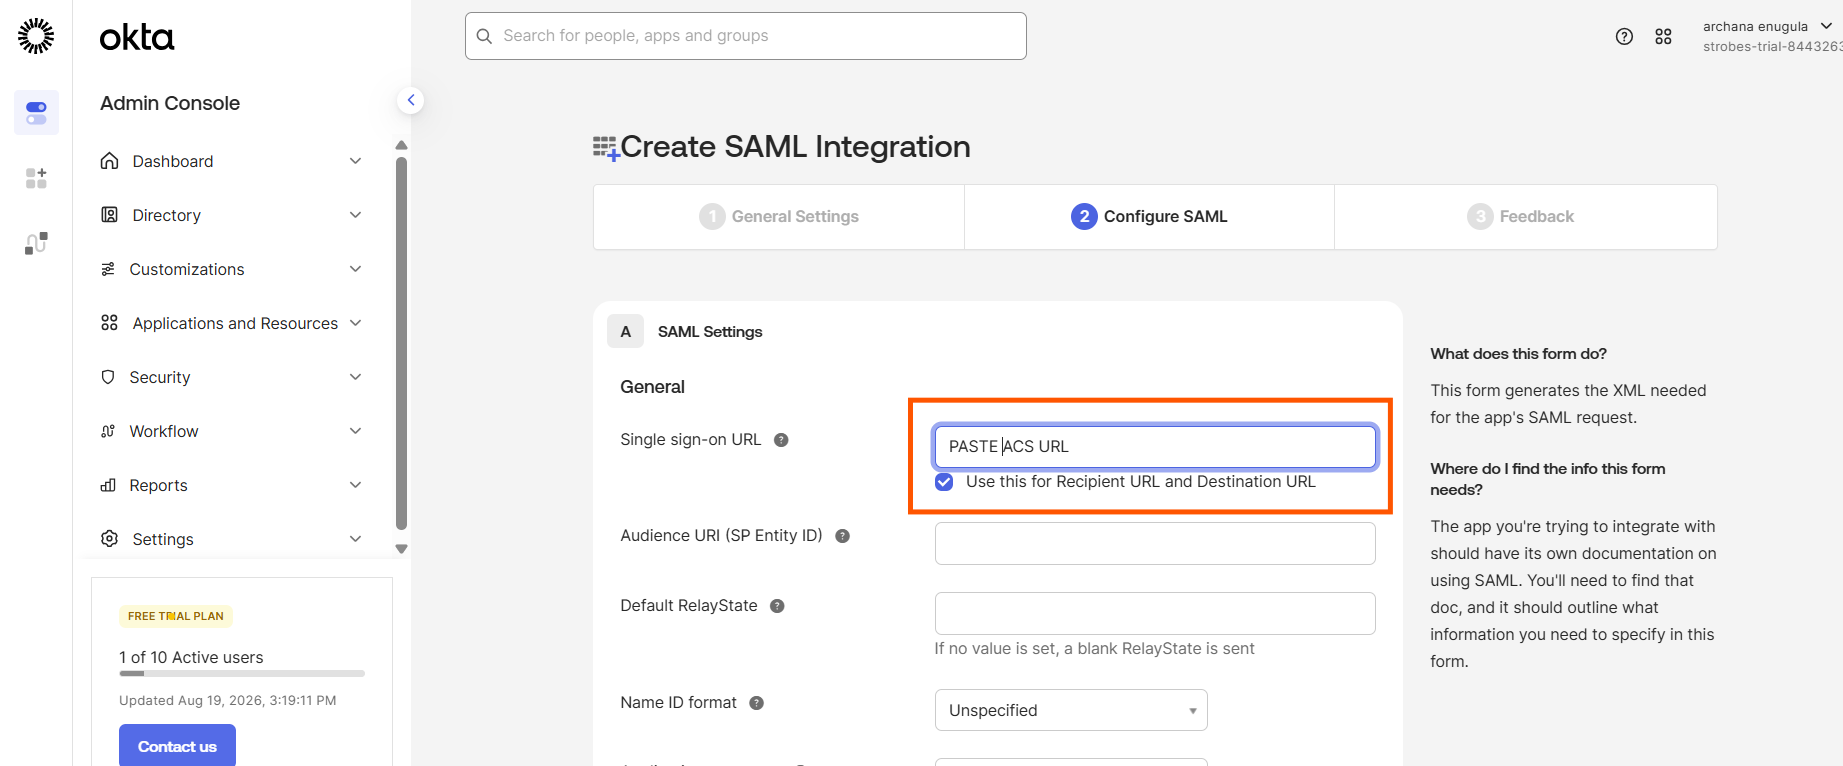
Return to the Okta browser tab where you left Step 2: Configure SAML open. Click the Single sign-on URL field and paste the ACS URL you copied from Strobes. This is the Strobes endpoint where Okta will send the SAML response after authenticating a user.
Step 18 — Paste the SP Entity ID into the Audience URI Field
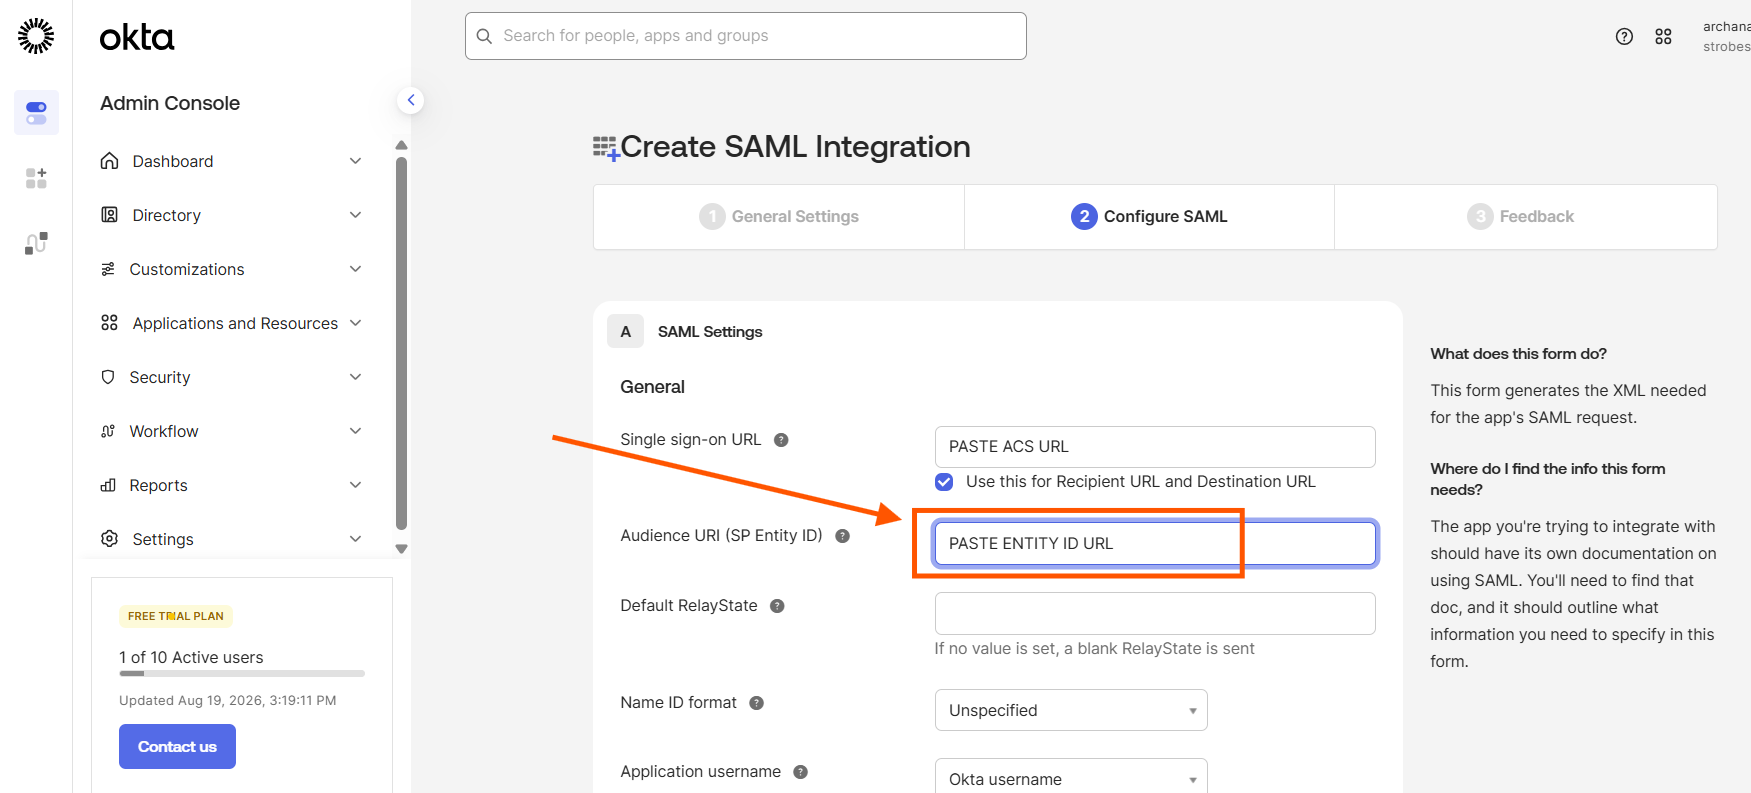
Click the Audience URI (SP Entity ID) field and paste the SP Entity ID you copied from Strobes. The Audience URI tells Okta that Strobes is the intended and authorized recipient of the SAML assertion.
Step 19 — Review the Remaining SAML Settings and Click Next
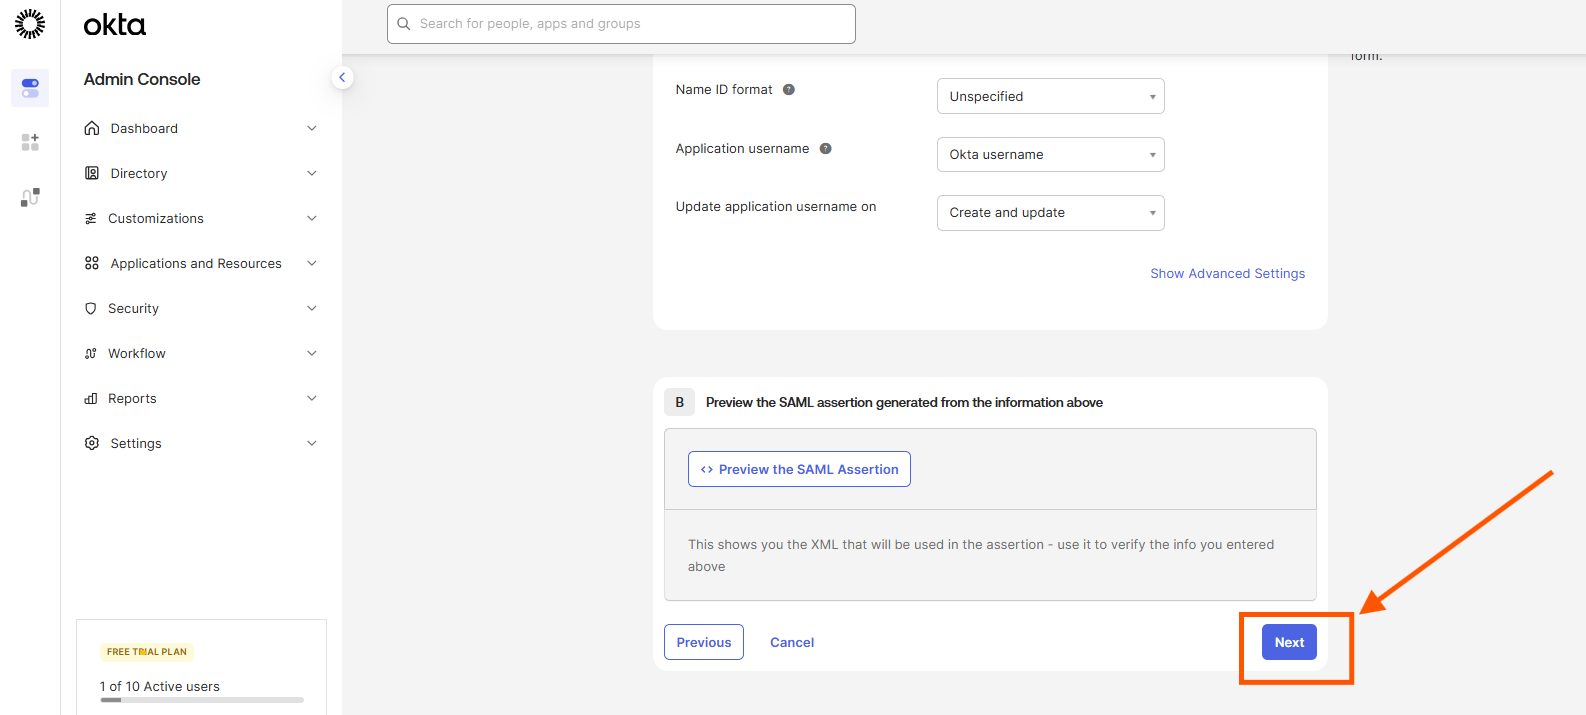
Review the remaining Configure SAML settings and leave them at their defaults:
- Default RelayState: Leave empty.
- Name ID format: Unspecified.
- Application username: Okta username.
- Update application username on: Create and update.
No changes are needed for a standard Strobes integration. Click Next. The wizard advances to Step 3: Feedback.
Step 20 — Select the App Type and Click Finish
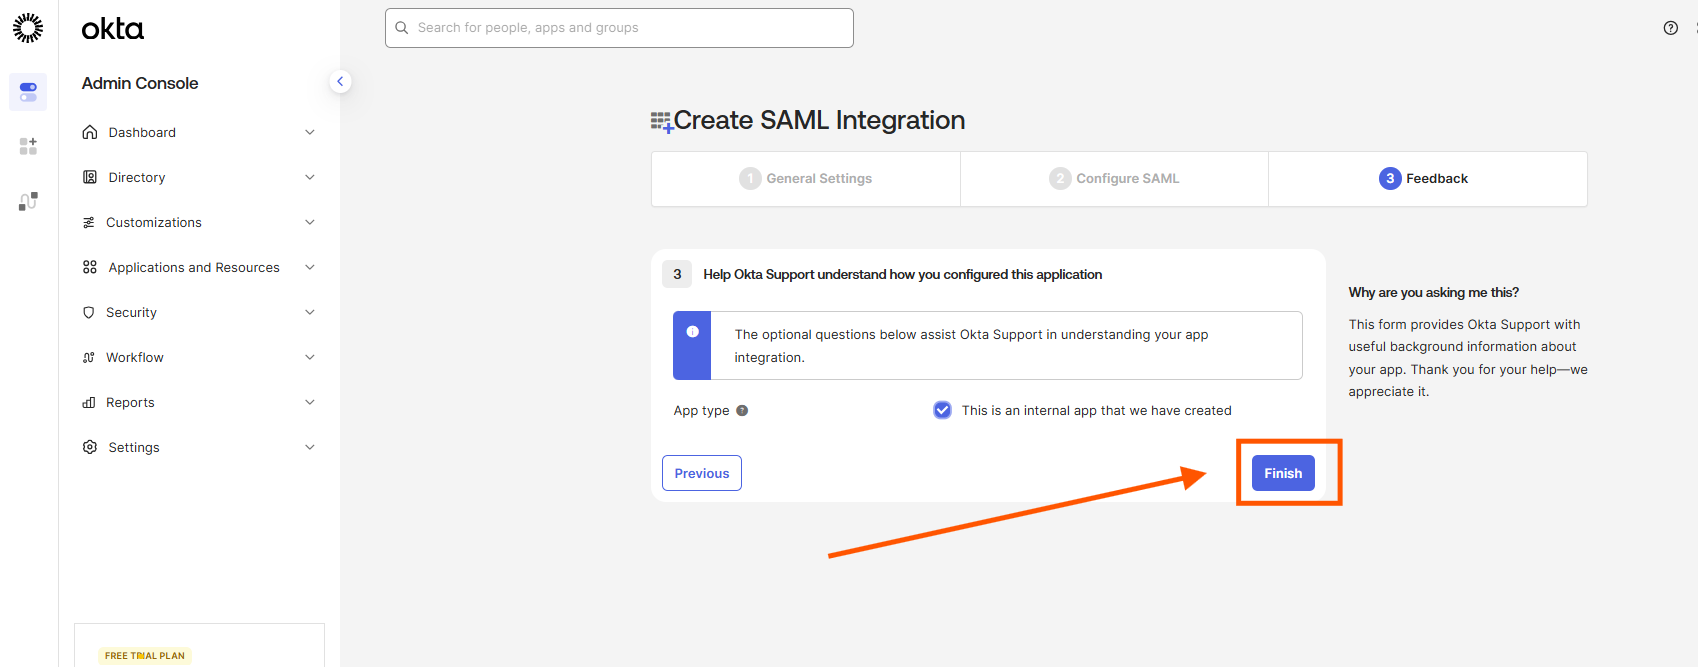
On the Feedback step, select "This is an internal app that we have created" and click Finish. This indicates that the integration is a private app for your organization rather than a public submission to the Okta Integration Network. Okta creates the Strobes Login app integration and opens the app detail page.
Part 5 — Copy the Okta Metadata
Step 21 — Go to the Sign On Tab and Locate the Metadata URL
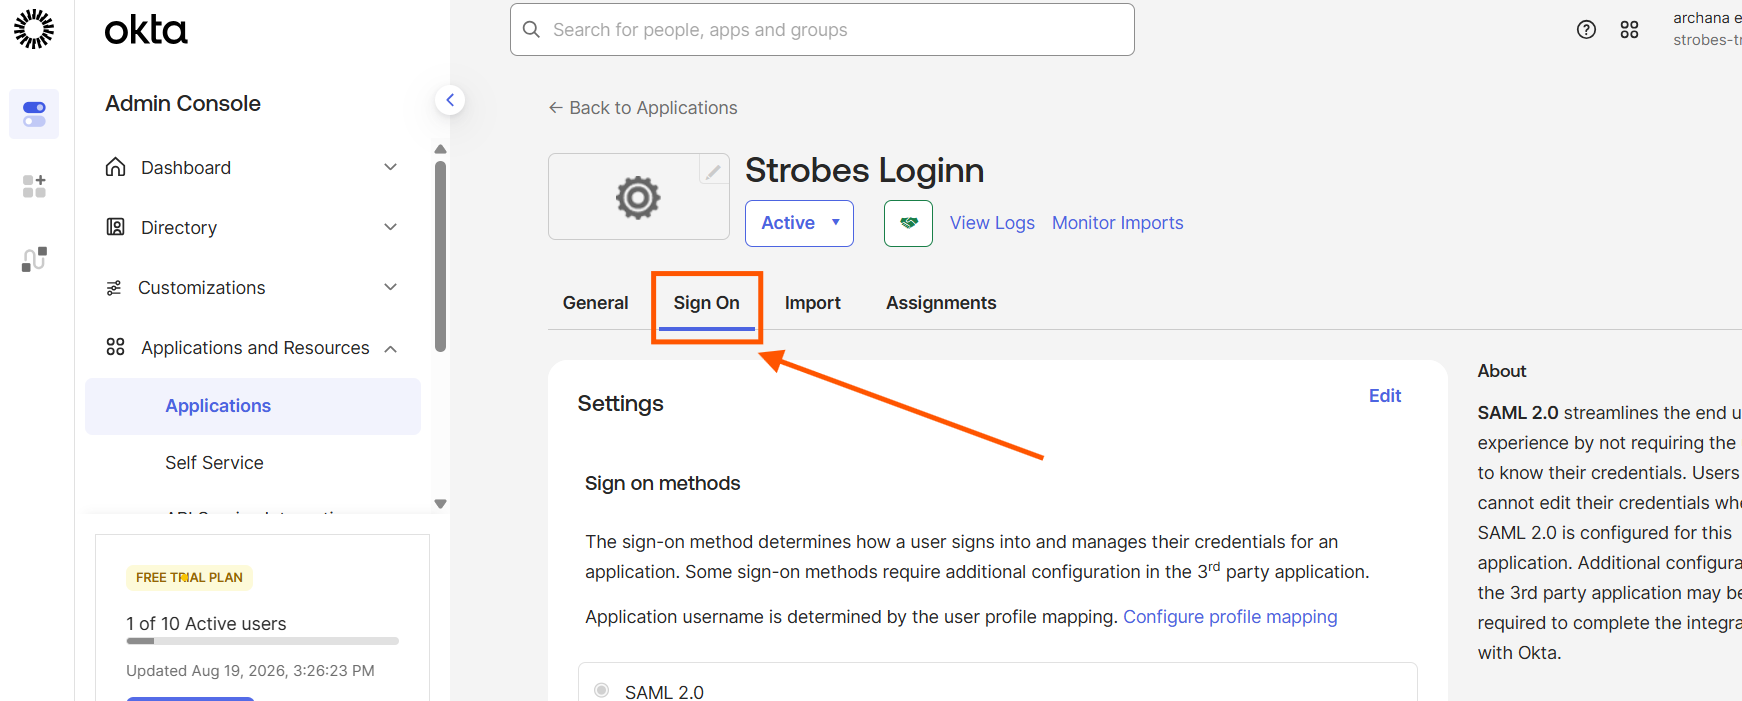
Click the Sign On tab on the Strobes Login app page and scroll down to the Metadata details section. The Metadata URL for your SAML app is listed here. This URL points to the XML file that contains all the Identity Provider information Strobes needs.
Step 22 — Copy the Metadata URL
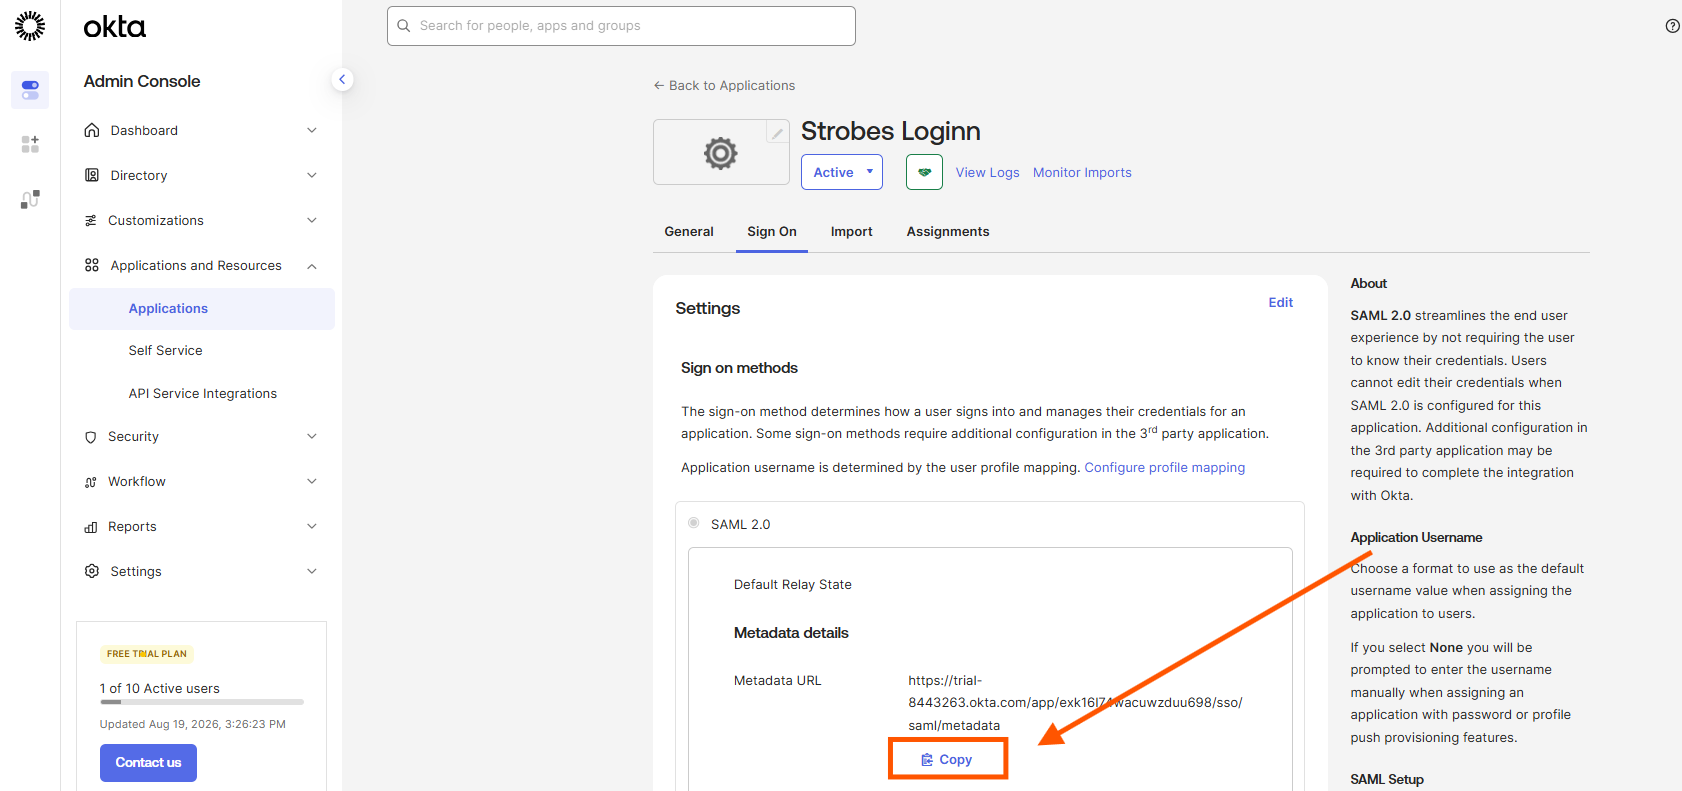
Click the copy icon next to the Metadata URL to copy it. The URL follows the format https://[your-okta-domain].okta.com/app/[app-id]/sso/saml/metadata. You will open this URL in your browser to retrieve the SAML metadata XML.
Step 23 — Open the Metadata URL and Copy the Full XML
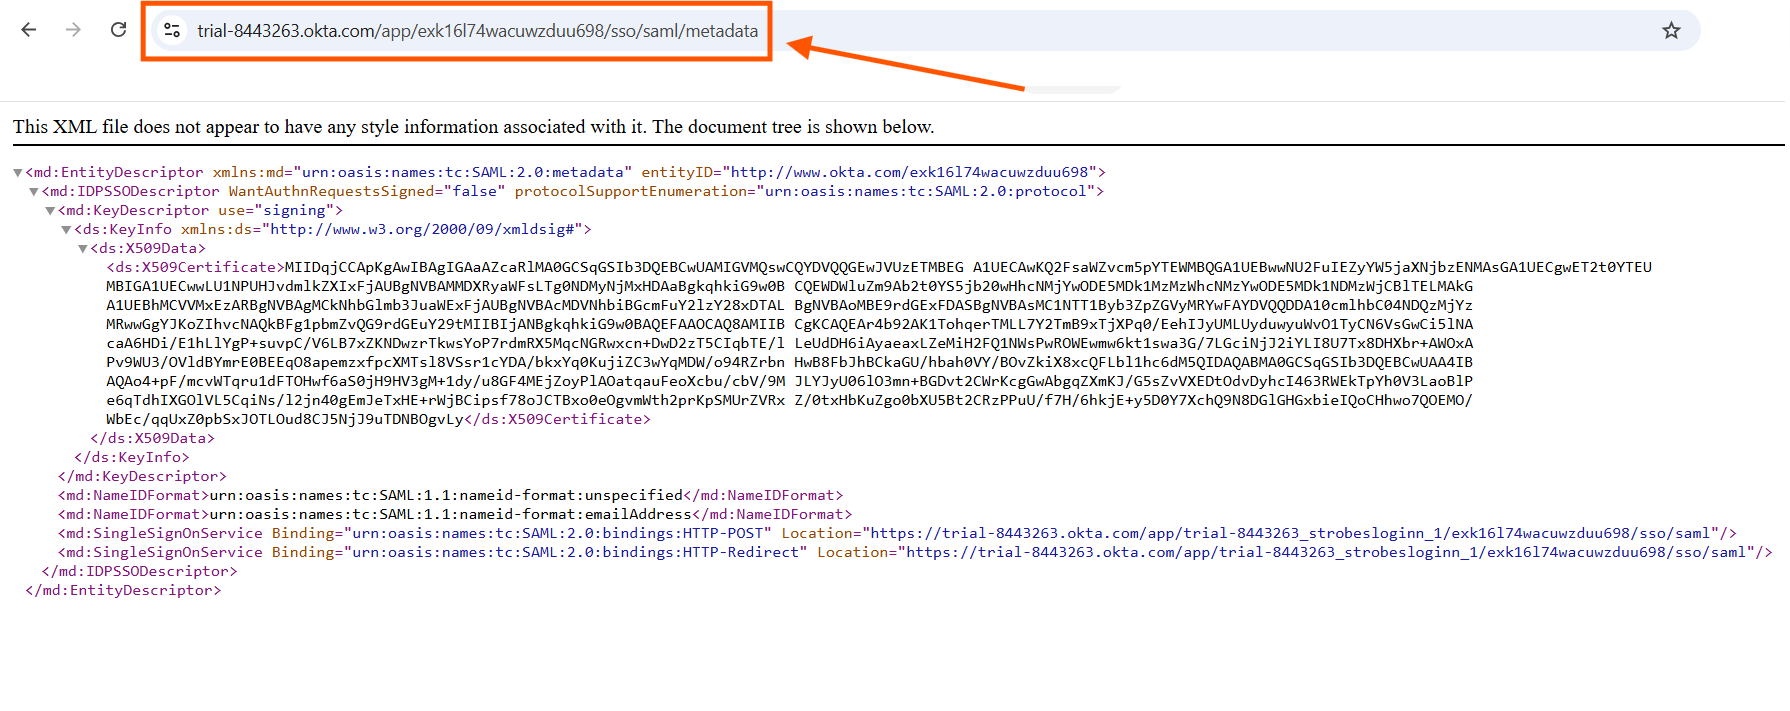
Paste the Metadata URL into your browser address bar and press Enter. The browser displays the Okta SAML metadata as raw XML. Press Ctrl+A (or Cmd+A on Mac) to select all the content on the page, then press Ctrl+C (or Cmd+C) to copy it. The entire XML document — including the EntityDescriptor, X509Certificate, and SingleSignOnService elements — should be selected before copying.
Part 6 — Update the Identity Provider with the Okta Metadata
Step 24 — Open the Three-Dot Menu and Click Edit
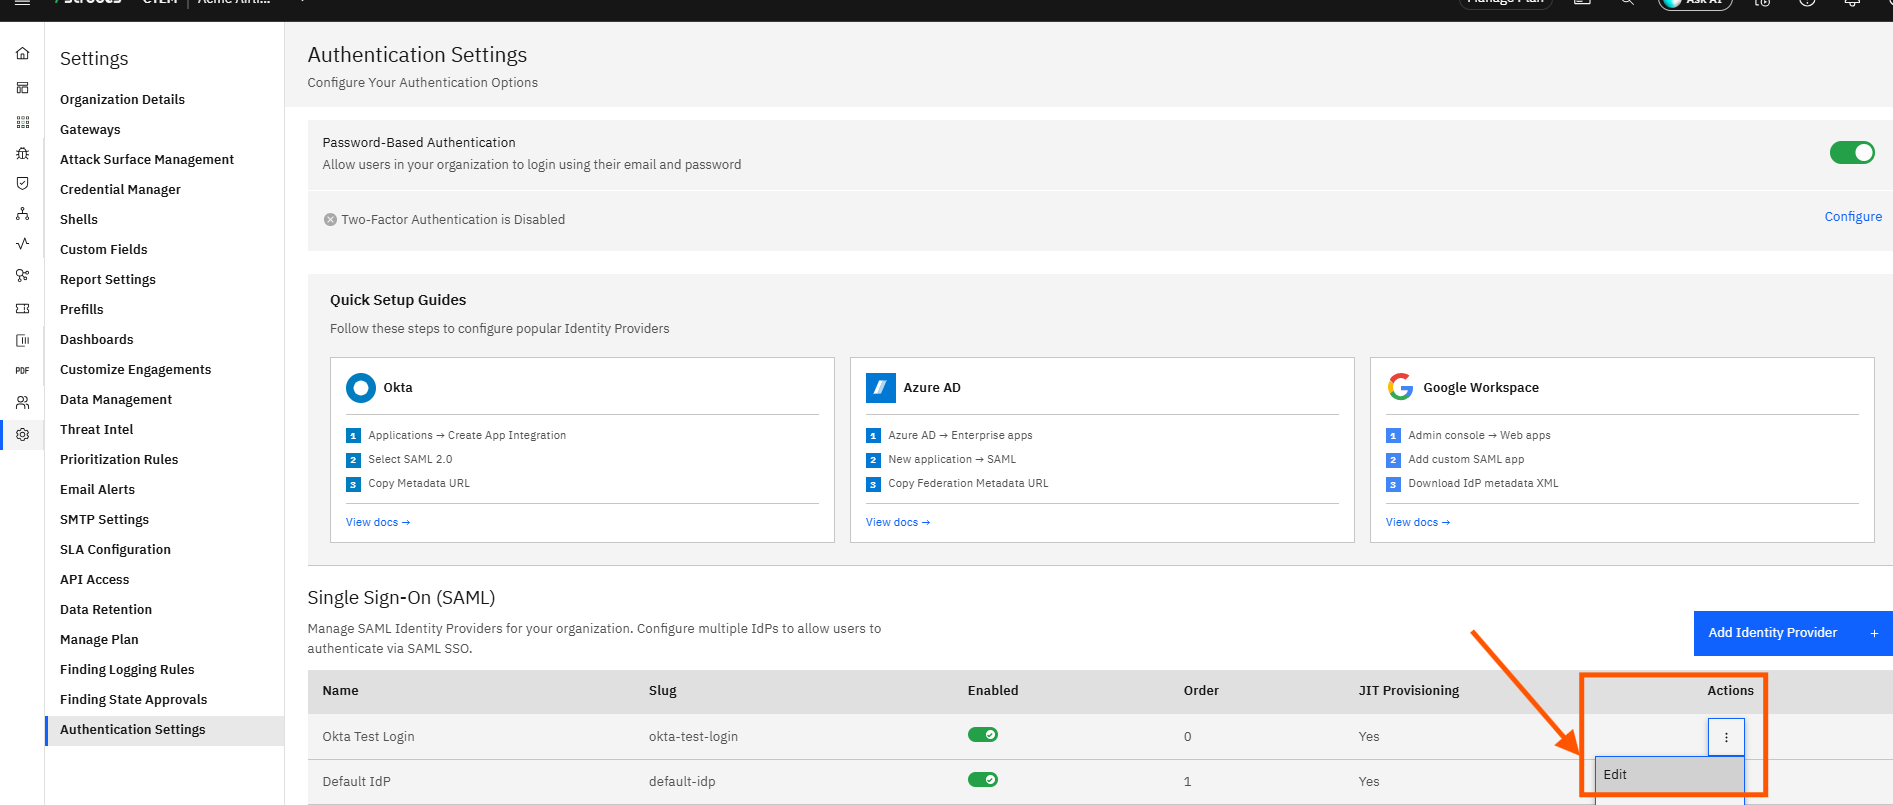
Return to the Strobes Authentication Settings page. Click the three-dot (⋮) actions menu on the Okta login row and click Edit. The Edit Identity Provider modal opens on the Basic Info tab, showing the name and slug set during creation. Click Next to advance to the Metadata tab.
Step 25 — Paste the Okta Metadata XML
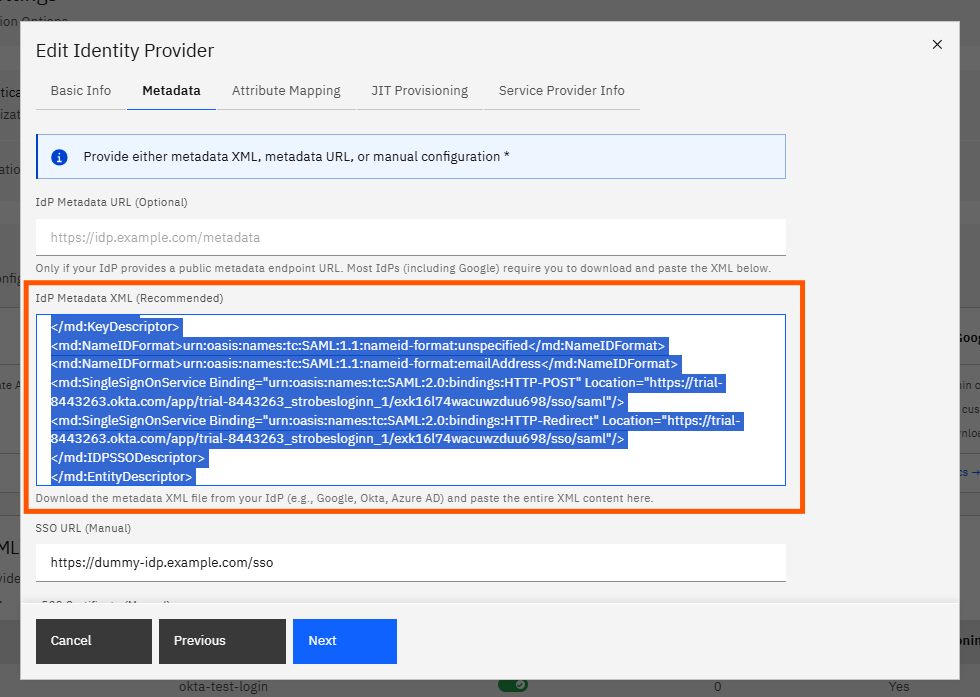
On the Metadata tab, click the IdP Metadata XML field and paste the XML you copied from Okta. The field fills with the complete XML document. This XML gives Strobes the Okta signing certificate, the Okta SSO endpoint URL, and the Okta Entity ID — everything required to validate SAML assertions from Okta. Click Next to advance to the Attribute Mapping tab.
Step 26 — Review Attribute Mapping, JIT Provisioning, and Advance to Service Provider Info
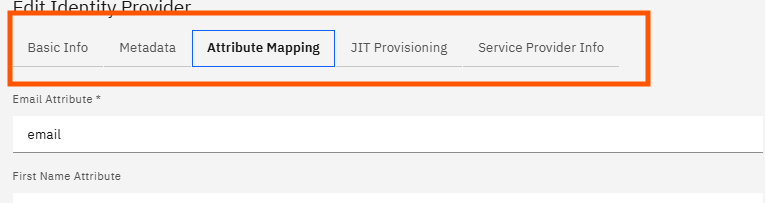
Review the Attribute Mapping tab. The values set during creation — email, given_name, and family_name — are still in place. No changes are needed. Click Next to advance to the JIT Provisioning tab. Review the JIT Provisioning settings — the Enable JIT Provisioning toggle remains on and the Default Role remains set to Member. Click Next again to advance to the Service Provider Info tab.
Step 27 — Click Update on the Service Provider Info Tab
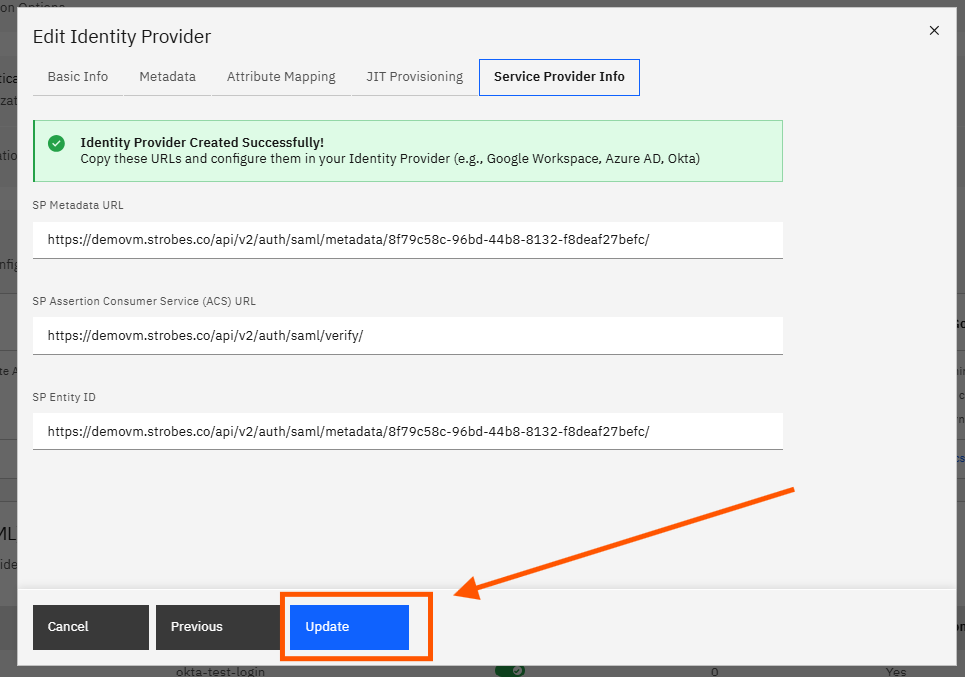
On the Service Provider Info tab, click Update. This tab displays the SP Metadata URL, SP ACS URL, and SP Entity ID for reference — confirming the values already configured in Okta. Clicking Update saves the Okta metadata XML to the Identity Provider and completes the configuration.
Step 28 — Confirm the Update and Verify the Integration
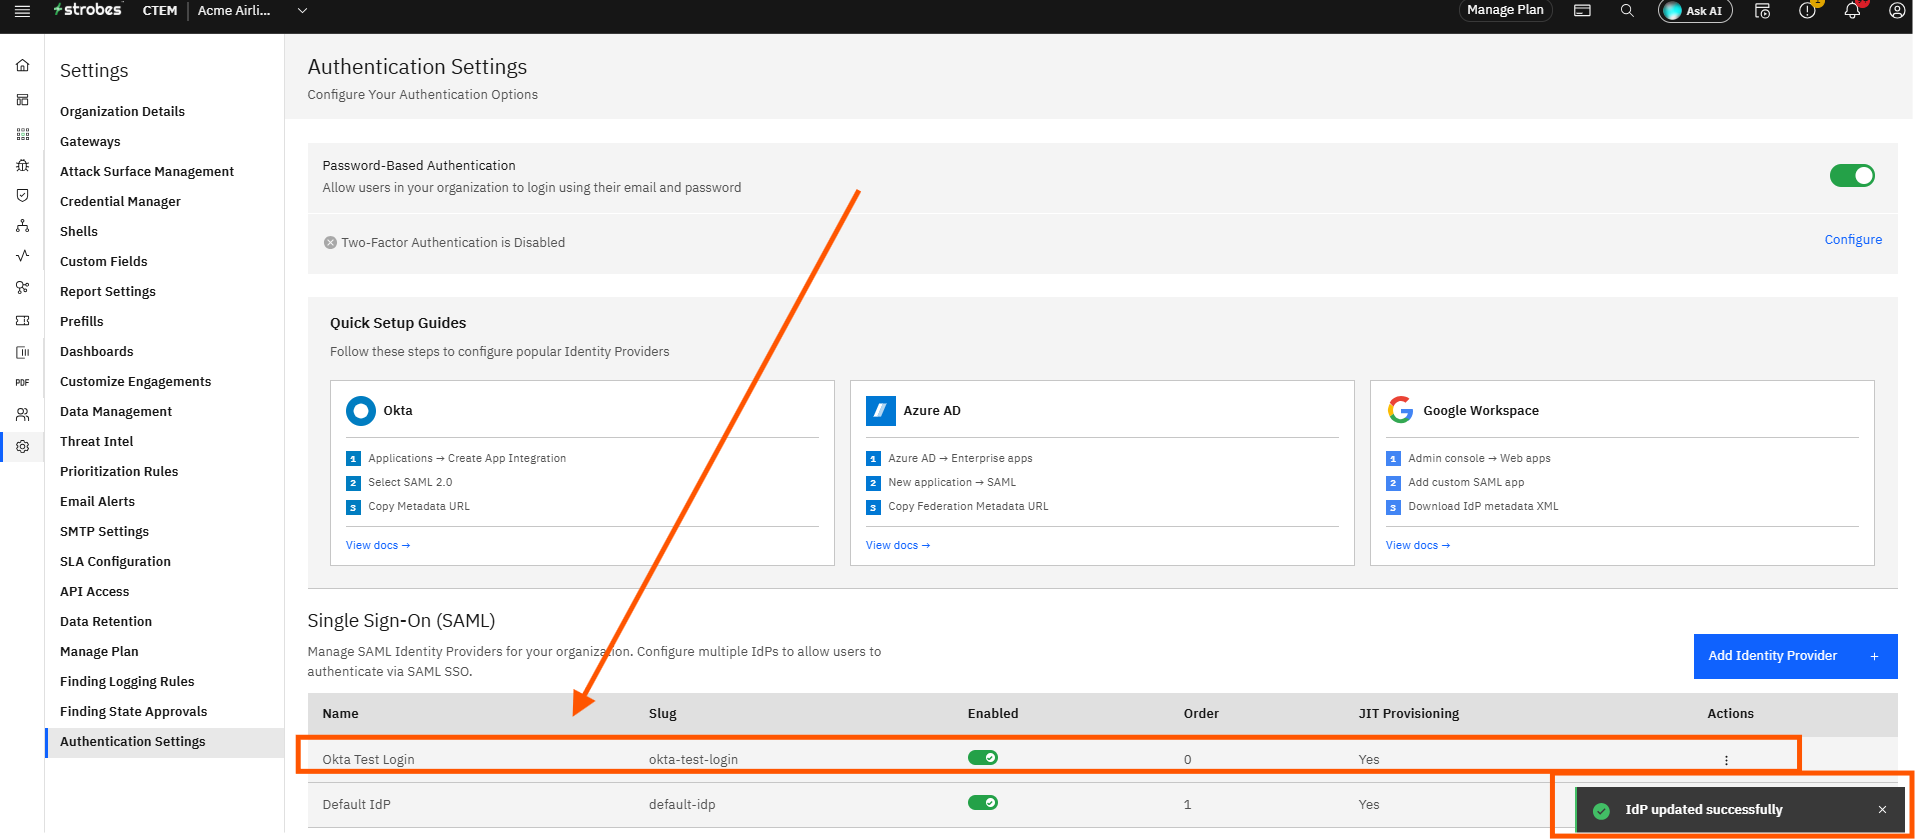
Confirm that the "IdP updated successfully" toast appears. The Authentication Settings page shows the Okta login Identity Provider in the SAML table.
The Okta SSO integration is now fully configured. The Okta login row in the Single Sign-On (SAML) table confirms that the Identity Provider is Enabled and that JIT Provisioning is active. Users assigned to the Strobes Login app in Okta can now log in to Strobes using their Okta credentials, and new accounts will be created automatically on first login.
Tips
The Okta Metadata URL is only available after the app is fully created. The Metadata URL appears on the Sign On tab only after you click Finish in the Okta SAML app wizard. Opening the URL before that point will not return valid SAML metadata.
JIT Provisioning eliminates the need to pre-invite users. With JIT enabled, any user assigned to the Strobes Login app in Okta has a Strobes account created automatically on their first SSO login, using the role defined in the Default Role setting.
Attribute names in Strobes must match the attribute names in the Okta SAML assertion. The defaults — email, given_name, family_name — match Okta's standard user profile attributes. If your Okta app uses custom attribute statements, update the Attribute Mapping tab in Strobes to use those names instead.
The Audience URI and ACS URL in Okta must match the Strobes SP values exactly. Copying directly from the SP URLs modal in Strobes prevents typographical errors. A mismatch causes Okta to reject the SAML assertion and login attempts will fail.
You can edit the Identity Provider at any time. Click the three-dot menu on the Okta login row and select Edit to update the metadata XML, change the display name, adjust JIT Provisioning settings, or modify the attribute mappings.
The SP URLs are always accessible via View SP URLs. Click the three-dot menu on the Okta login row and select View SP URLs whenever you need to reference the Strobes ACS URL or SP Entity ID — for example, when reconfiguring the Okta app or troubleshooting SSO issues.