
Connecting AWS Asset Inventory to Strobes
Overview
The AWS Asset Inventory connector pulls your AWS infrastructure into Strobes as assets. Once configured, Strobes discovers the AWS services running in your account and adds them to your asset inventory, where they are deduplicated, merged with existing records, and made available for vulnerability and exposure management.
This article covers the complete setup: finding the connector, naming your configuration, creating or selecting an AWS credential, configuring merge and scan settings, specifying services and regions, and running your first sync.
Before You Start
- Strobes access: Owner or Manager role on your Strobes account.
- AWS IAM credentials: An Access Key ID and Secret Access Key for an IAM user or role with read-only access to the AWS services you plan to import (for example,
AmazonEC2ReadOnlyAccess). - Services and regions: Know which AWS service types (e.g.,
ec2,rds) and which AWS regions (e.g.,us-east-1,ap-south-1) you want Strobes to discover.
Step 1 — Open the Connectors Page
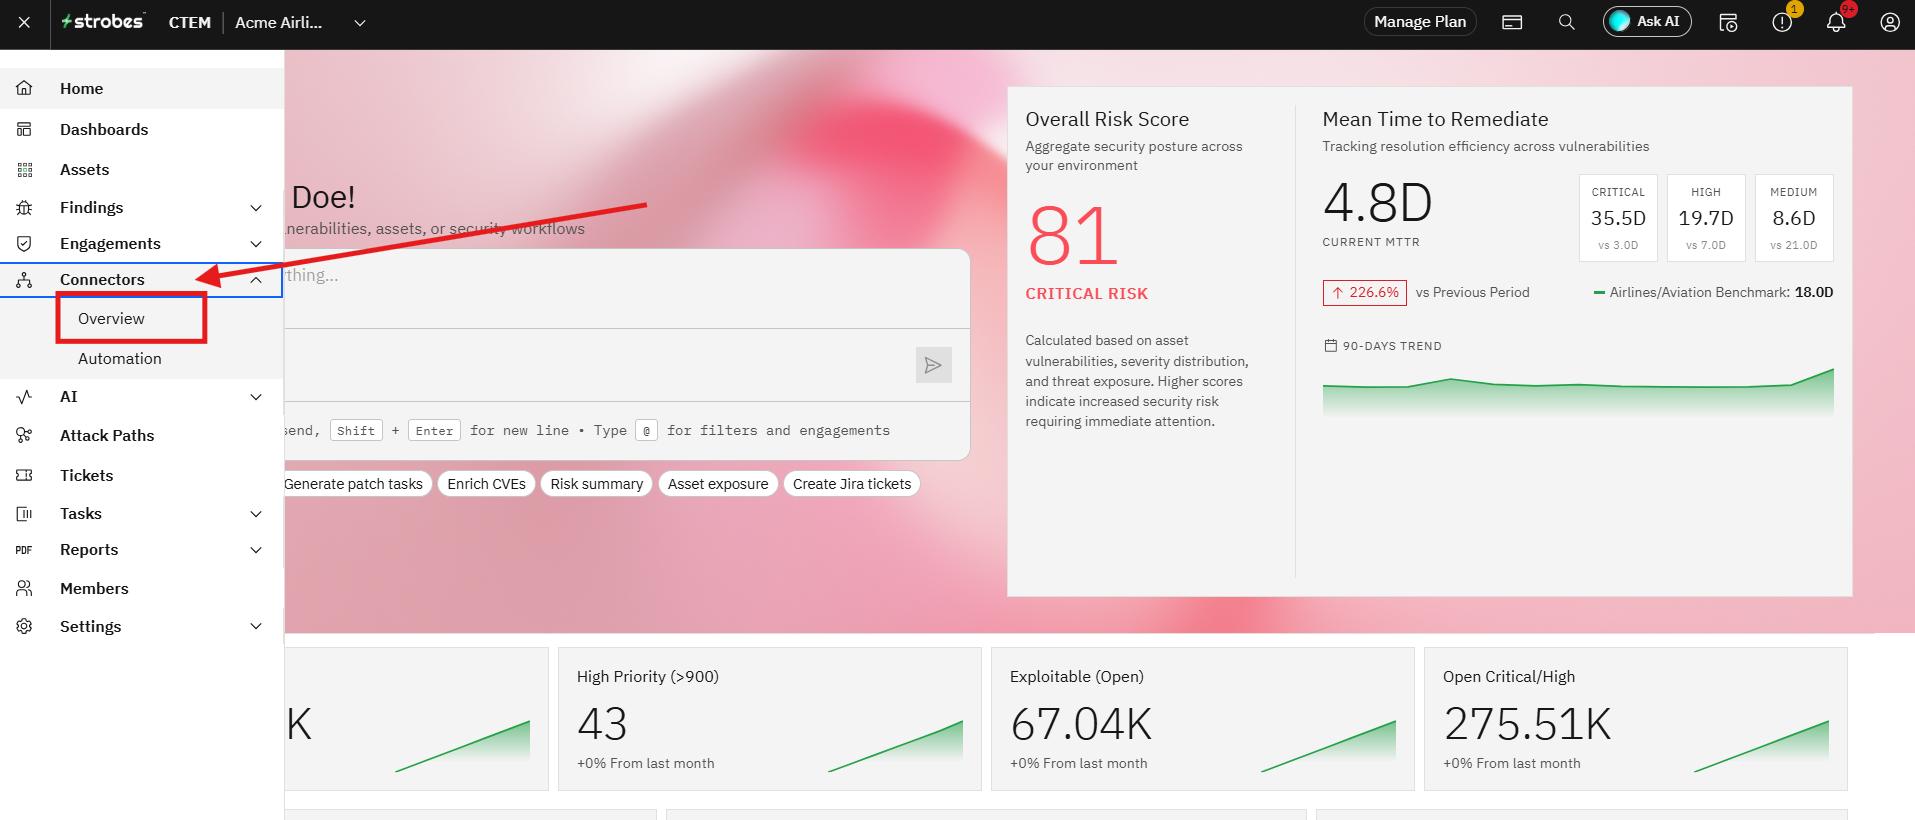
In the left sidebar, click Connectors to expand the section, then click Overview. The Connectors page loads, displaying the Installed Connectors section and a Look for Connectors search bar.
Step 2 — Search for the AWS Asset Inventory Connector
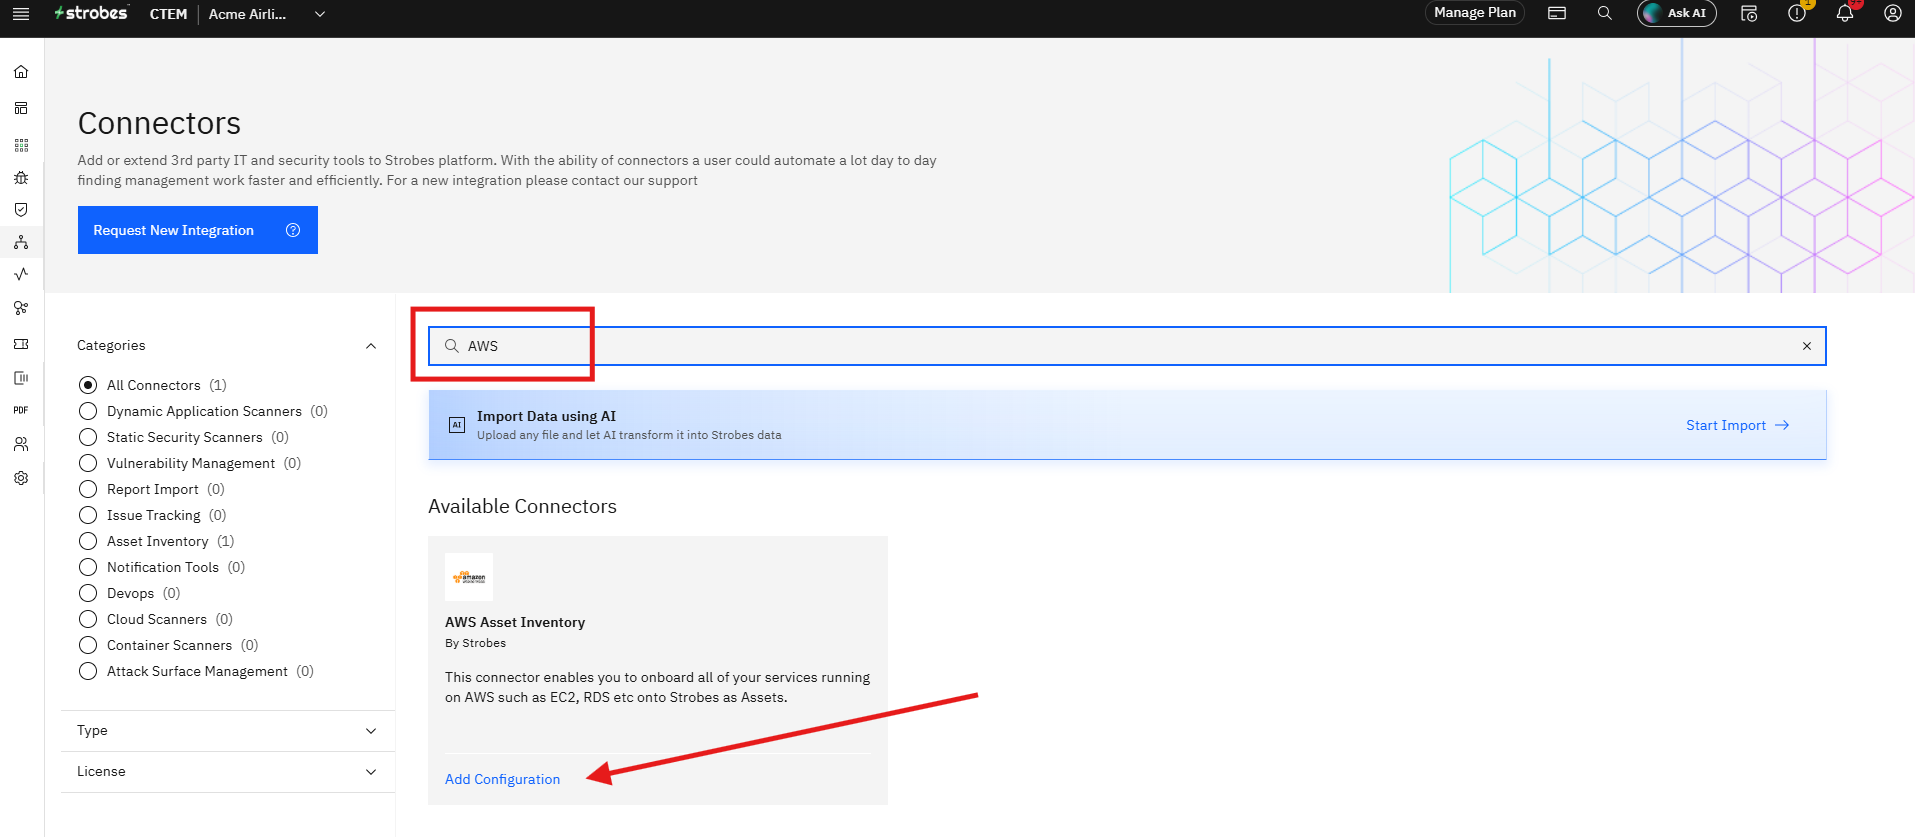
Click the Look for Connectors search bar and type aws. The Available Connectors section updates to show the AWS Asset Inventory connector card, published by Strobes, with the description: "This connector enables you to onboard all of your services running on AWS such as EC2, RDS etc onto Strobes as Assets."
Step 3 — Start a New Configuration
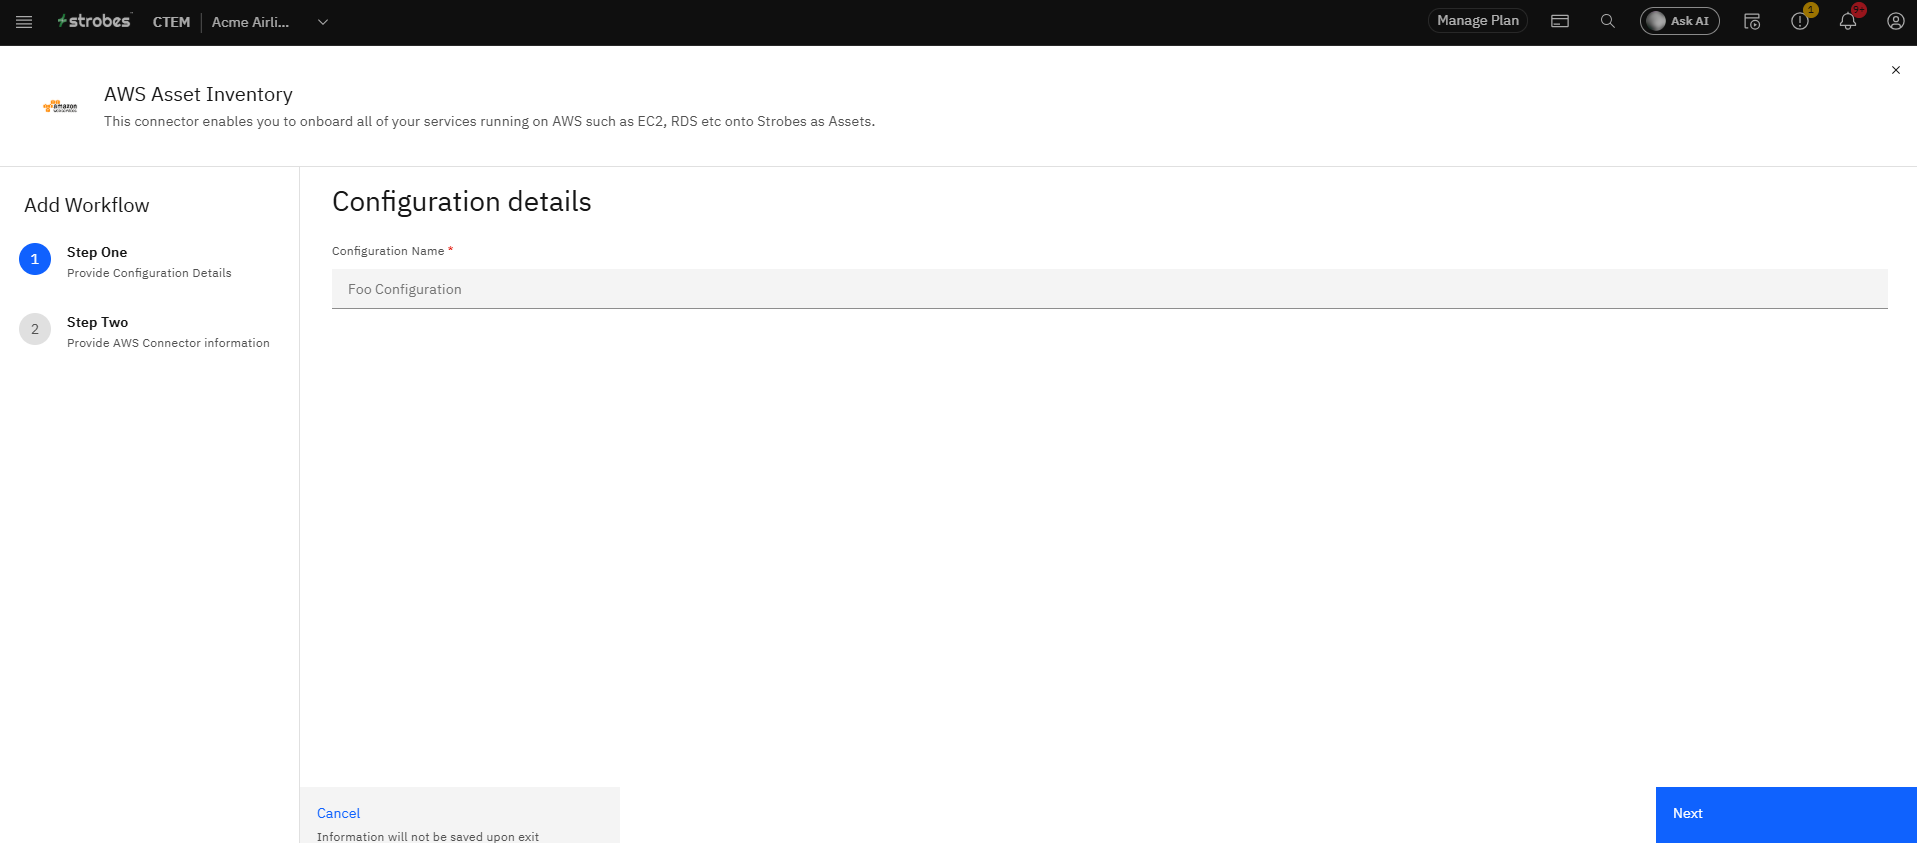
Click Add Configuration on the AWS Asset Inventory connector card. The Add Workflow wizard opens. The left sidebar shows the two steps in the wizard: Step One (Provide Configuration Details) and Step Two (Provide AWS Connector information).
Step 4 — Enter a Configuration Name
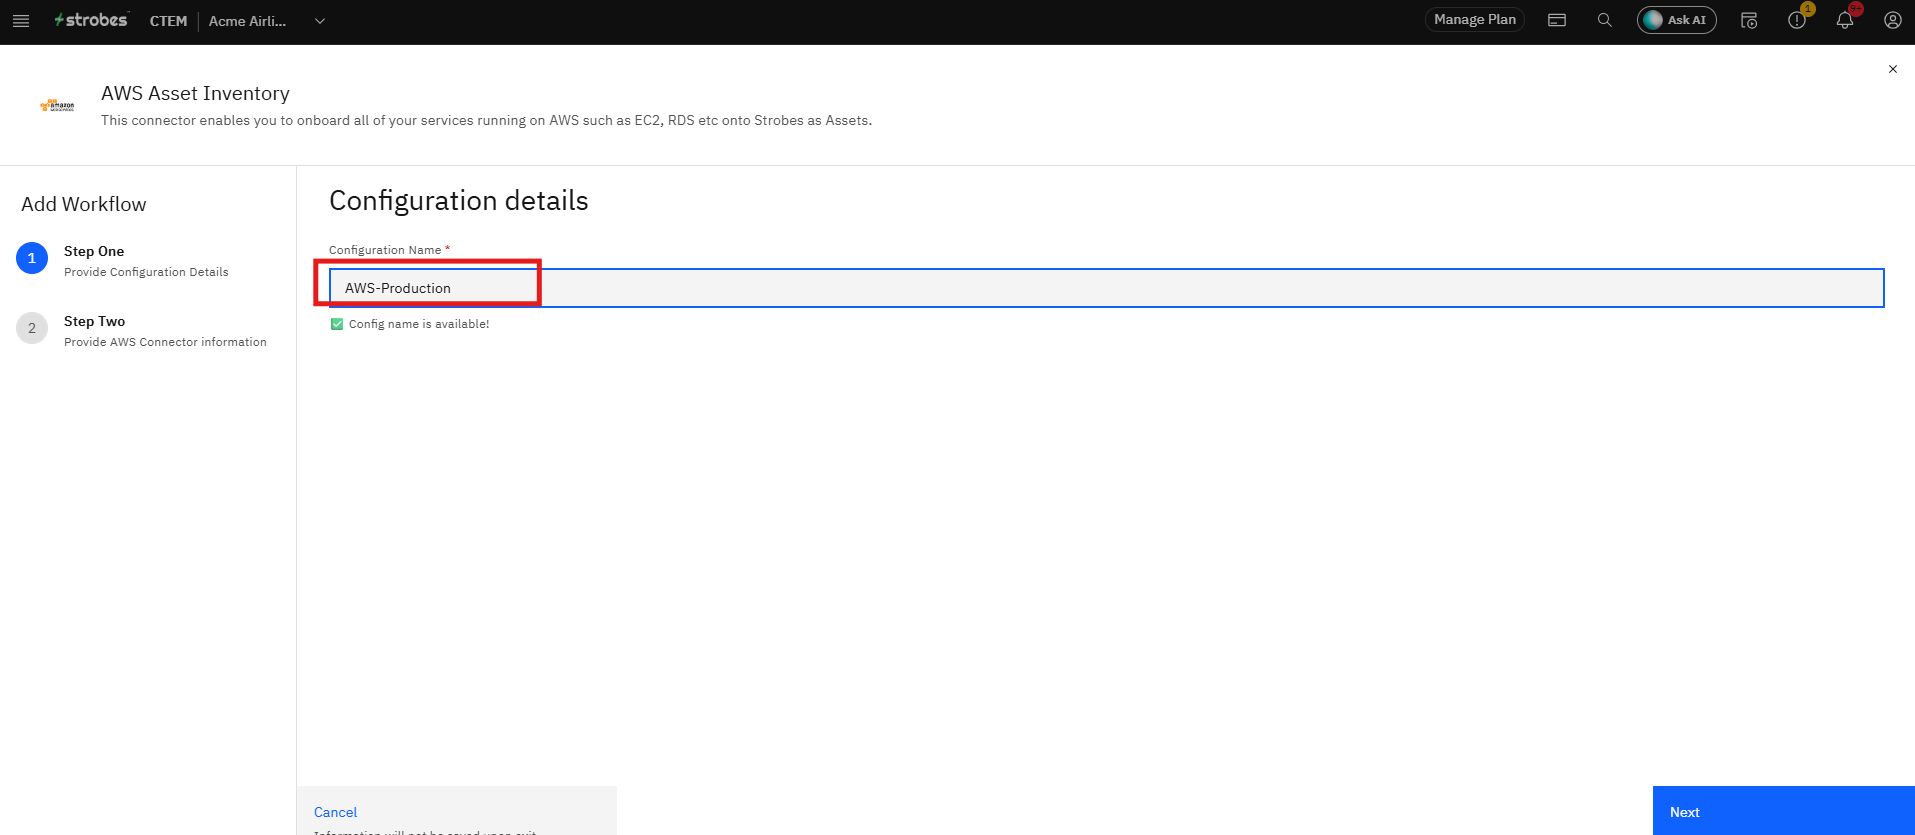
In the Configuration Name field, type a name that identifies this configuration. Use a name that reflects the AWS account or environment this connector will cover, for example: AWS-Production or AWS-US-East. As you type, Strobes checks whether the name is unique and shows a green "Config name is available!" message when it is.
Click Next.
Step 5 — Proceed to Step Two
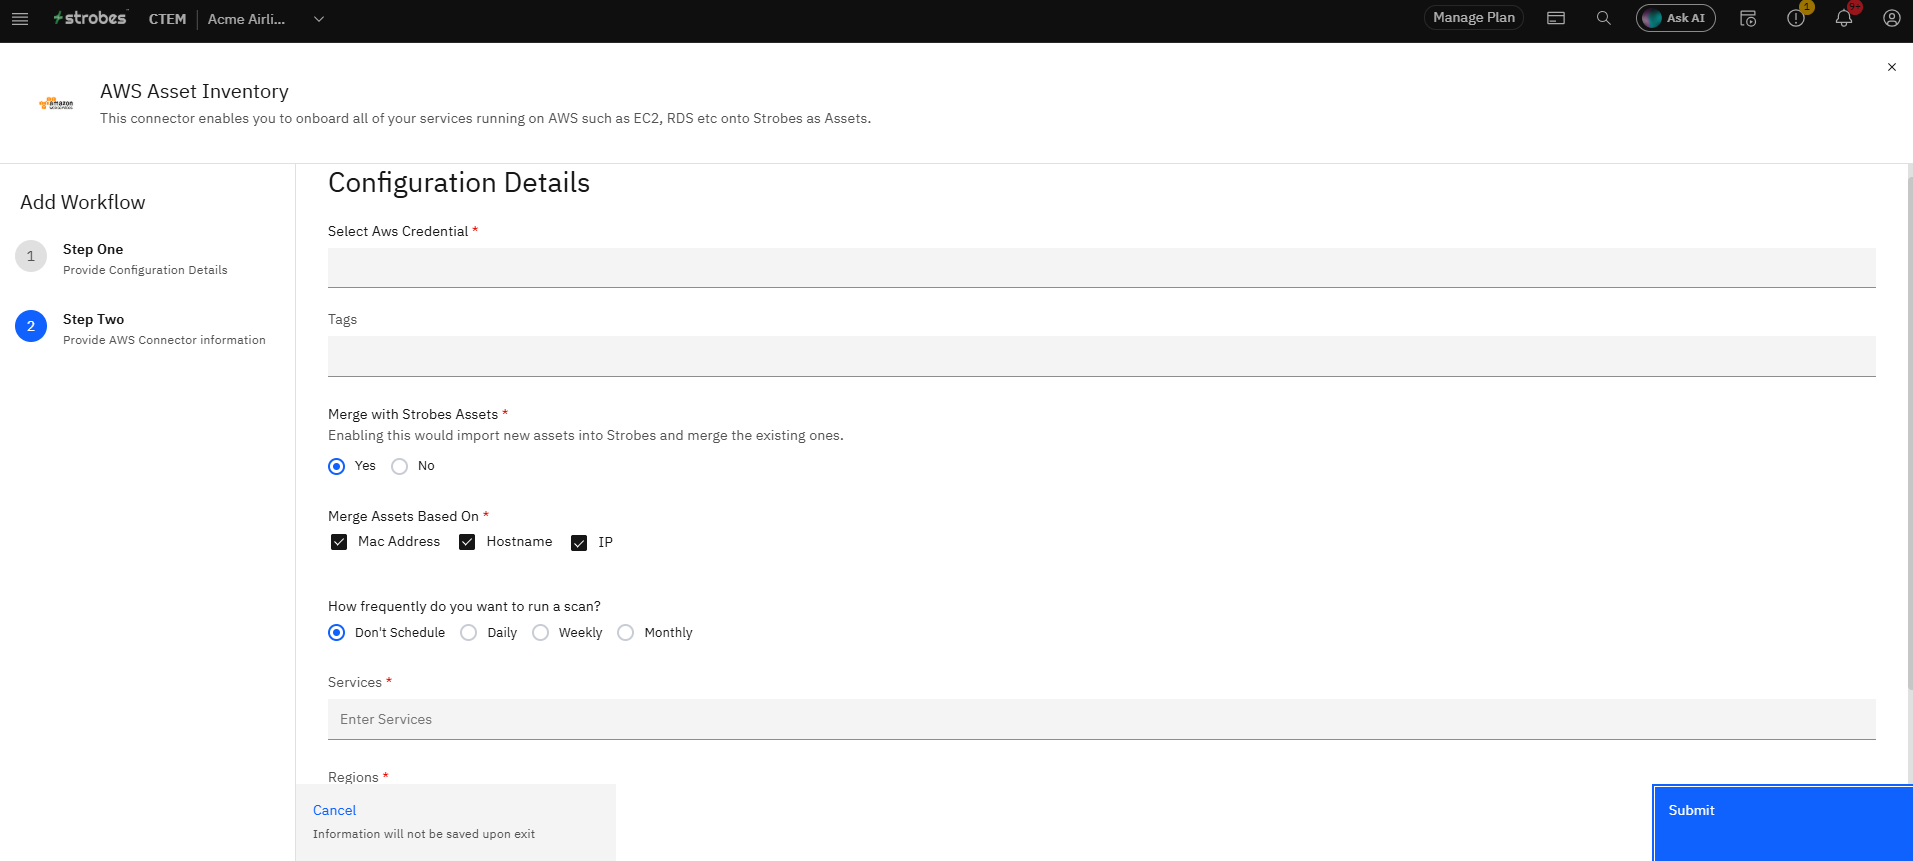
The wizard advances to Step Two — Provide AWS Connector information, which contains all the remaining configuration fields.
Step 6 — Open the AWS Credential Dropdown
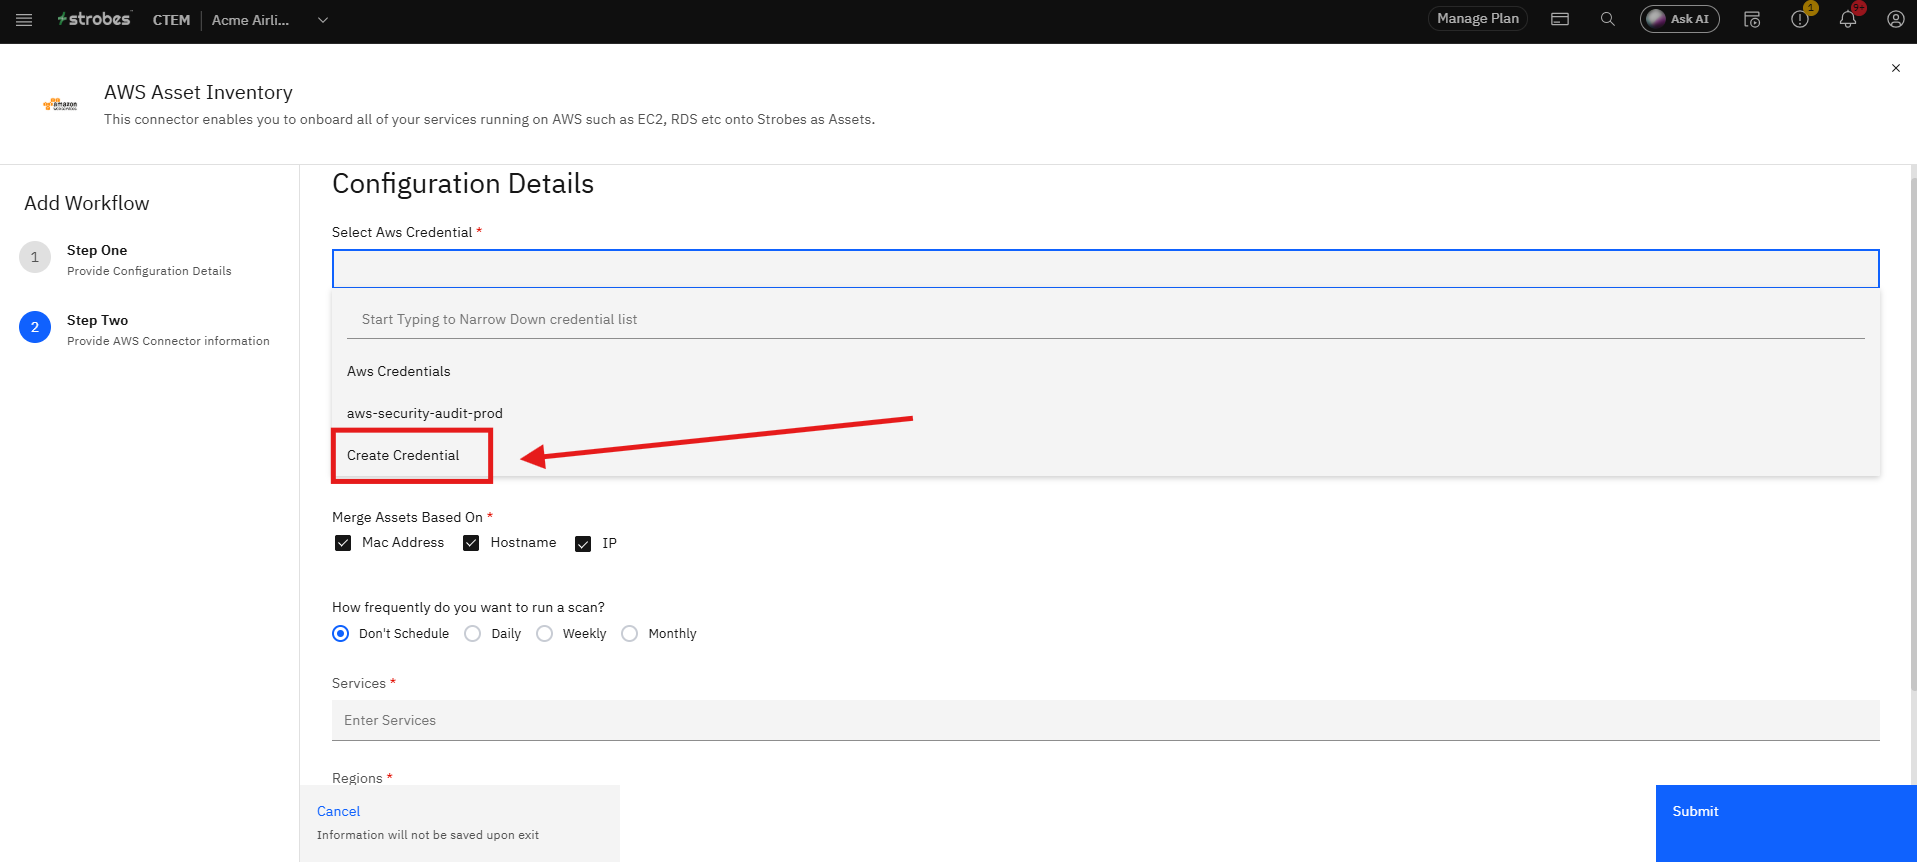
Click the Select Aws Credential dropdown. The dropdown lists all AWS credentials already stored in Strobes, with a search box to narrow results. If you have a credential ready, select it and skip to Step 9. If you need to create one, click Create Credential.
Step 7 — Create a New AWS Credential
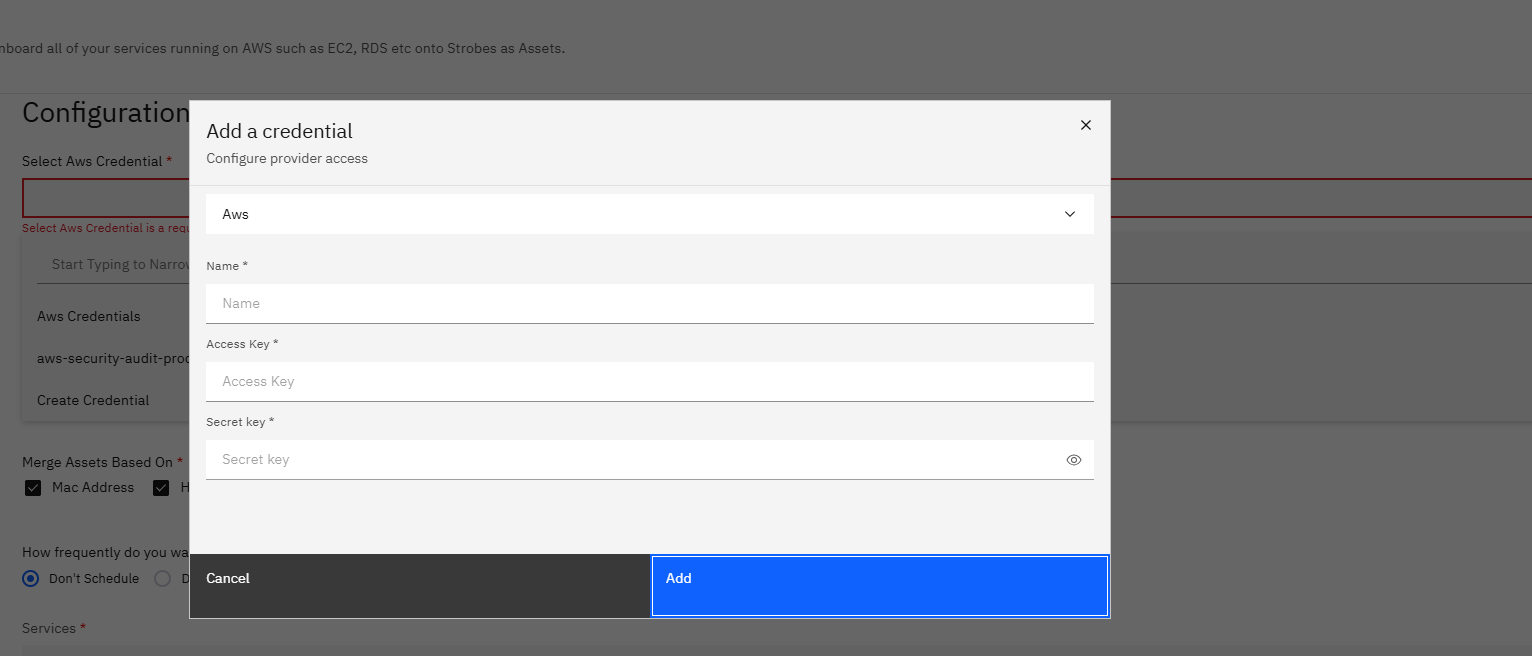
In the Add a credential dialog, fill in the three required fields and click Add. The provider type is pre-set to Aws.
Field | What to enter |
|---|---|
Name | A label for this credential, e.g., |
Access Key | Your AWS Access Key ID |
Secret key | Your AWS Secret Access Key |
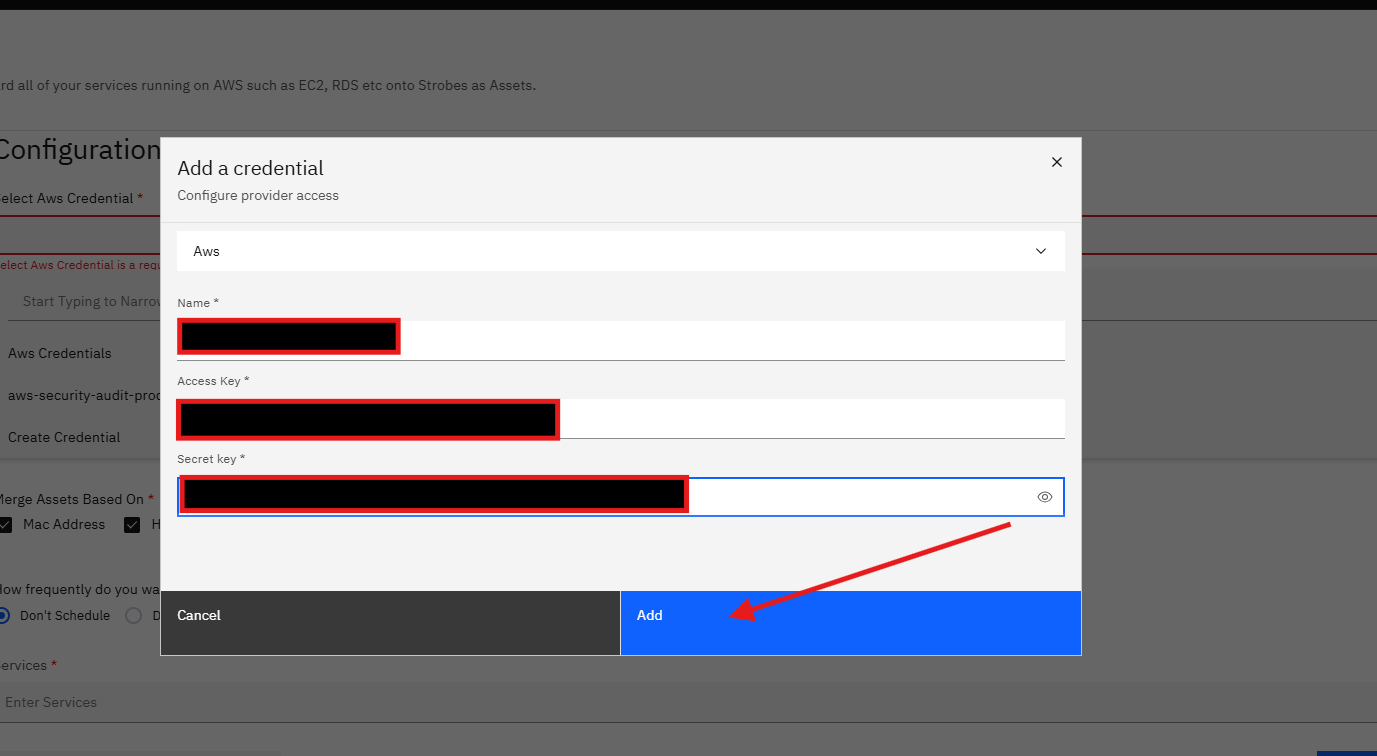
Step 8 — Add Tags (Optional)
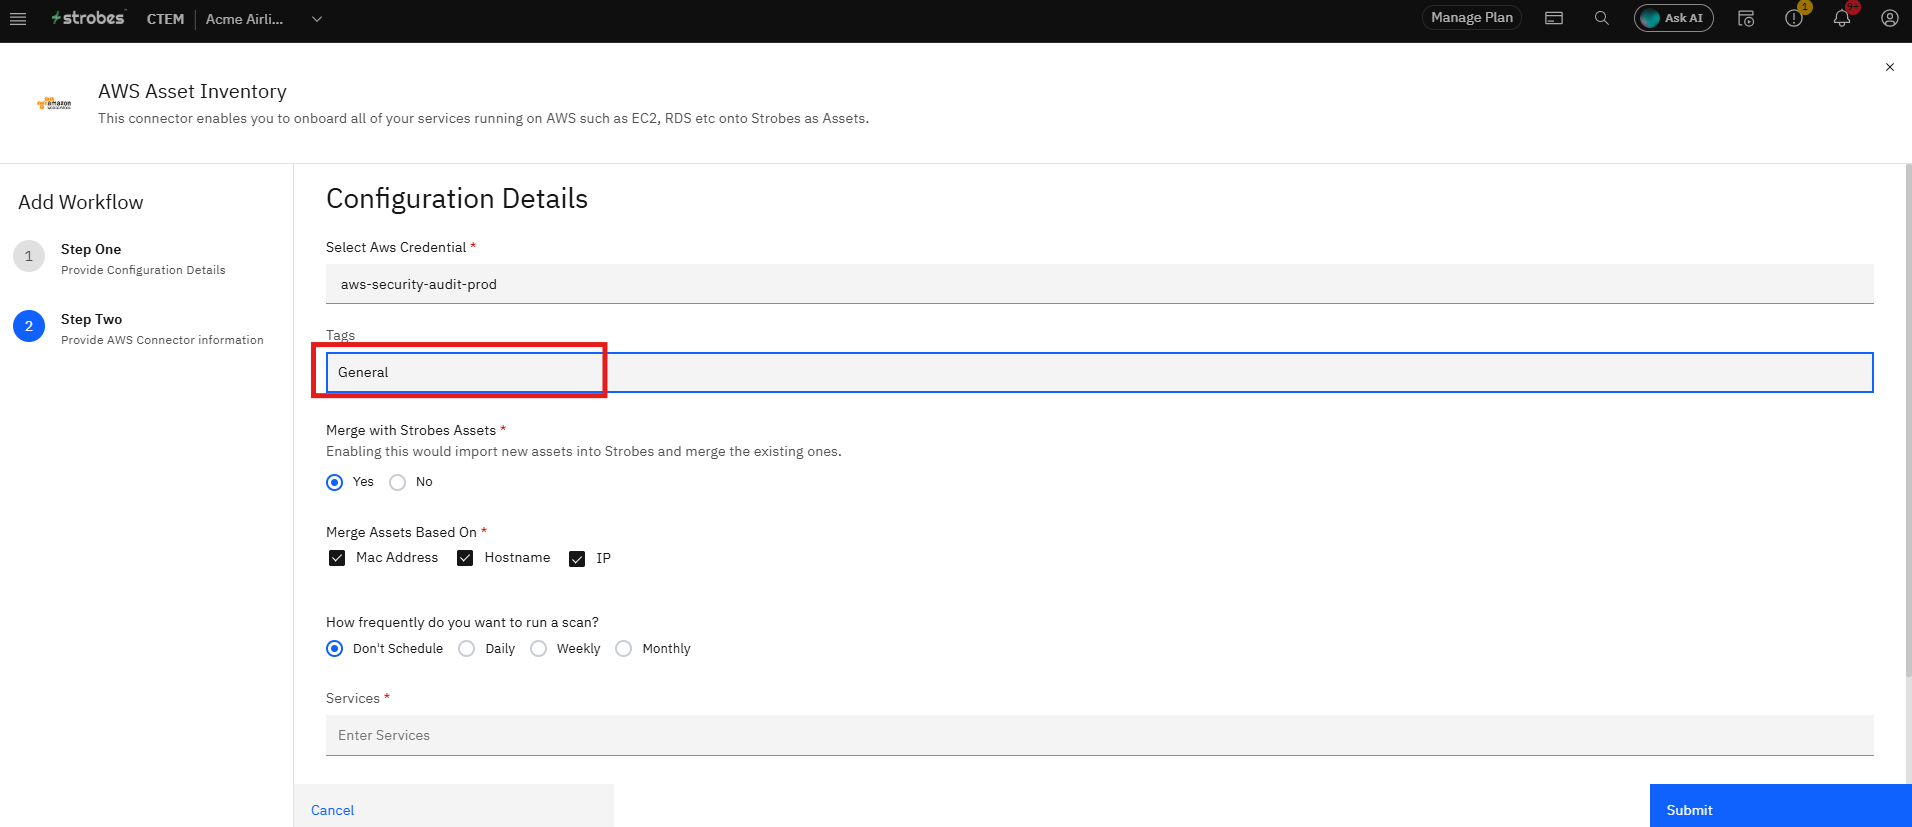
- Click the Tags field and type a tag to categorize this workflow, then press Enter.
Tags help you organize and filter workflows across connectors.
This field is optional — leave it blank if you do not need tags.
Step 9 — Set Merge with Strobes Assets
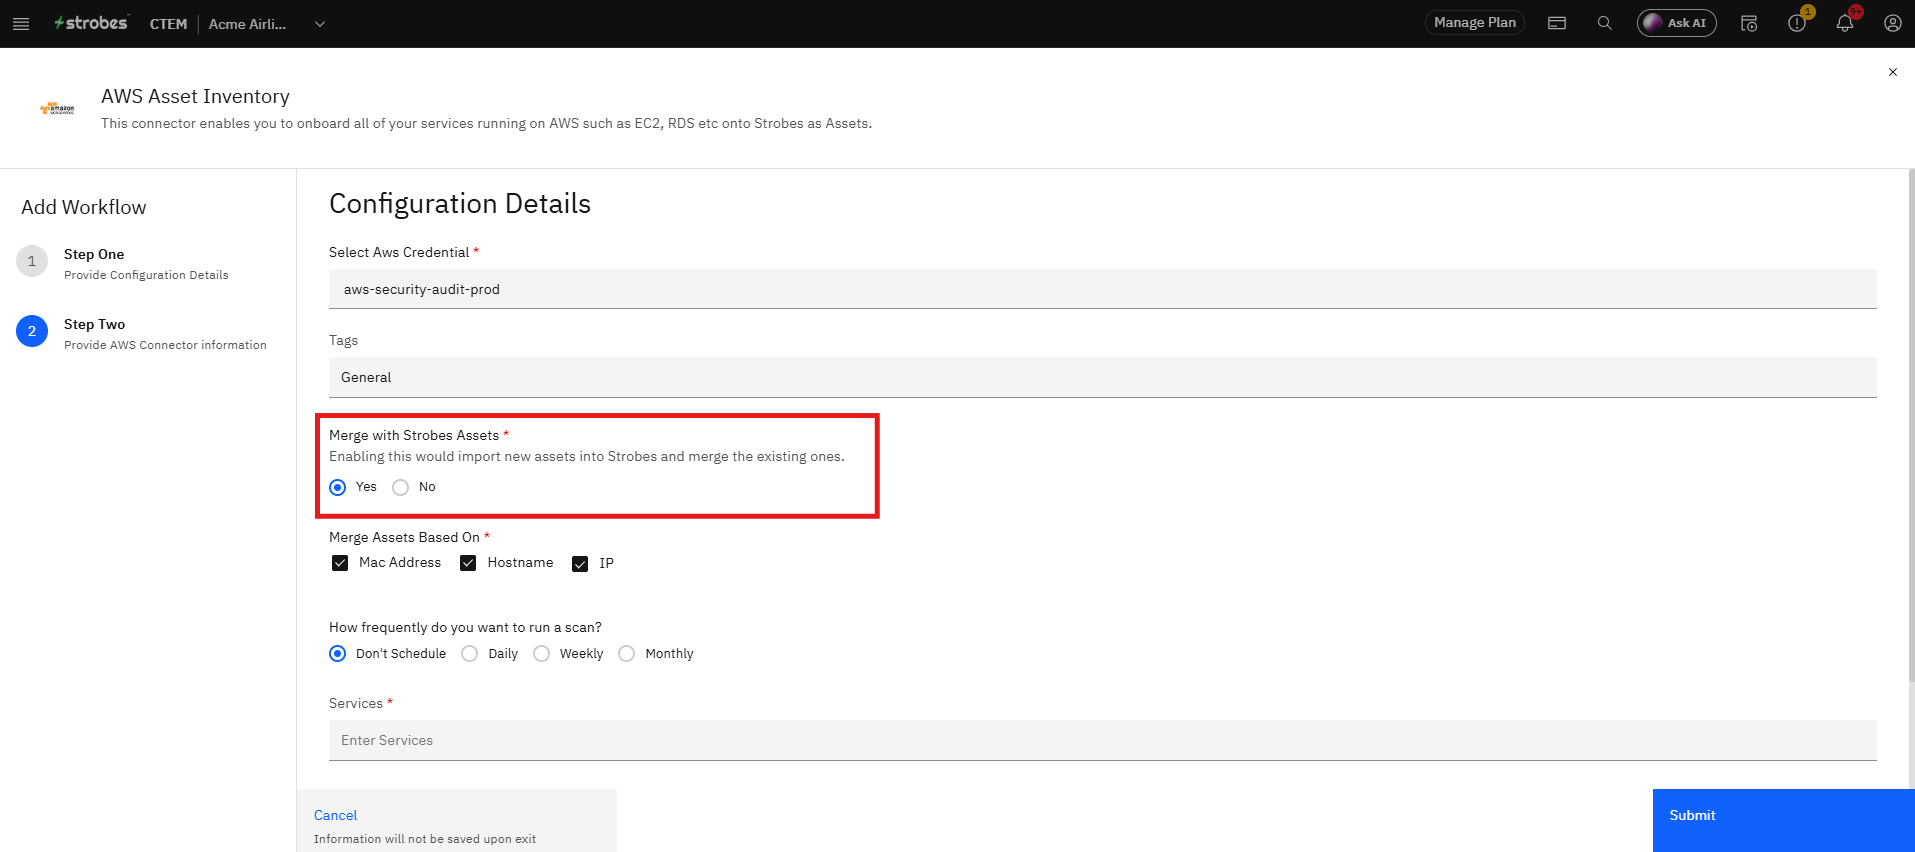
Under Merge with Strobes Assets, select Yes to import and merge discovered AWS assets with your existing Strobes inventory. Selecting No imports assets without merging them against existing records. Yes is recommended in most cases to prevent duplicate asset entries.
Step 10 — Set Merge Assets Based On
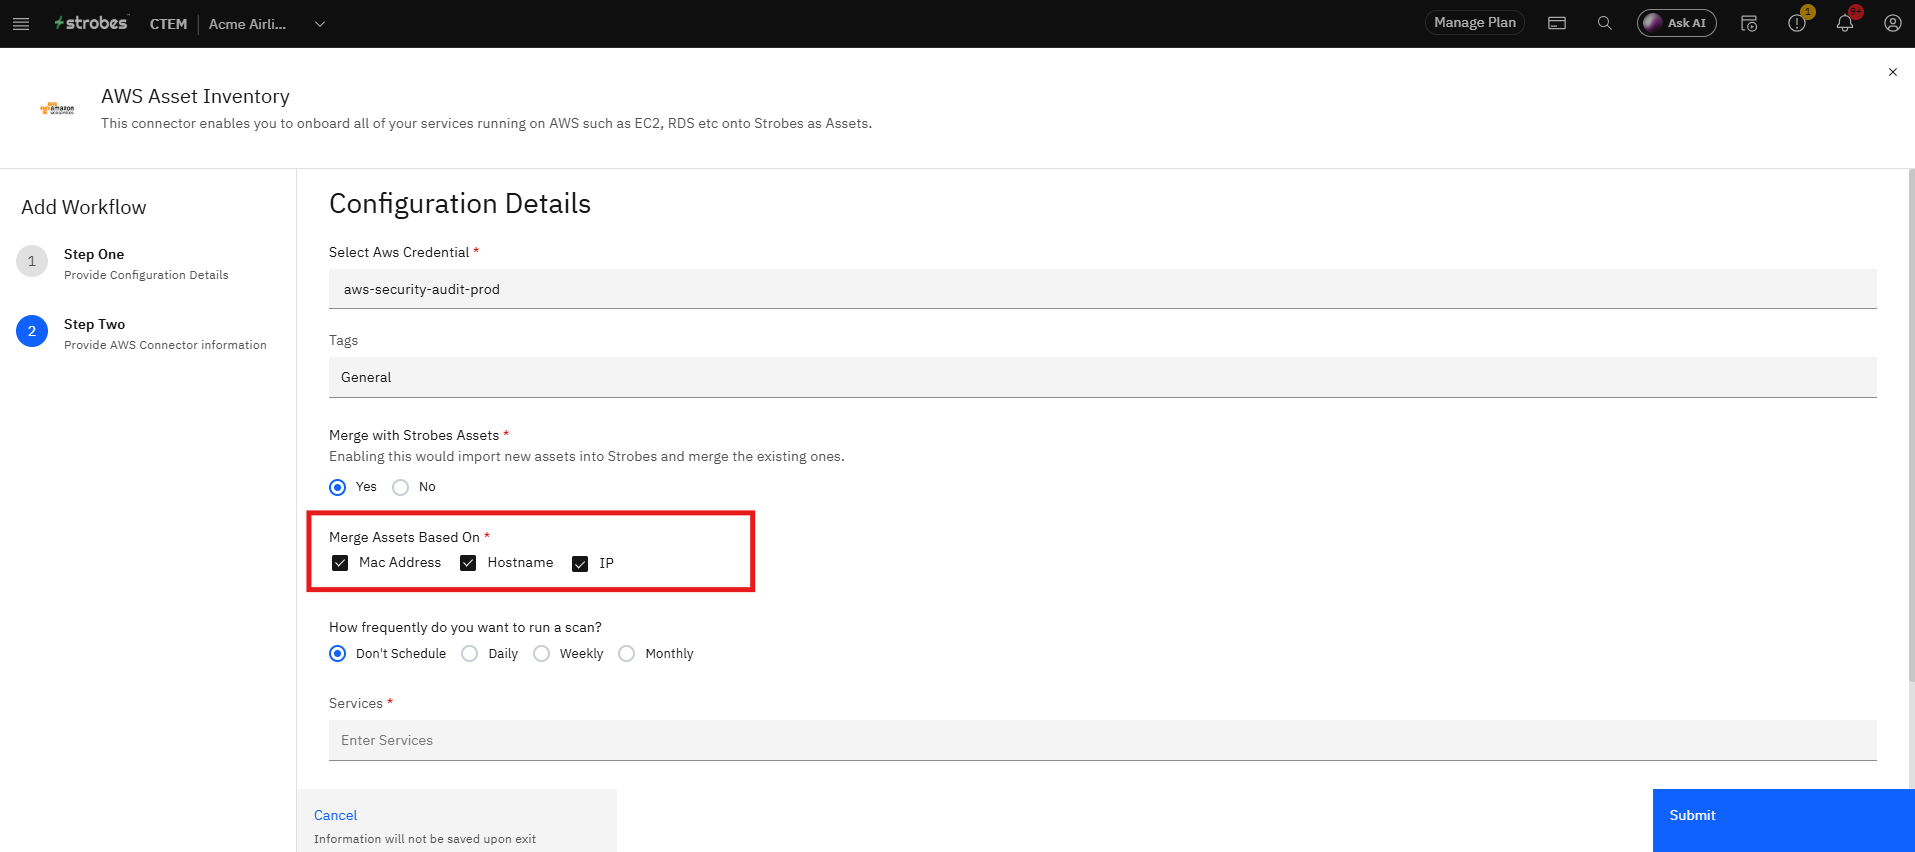
Under Merge Assets Based On, check the identifiers Strobes should use to match a newly discovered AWS asset to an existing record. Available options are Mac Address, Hostname, and IP. All three are checked by default. Select the identifiers that match how your other scanners identify the same hosts.
Step 11 — Set the Scan Schedule
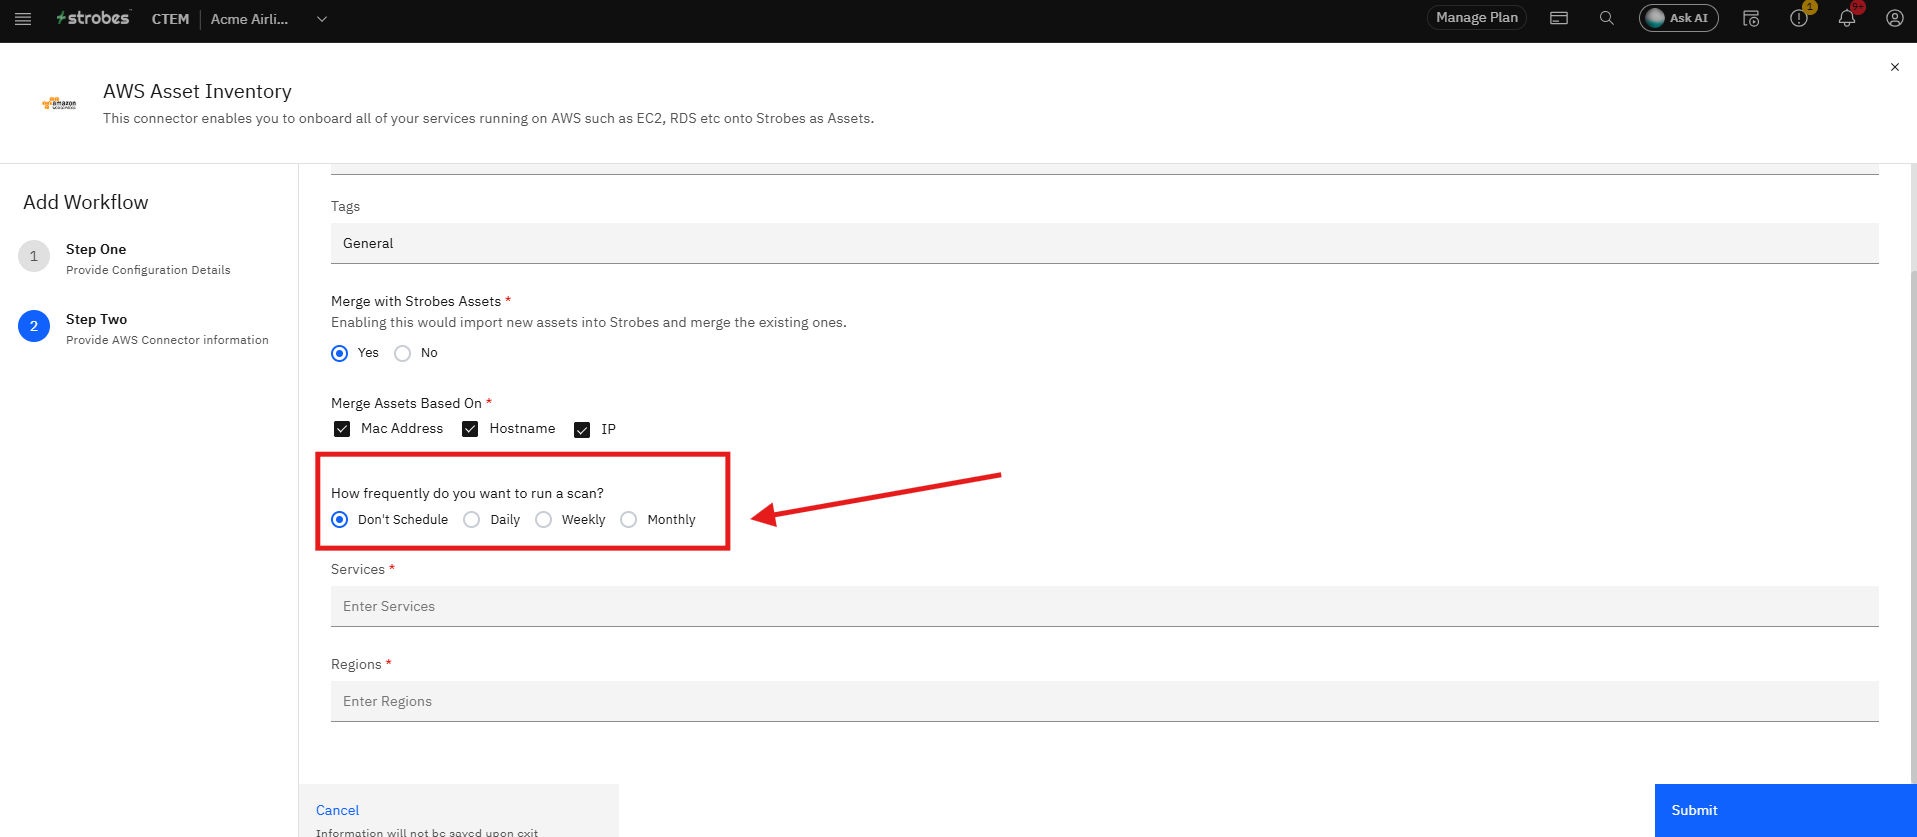
Under How frequently do you want to run a scan?, choose how often Strobes should automatically pull updated asset data from AWS. Options are Don't Schedule (manual only), Daily, Weekly, and Monthly. Don't Schedule is a safe starting point — you can switch to an automatic schedule from the Settings tab after your first sync.
Step 12 — Enter the AWS Services to Import
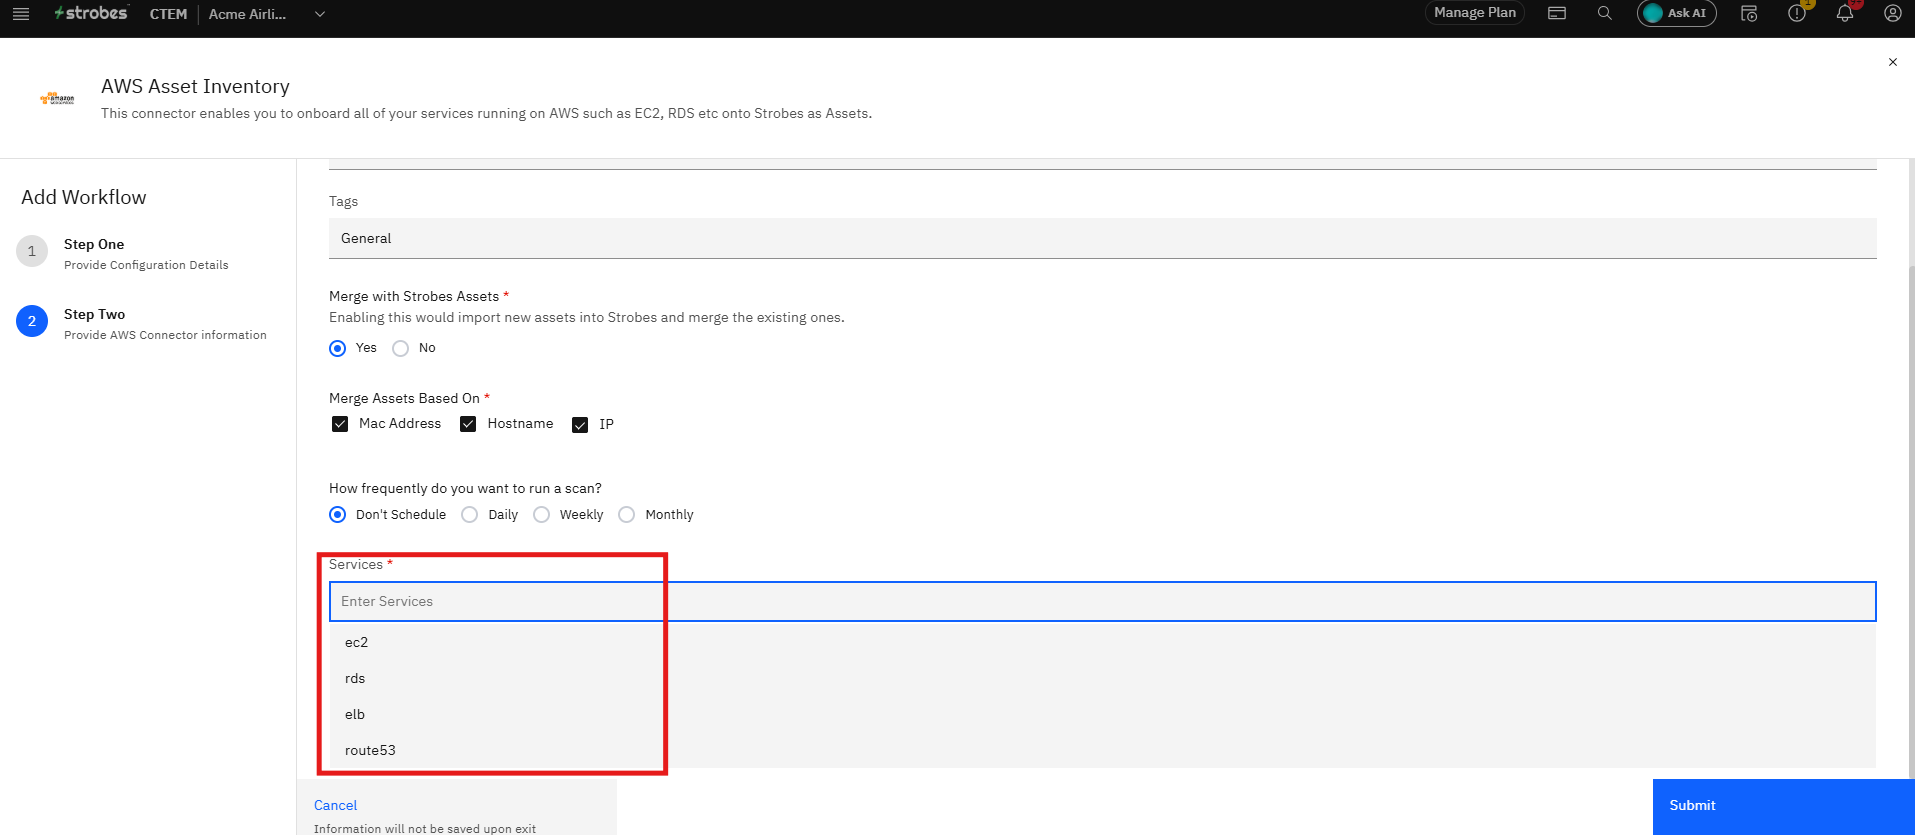
Click the Services field, type an AWS service name, and press Enter to add it as a chip tag. Repeat for each additional service you want Strobes to discover.
Common values include ec2, rds, s3, lambda, and elb. At least one service is required. Remove a service by clicking the x on its chip.
Step 13 — Select the AWS Regions to Monitor
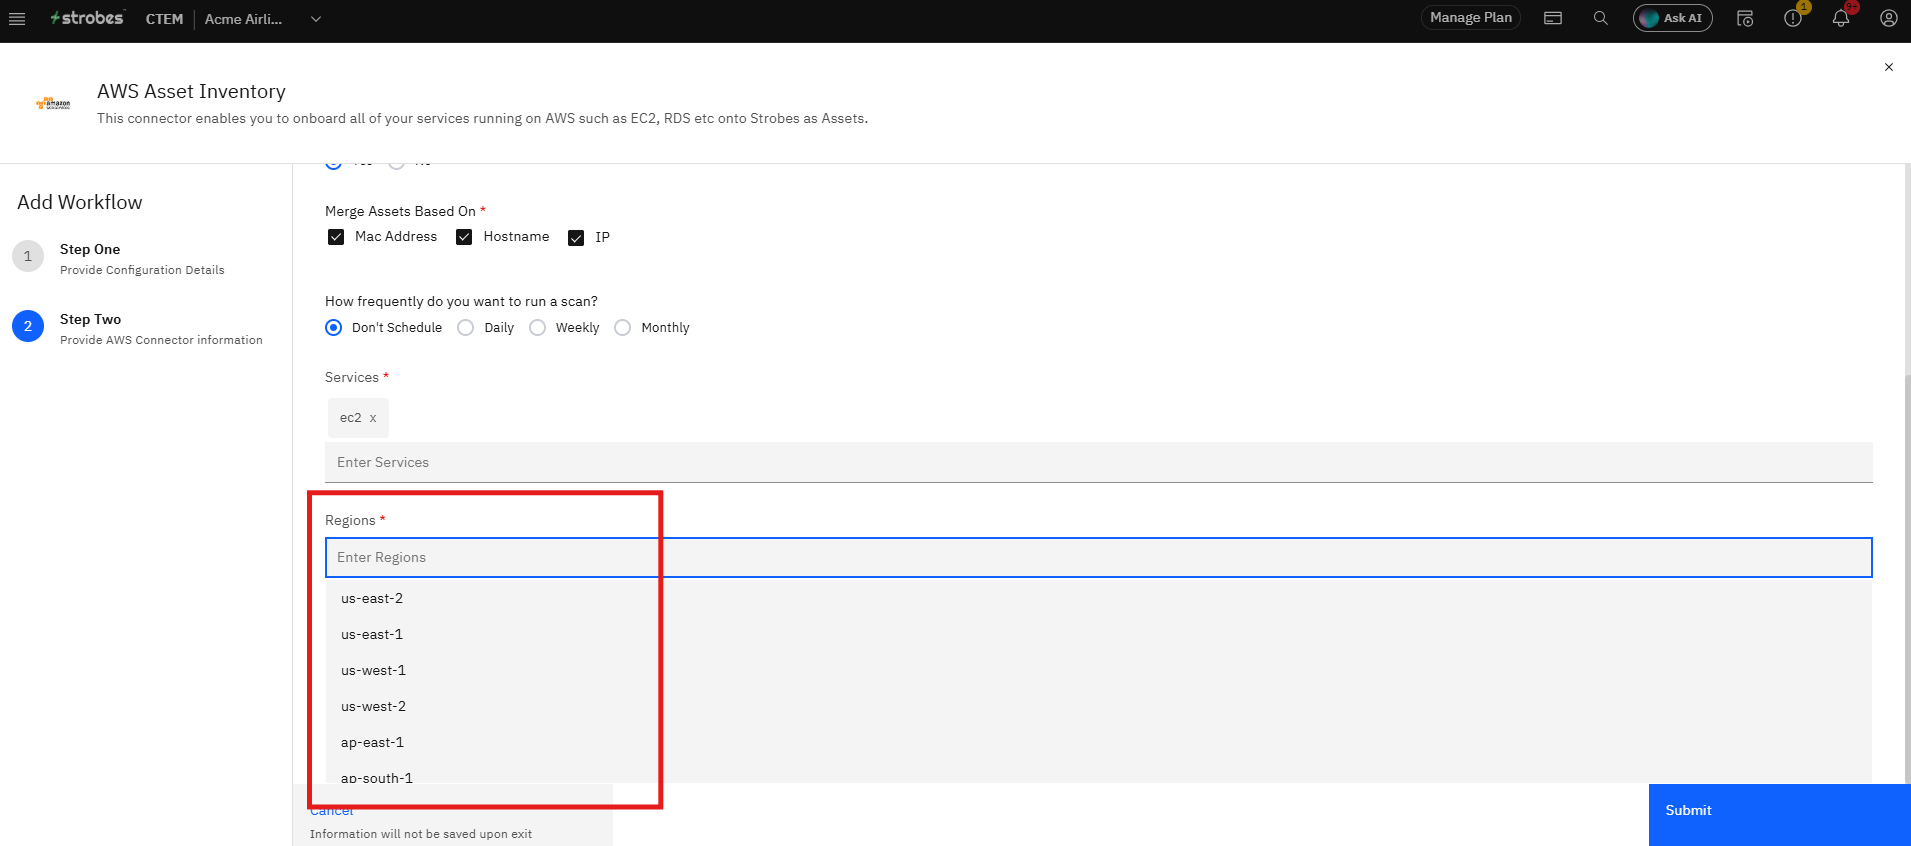
Click the Regions field to open the region dropdown, then click each region you want Strobes to scan.
Selected regions appear as chip tags. At least one region is required. Add as many regions as needed to cover your AWS footprint.
Step 14 — Submit the Workflow
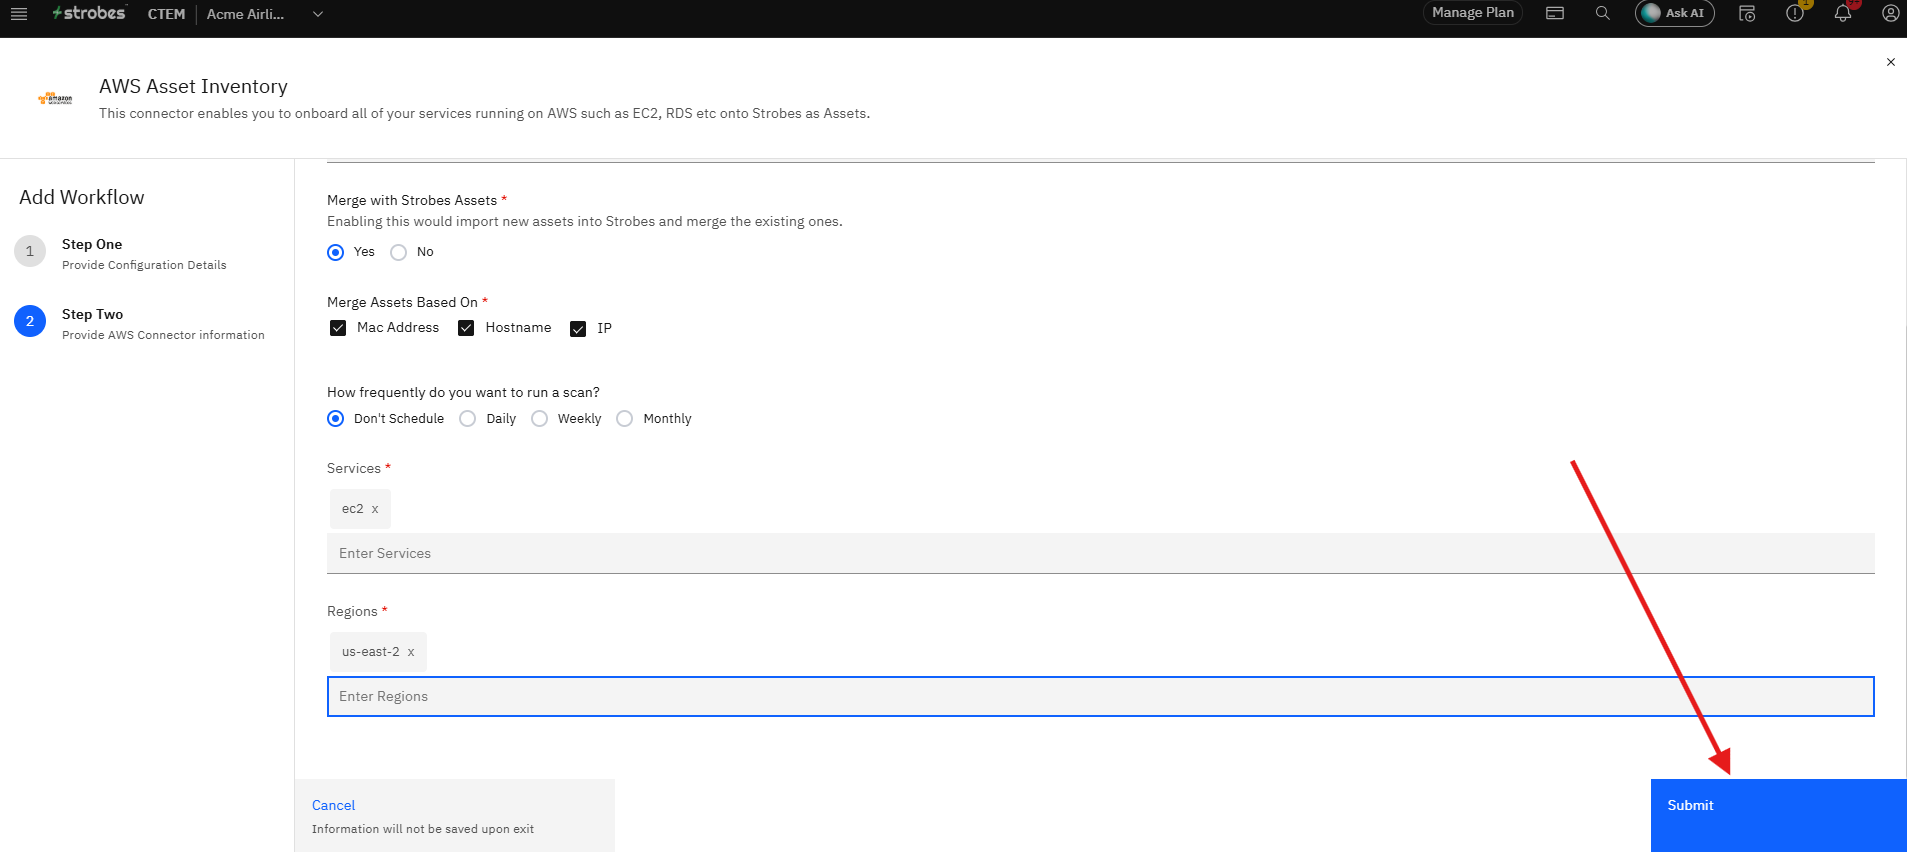
Click Submit. Strobes saves the workflow. The screen transitions to the workflow detail page, and your new configuration appears in the Workflows list in the left sidebar.
Step 15 — Review the Workflow Detail Page
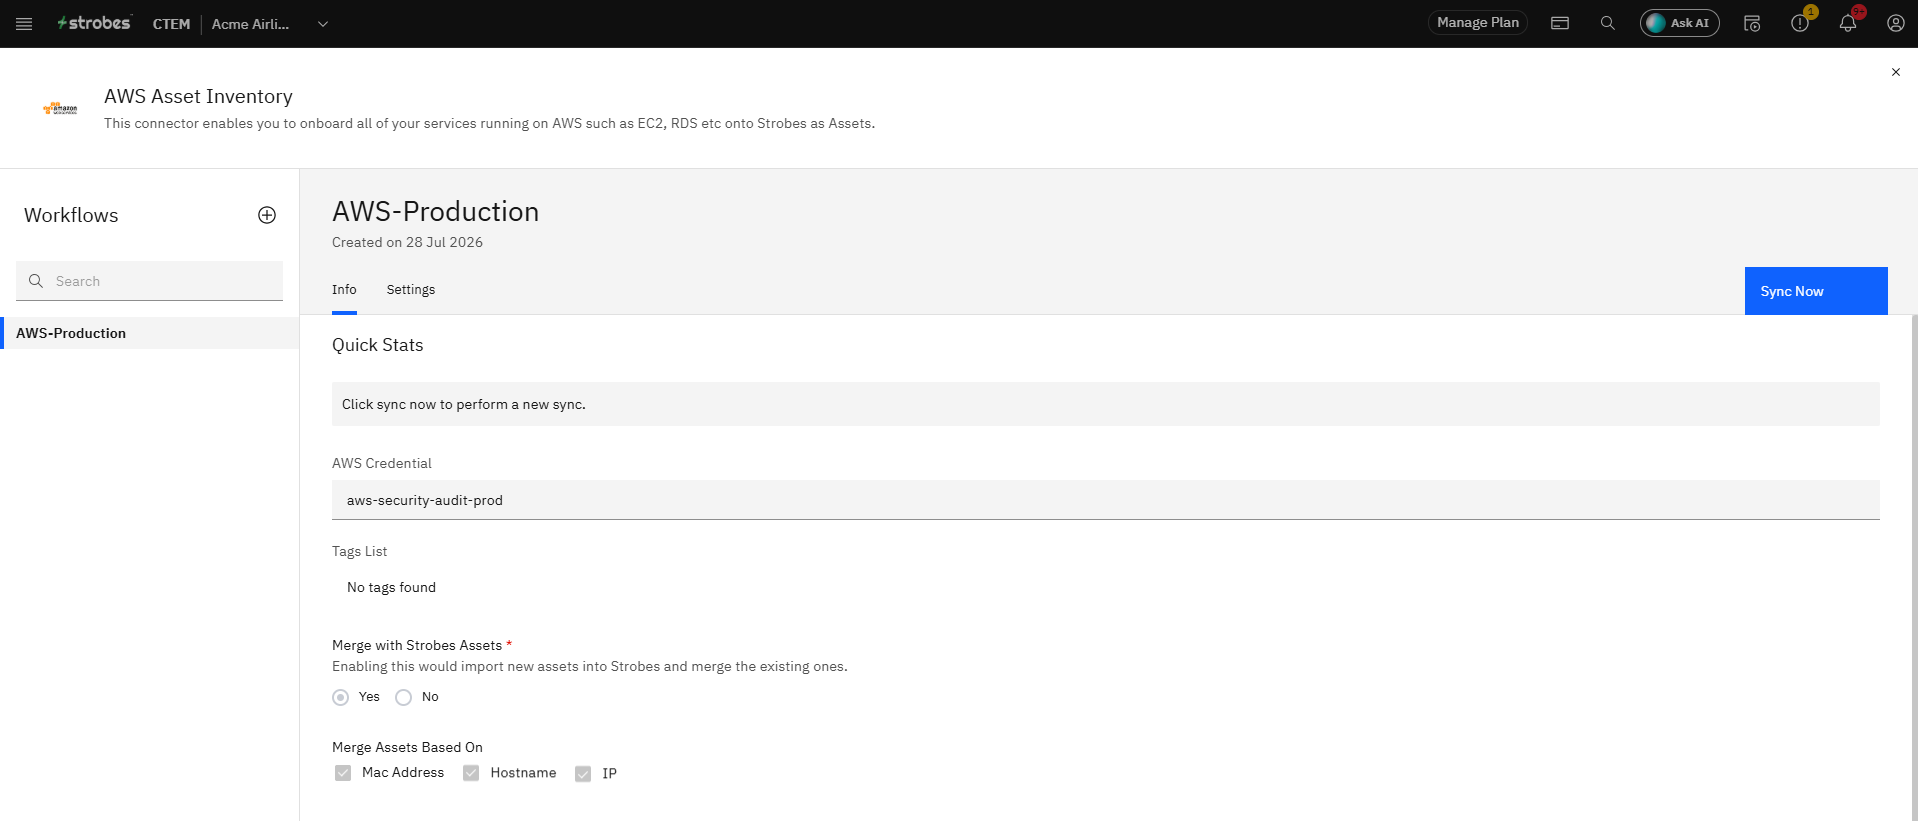
The workflow detail page summarizes your configuration and provides the controls to sync. The Info tab displays: AWS Credential, Tags List, Merge with Strobes Assets setting, Merge Assets Based On identifiers, scan frequency, Services, and Regions. The Settings tab lets you edit any of these fields after creation.
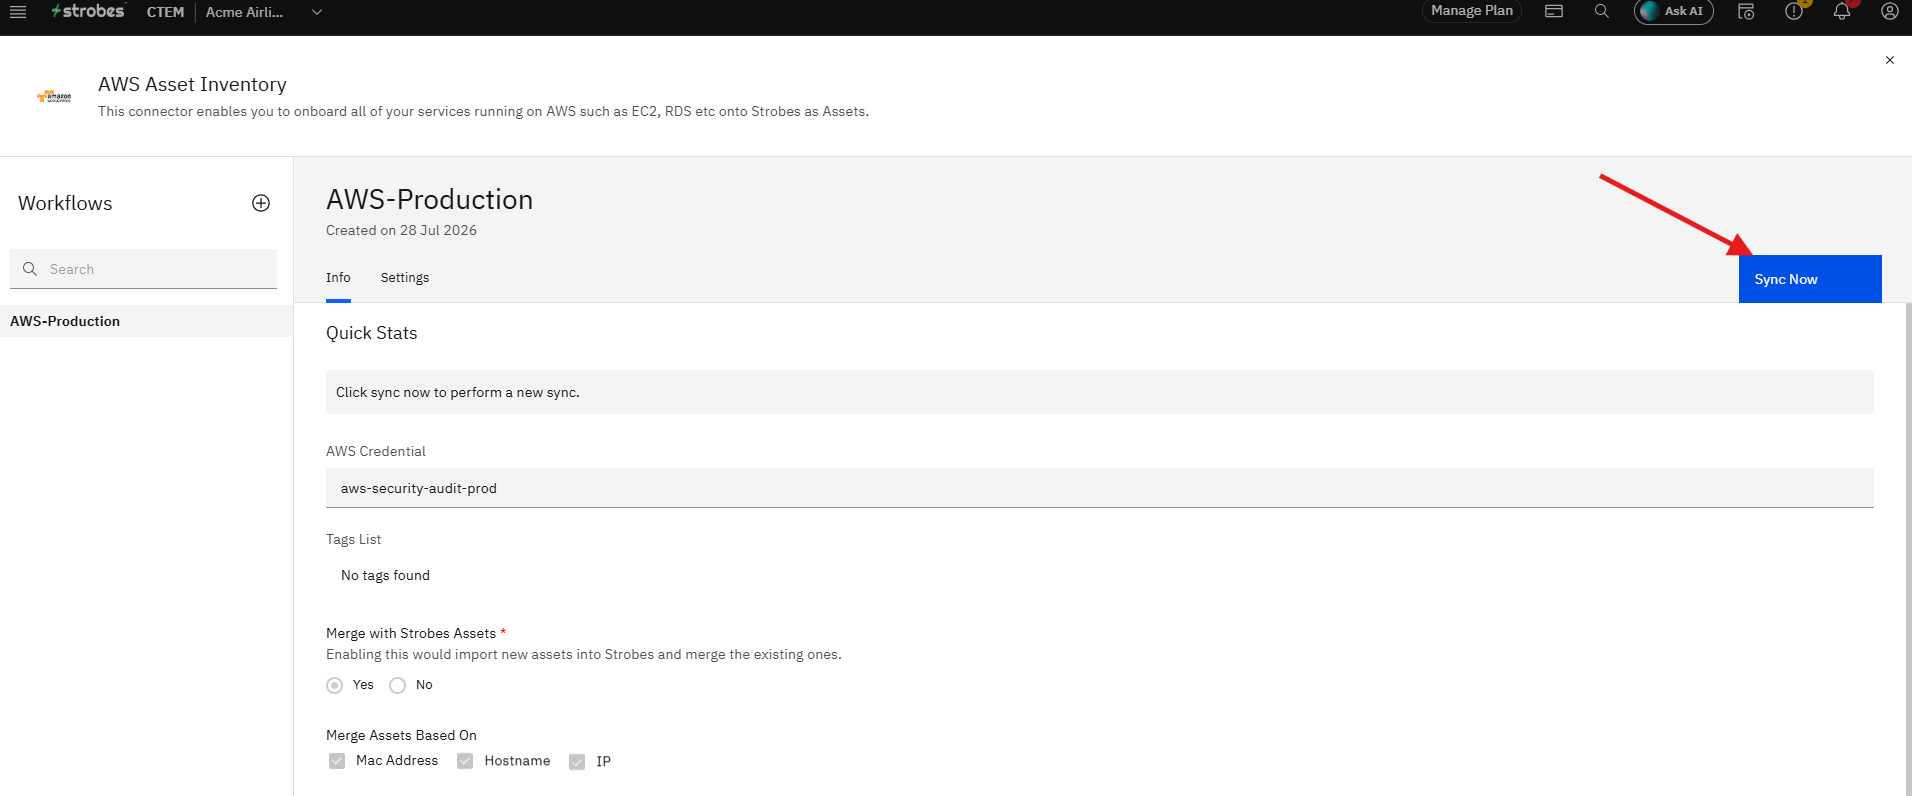
The Quick Stats section shows asset counts and sync history. Before the first sync it shows: "Click sync now to perform a new sync."
Step 16 — Run Your First Sync
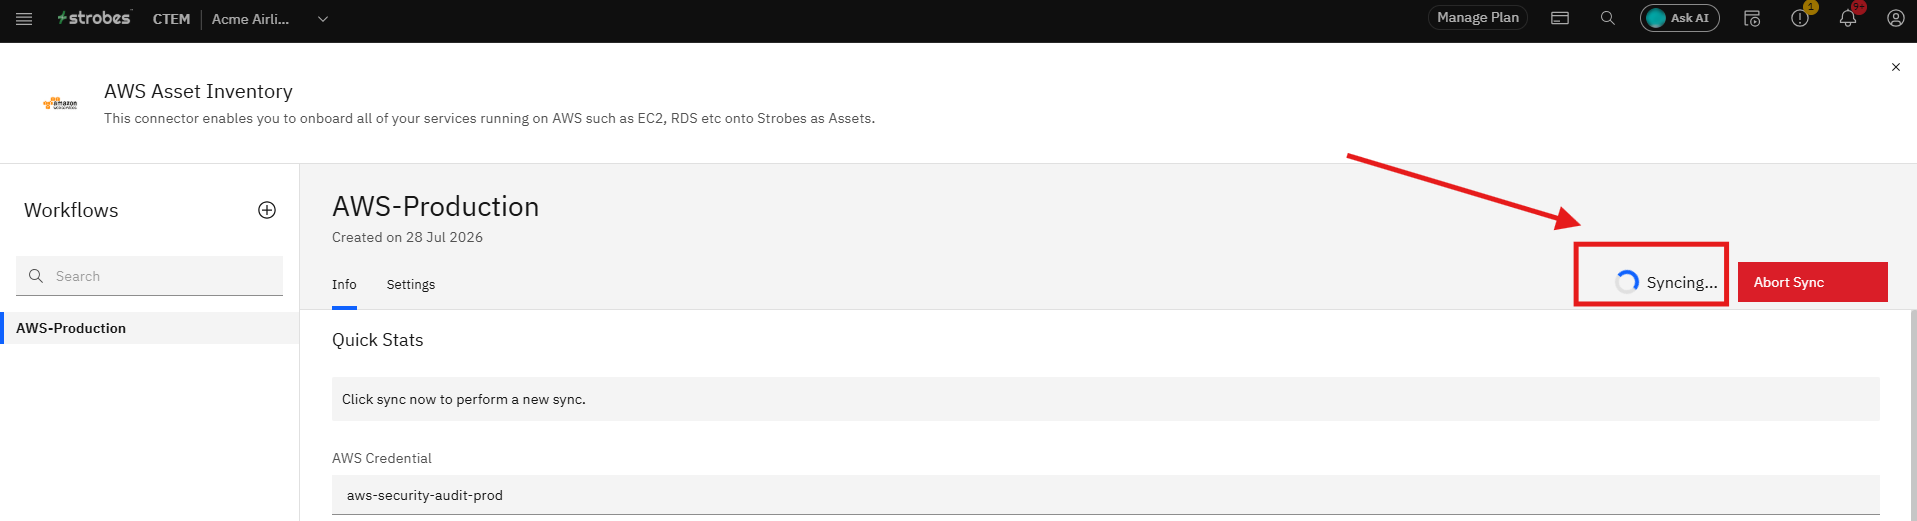
Click Sync Now in the top-right corner. The button changes to Syncing... and a red Abort Sync button appears. You can click Abort Sync at any time to cancel the in-progress sync. Once the sync completes, the Quick Stats section updates with the number of assets discovered and imported.
Where Your AWS Data Appears
Once a sync completes, your AWS asset data flows into the following areas across Strobes:
Assets: Newly discovered AWS instances appear in the Strobes asset inventory. Hosts that match existing assets by the identifiers you selected are merged rather than duplicated.
Findings: Connected vulnerability scanners targeting the same hosts will associate their findings with the imported AWS asset records.
Dashboards: Onboarded AWS assets factor into asset count metrics and risk dashboards across your workspace.
Tips
Scope your services and regions carefully from the start. Starting broad — for example, importing s3 across all regions — can onboard a very large number of assets on the first sync. Begin with a targeted service and region subset, then expand after reviewing the results.
Use IAM least-privilege for your AWS credential. Create a dedicated IAM user or role for Strobes with read-only permissions on the specific services you are importing. Avoid attaching credentials that have write permissions to AWS resources.
The "Invalid Access Key or Secret Key" error means AWS rejected the credential. Verify that the Access Key ID and Secret Access Key are copied correctly, that the IAM user is active, and that the credentials have not been rotated or deactivated in the AWS console.
Match your merge identifiers to your other scanners. If your other connectors identify hosts by IP address, enable IP as a merge key so AWS-discovered hosts match existing records rather than creating duplicates.
You can edit the workflow after creation. Open the Settings tab on the workflow detail page to update the credential, services, regions, merge settings, or schedule without deleting and recreating the configuration.