
Configuring the Jira Integration in Strobes OAuth 1.0
Overview
This article walks through connecting Strobes to your Jira instance using OAuth. The integration lets Strobes create and update Jira tickets directly from findings and engagements in your Strobes workspace.
Setup runs across two systems in four parts: retrieve the Public Key and Redirect URL from the Strobes Credential Manager, create an Application Link in Jira that points to Strobes, configure the Incoming Authentication settings on that link, then create the Jira credential in Strobes and authorize access.
Before You Start
- Role required in Strobes: Owner or Manager access on your Strobes account.
- Role required in Jira: Jira Administrator access — Application Links configuration is an admin-only action.
- Strobes URL: Have your Strobes instance URL ready. You will enter it in Jira when creating the Application Link.
- Jira URL: Have your Jira instance URL ready. You will enter it in Strobes when creating the credential.
Part 1 — Get the Public Key and Redirect URL from Strobes
Step 1 — Navigate to the Credential Manager in Strobes
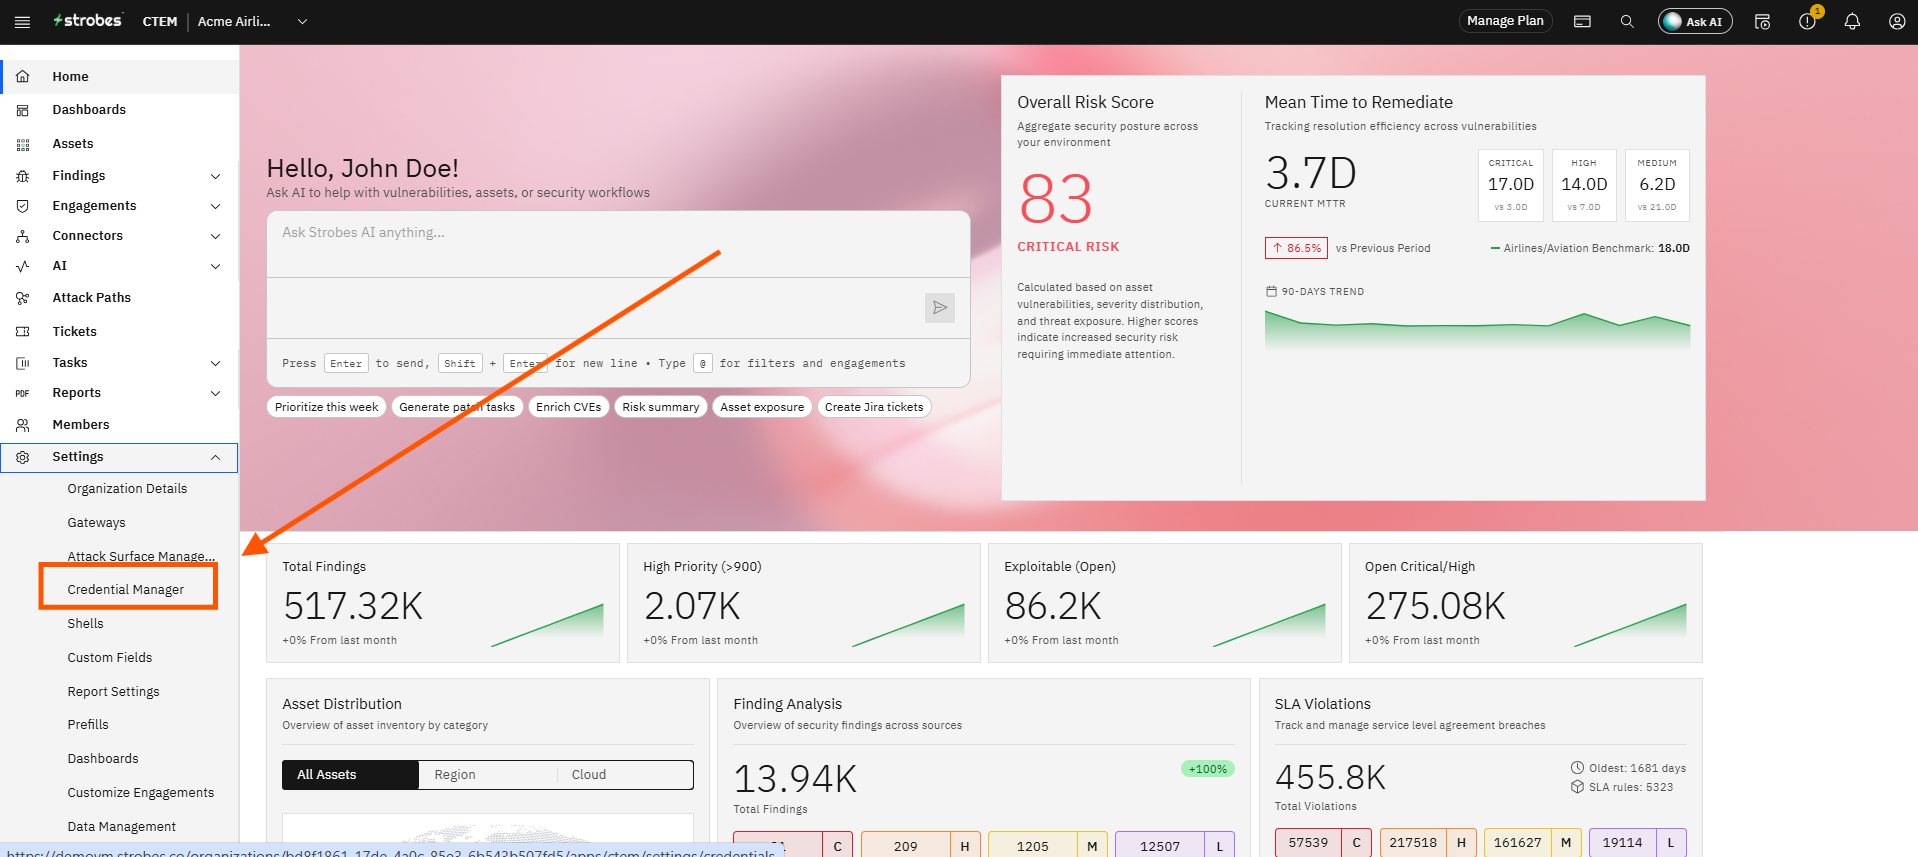
In Strobes, click Settings in the left sidebar and then click Credential Manager. The Credential Manager page opens, showing any saved credentials and a list of supported connector types.
Step 2 — Select the Jira Connector
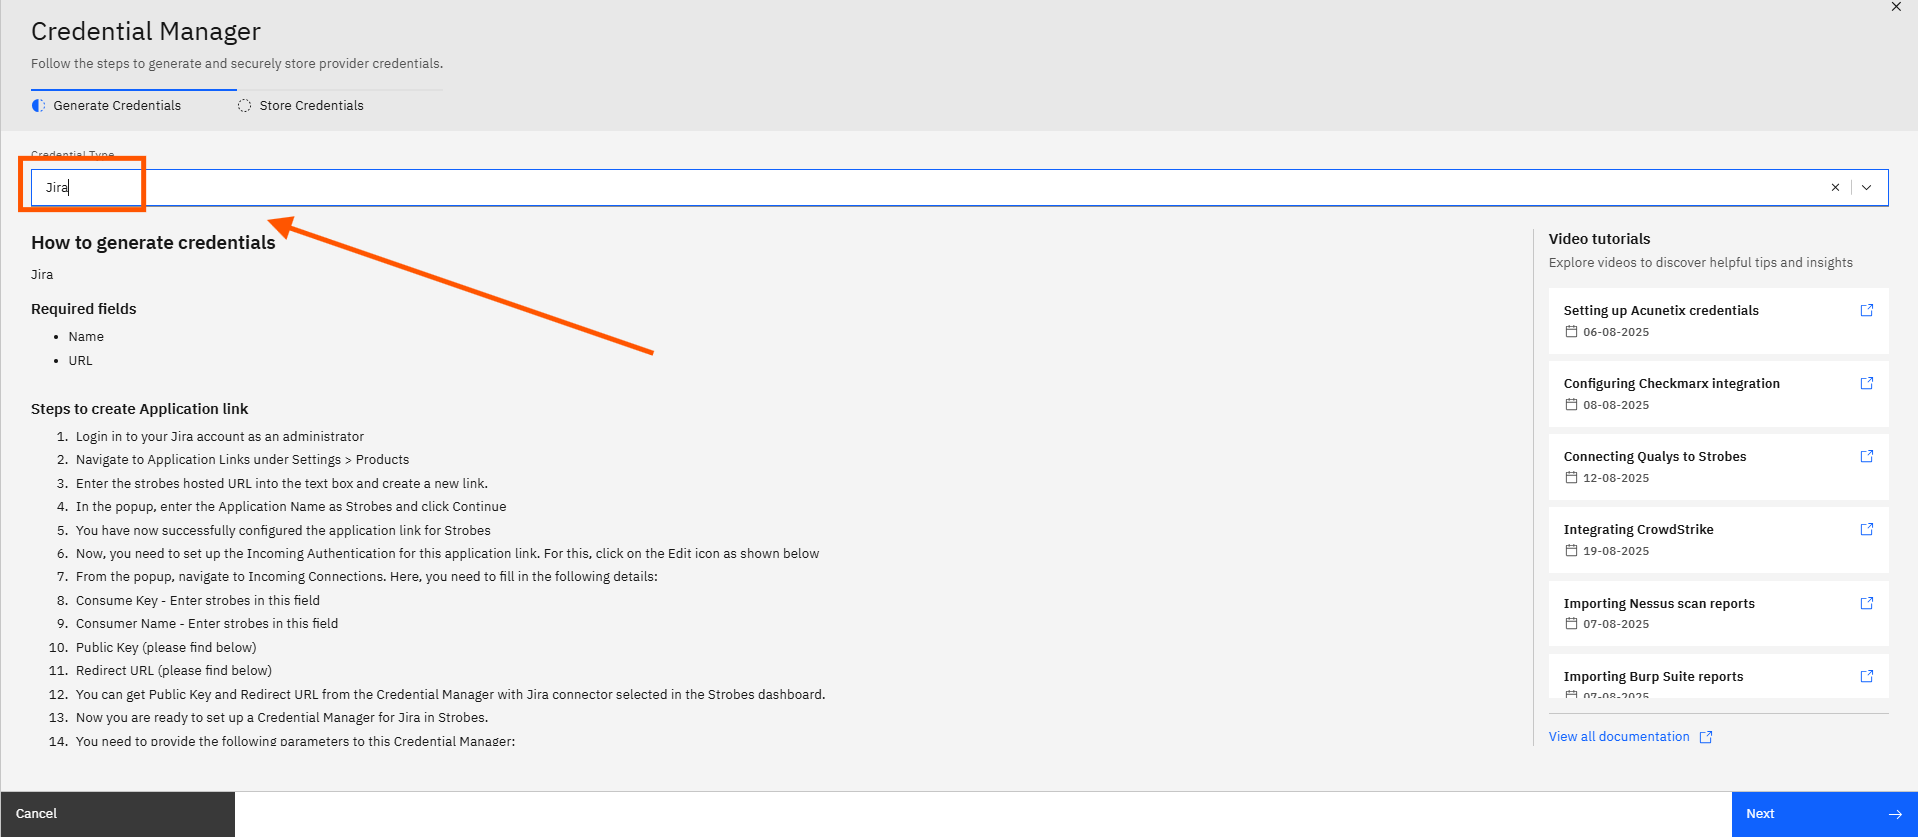
Click the Jira connector in the connector list. The Jira credential panel opens. At the bottom of the panel, Strobes displays two static values you need for the Jira Application Link setup: the Public Key and the Redirect URL.
Step 3 — Copy the Public Key and the Redirect URL
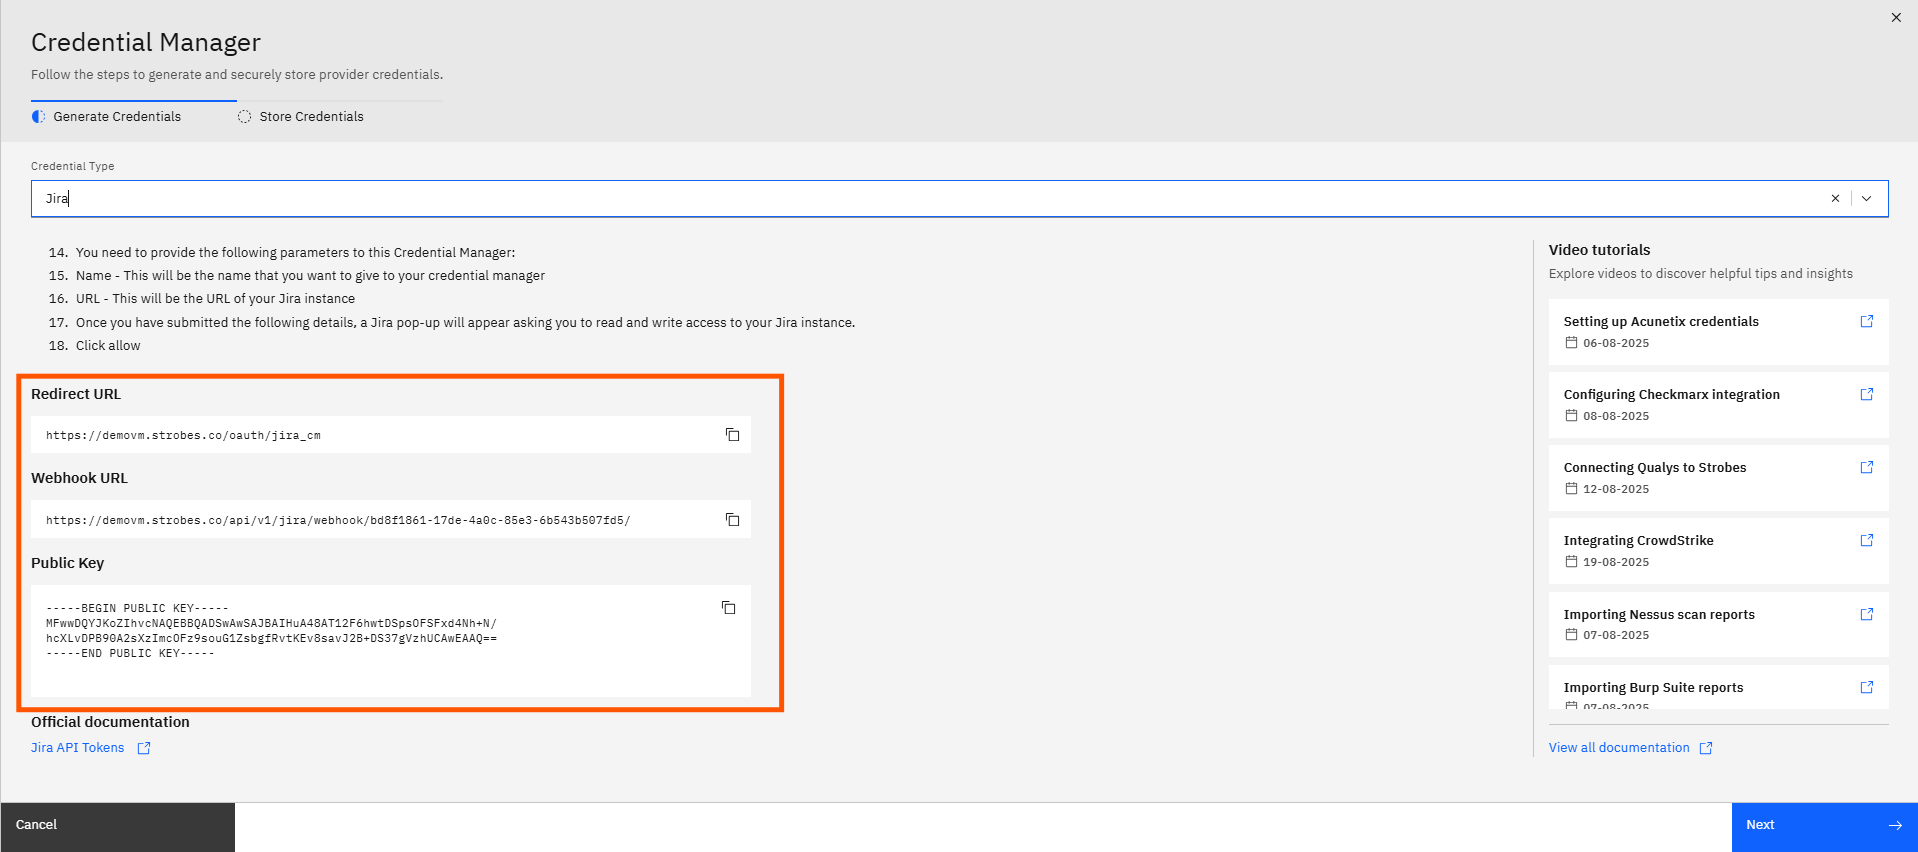
Copy the Public Key and the Redirect URL and keep them available. You will paste both values into the Jira Incoming Authentication settings in the next part. The Public Key is the RSA public key Strobes uses to sign OAuth requests. The Redirect URL is the callback endpoint where Jira redirects users after they authorize access.
Part 2 — Create the Application Link in Jira
Step 4 — Log In to Jira as an Administrator
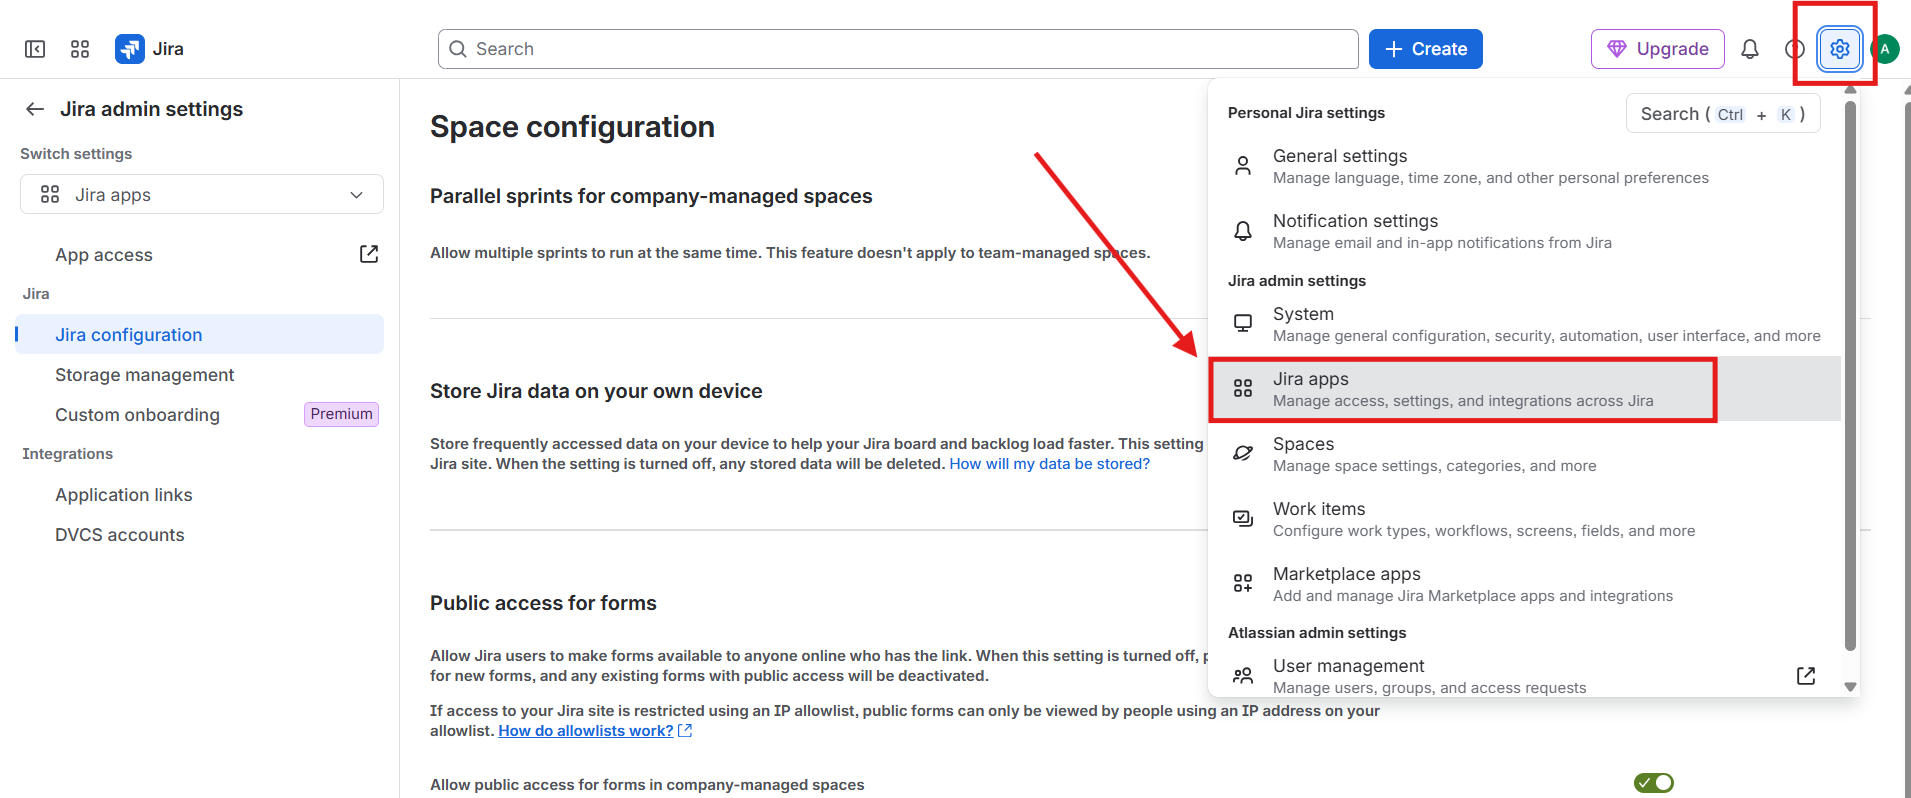
Next click "Application links"
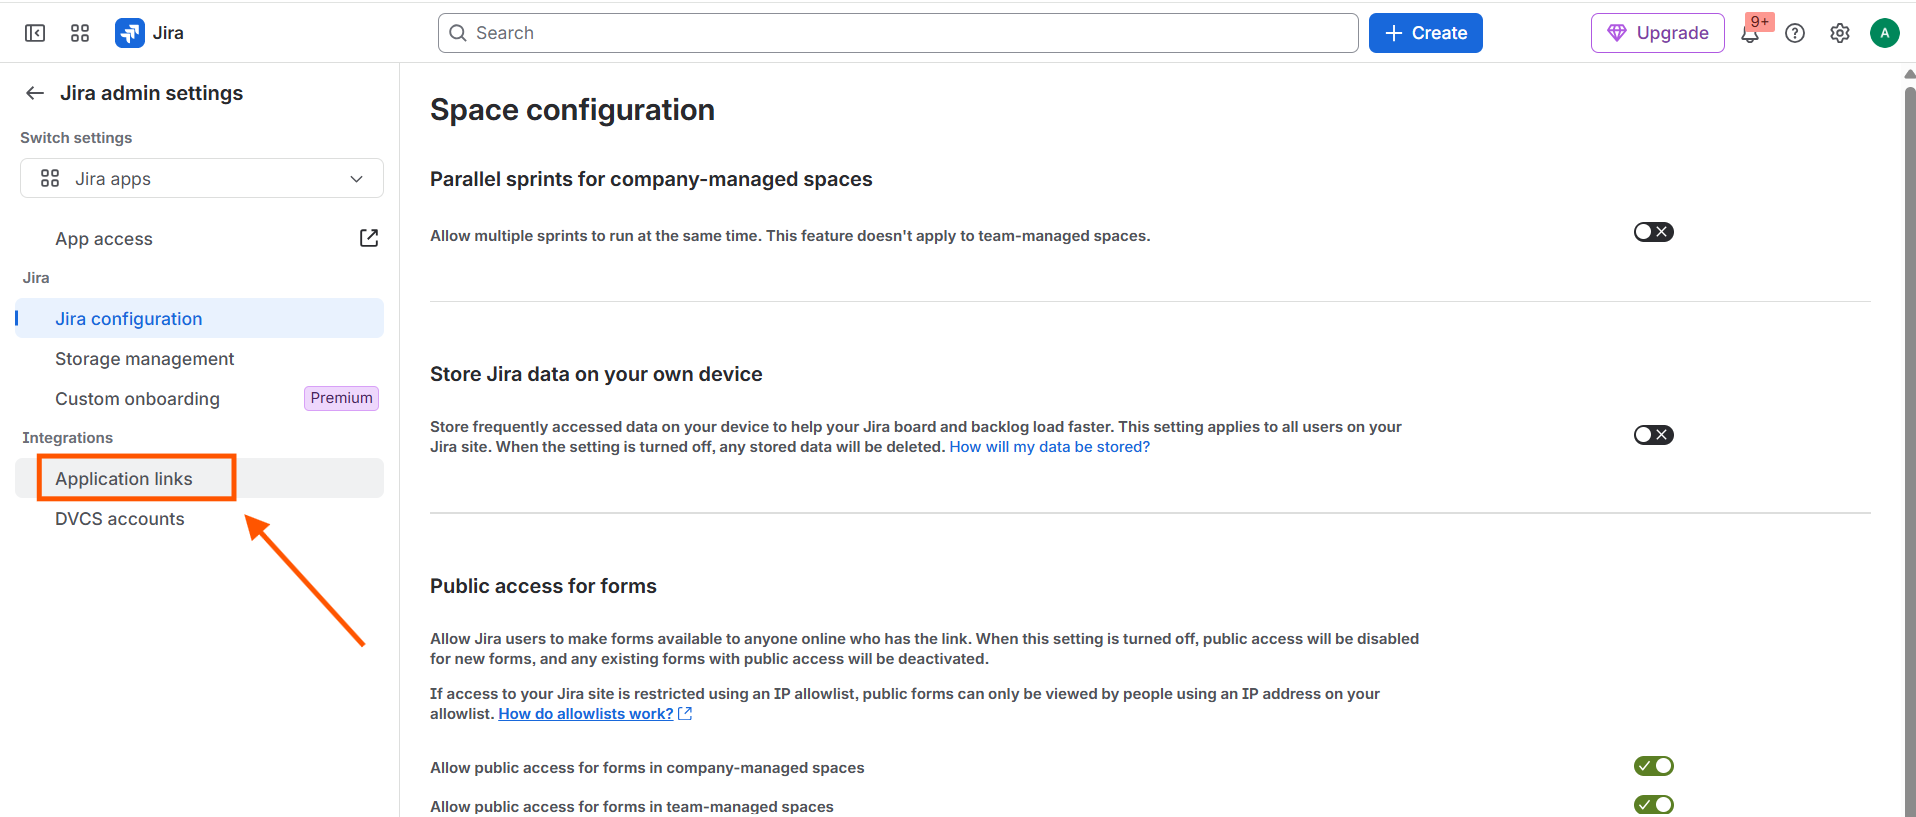
Log in to your Jira instance using an account with administrator access. Application Links configuration is restricted to Jira administrators.
Step 5 — Navigate to Application Links
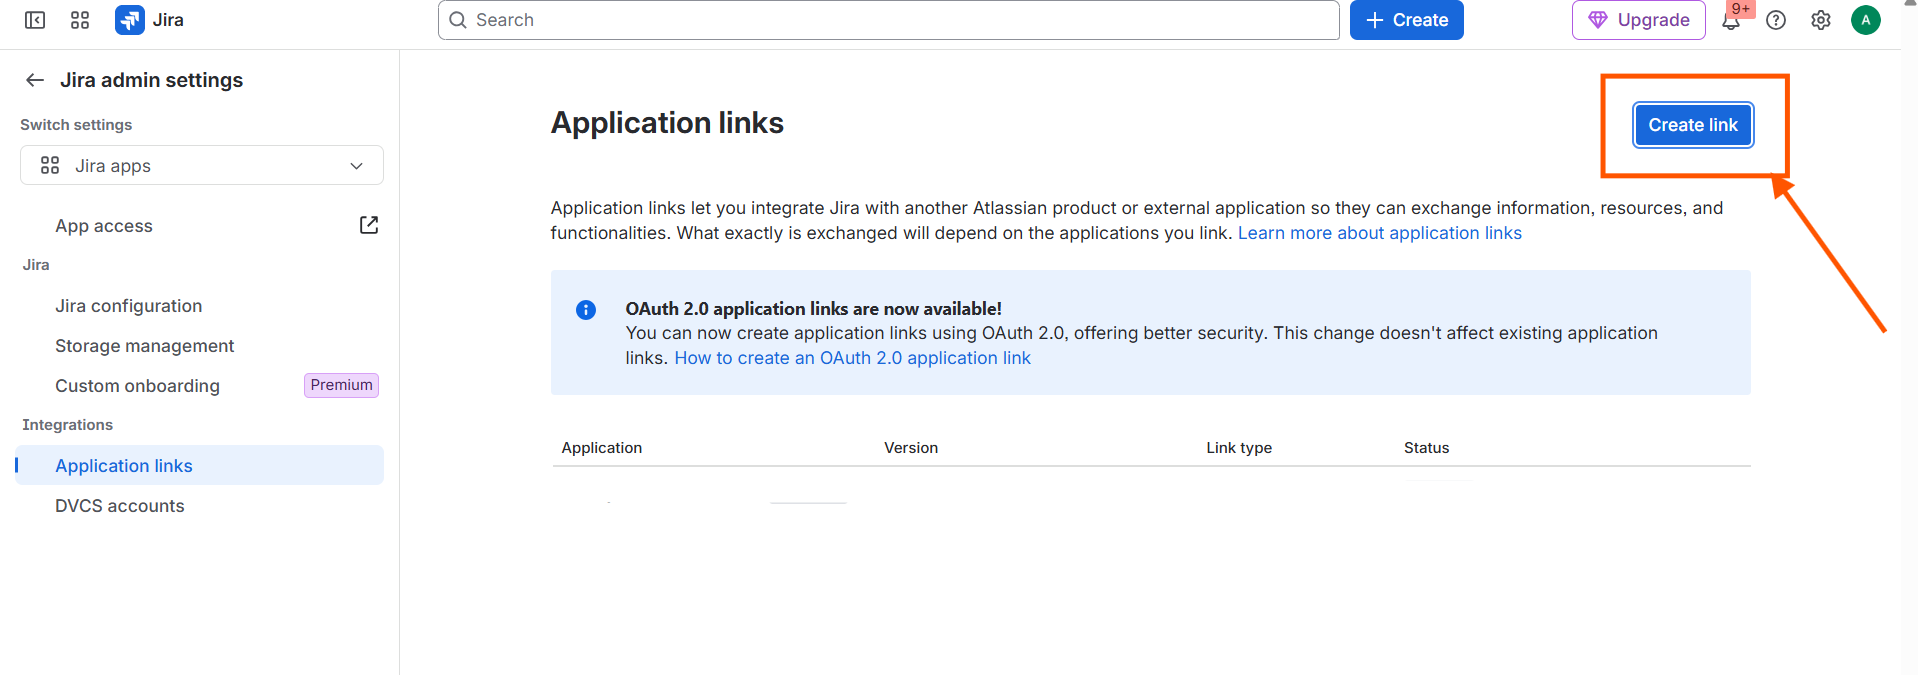
Click the Settings (gear) icon in the top right corner, click Products, and then click Application Links in the left sidebar under Integrations. The Application Links page opens, showing any existing linked applications and a field to enter a new application URL.
Step 6 — Enter the Strobes URL and Create the Link
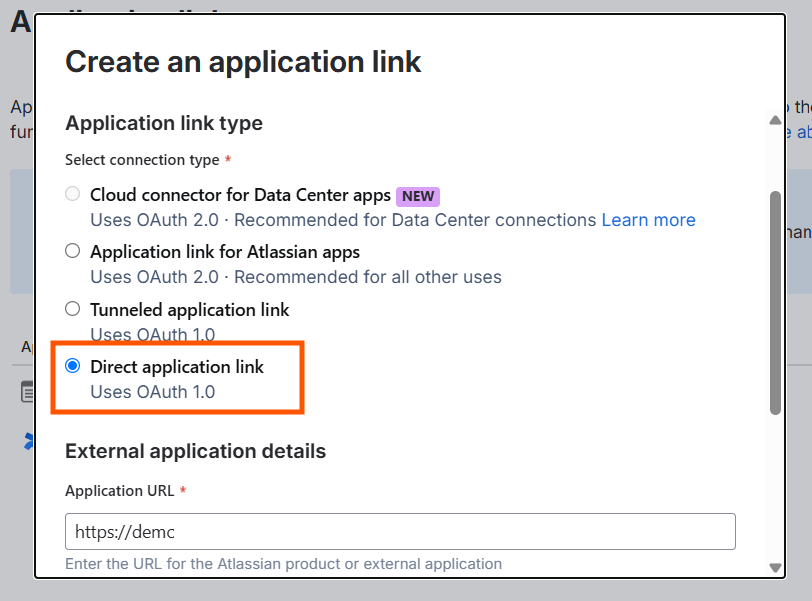
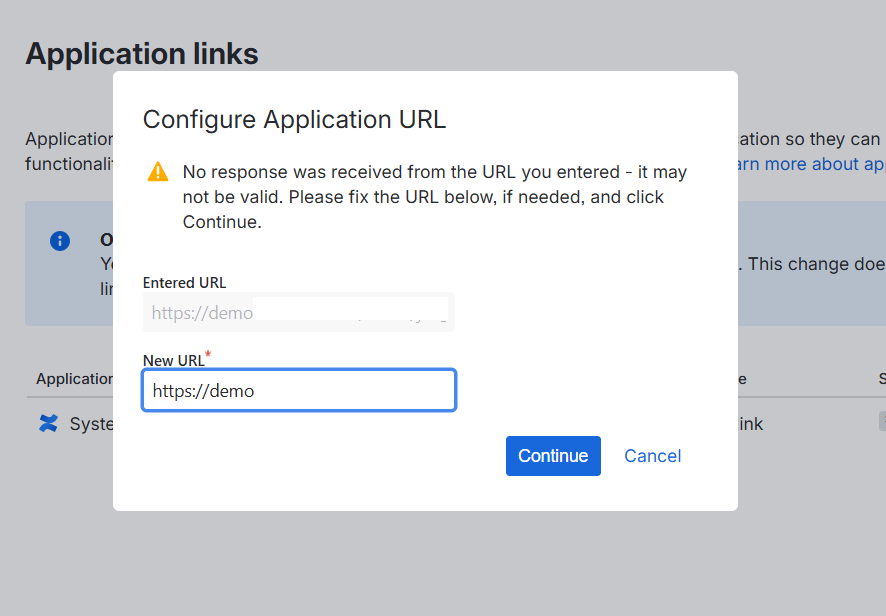
Enter your Strobes instance URL into the text field and click Create new link. Jira may show a warning that it could not verify the URL — this is expected. Continue through the prompt to proceed.
Step 7 — Enter the Application Name and Click Continue
In the Link applications dialog, enter Strobes in the Application Name field and click Continue. Leave all other fields at their defaults. Jira creates the Application Link and returns you to the Application Links list, where Strobes now appears.
Part 3 — Configure Incoming Authentication in Jira
Step 8 — Click Edit on the Strobes Application Link
Next:
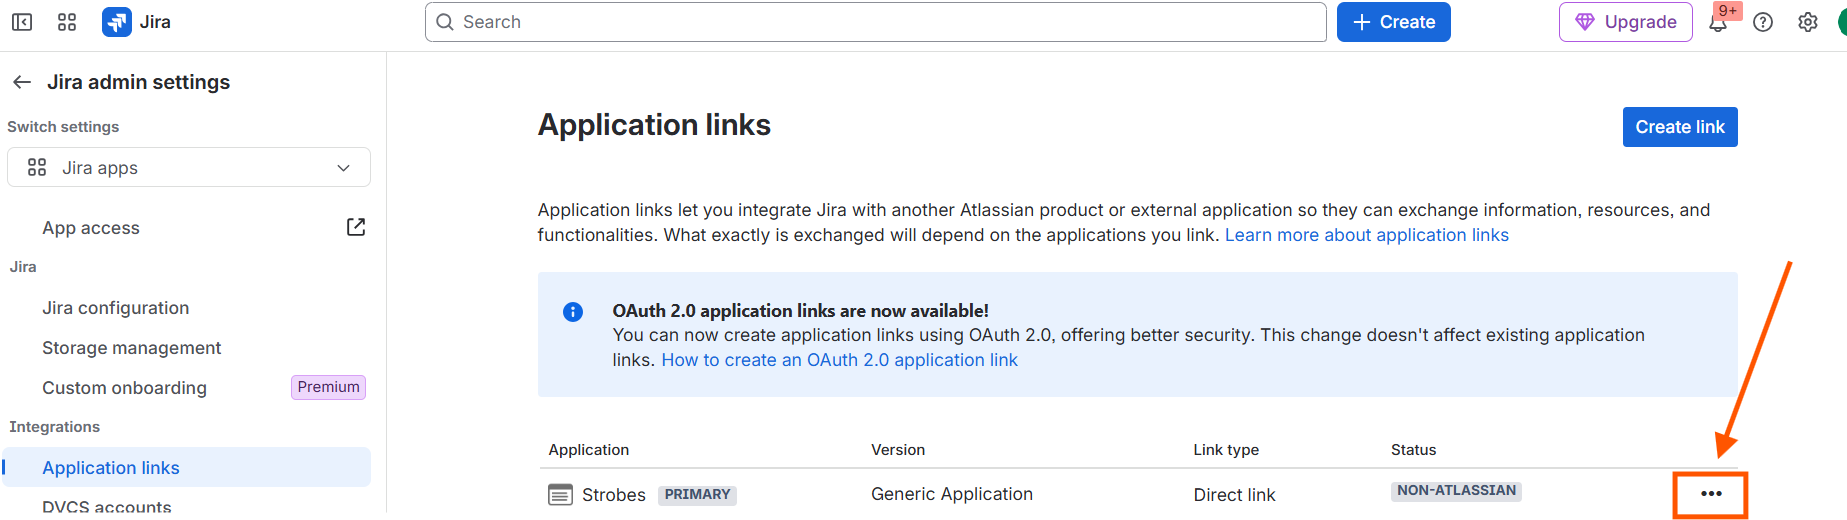
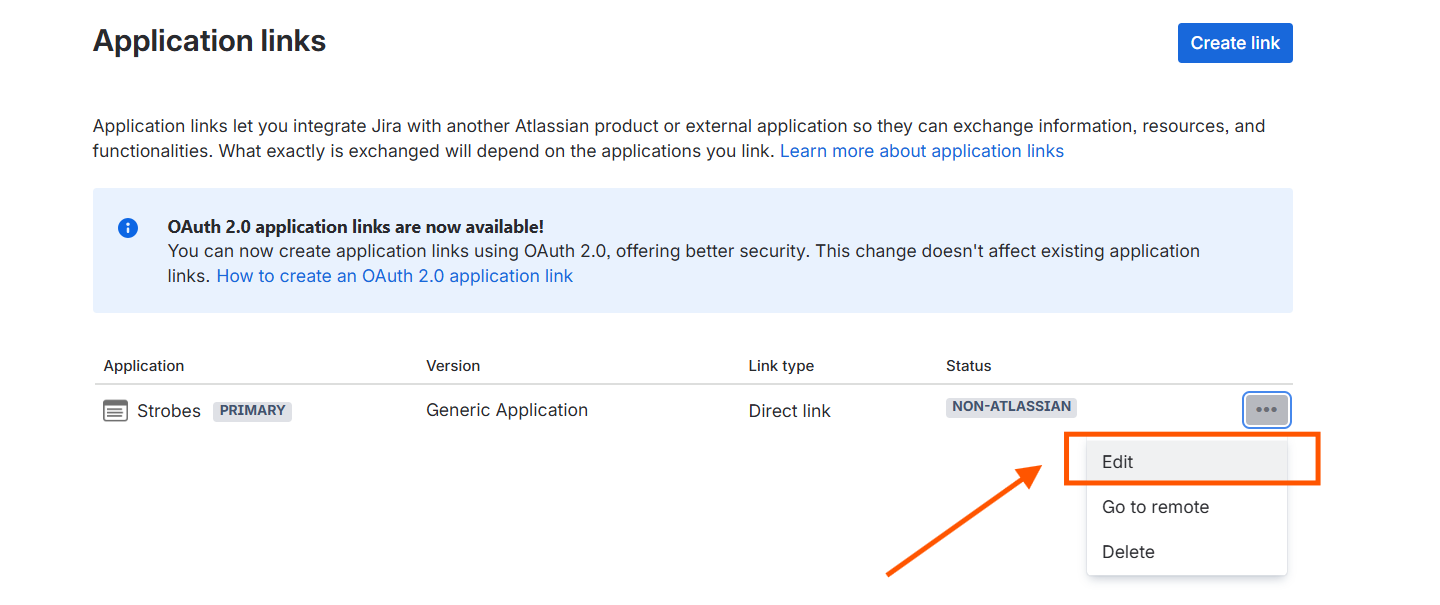
Locate the Strobes entry in the Application Links list and click the Edit (pencil) icon. The Edit application link dialog opens on the Application Details tab.
Step 9 — Navigate to Incoming Authentication
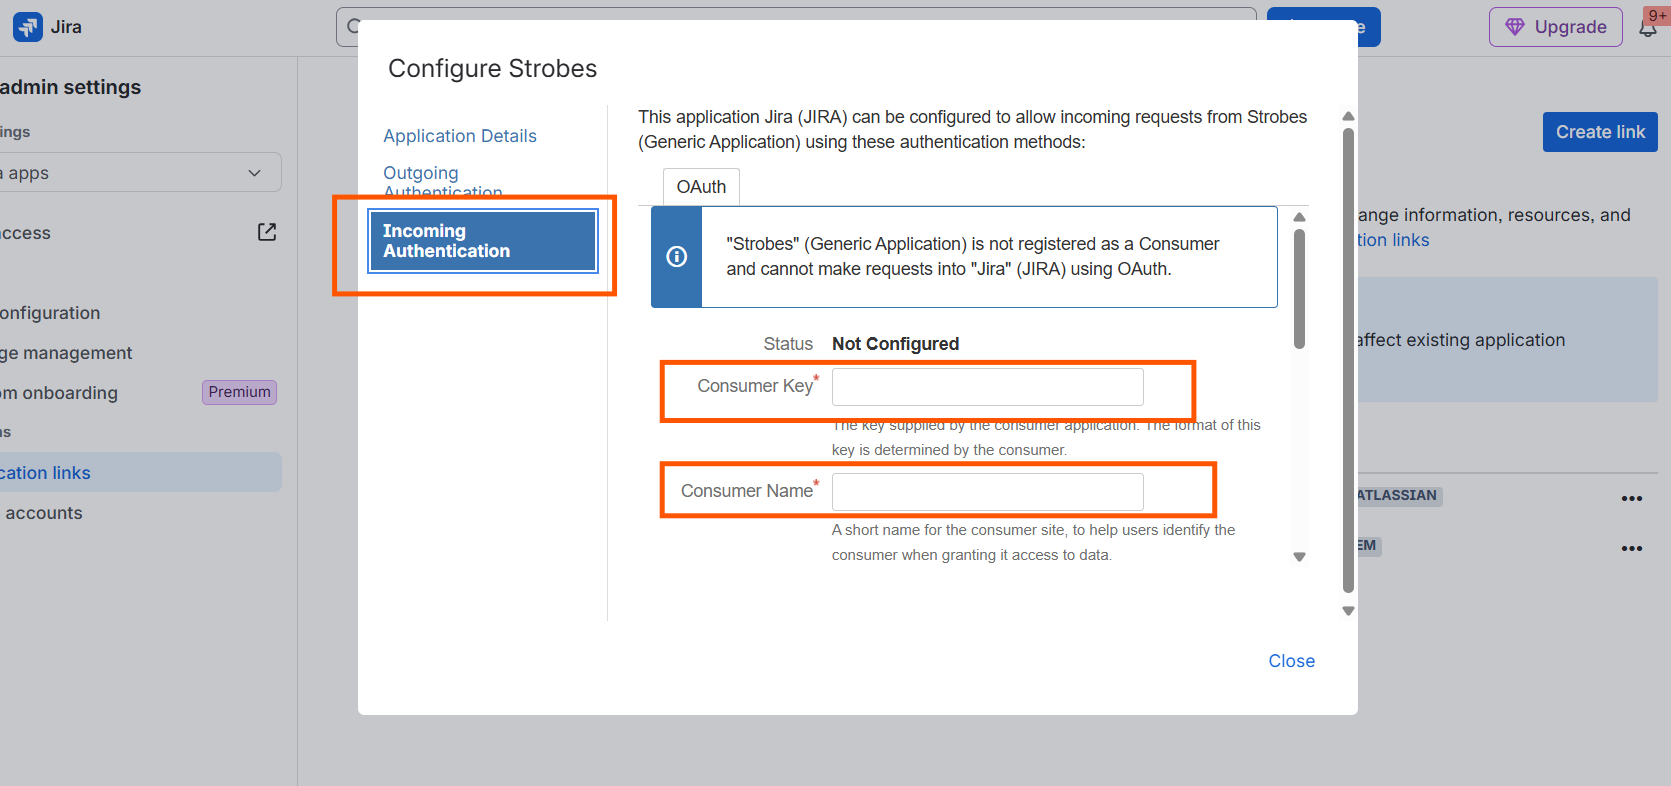
Click Incoming Authentication in the left navigation of the Edit application link dialog. The Incoming Authentication panel opens with fields for Consumer Key, Consumer Name, Public Key, and Consumer Callback URL.
Step 10 — Enter the Consumer Key
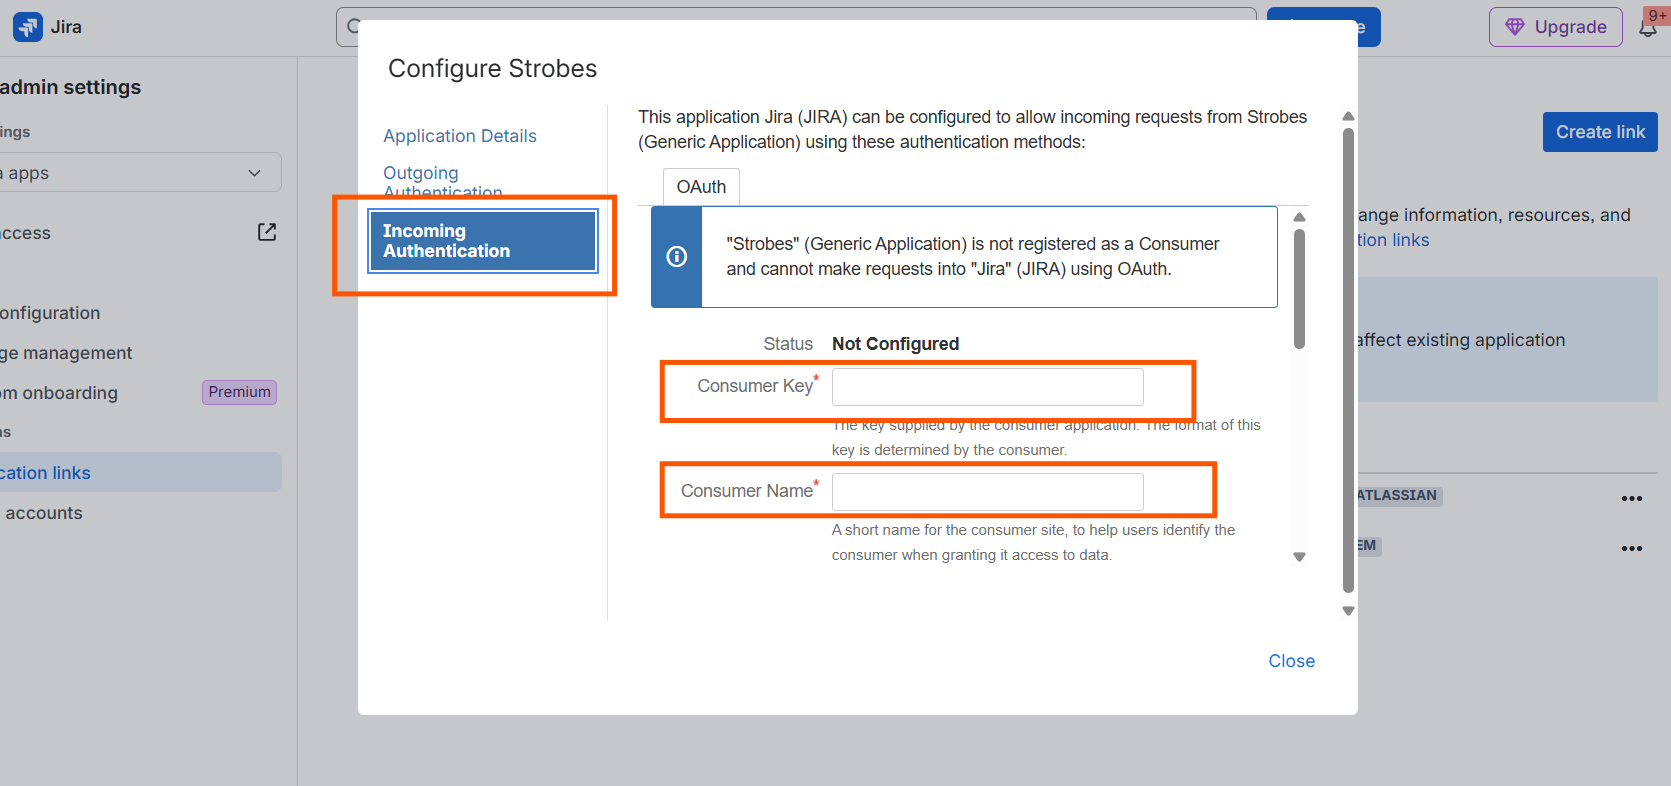
Click the Consumer Key field and type strobes. This value identifies Strobes to Jira as the authorized OAuth consumer.
Step 11 — Enter the Consumer Name
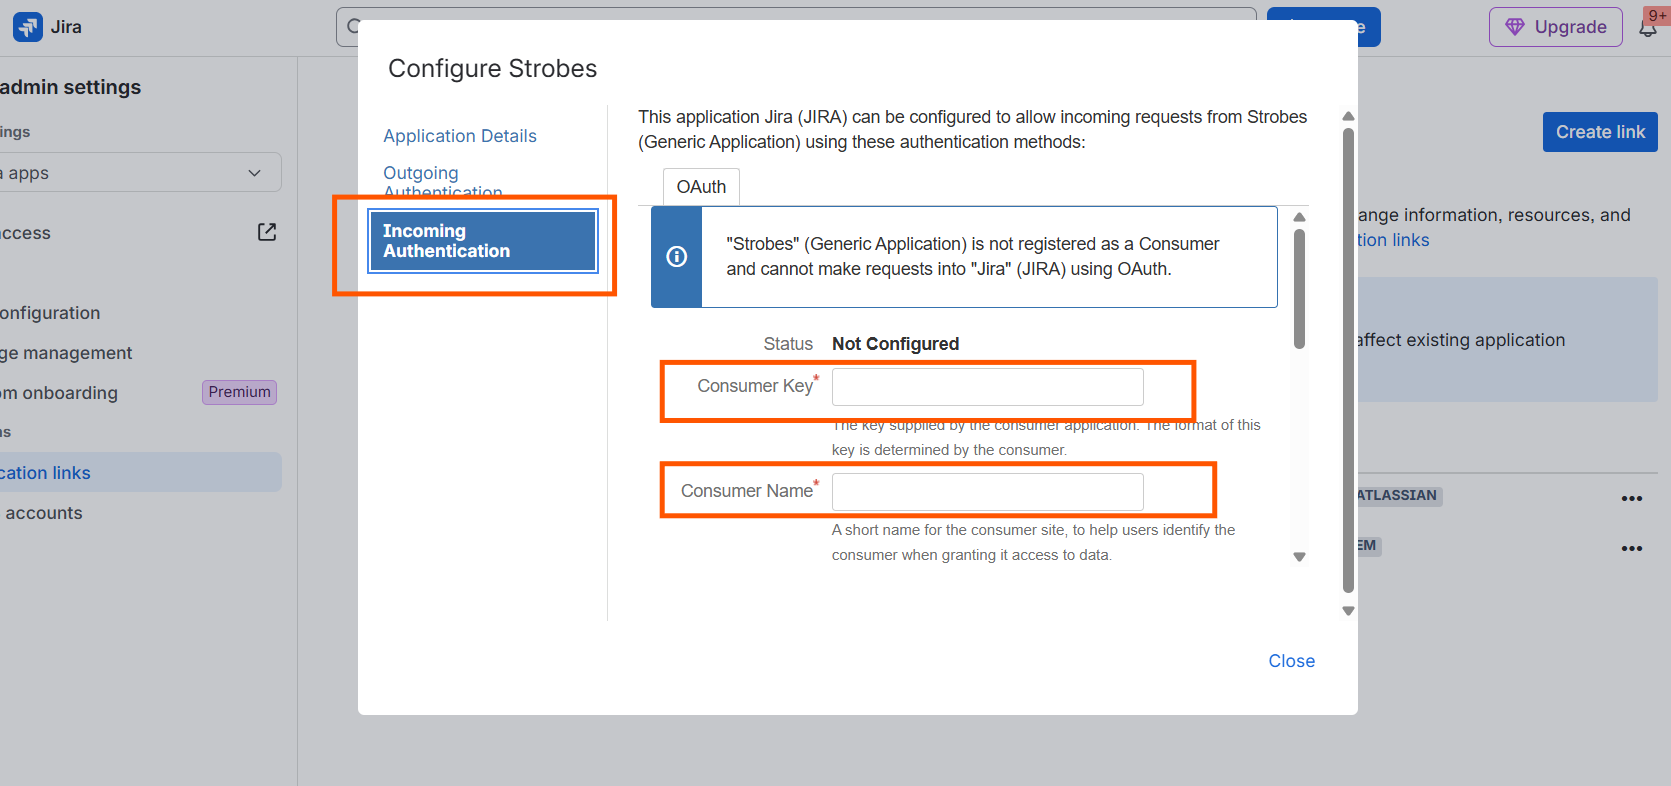
Click the Consumer Name field and type strobes. This is the display name Jira uses to identify the Strobes integration in OAuth approval dialogs.
Step 12 — Paste the Public Key
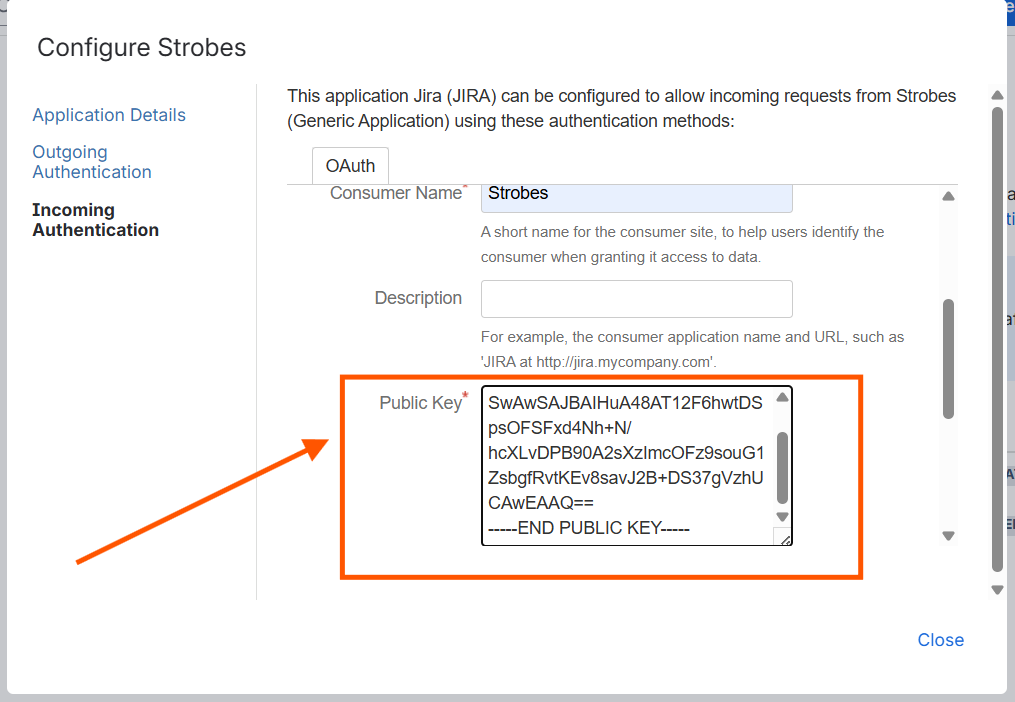
Click the Public Key field and paste the Public Key you copied from the Strobes Credential Manager. The Public Key is the RSA public key Strobes uses to sign OAuth requests. Jira uses this key to verify that incoming requests are genuinely from Strobes.
Step 13 — Paste the Consumer Callback URL
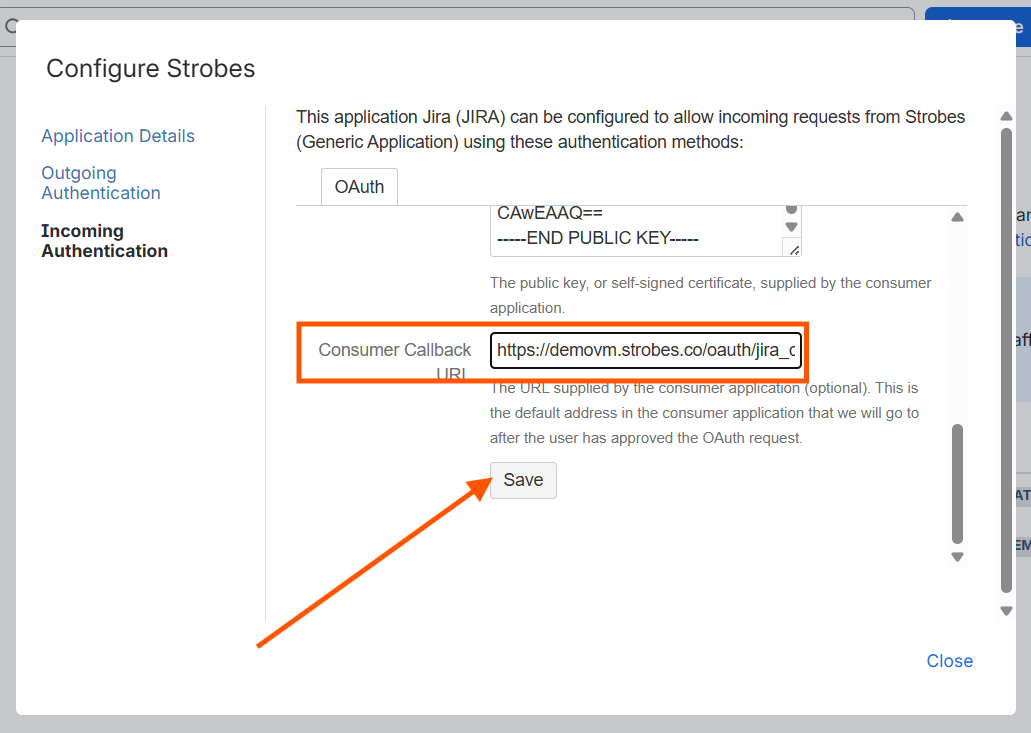
Click the Consumer Callback URL field and paste the Redirect URL you copied from the Strobes Credential Manager. This is the Strobes endpoint where Jira sends the user after they authorize access.
Step 14 — Save the Incoming Authentication Settings
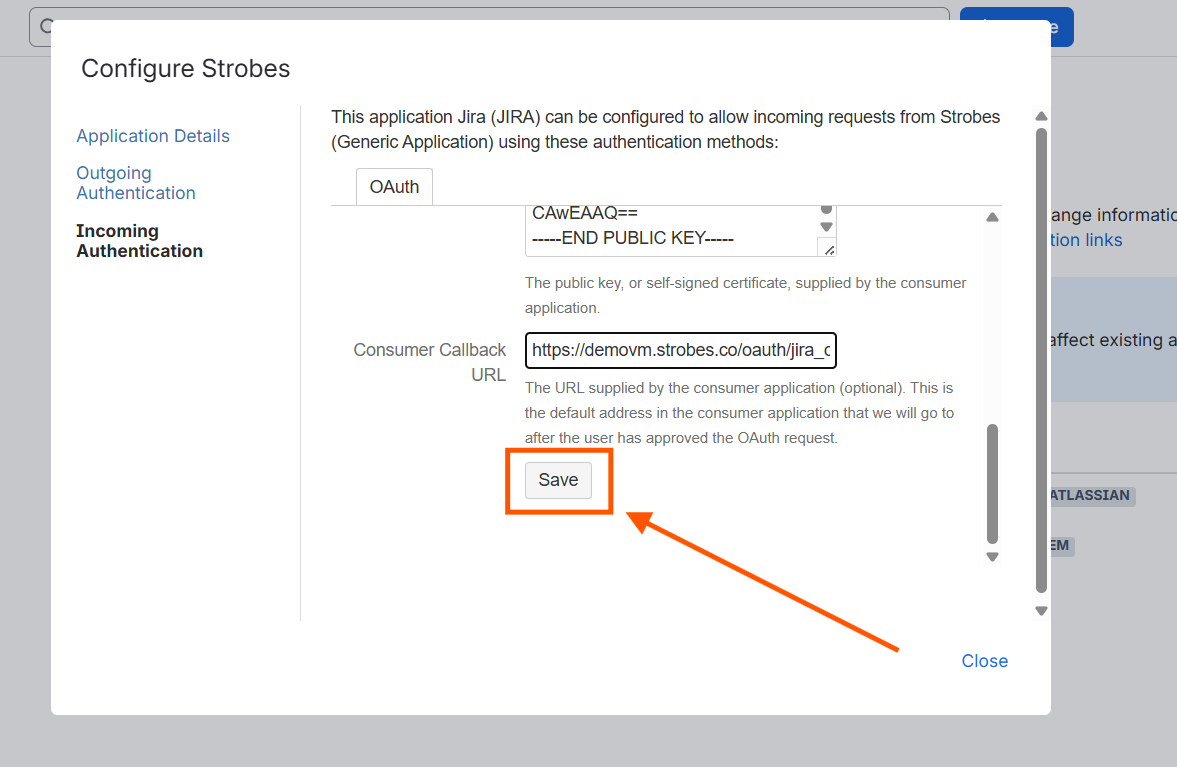
Click Save. Jira saves the Incoming Authentication configuration. The Application Link is now fully configured on the Jira side. Close the Edit dialog and return to Strobes.
Part 4 — Create the Jira Credential in Strobes
Step 15 — Open the Add Credential Form for Jira
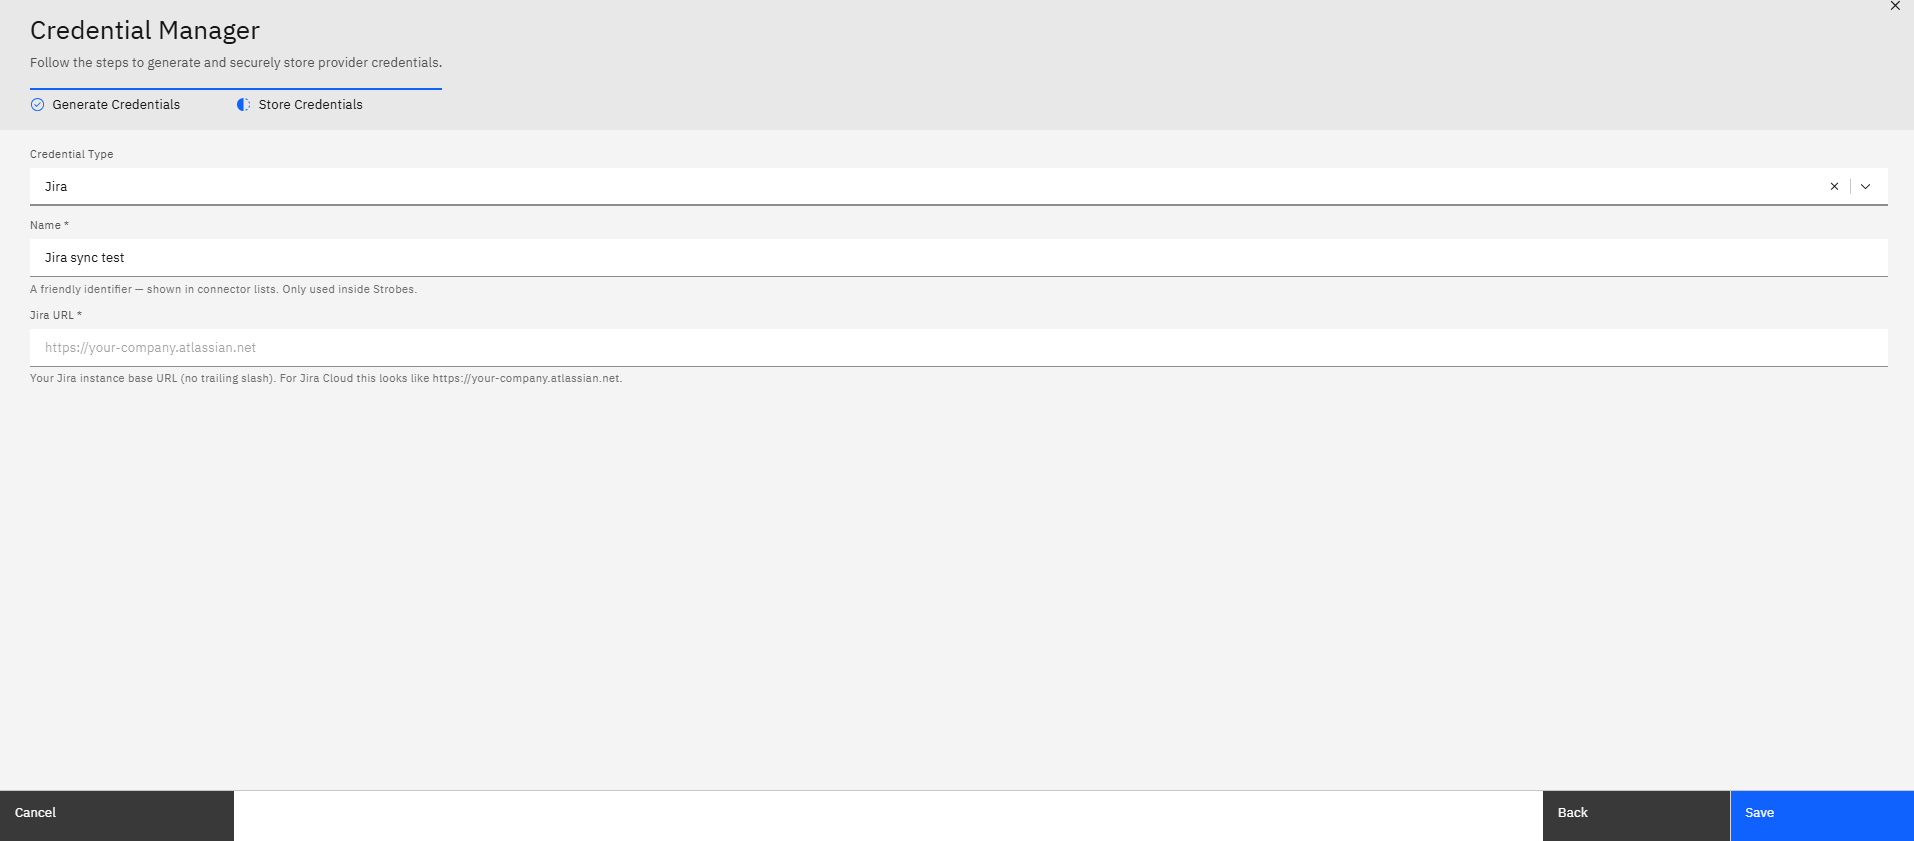
In the Strobes Credential Manager, click the Add Credential button for the Jira connector. The Add Credential form opens with fields for the credential Name and the Jira instance URL.
Step 16 — Enter a Credential Name
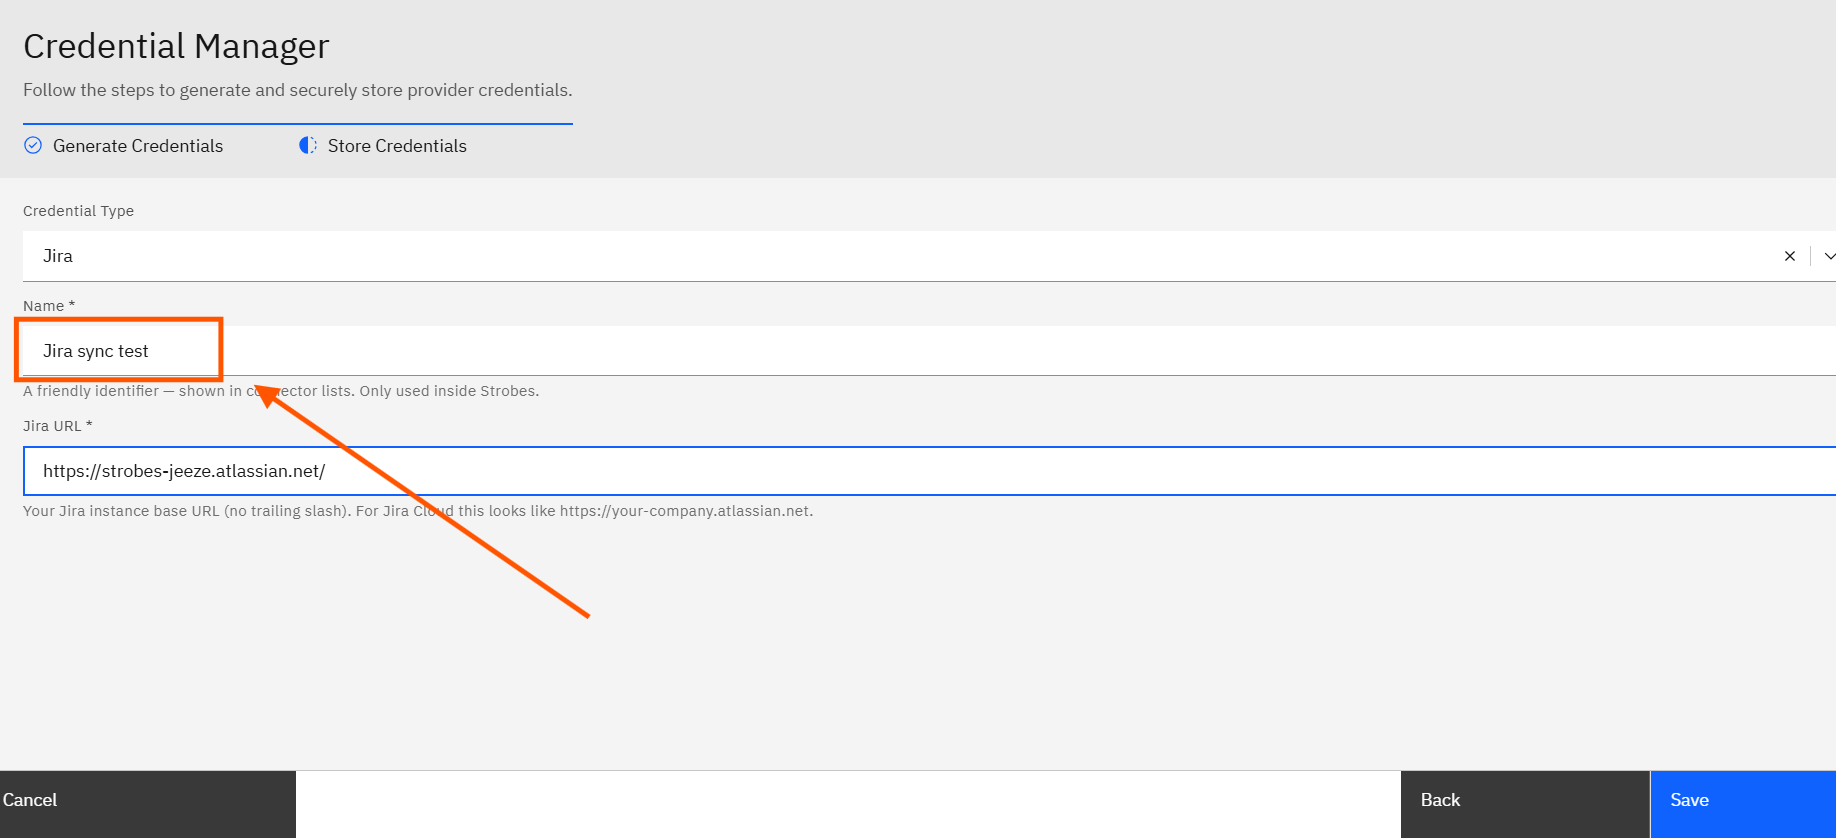
Click the Name field and type a name for this credential. Use a name that identifies the Jira instance being connected, for example: Prod Jira.
Step 17 — Enter Your Jira Instance URL
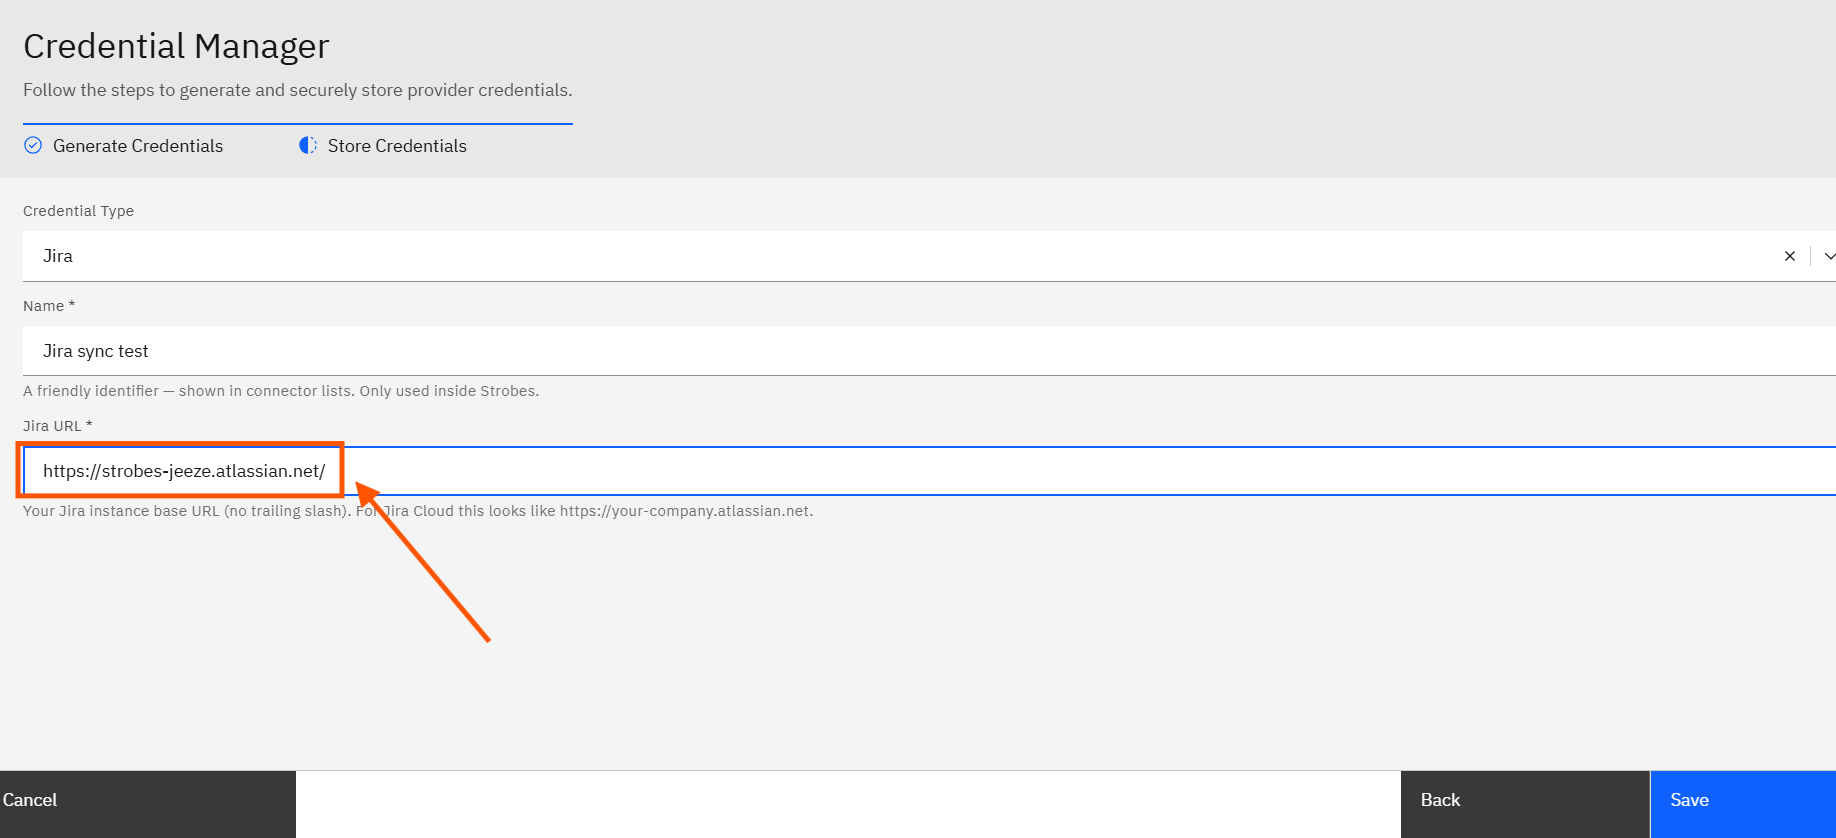
Click the URL field and type the URL of your Jira instance, for example https://yourcompany.atlassian.net. This must be the same URL you used when creating the Application Link in Jira.
Step 18 — Submit the Form and Authorize Access in Jira
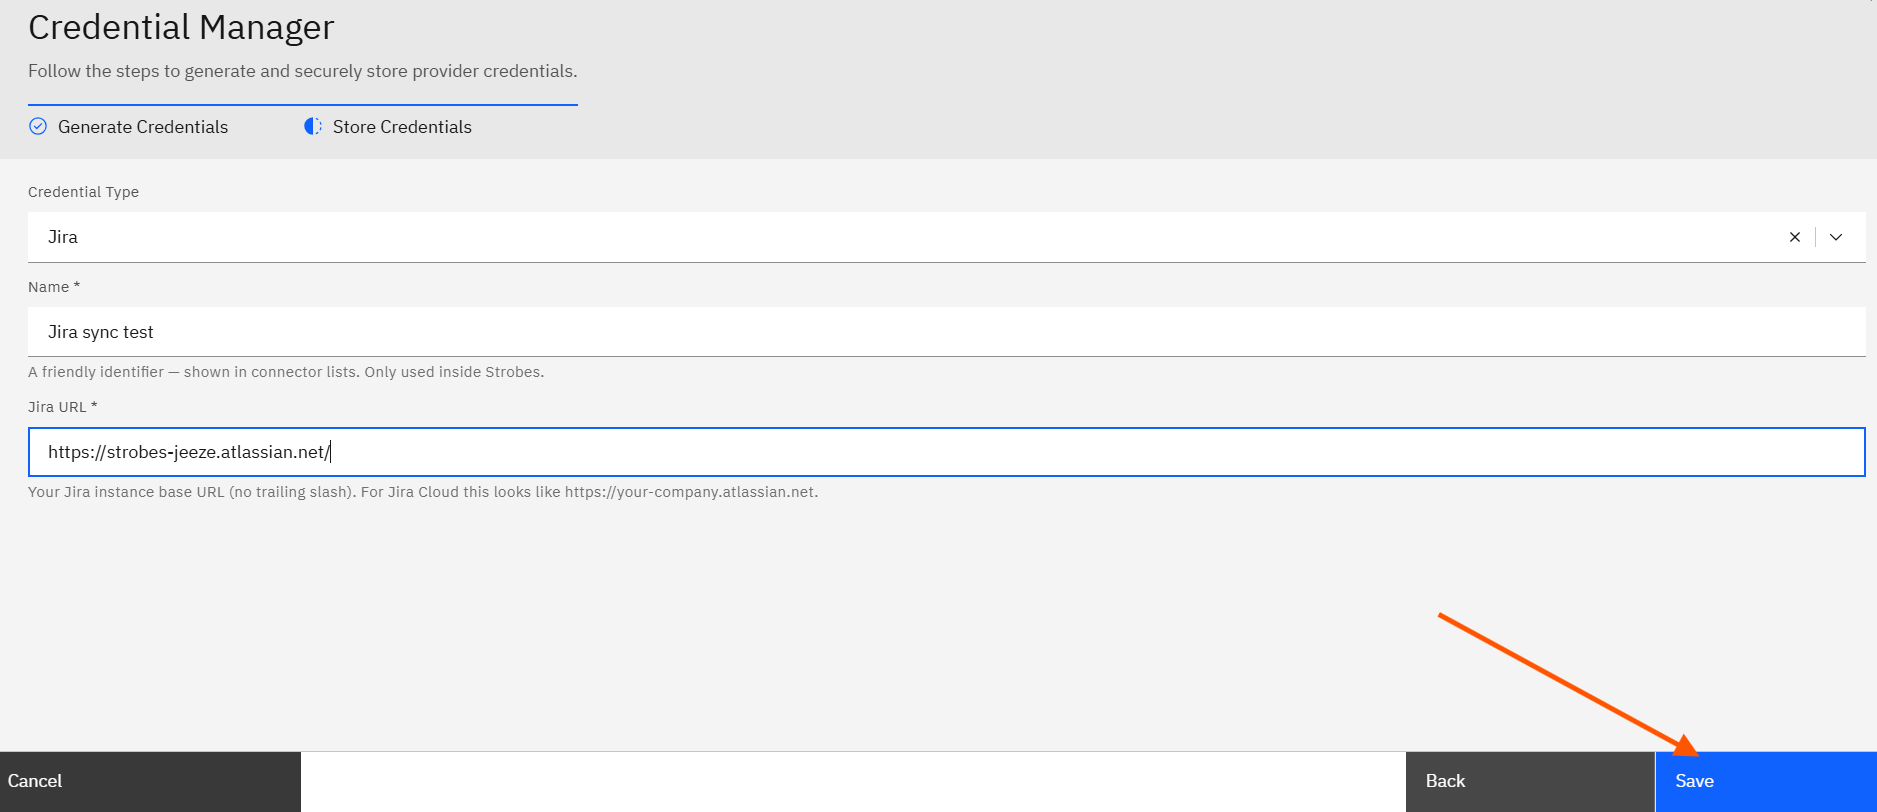
Click Submit. A Jira OAuth authorization popup appears, asking you to grant Strobes read and write access to your Jira instance. Click Allow. Jira redirects you back to Strobes and the credential is saved. The Jira integration is now active and ready to use.
Tips
The Public Key and Redirect URL are static values generated by Strobes. They do not change between credential creations. You only need to configure them in Jira once per Strobes instance. If you add additional Jira credentials later, the Jira Application Link configuration does not need to be updated.
The Application Link must be created before you submit the Strobes credential. If the Application Link is missing or the Incoming Authentication fields are incorrect, the Jira OAuth popup will not appear or the authorization will fail. Verify that all four Incoming Authentication fields — Consumer Key, Consumer Name, Public Key, and Consumer Callback URL — are saved in Jira before creating the Strobes credential.
The Consumer Key and Consumer Name must both be set to strobes exactly. These values are case-sensitive. Jira uses the Consumer Key to look up the matching Application Link when it receives an OAuth request from Strobes.
You need Jira Administrator access to configure Application Links. If you do not have that access, ask your Jira administrator to complete Parts 2 and 3 while you complete Parts 1 and 4 from the Strobes side.
You can create multiple Jira credentials in Strobes. If your organization uses more than one Jira instance, repeat Parts 1 through 4 for each instance. Each credential gets its own name and URL, and the same Incoming Authentication settings can be reused in Jira if both instances share the same Strobes instance.