
Configuring Strobes DAST
Overview
The Strobes DAST connector lets you continuously scan your web applications for vulnerabilities and prioritize the findings directly within Strobes. Scans can be run on-demand or on a recurring schedule. Each configuration targets a specific web asset and controls how the scan engine crawls, what findings it logs, and how your team gets notified when results come in.
Step 1 — Navigate to Connectors
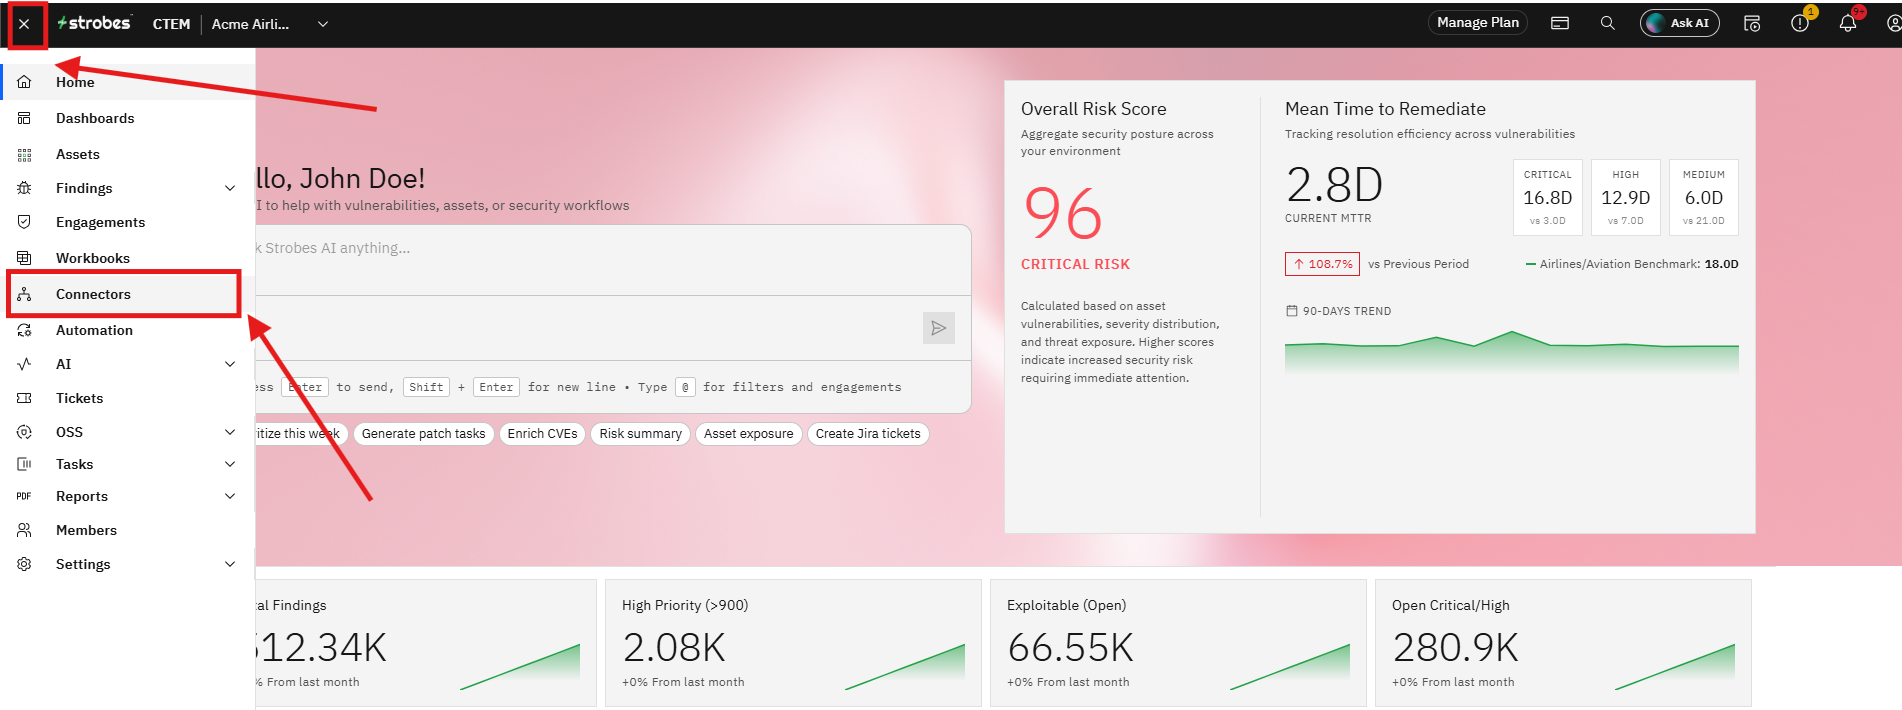
Click Connectors in the left sidebar. The Connectors page opens showing all installed and available connectors.
Step 2 — Search for the Connector
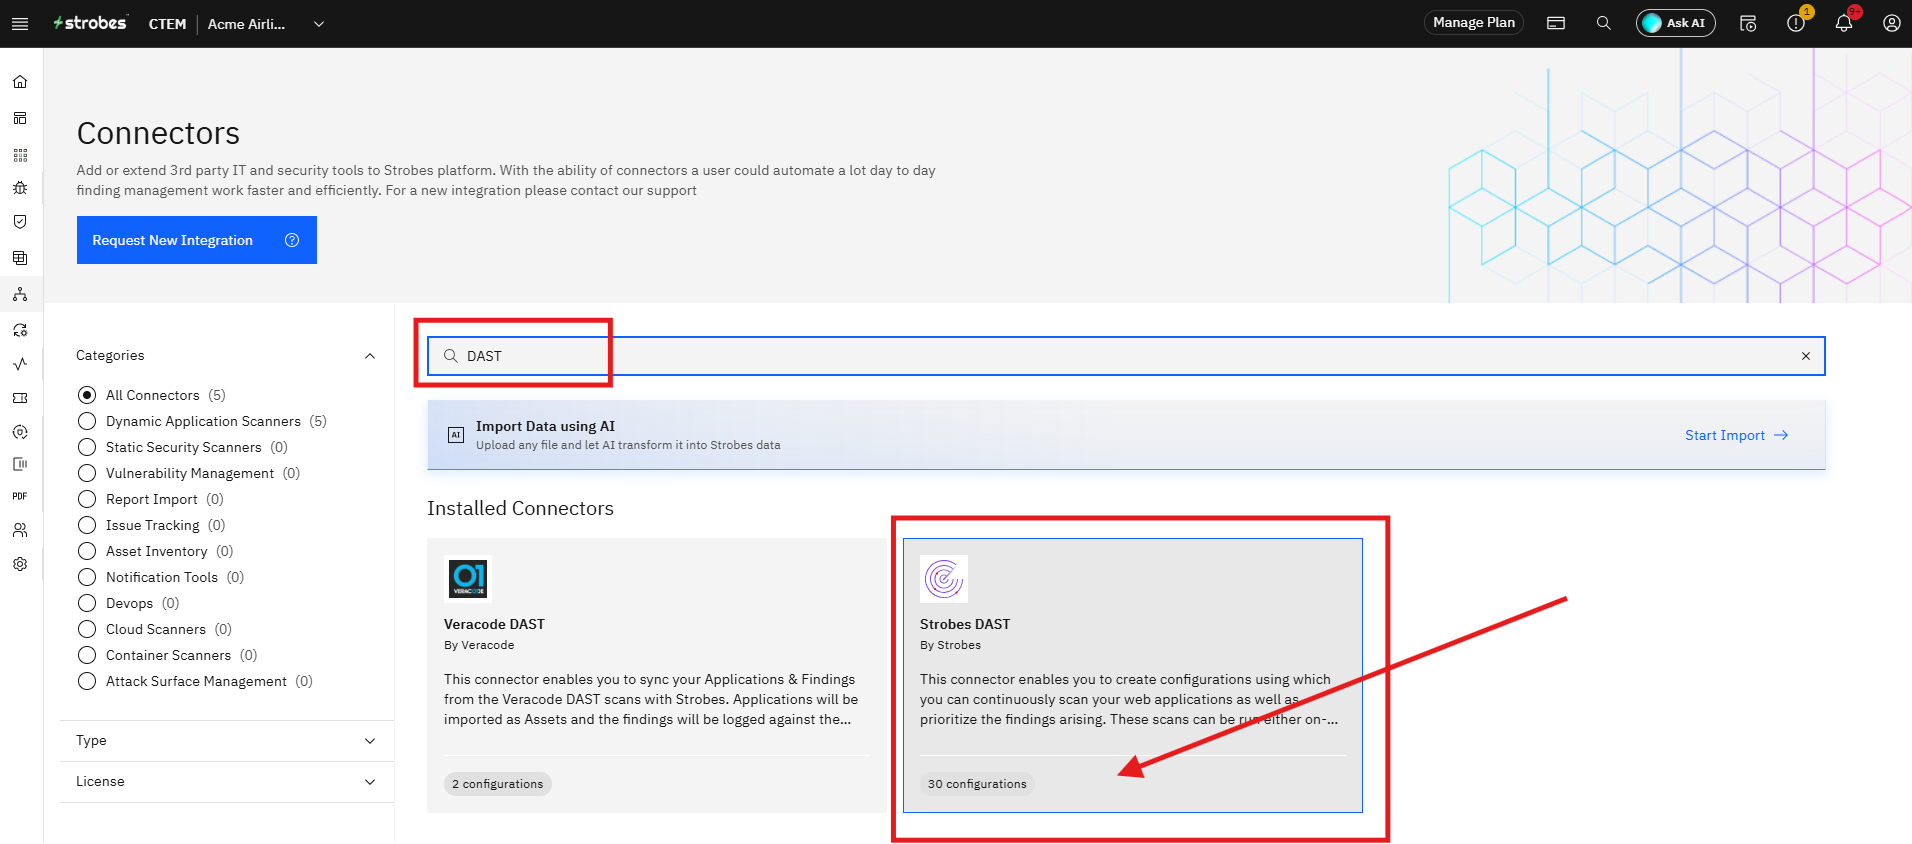
Click the Look for Connectors search bar and type DAST. The results show both Veracode DAST and Strobes DAST under Installed Connectors.
Step 3 — Open Strobes DAST
Click the Strobes DAST card. The connector detail page opens showing the Workflows sidebar on the left with all existing configurations listed.
Step 4 — Add a New Workflow
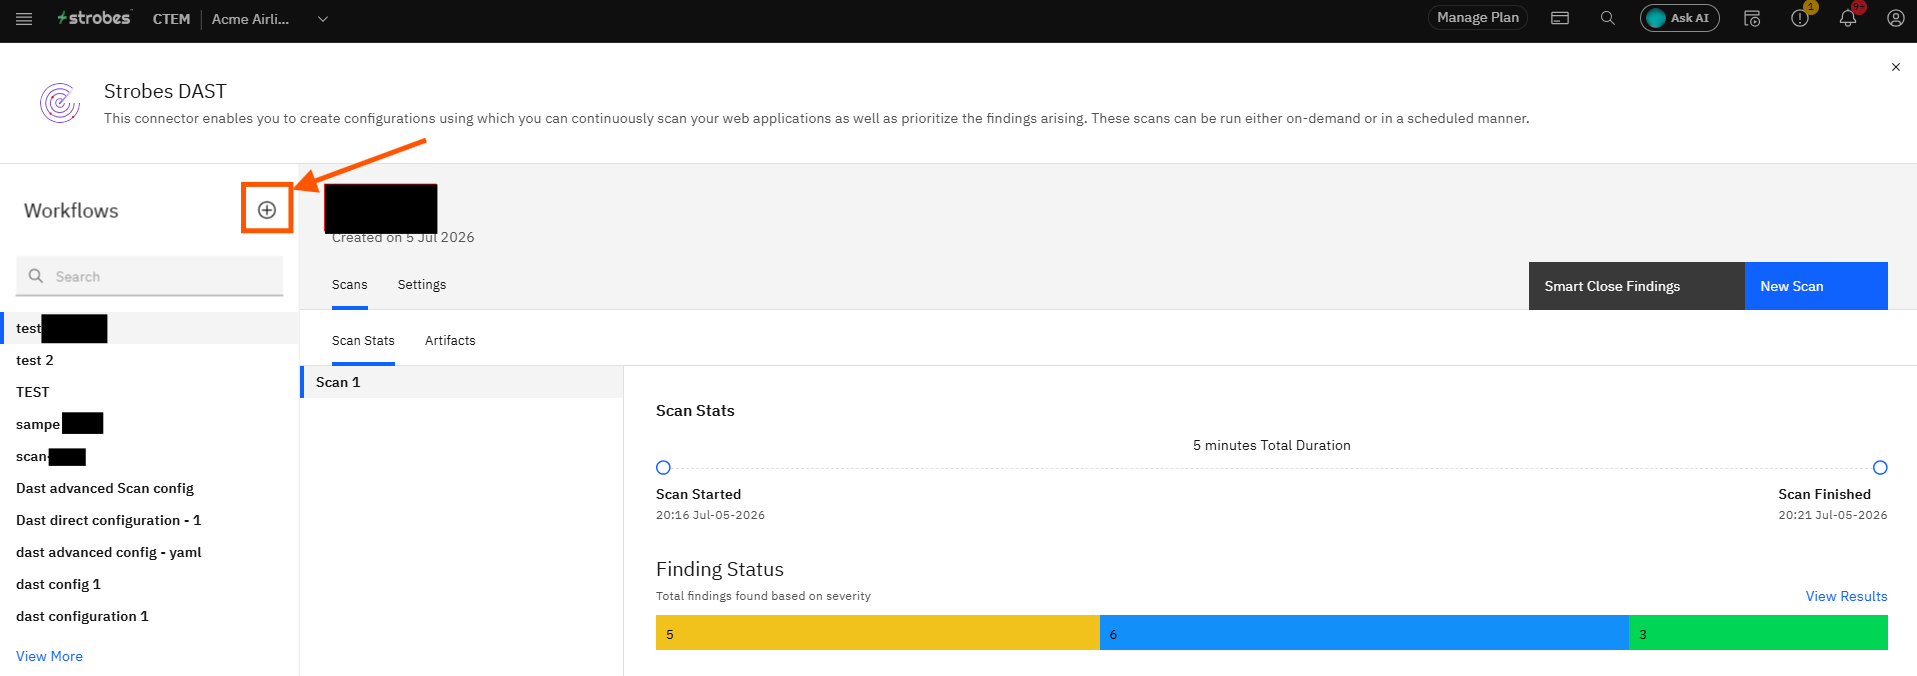
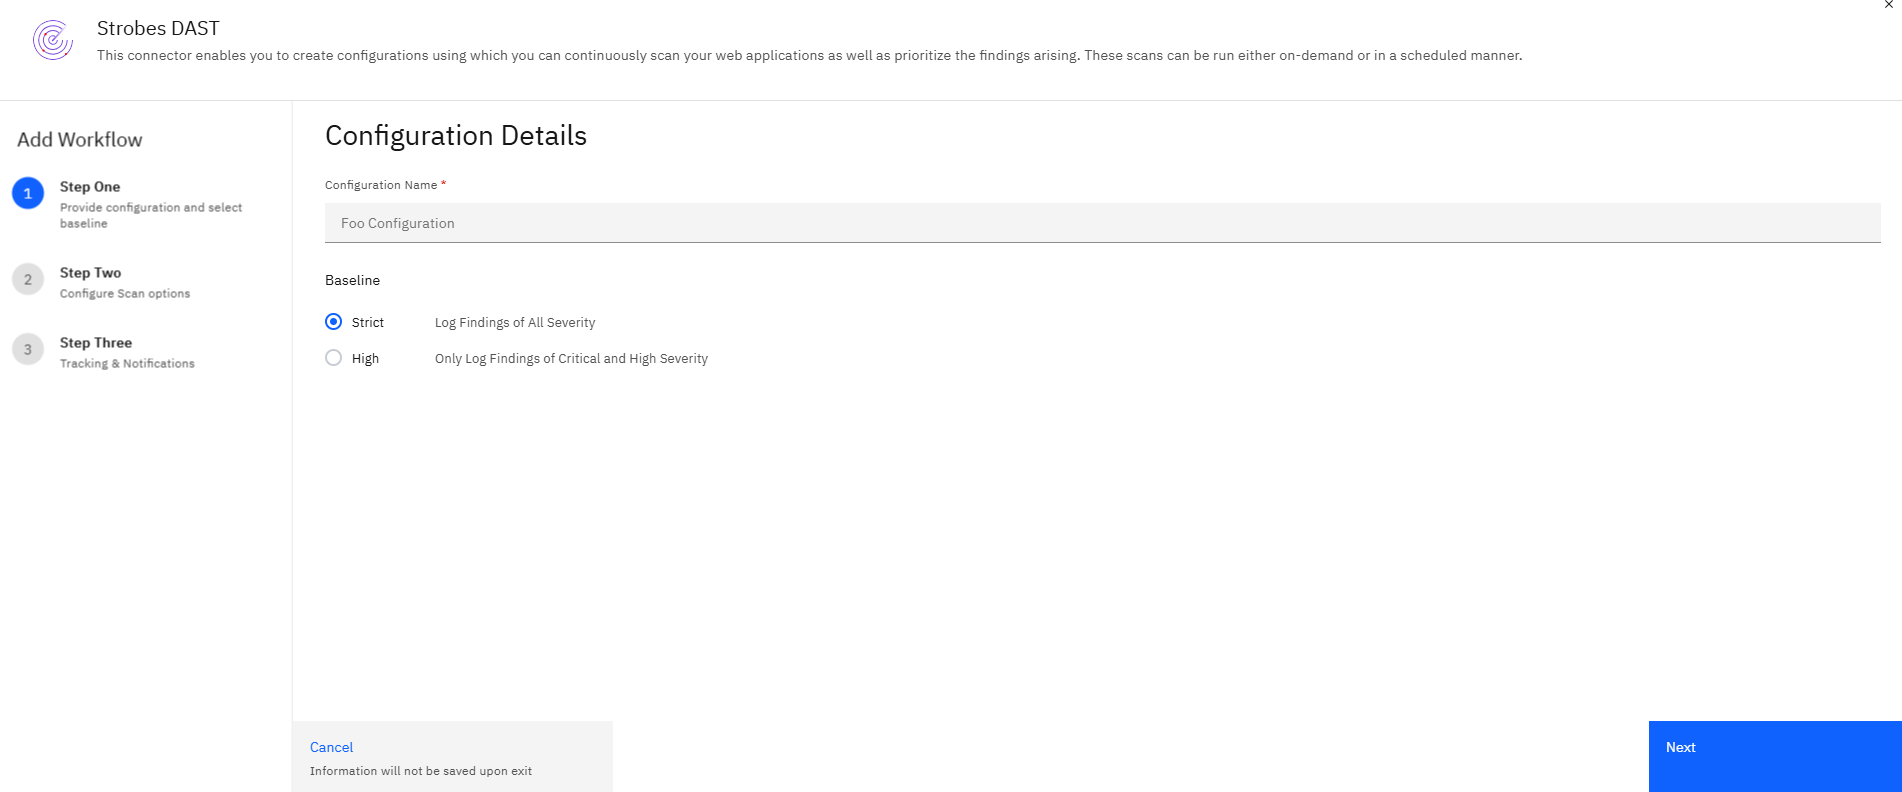
If you already have any configurations setup then Click the + icon next to Workflows in the left sidebar. The Add Workflow panel opens with three steps: Step One (Provide configuration and select baseline), Step Two (Configure Scan options), and Step Three (Tracking & Notifications).
Step 5 — Lets continue; Enter a Configuration Name
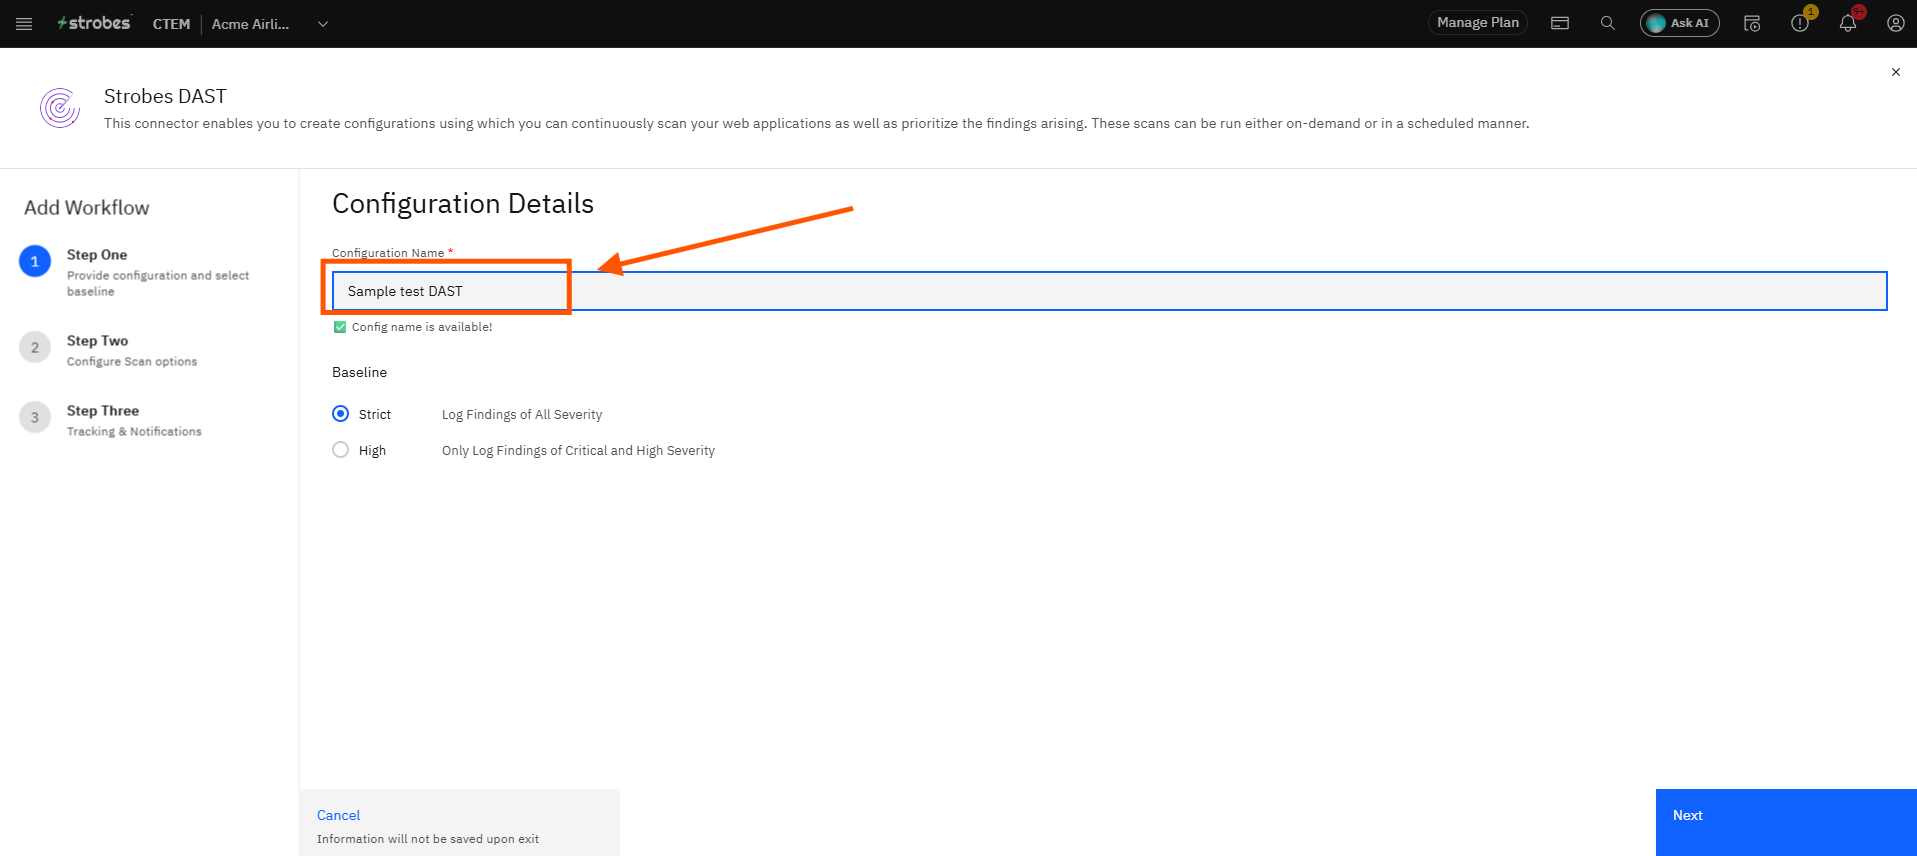
Click the Configuration Name field and type a unique name for this configuration. A green "Config name is available!" message confirms the name is not already in use.
Step 6 — Choose a Baseline
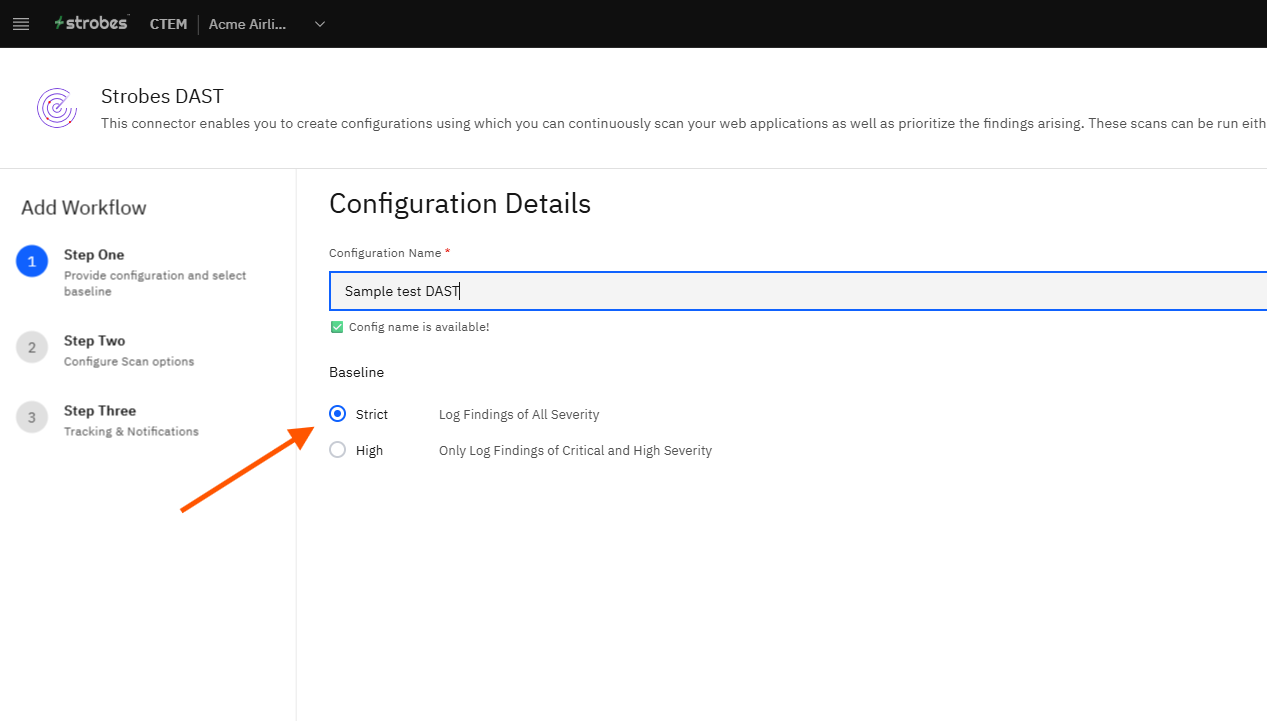
Under Baseline, select which findings this configuration should log:
Option | What it logs |
|---|---|
Strict | Findings of all severity levels |
High | Critical and High severity findings only |
Step 7 — Proceed to Step Two
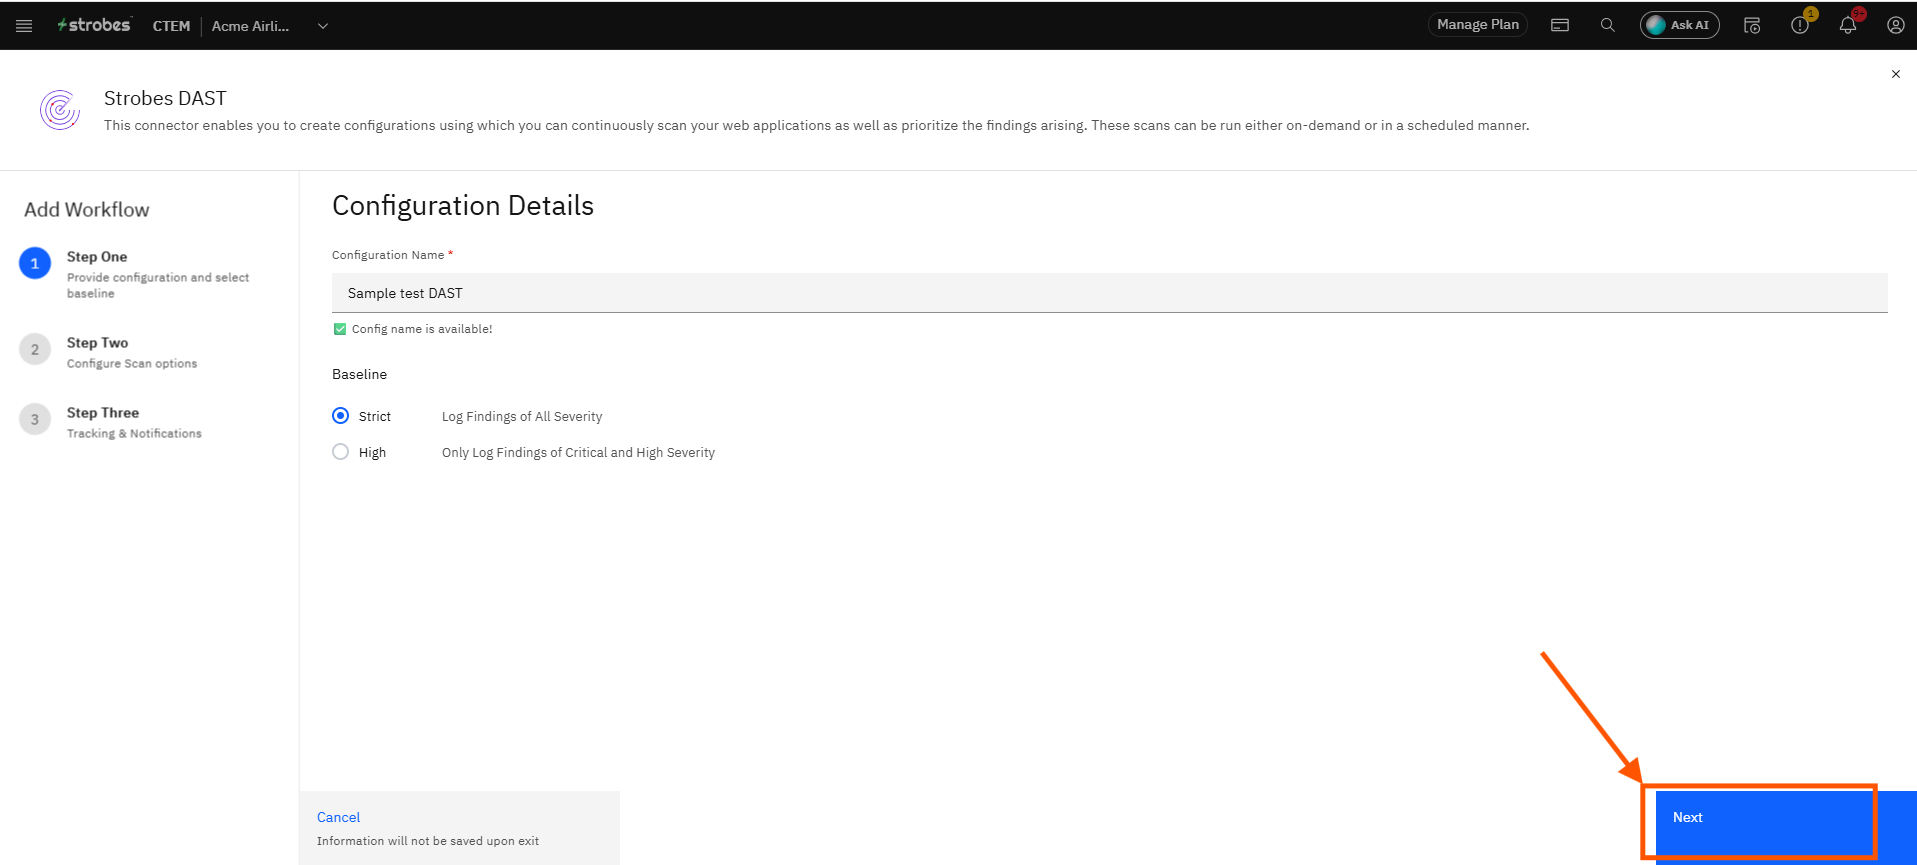
Click Next. The wizard moves to Step Two: Configuration settings.
Step 8 — Select an Asset
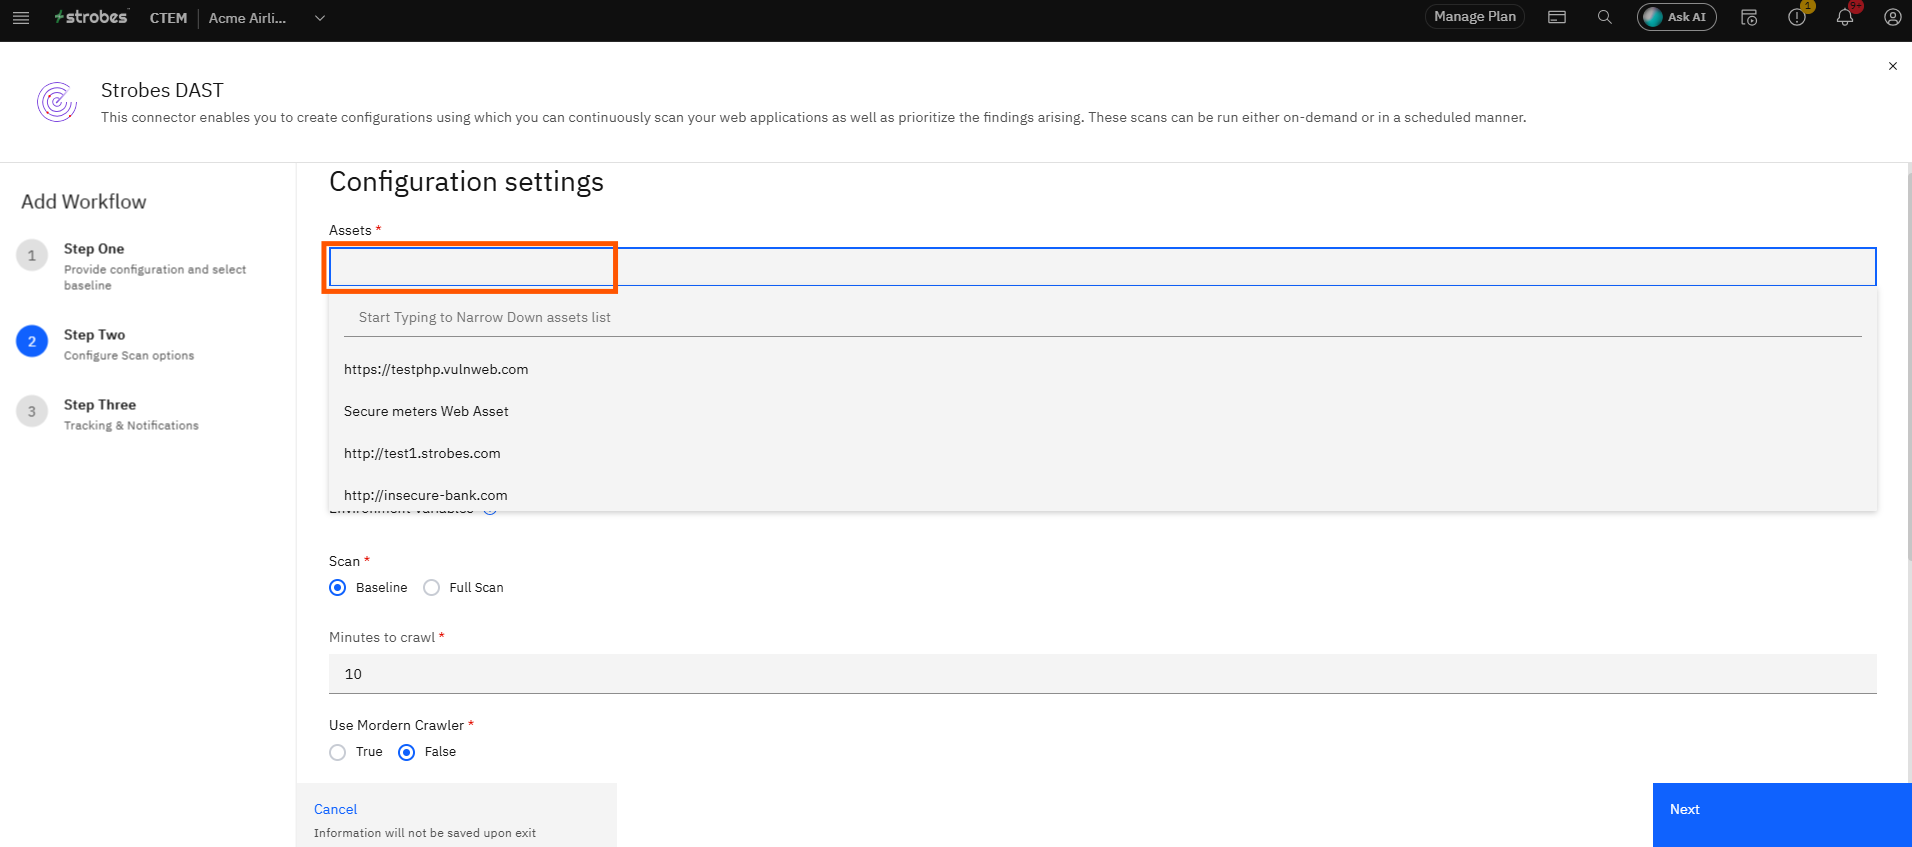
Click the Assets field. A dropdown appears listing all web assets registered in Strobes. Type to narrow the list, then click the asset you want this scan to target.
Note: Assets is a required field. The form will not advance without one selected.
Step 9 — Select an Agent
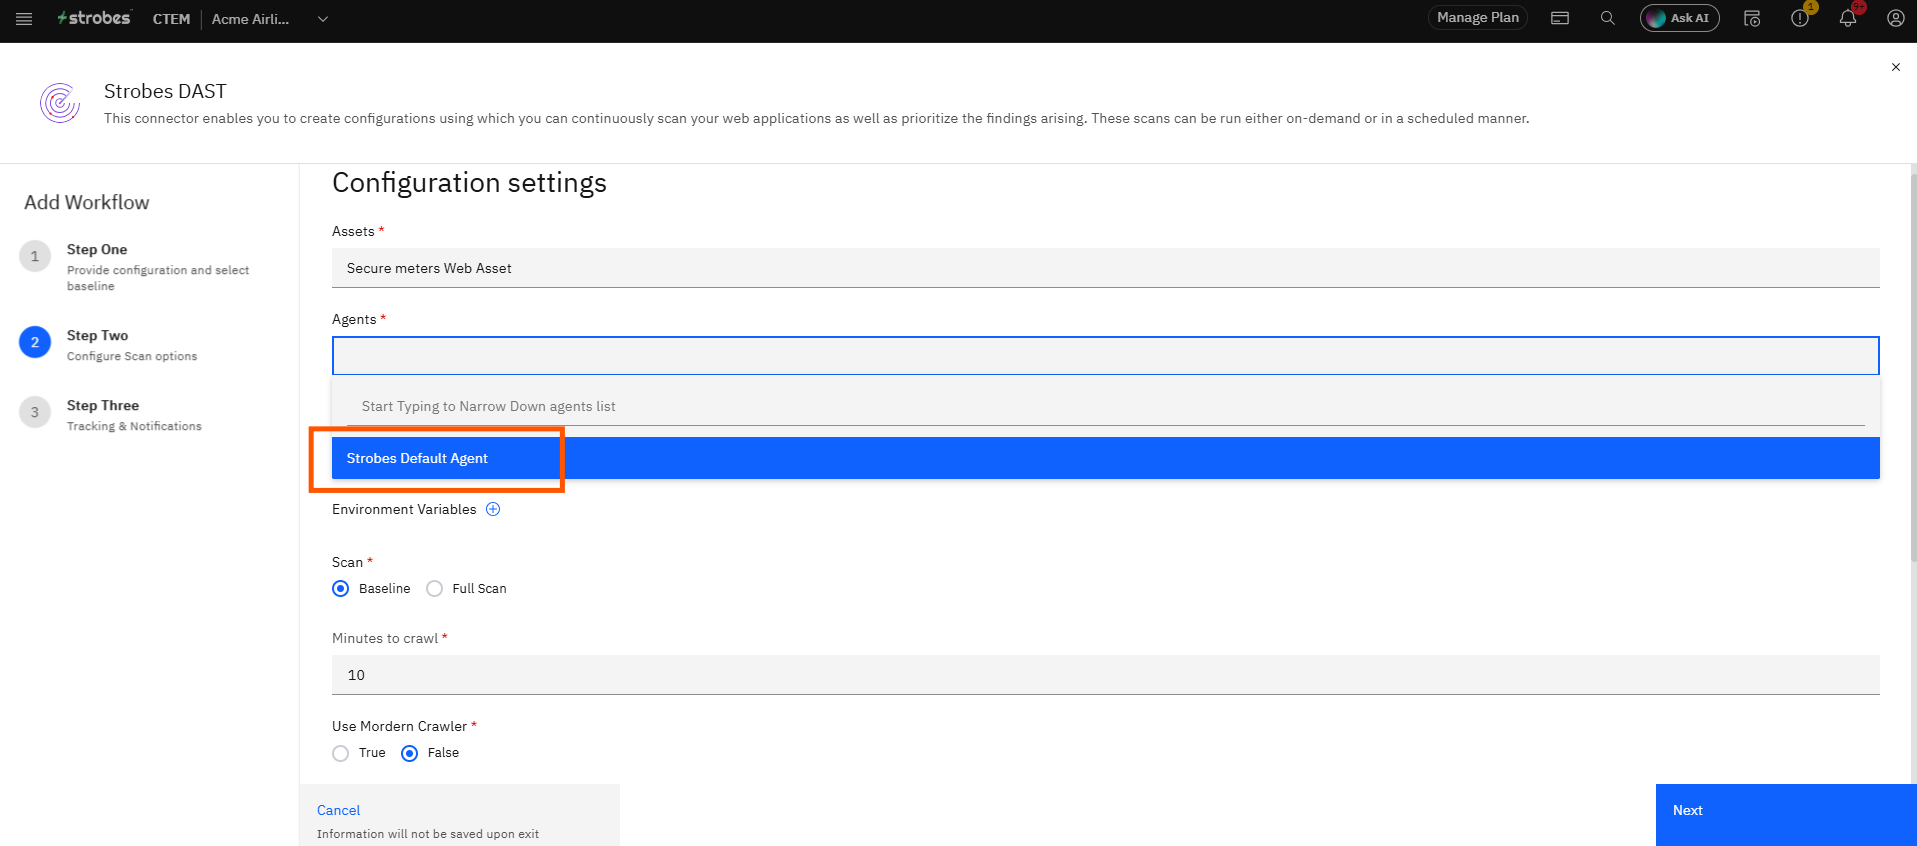
Click the Agents field and select the Strobes agent that will run this scan. The default is Strobes Default Agent.
Step 10 — Set Enable YAML Instructions (Optional)
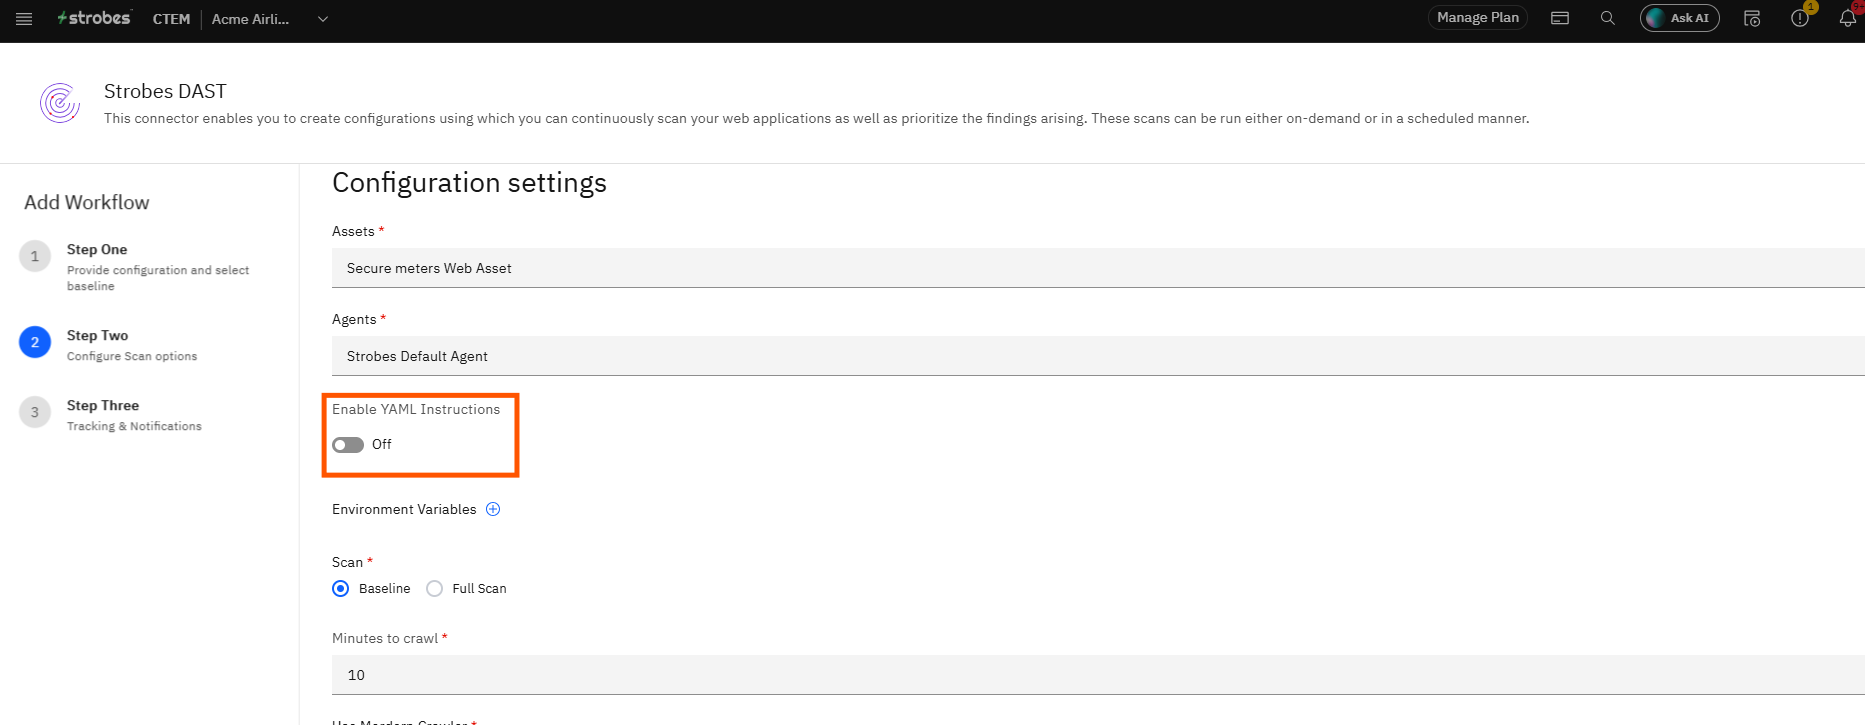
Toggle Enable YAML Instructions on if you want to provide custom YAML-based scan instructions for this configuration. Leave it off to use the default scan behavior.
Step 11 — Add Environment Variables (Optional)
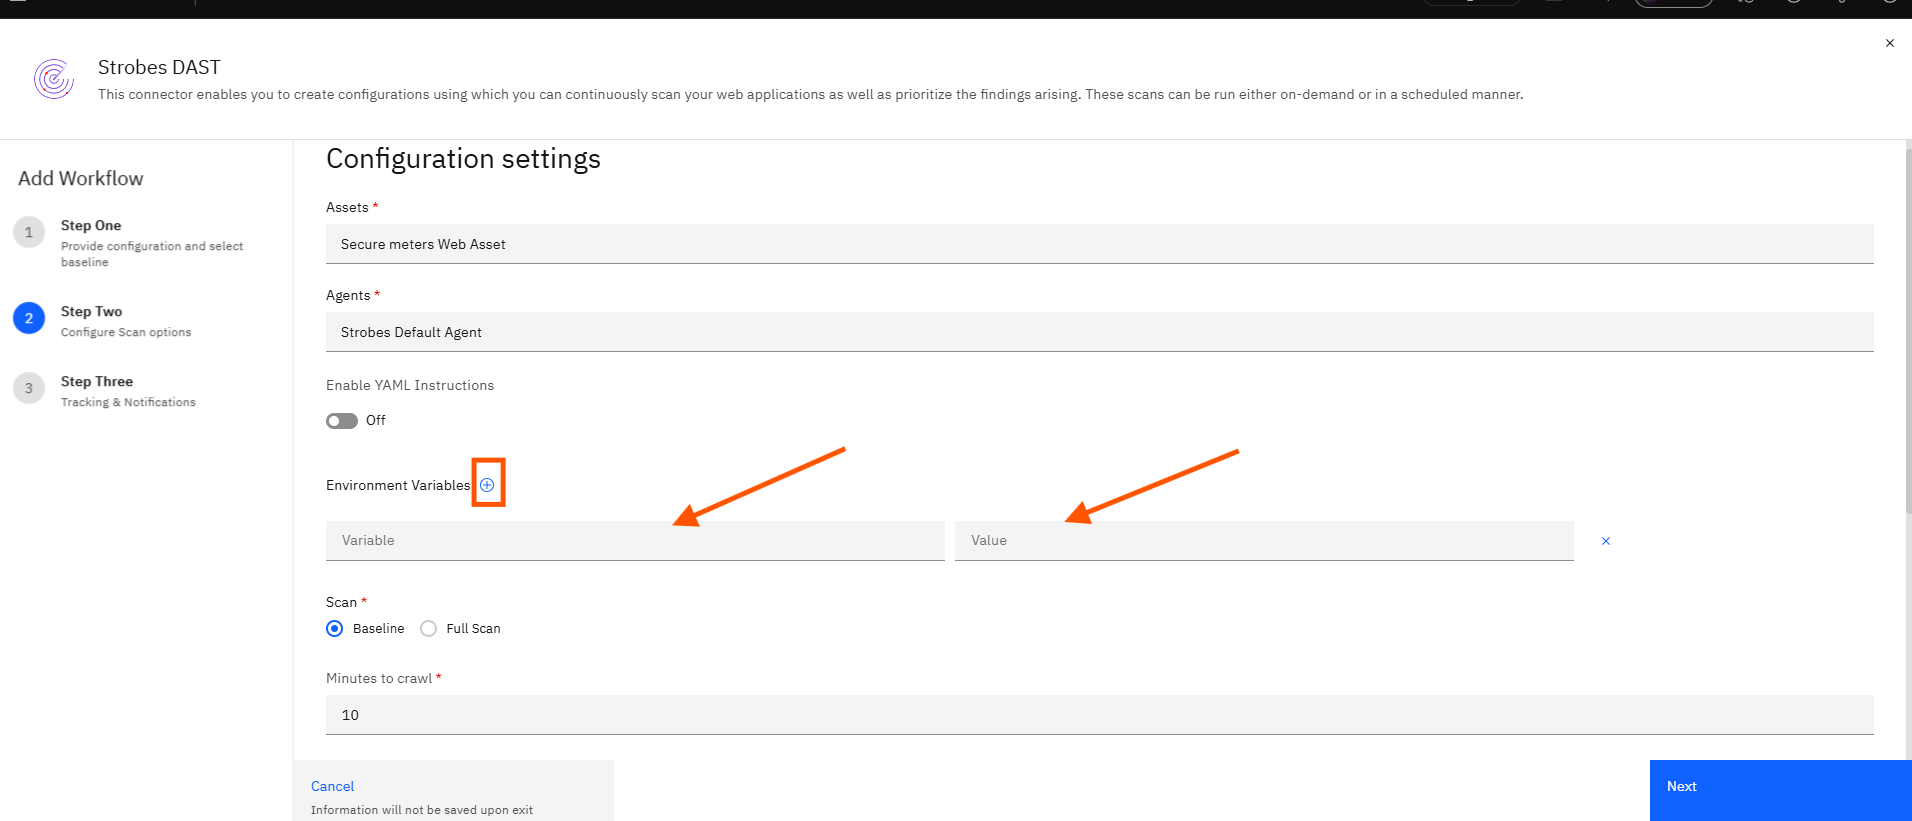
Click the + next to Environment Variables to add any key-value pairs the scan engine needs at runtime, such as authentication tokens or custom headers. Leave this section empty if no environment variables are required.
Step 12 — Choose a Scan Type
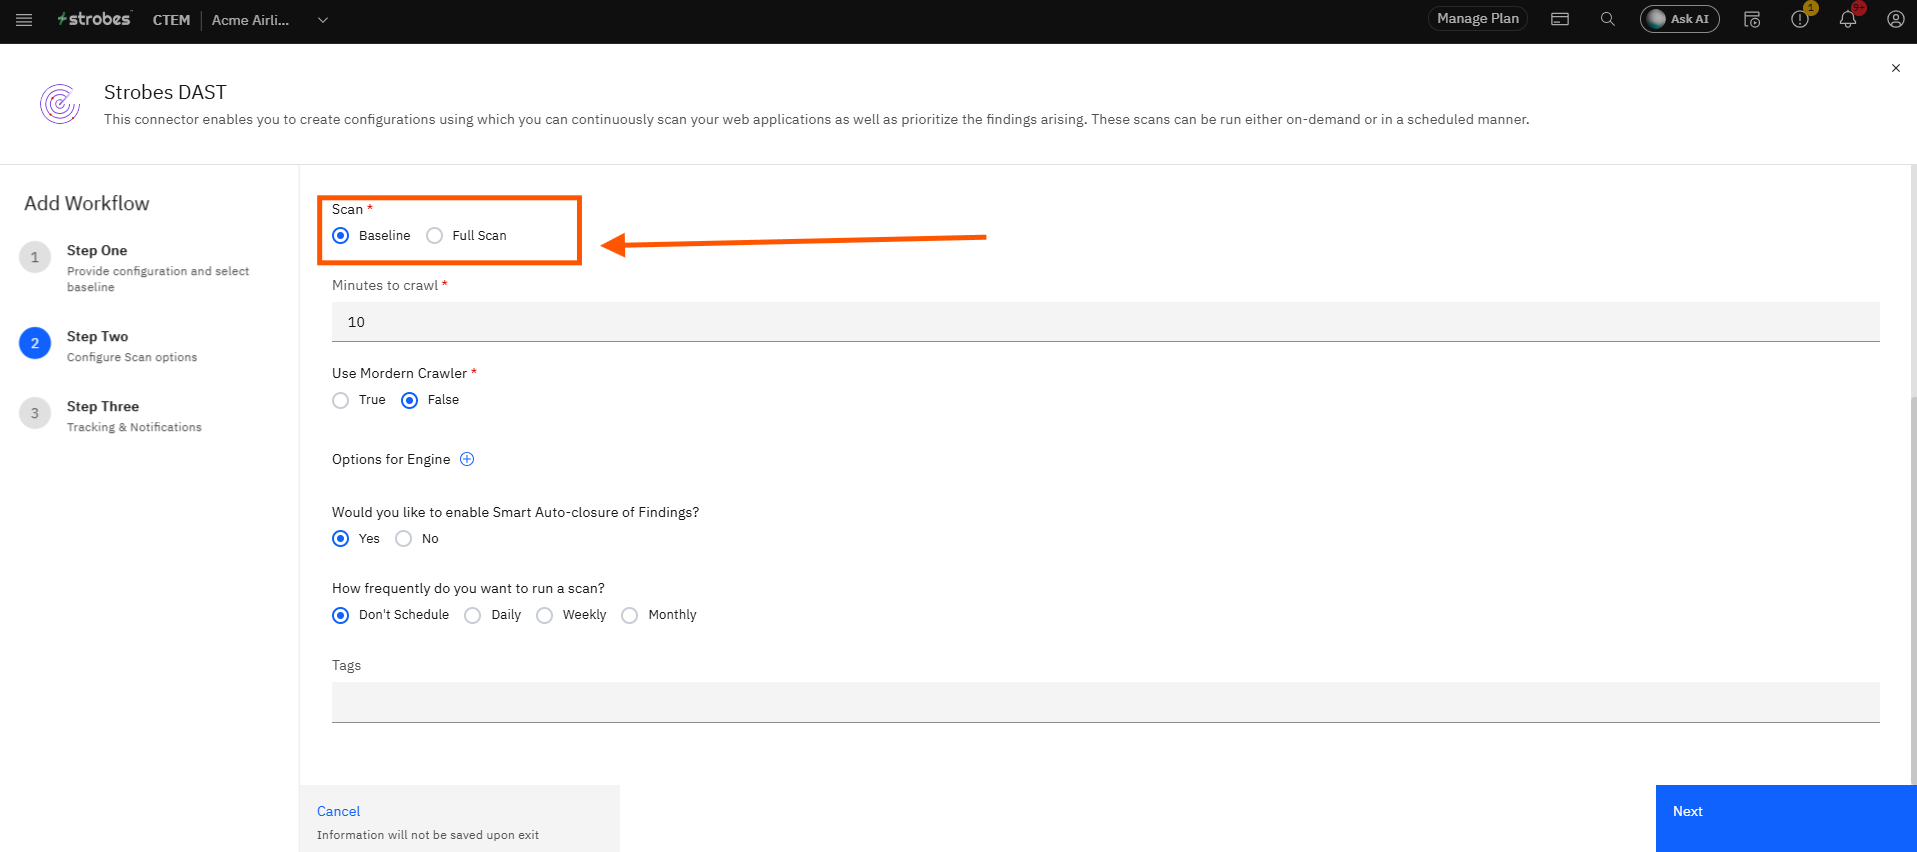
Under Scan, select the type of scan to run:
Option | Description |
|---|---|
Baseline | A lighter, faster scan covering common vulnerability classes |
Full Scan | A comprehensive scan that covers a wider attack surface |
Step 13 — Set Minutes to Crawl
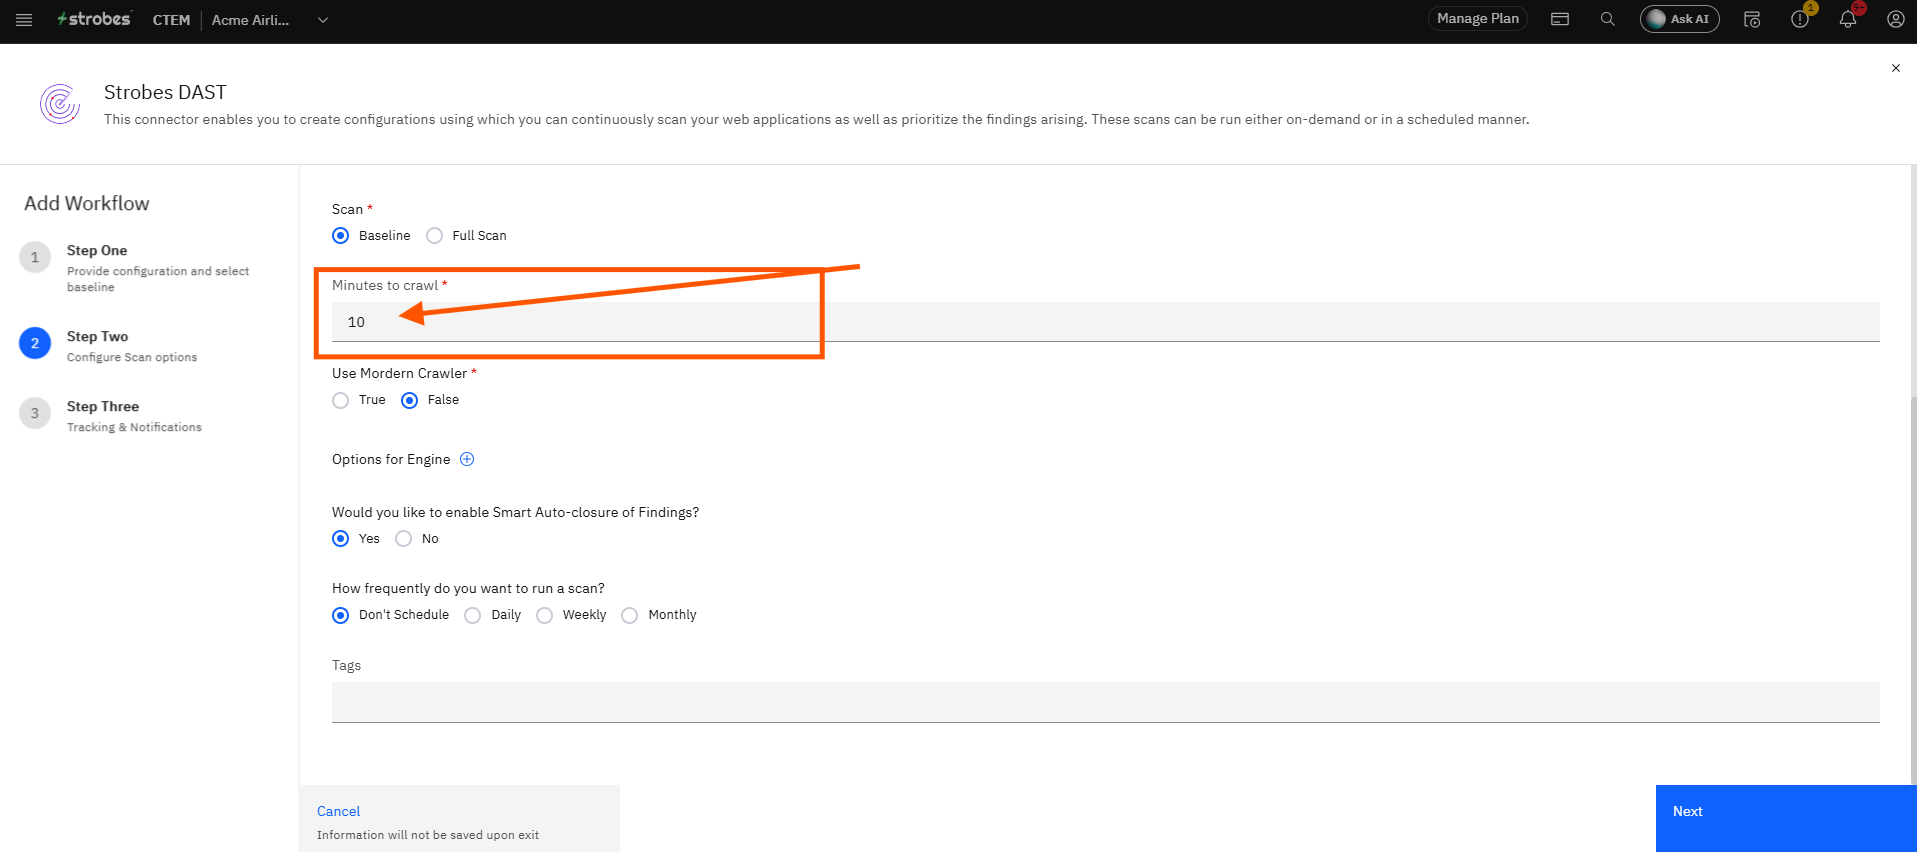
In the Minutes to crawl field, enter how long the scanner should spend crawling the target asset before beginning active testing. The default is 10 minutes. Increase this value for larger or more complex applications.
Step 14 — Set Use Modern Crawler
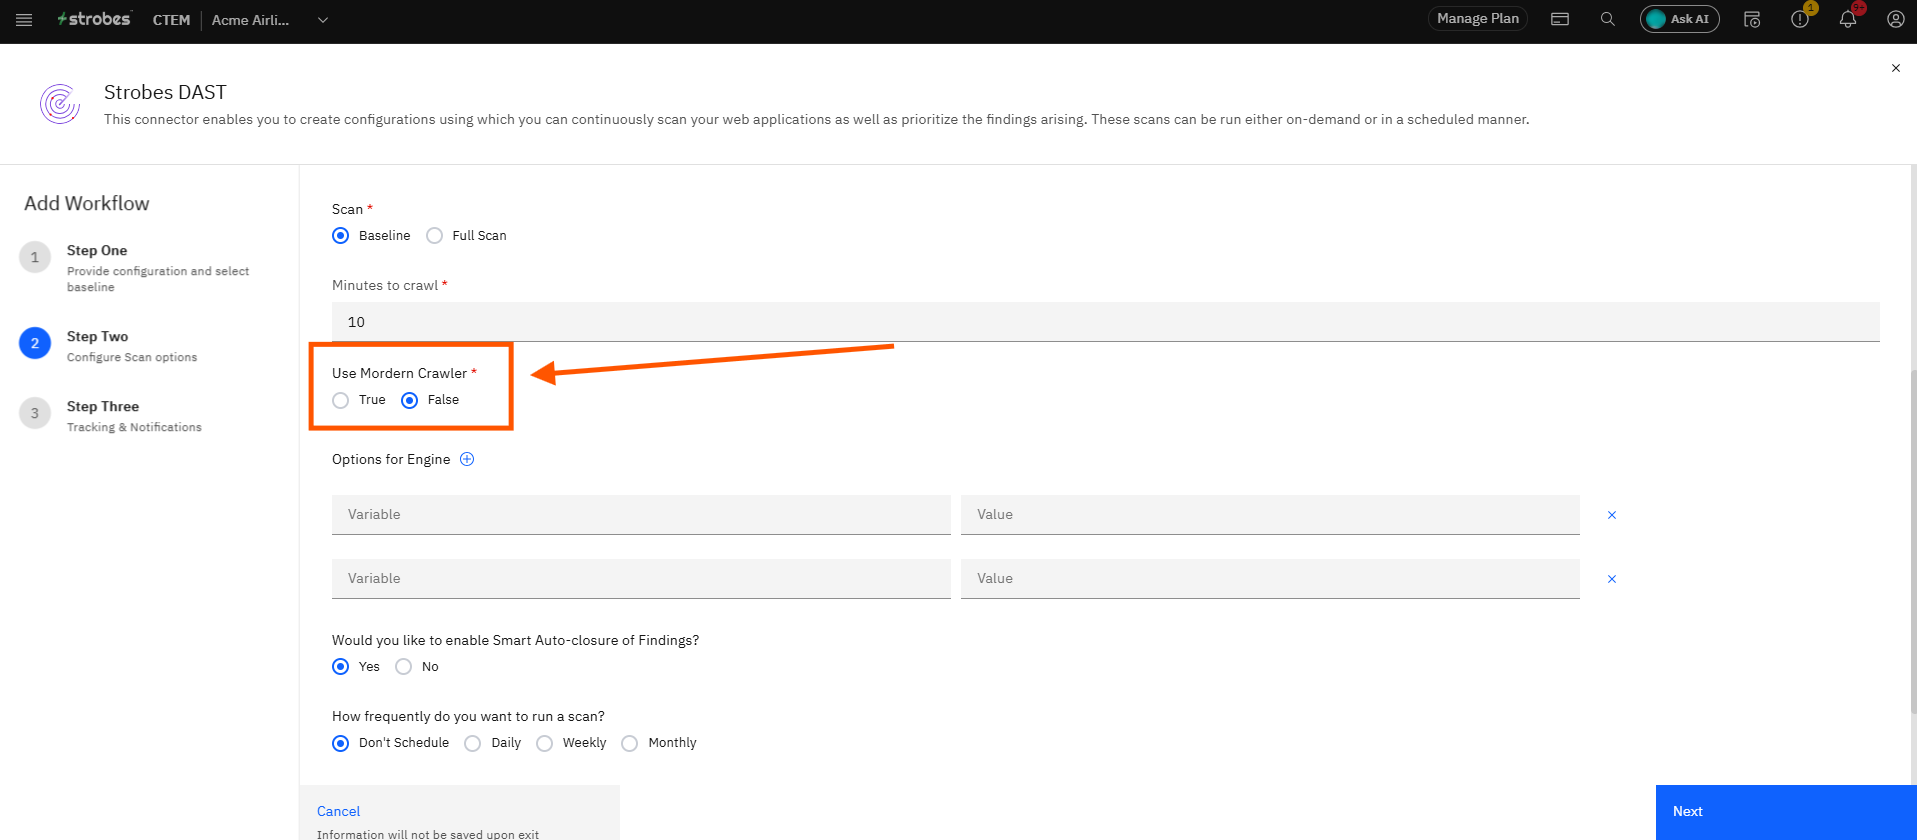
Under Use Modern Crawler, select True to use a JavaScript-aware crawler that can interact with modern single-page applications, or False to use the standard crawler. Use True for React, Angular, or Vue-based applications.
Step 15 — Add Options for Engine (Optional)
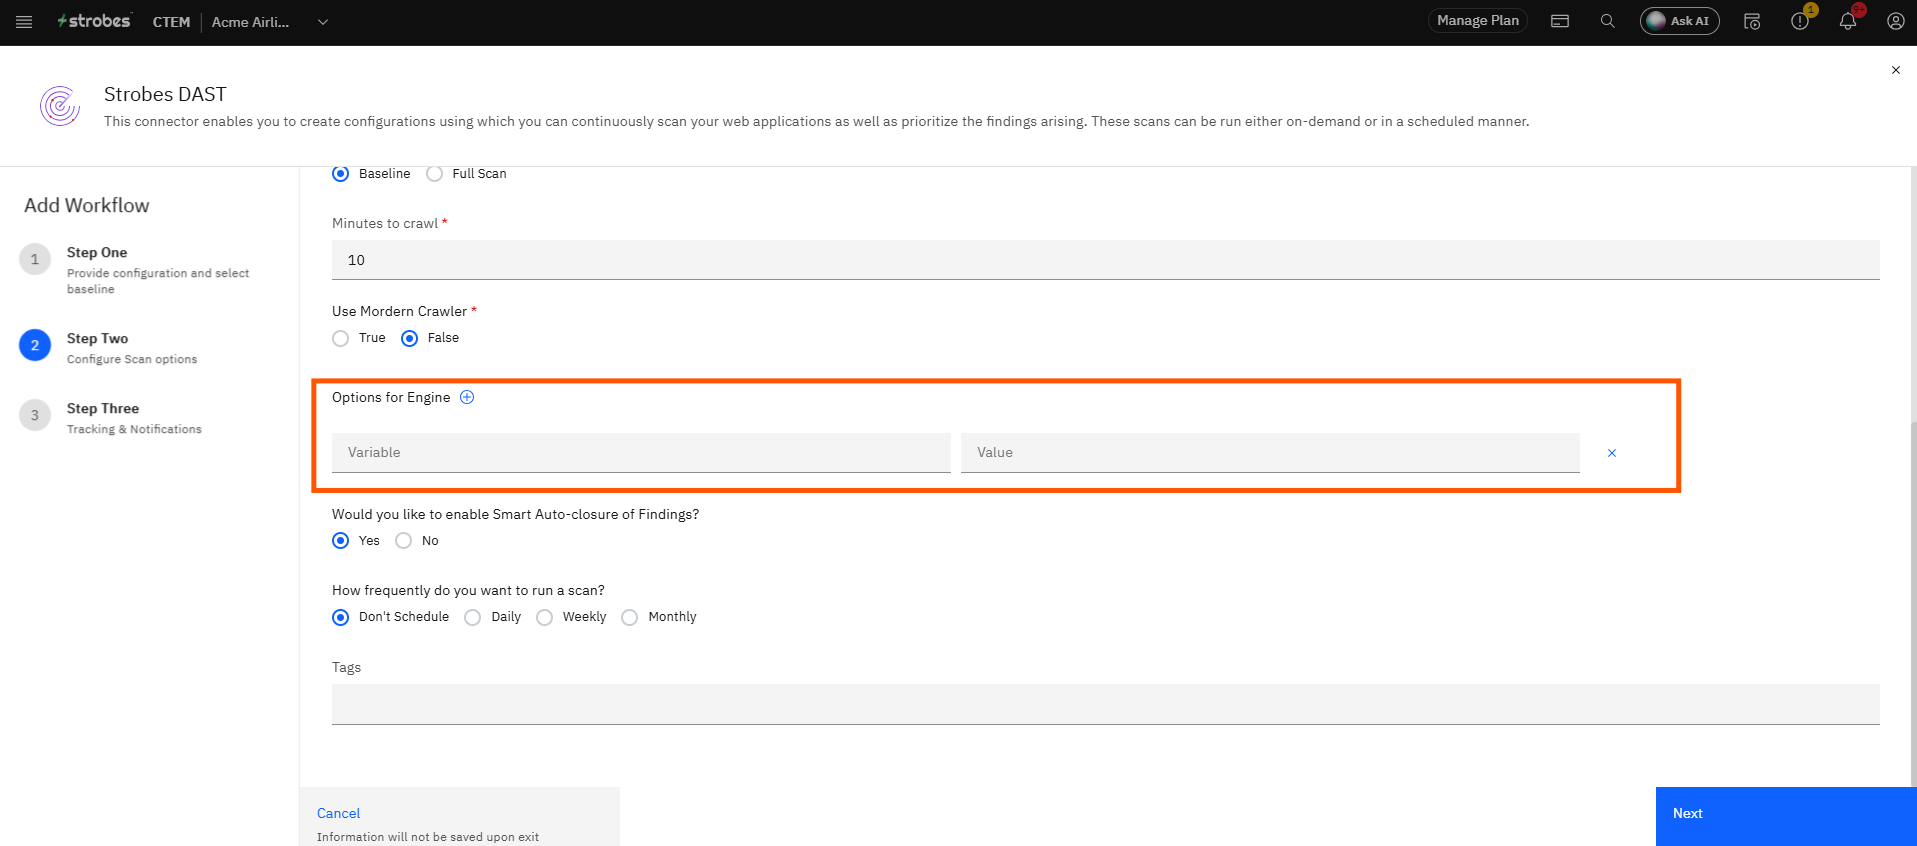
Click the + next to Options for Engine to add advanced engine parameters for this scan. Leave this section empty to use the default engine settings.
Step 16 — Set Smart Auto-closure
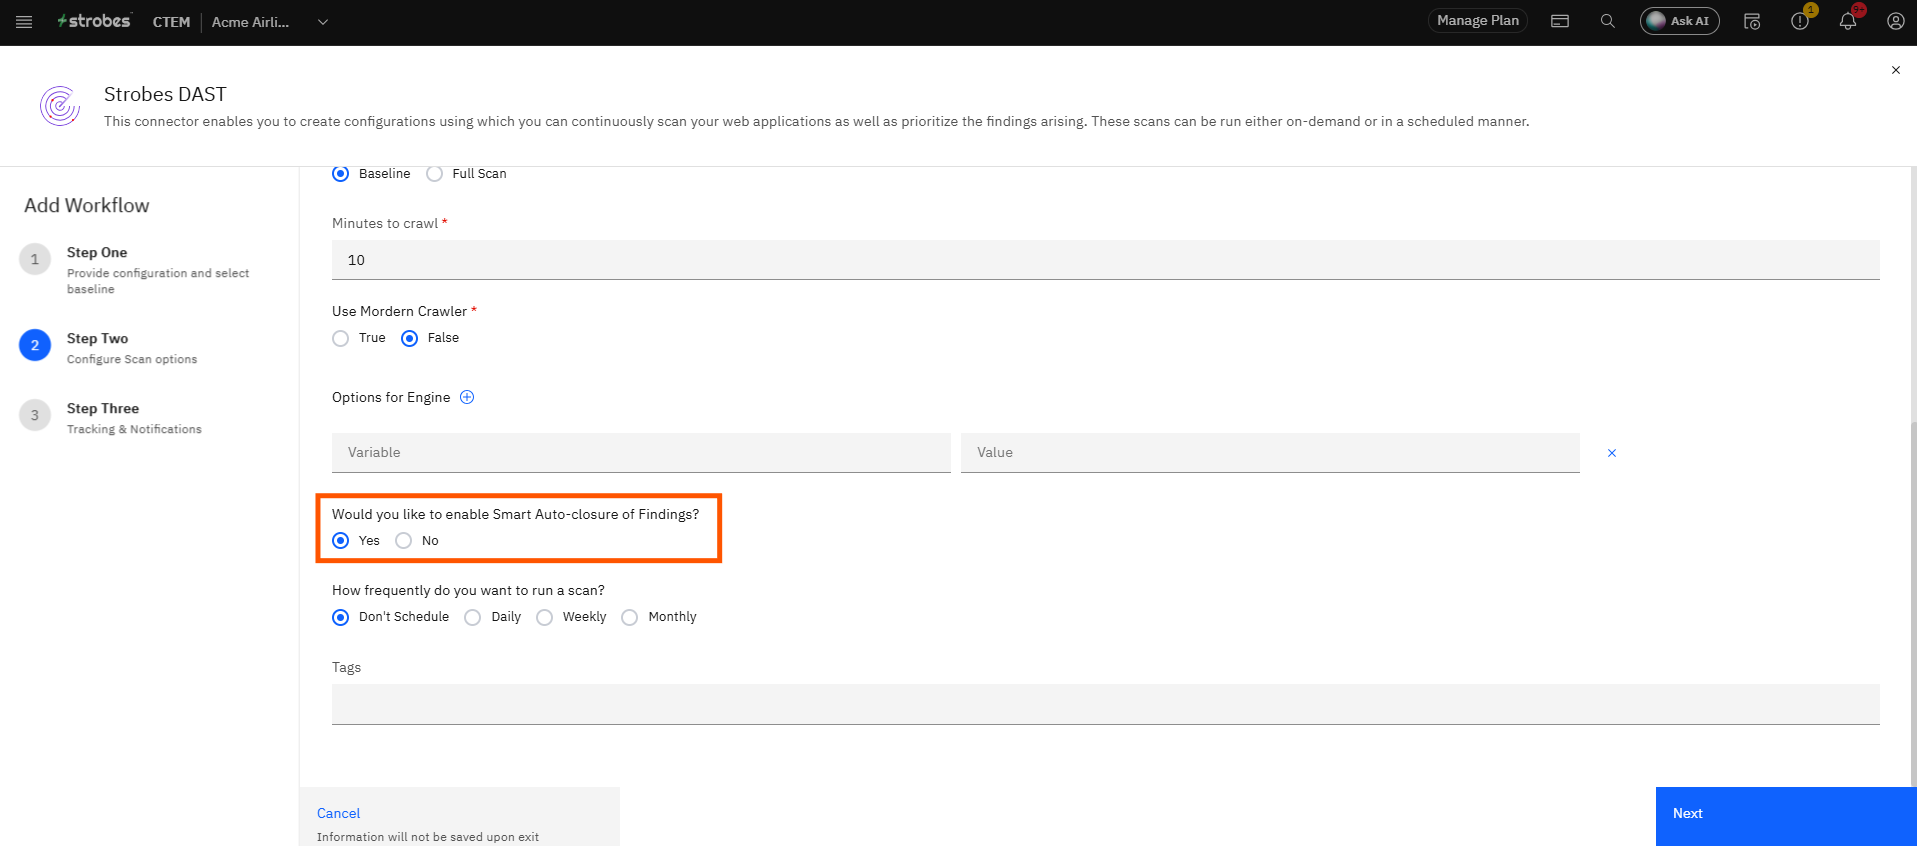
Under Would you like to enable Smart Auto-closure of Findings?, select Yes to have Strobes automatically close findings that no longer appear in subsequent scans, or No to manage finding states manually.
Step 17 — Set Scan Frequency
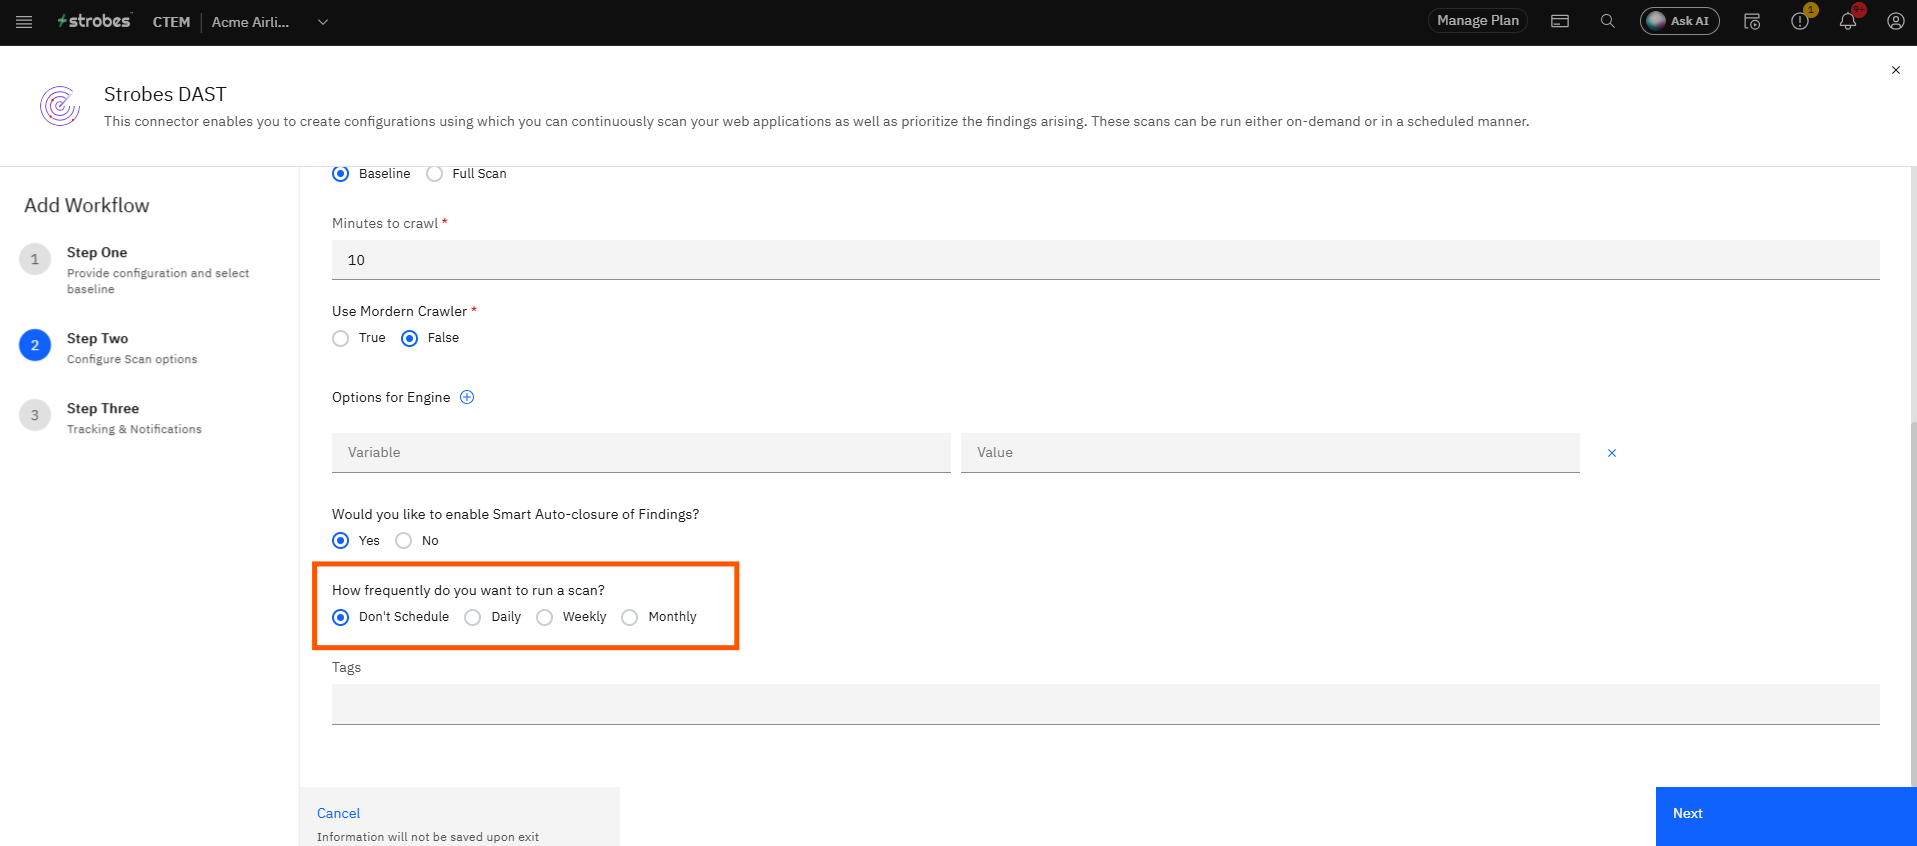
Under How frequently do you want to run a scan?, select a recurring schedule:
Option | Description |
|---|---|
Don't Schedule | Trigger scans manually only |
Daily | Run a scan once every day |
Weekly | Run a scan once every week |
Monthly | Run a scan once every month |
Step 18 — Add Tags (Optional)
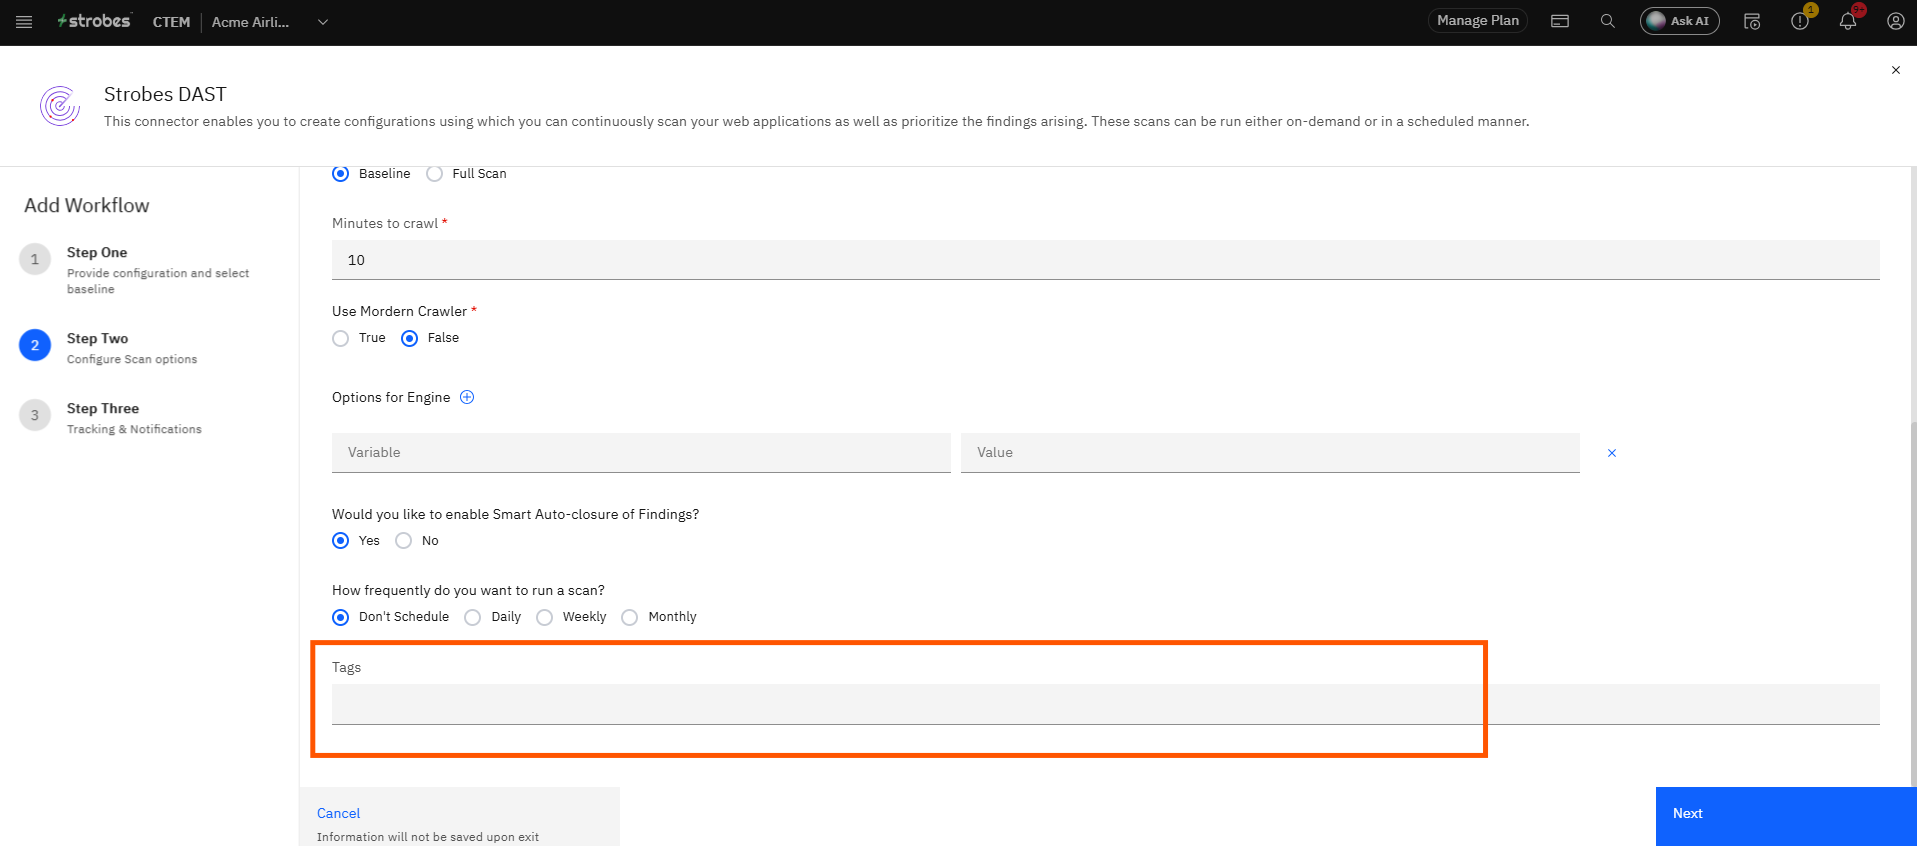
Click the Tags field and type any tags to label the findings imported by this configuration. Tags help with filtering and scoping inside Strobes. Leave the field empty if no tags are needed.
Step 19 — Proceed to Step Three
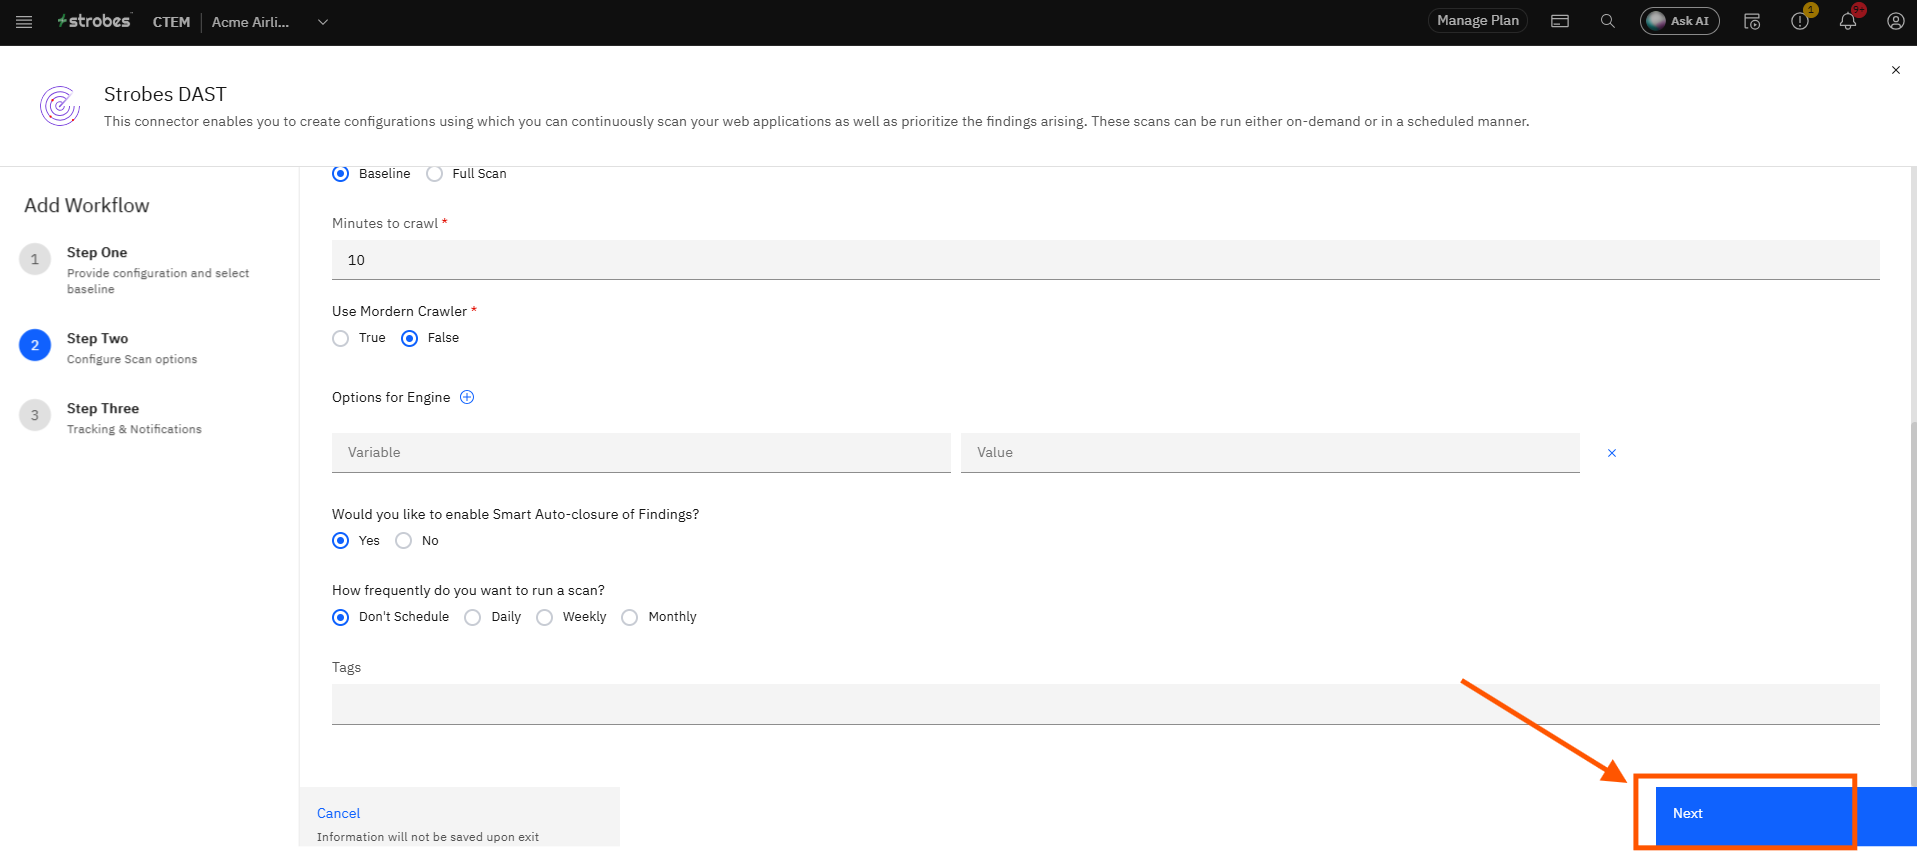
Click Next. The wizard moves to Step Three: Tracking & Notifications.
Step 20 — Configure a Notification Channel (Optional)
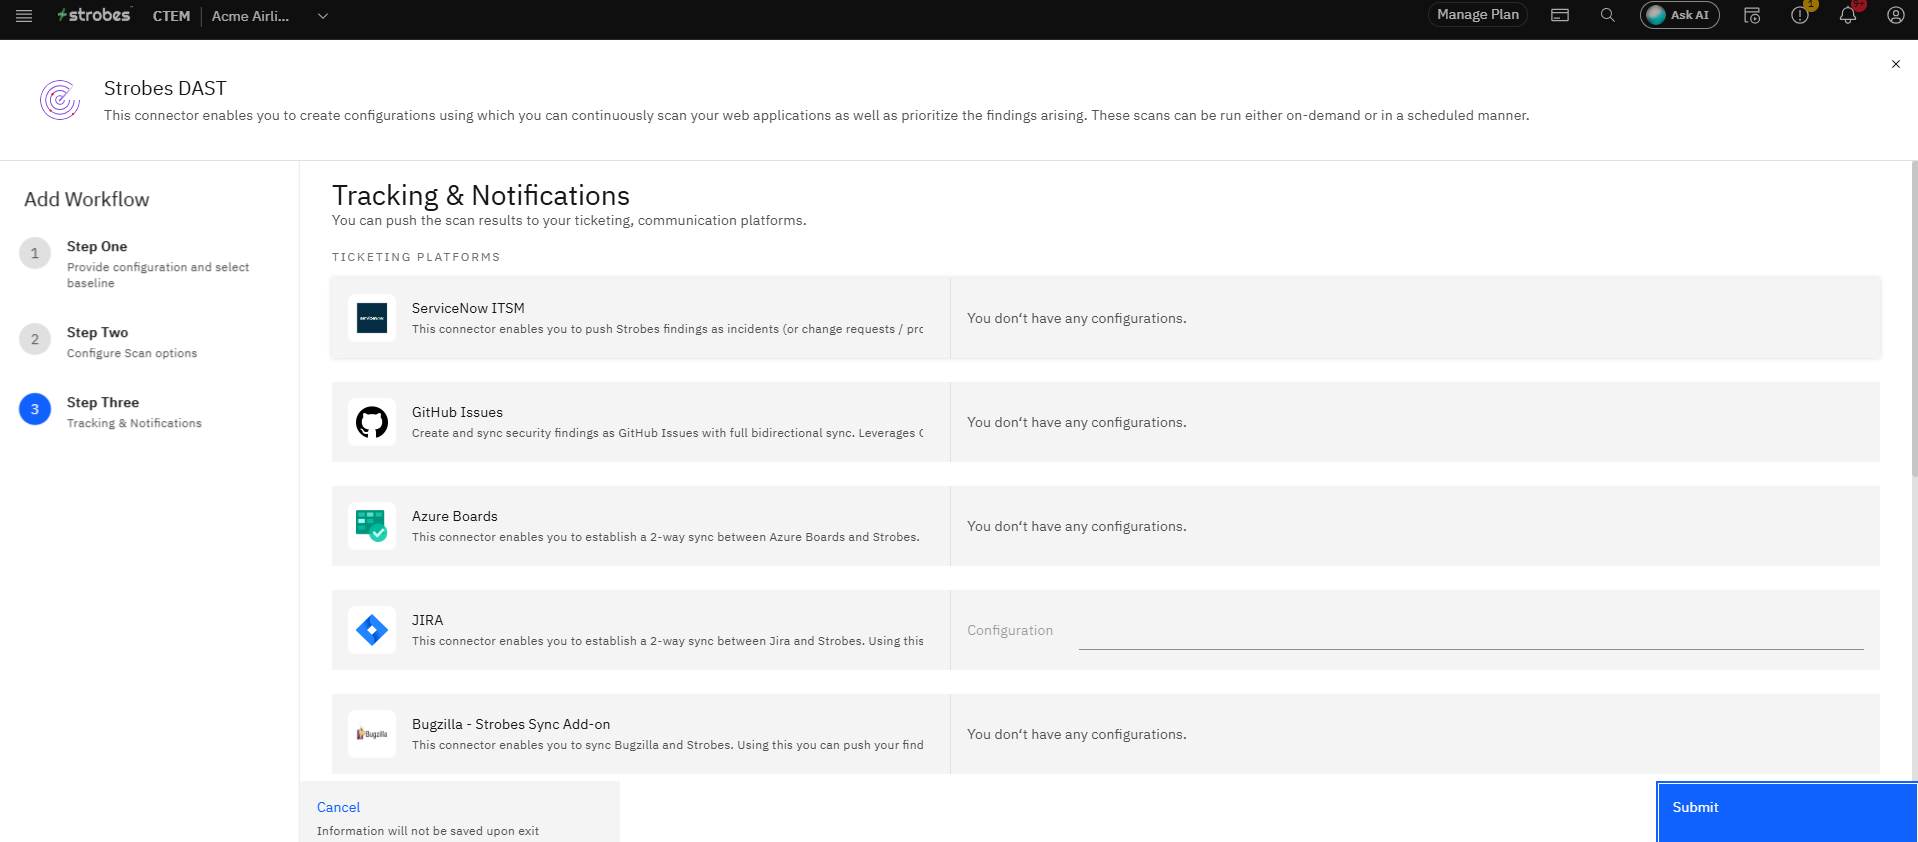
This step lets you connect a notification channel to receive alerts when a scan completes or new findings are detected. The available channels are listed under Communication Tools: MS Teams, Email, Microsoft 365 Email, Flock Messenger, and Slack.
If a channel is already configured elsewhere in Strobes, it appears here and can be linked to this configuration. If no channels are set up yet, you can skip this step and configure notifications later.
Step 21 — Submit the Configuration
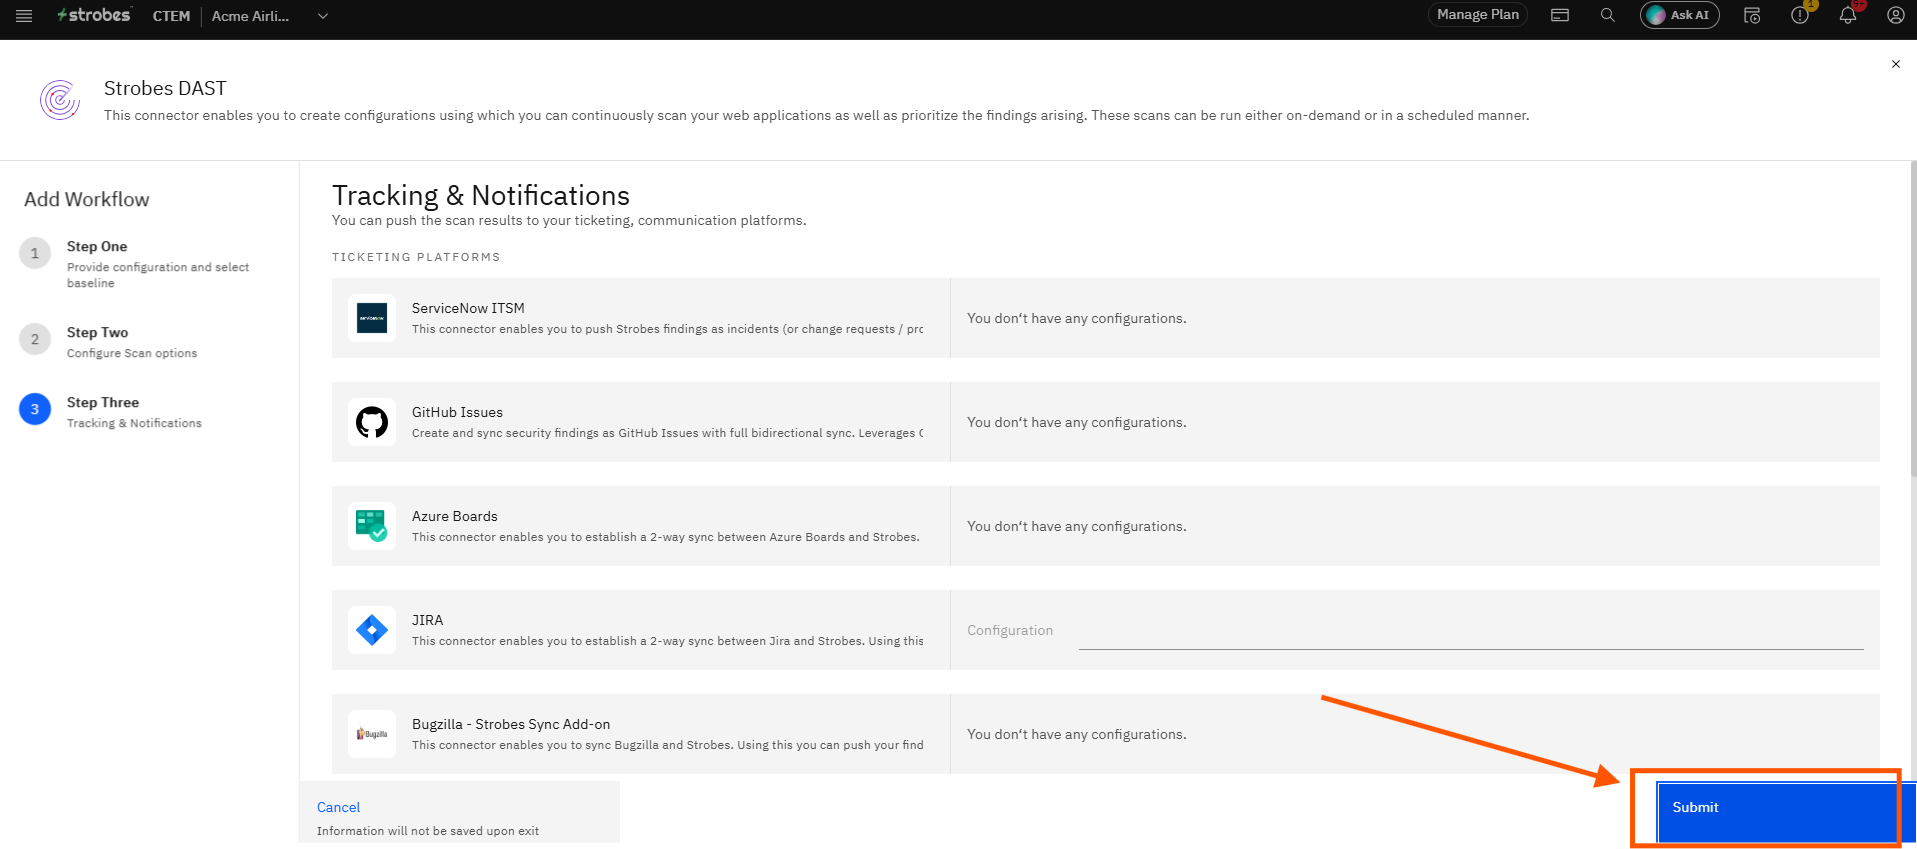
Click Submit to save and activate the configuration. Strobes will run scans against the selected asset according to the schedule you configured, logging findings based on the baseline and auto-closure settings you chose.
Tips
Use Strict baseline for initial setup. Running your first scan with all severity levels lets you see the full picture before narrowing the scope. Switch to High only once you have reviewed the finding volume and confirmed it is manageable.
Enable Smart Auto-closure from the start. Without it, findings that have been fixed will remain open in Strobes indefinitely. With it enabled, each scan automatically clears resolved findings, keeping your finding list accurate.
Increase crawl time for large applications. The default of 10 minutes is suitable for small to medium applications. Complex web apps with deep navigation or many dynamic routes benefit from a higher crawl time to ensure full coverage.
Use Modern Crawler for JavaScript-heavy apps. Standard crawlers cannot interact with content rendered by frameworks like React or Angular. Enabling Modern Crawler ensures the scanner reaches pages that require JavaScript to load.
Configurations are reusable and editable. Once saved, a configuration appears in the Workflows sidebar and can be edited at any time. You do not need to create a new configuration to change the scan schedule or asset