
Configuring Strobes CSPM
Overview
Strobes CSPM (Cloud Security Posture Management) continuously scans your cloud environment against more than 240 controls covering CIS, PCI-DSS, ISO27001, GDPR, HIPAA, FFIEC, SOC2, AWS FTR, ENS, and custom security frameworks. Scans can run on demand or on a recurring schedule.
Setting up a CSPM workflow takes three steps: naming the configuration and choosing a severity baseline (Section A), connecting your cloud provider credentials and defining the scan scope (Section B), and optionally linking ticketing or messaging platforms to receive scan result notifications (Section C).
Before You Start
- Strobes access: Owner or Manager role on your Strobes account.
- Cloud credentials ready: Gather the following before you begin, depending on your provider:
- AWS: An Access Key ID and Secret Access Key for an IAM user with read access to the services you plan to scan.
- Azure: A Client ID, Client Secret, and Tenant ID for an Azure service principal. Subscription ID is optional.
- GCP: A GCP service account credentials JSON file.
- Scan scope defined: Know which regions (or GCP zones) and cloud services you want Strobes to cover.
Section A: Step One — Configuration Name and Baseline
Step 1 — Open the Connectors Page
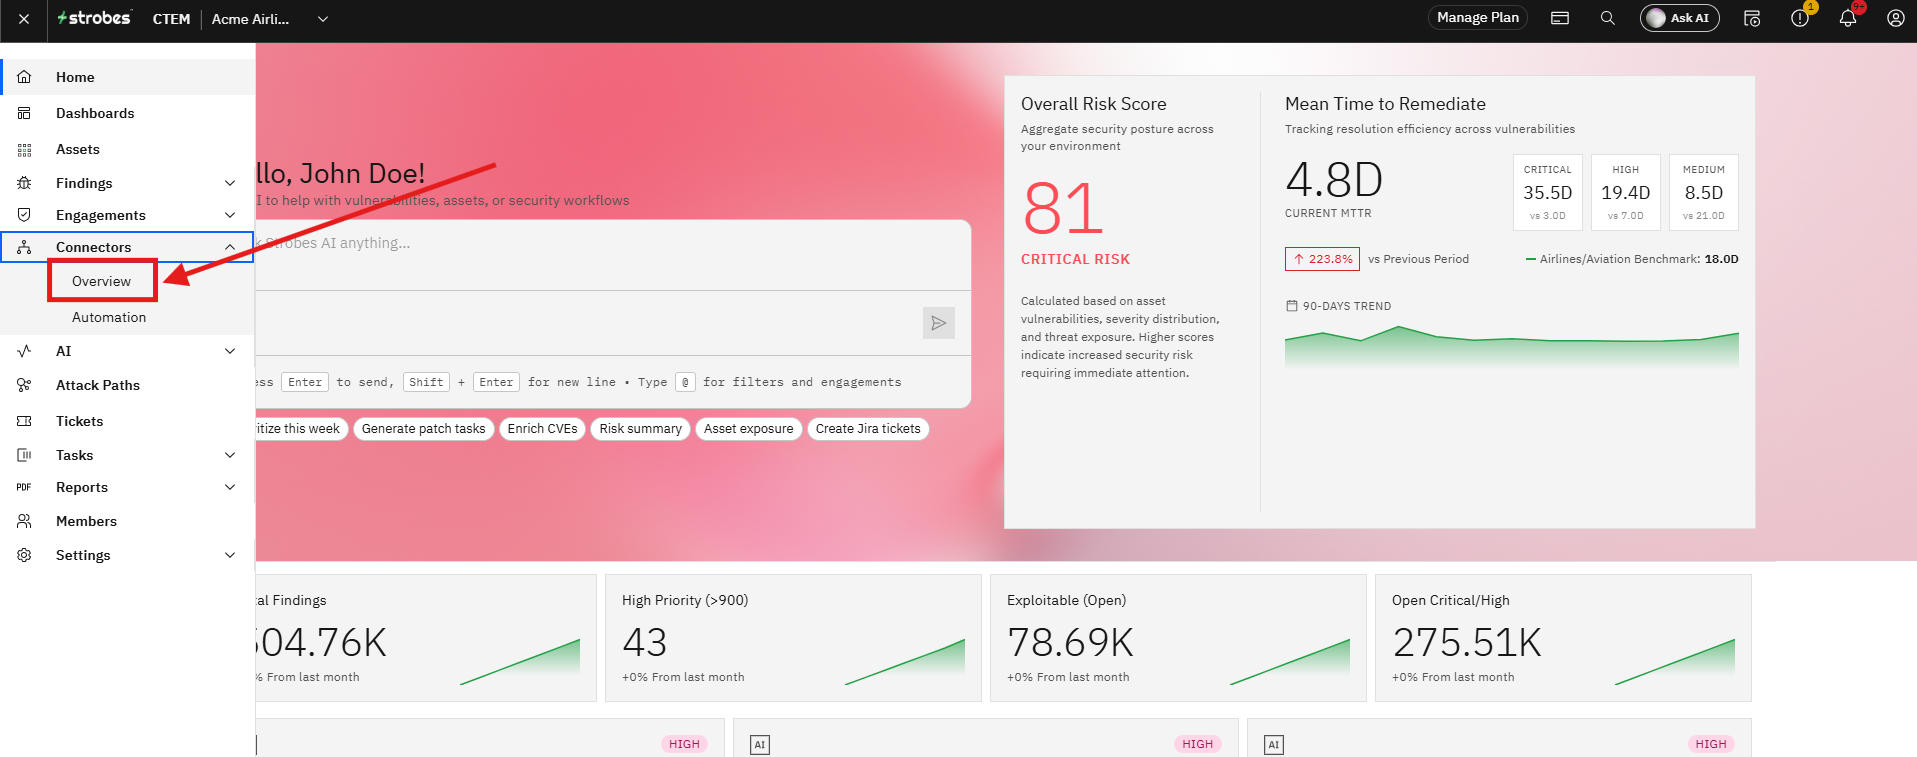
Click Connectors in the left sidebar. Click Overview and the Connectors page opens, showing the Installed Connectors list and a Look for Connectors search bar.
Step 2 — Search for Strobes CSPM
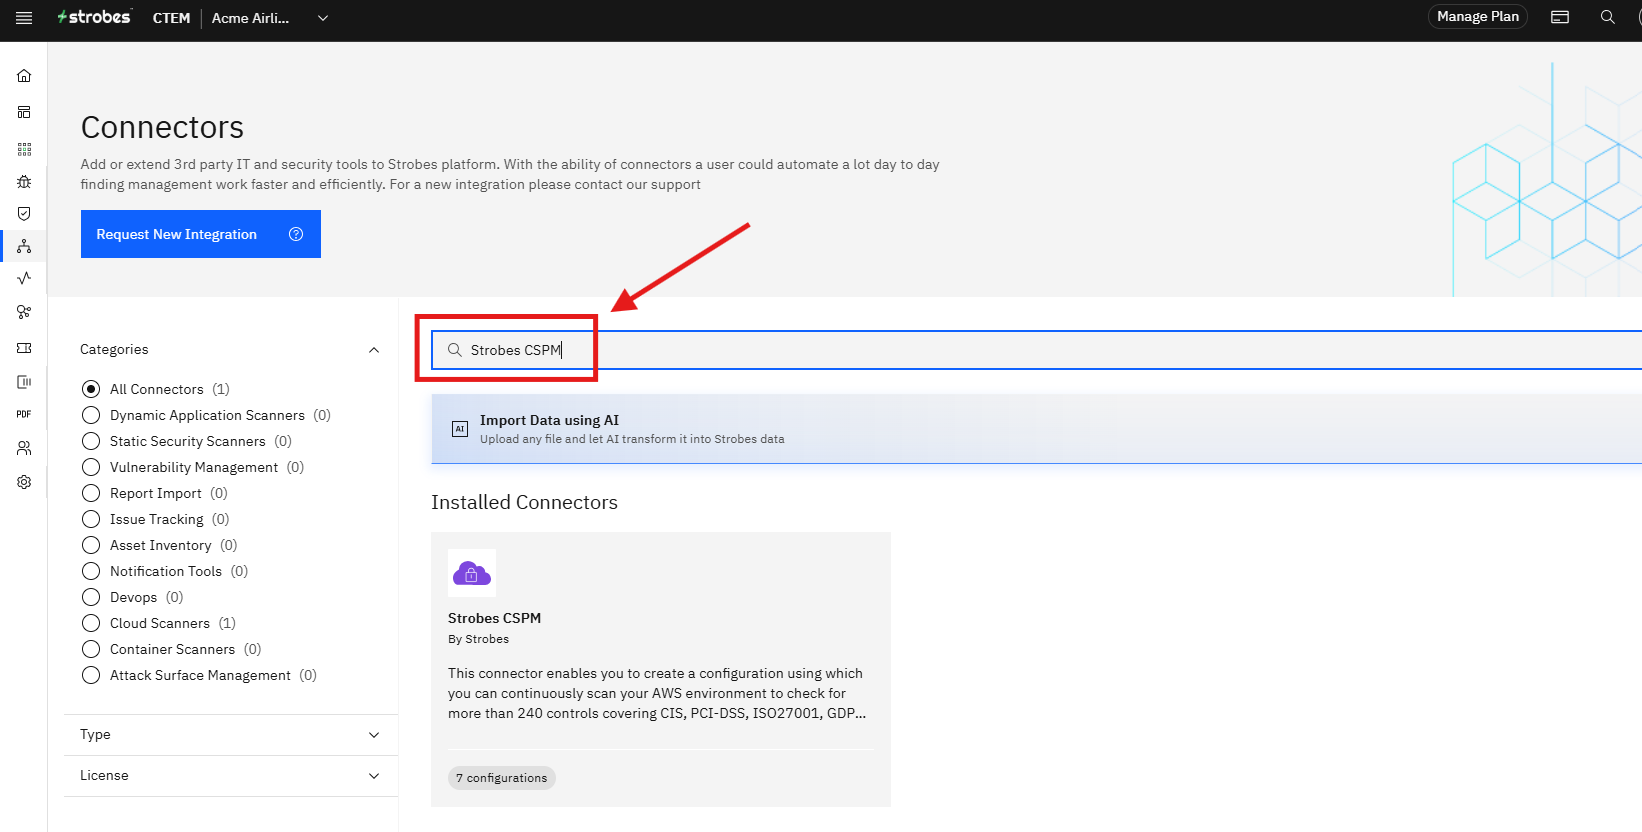
Click the Look for Connectors search bar and type Strobes CSPM. The Strobes CSPM connector card appears. The card description reads: "This connector enables you to create a configuration using which you can continuously scan your AWS environment to check for more than 240 controls covering CIS, PCI-DSS, ISO27001, GDPR, HIPAA, FFIEC, SOC2, AWS FTR, ENS and custom security frameworks."
Step 3 — Open the Connector and Click Add Workflow
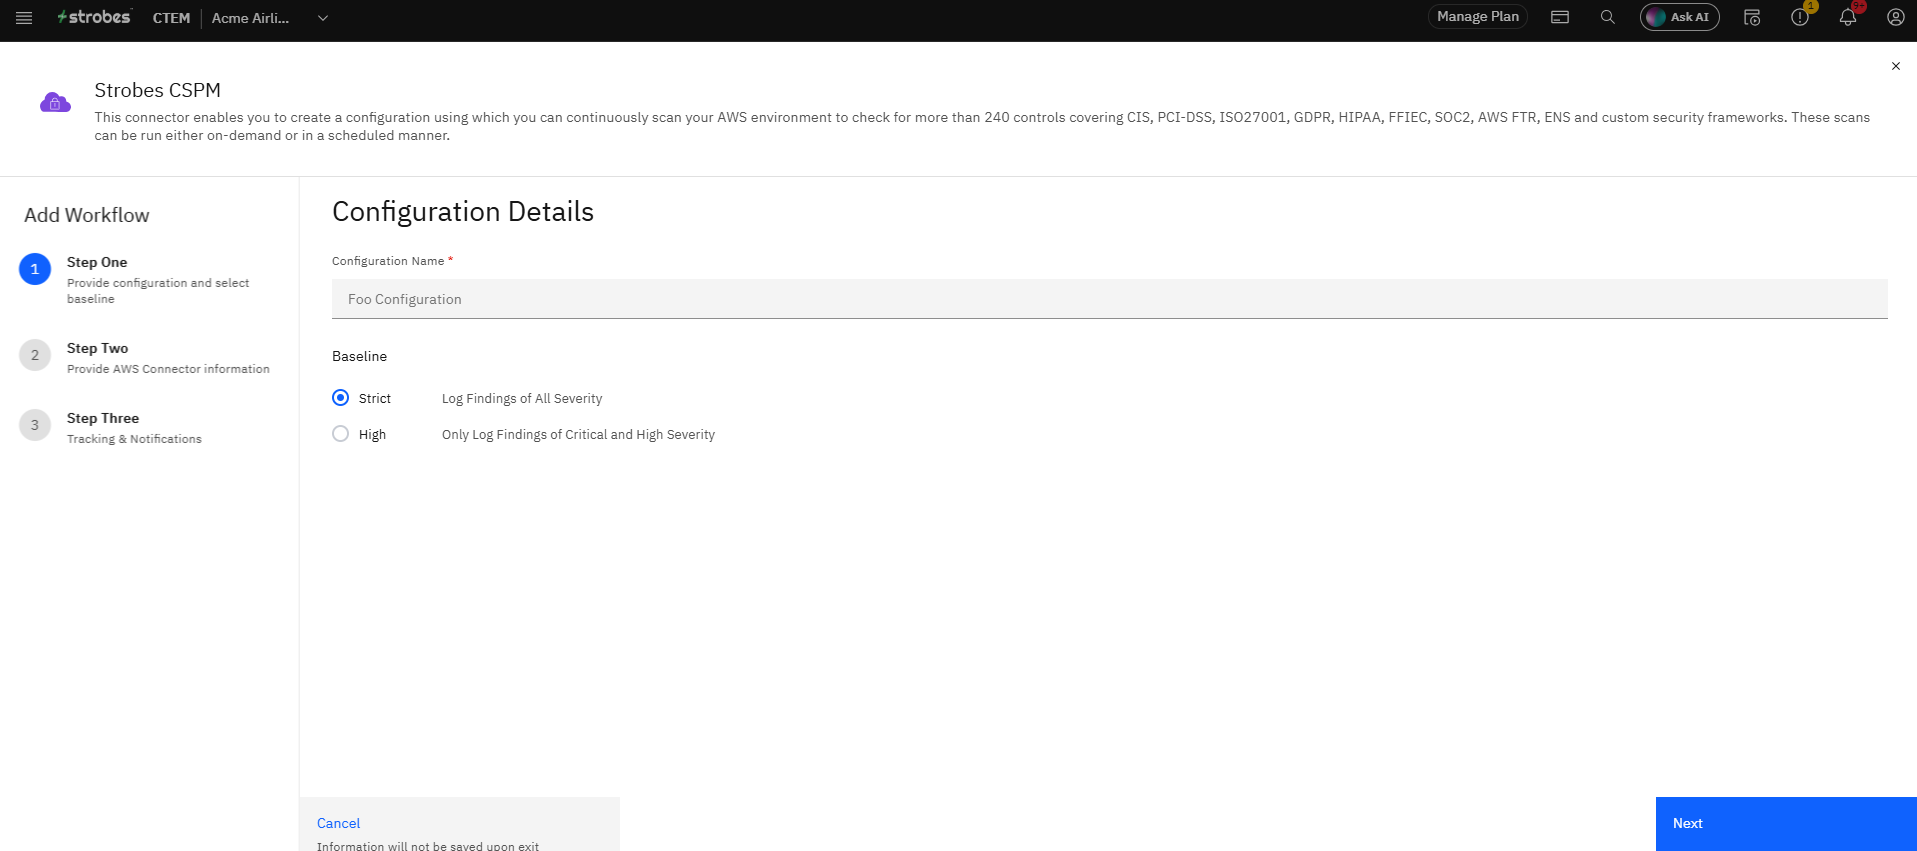
Click the Strobes CSPM card to open its detail panel, then click Add Workflow. The Add Workflow wizard opens with three steps shown in the left sidebar: Step One (Provide configuration and select baseline), Step Two (Provide AWS Connector information), and Step Three (Tracking and Notifications).
Step 4 — Enter a Configuration Name
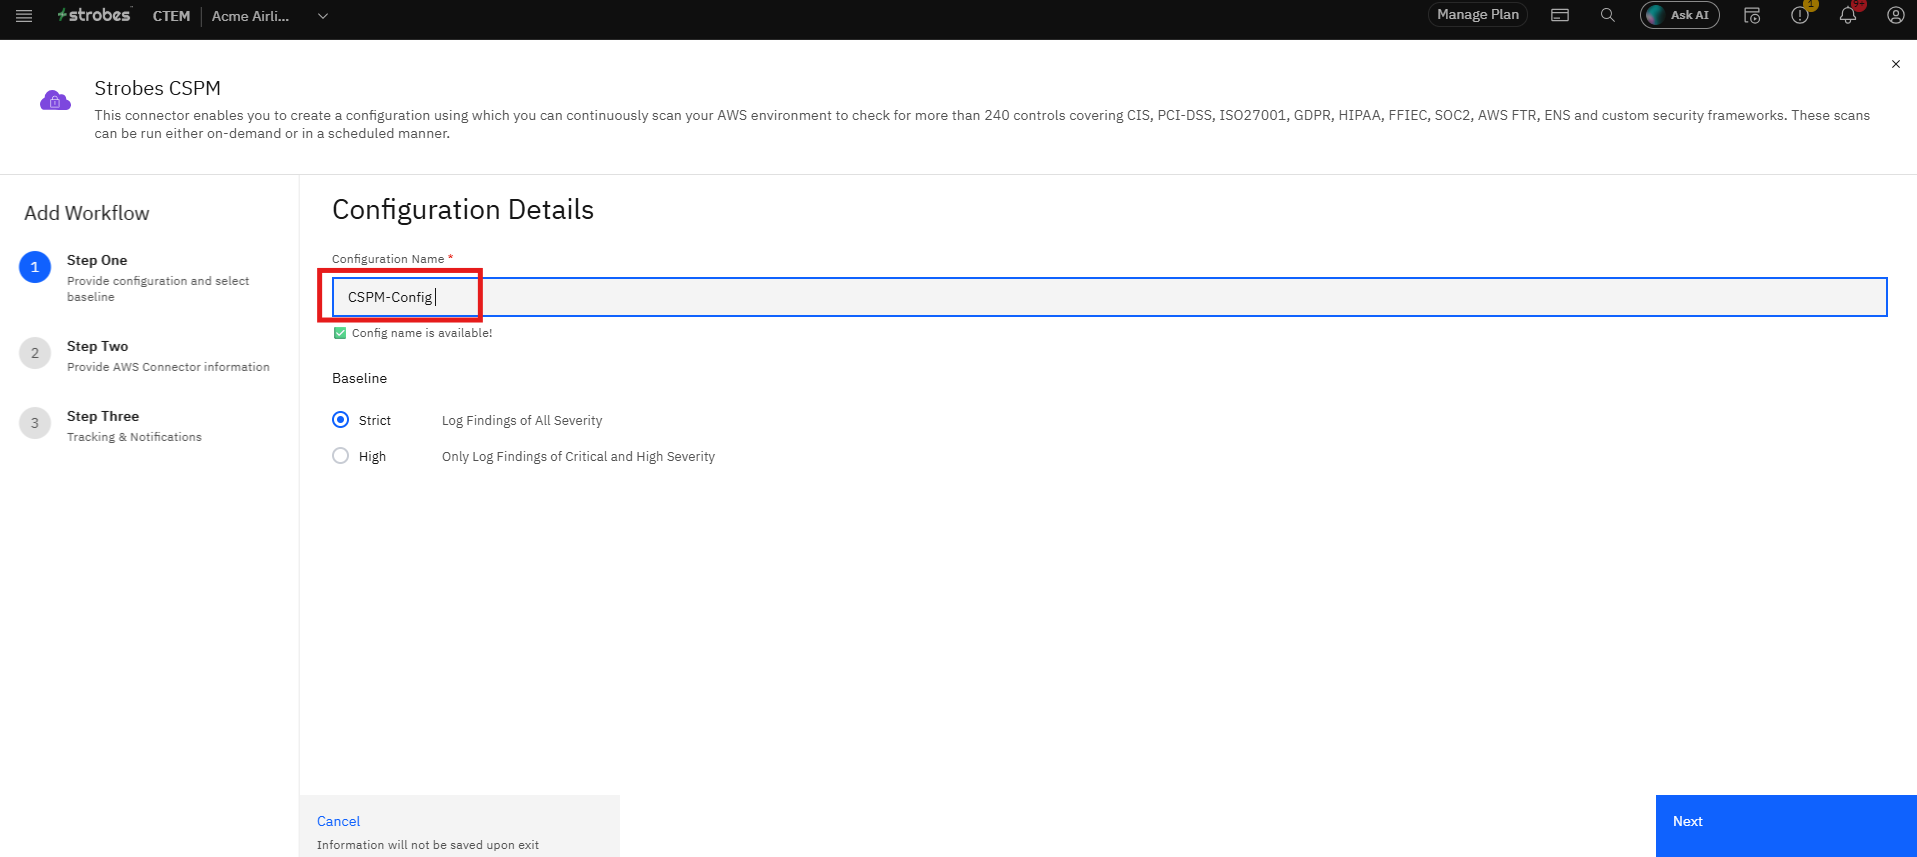
In the Configuration Name field, type a name that identifies this configuration. Use a name that reflects the cloud account or environment being scanned, for example: CSPM-AWS-Production or CSPM-Azure-Dev.
Step 5 — Select a Baseline
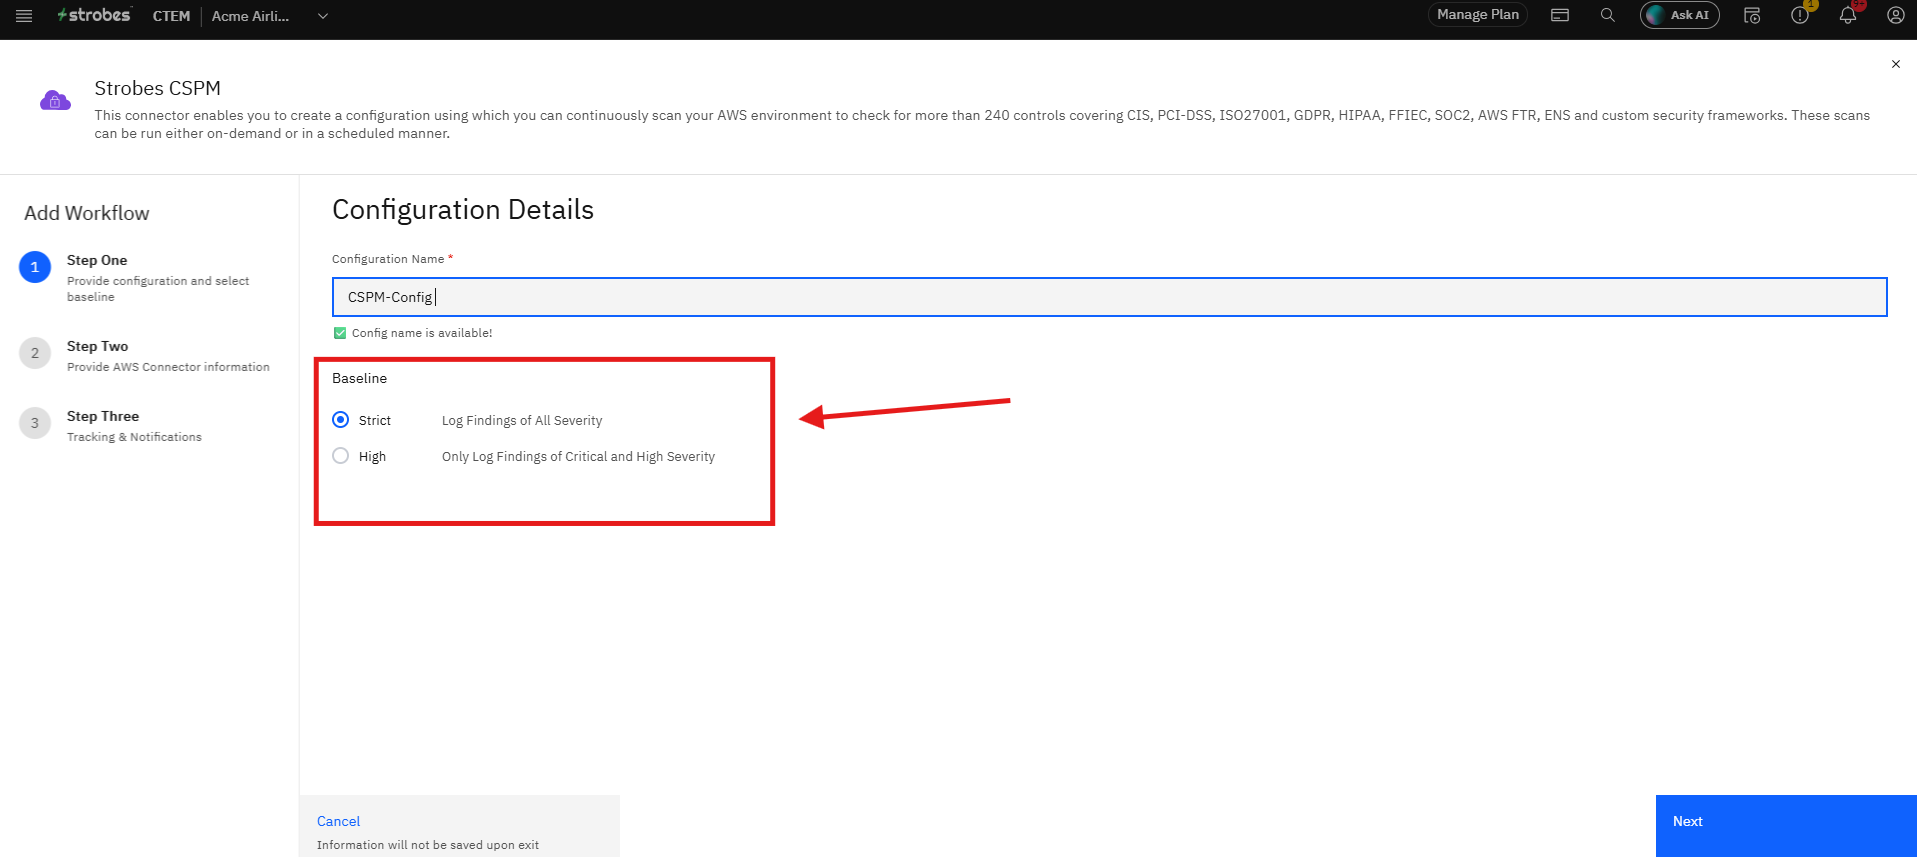
Under Baseline, click the option that matches the severity threshold you want to apply to this configuration. Two options are available:
Baseline | Findings logged |
|---|---|
Strict | All severity levels: Critical, High, Medium, Low, and Informational |
High | Critical and High severity only |
Step 6 — Proceed to Section B
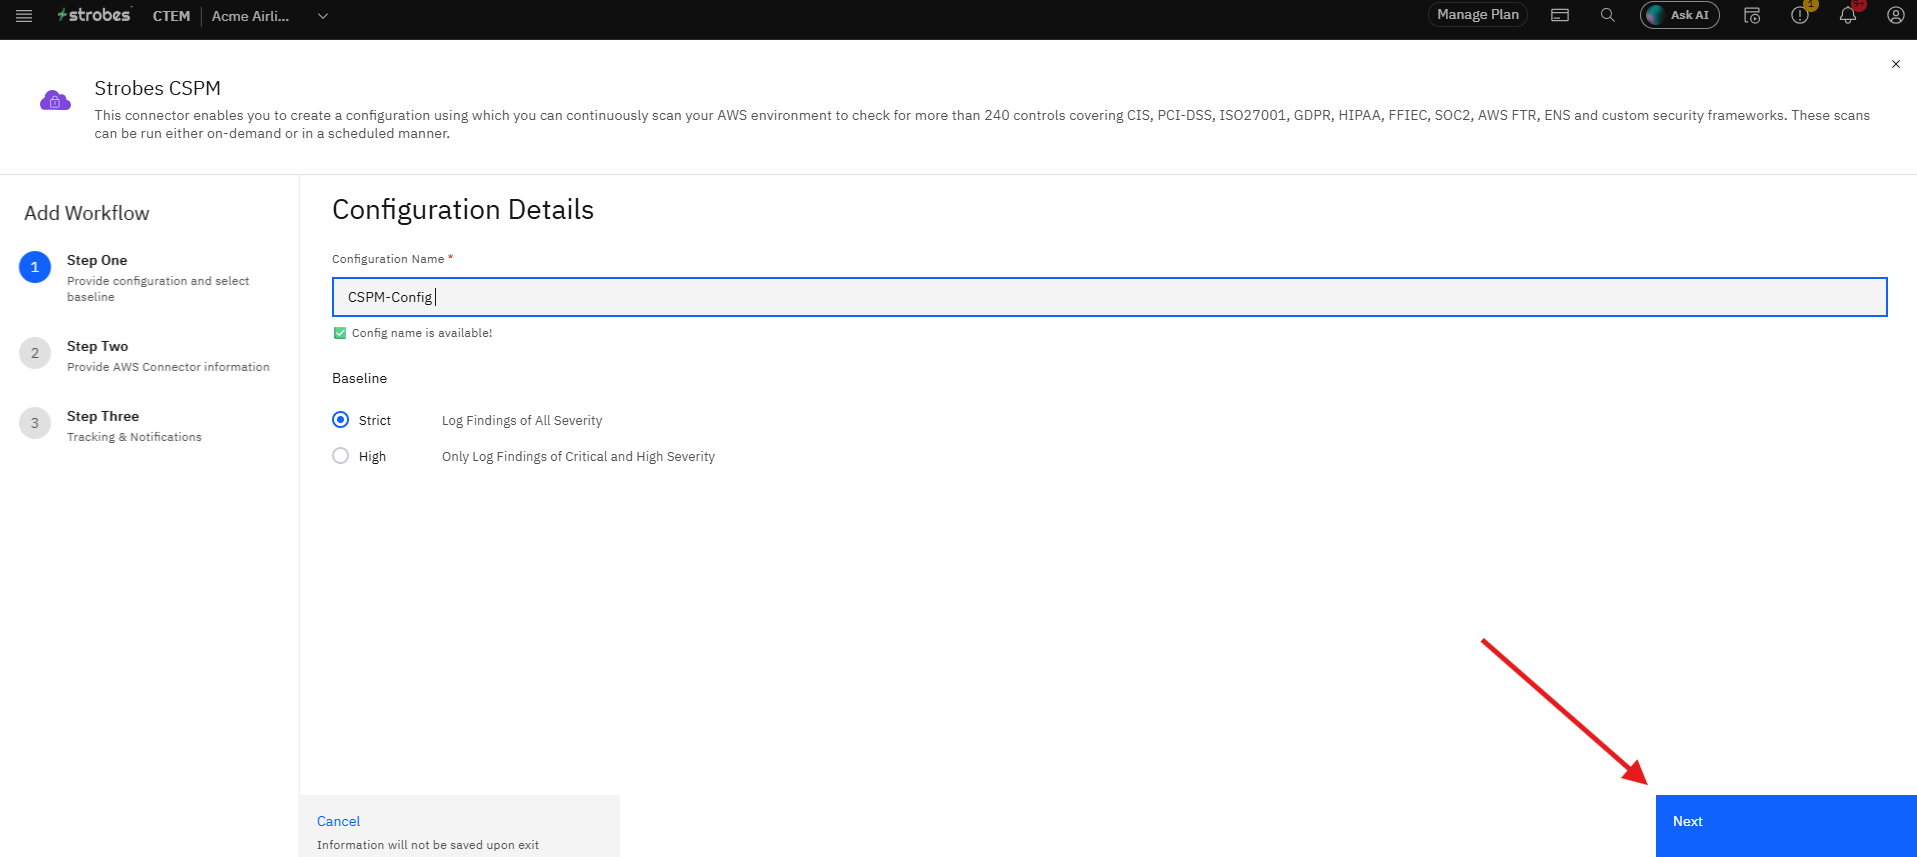
Click Next. The wizard advances to Step Two — Configuration Details (Section B).
Section B: Step Two — Configuration Details
Step 7 — Select a Cloud Provider
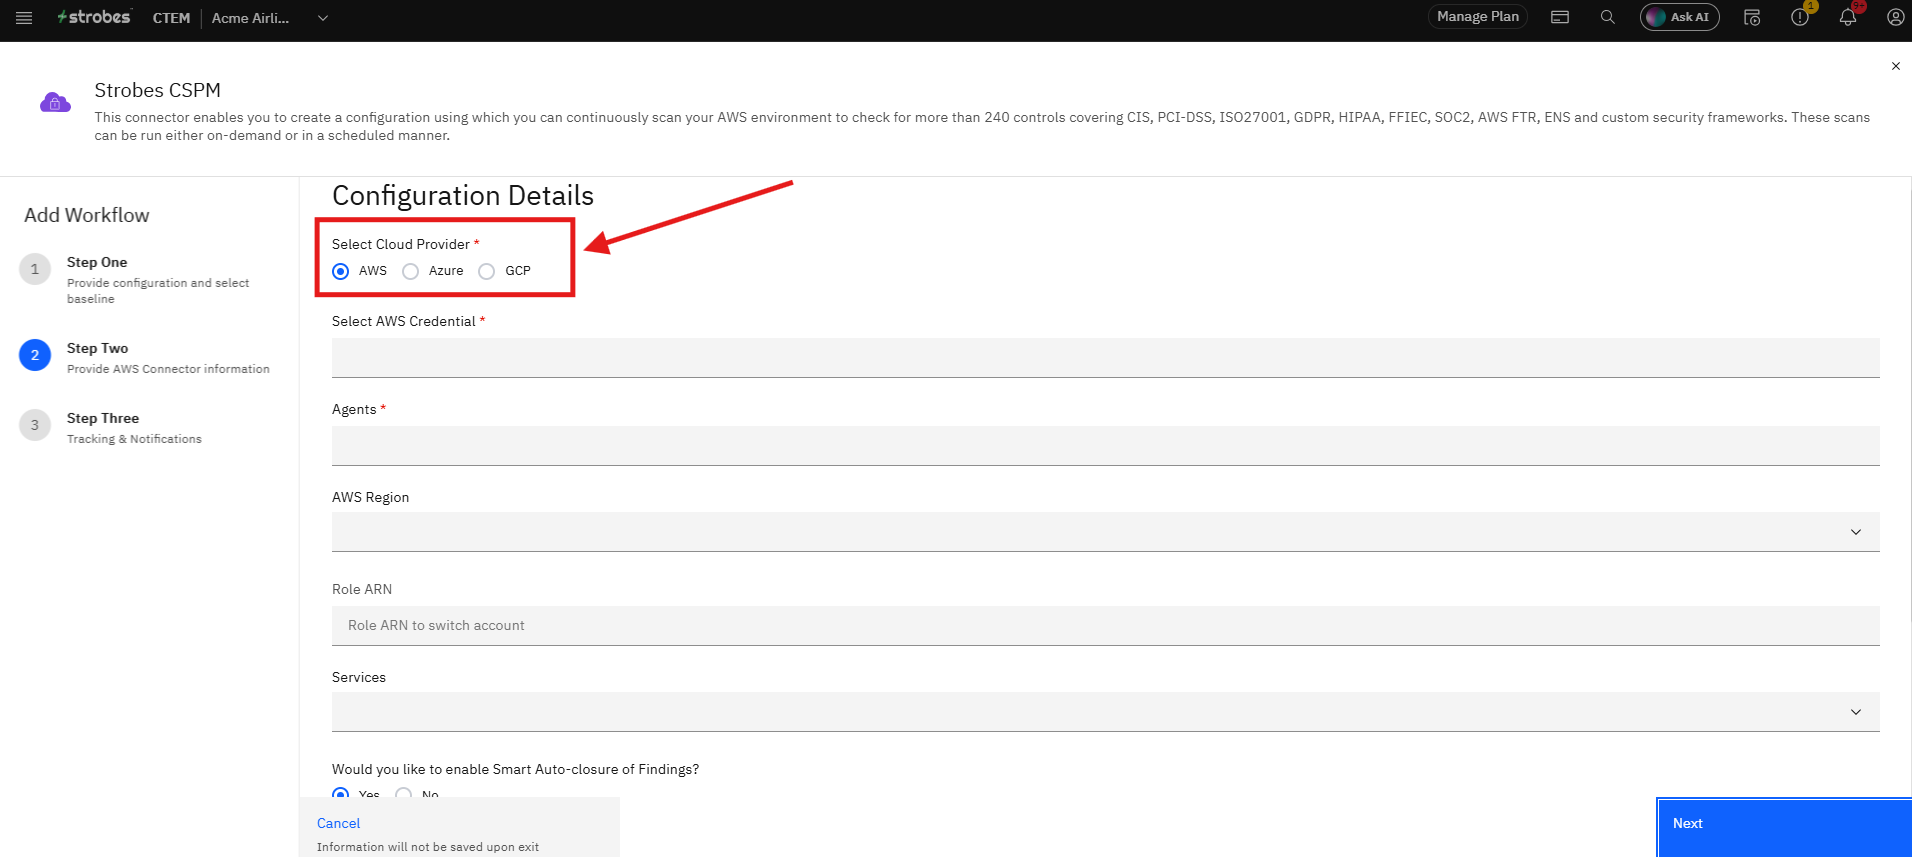
Under Select Cloud Provider, click the radio button for the cloud platform you want to scan. The fields below adjust automatically based on your selection. The primary fields are described in the steps below, with provider-specific differences noted.
Step 8 — Open the Credential Dropdown
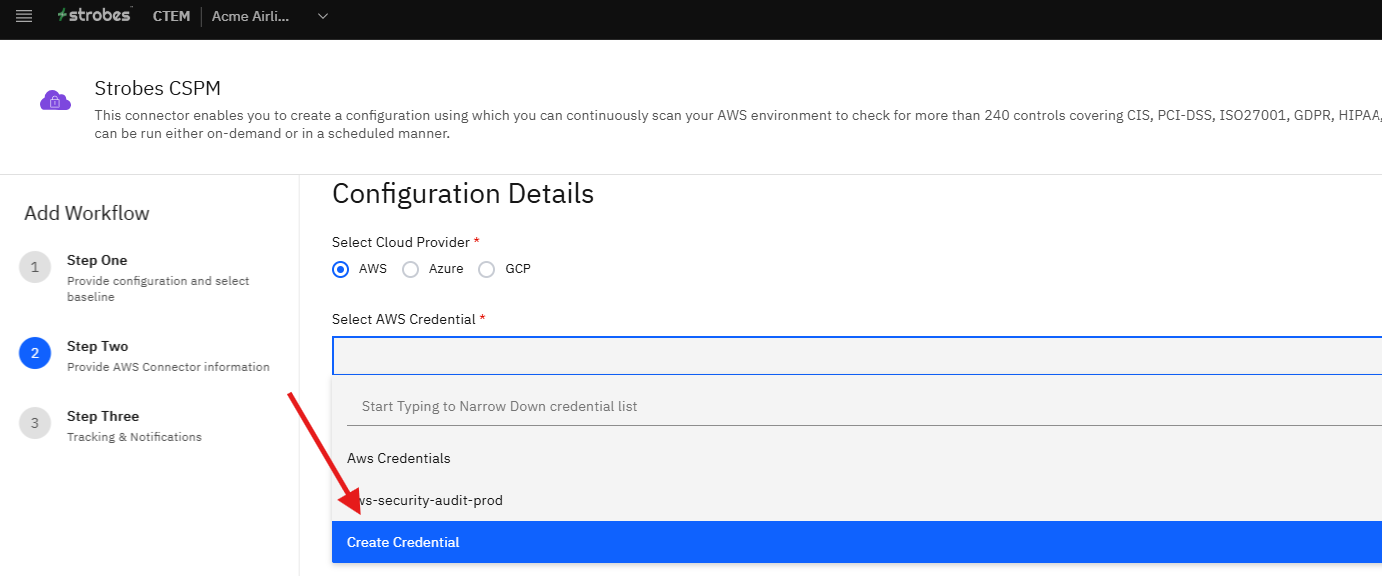
Click the credential dropdown for your selected provider. Strobes lists any credentials already saved in your account. If a credential is ready, click it to select it and skip to Step 10. If you need to add one, click Create Credential.
Step 9 — Create a New Credential (if needed)
The Add a credential dialog varies by cloud provider.
For AWS:
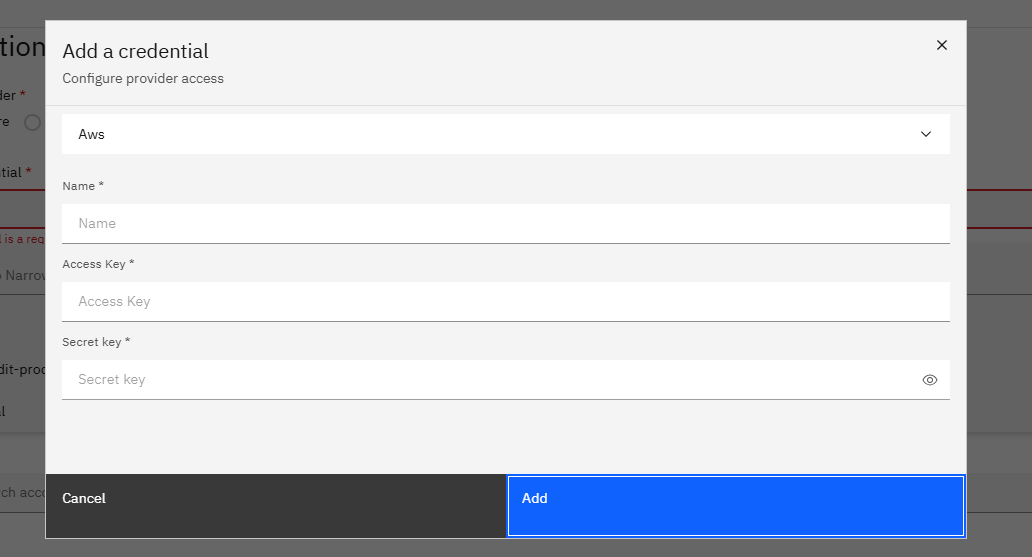
In the Add a credential dialog for AWS, fill in the three required fields and click Add. Provide a Name, the Access Key ID, and the Secret Access Key.
If the keys are invalid, Strobes shows an "Invalid Access Key or Secret Key" toast. Verify your credentials in the AWS console and try again.
For Azure:
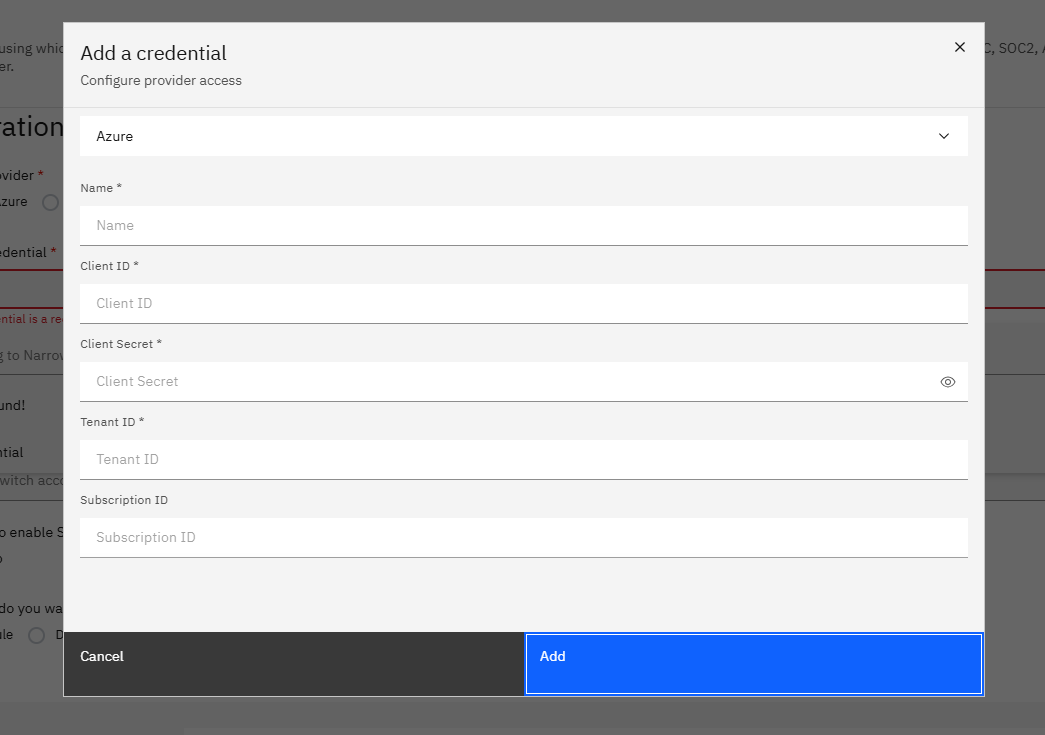
In the Add a credential dialog for Azure, fill in the required fields and click Add. Provide a Name, Client ID, Client Secret, and Tenant ID. Subscription ID is optional.
For GCP:
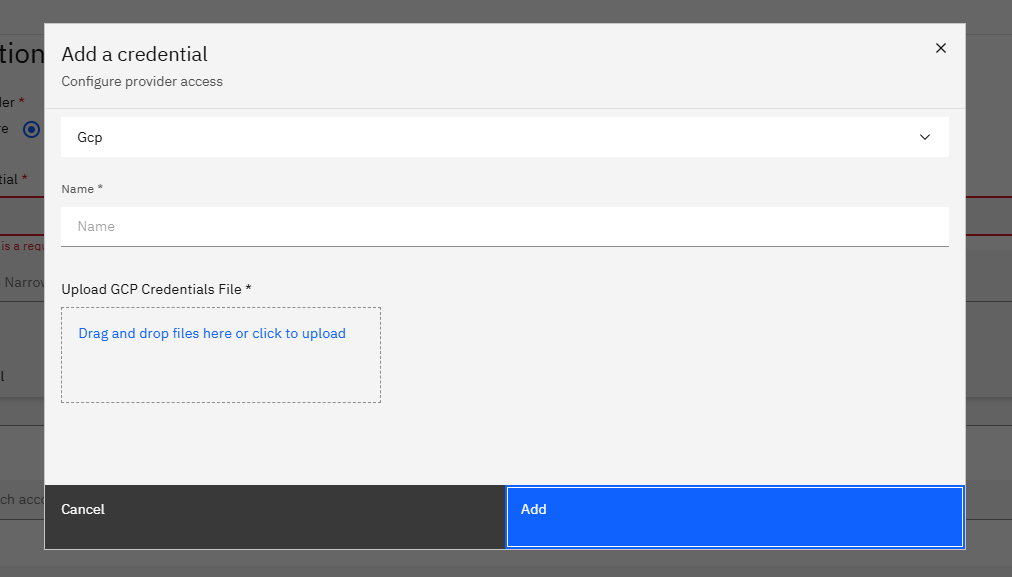
In the Add a credential dialog for GCP, enter a Name, upload your GCP service account credentials JSON file, and click Add. Drag the file onto the upload zone or click to browse for it.
Step 10 — Confirm the Agent
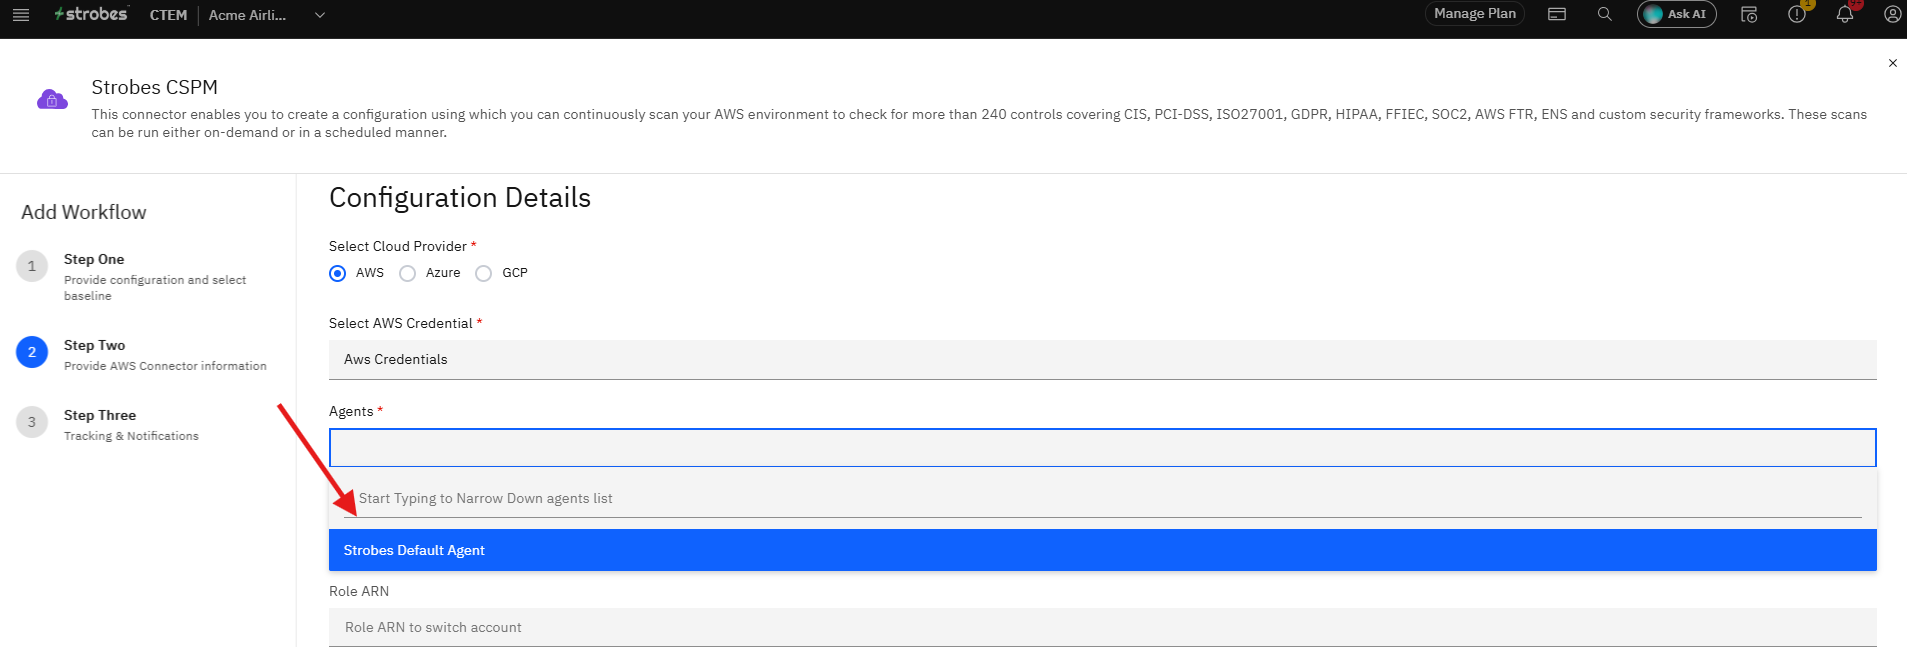
Verify the Agents field shows the correct Strobes agent for your environment. The field defaults to Strobes Default Agent. Contact your Strobes administrator if a specific agent should be used instead.
Step 11 — Select Region(s) to Scan
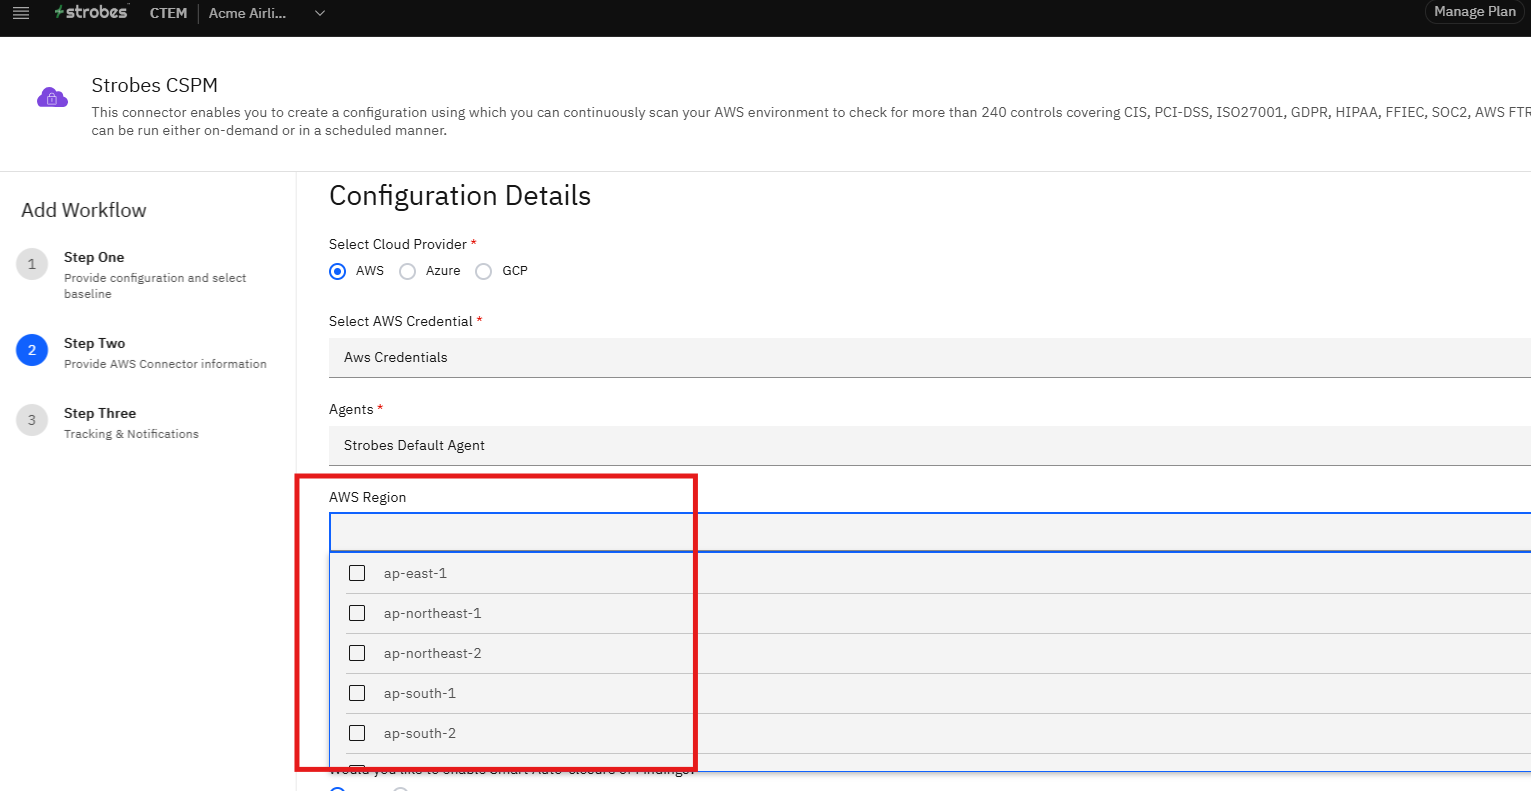
Click the Region dropdown and select each region you want Strobes to cover. Selected regions appear as chip tags in the field. At least one region is required. For GCP configurations, this field lists GCP zones instead of AWS regions. Azure configurations do not include a region field.
Step 12 — Enter a Role ARN (Optional)
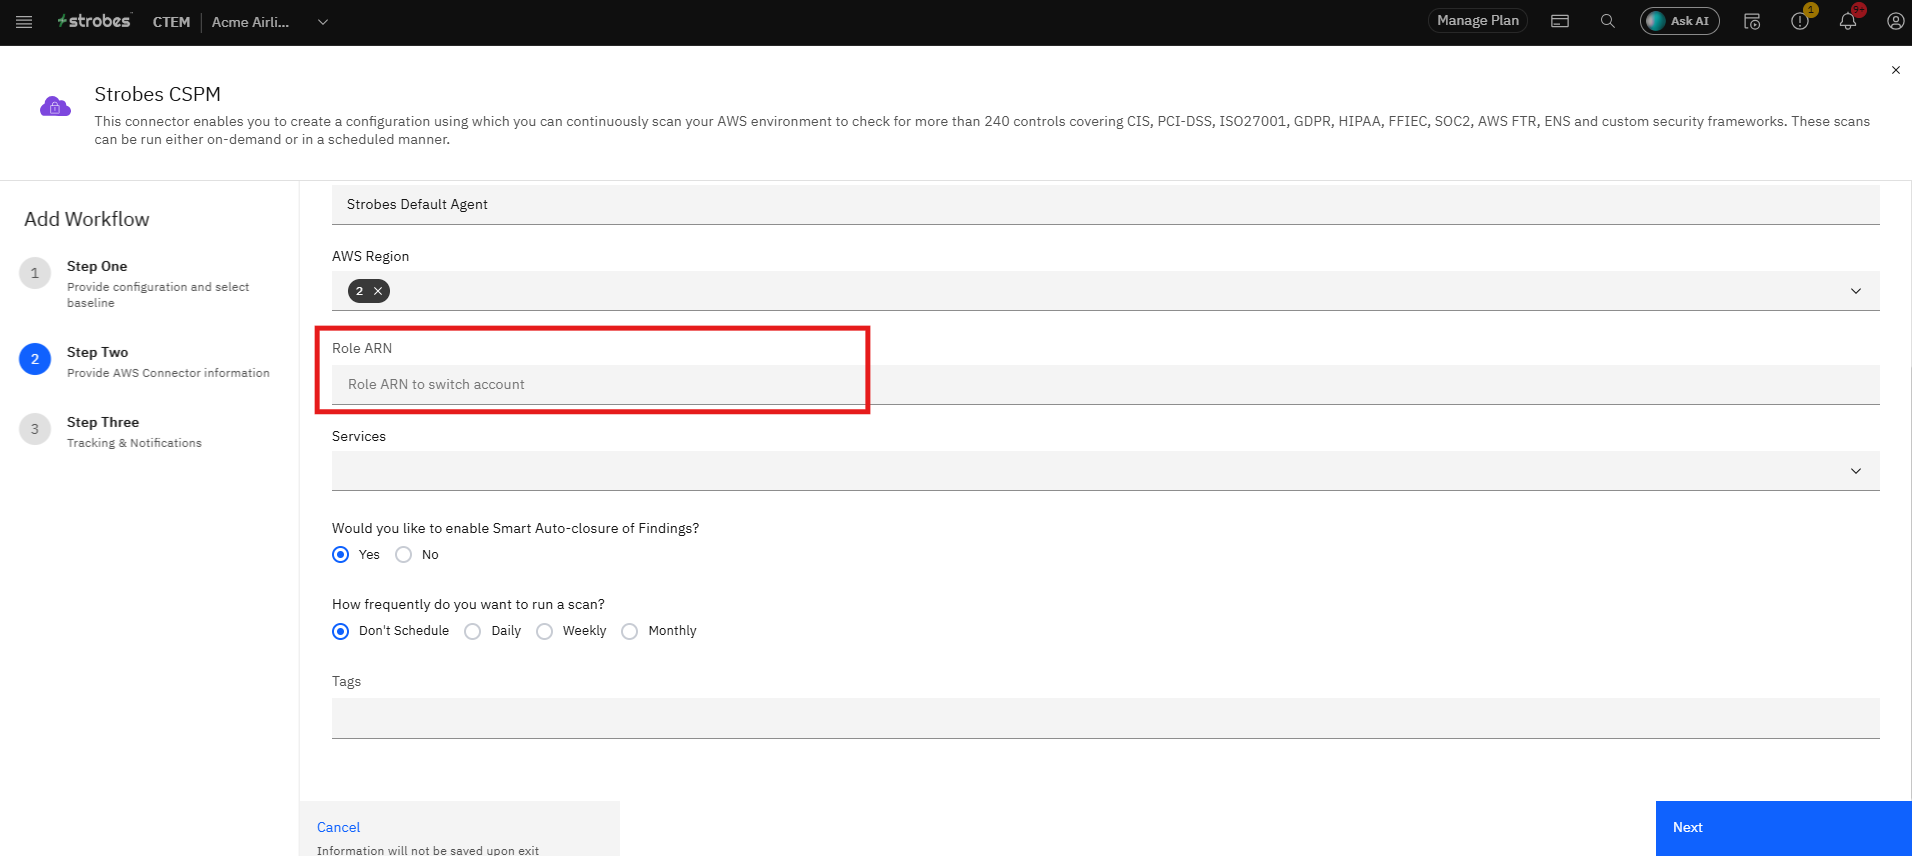
If you want Strobes to assume a different IAM role to perform the scan, enter the Role ARN in the Role ARN field. This is optional and applies to AWS and GCP configurations. Leave it blank to scan using the credential's own permissions.
Step 13 — Select Services to Scan
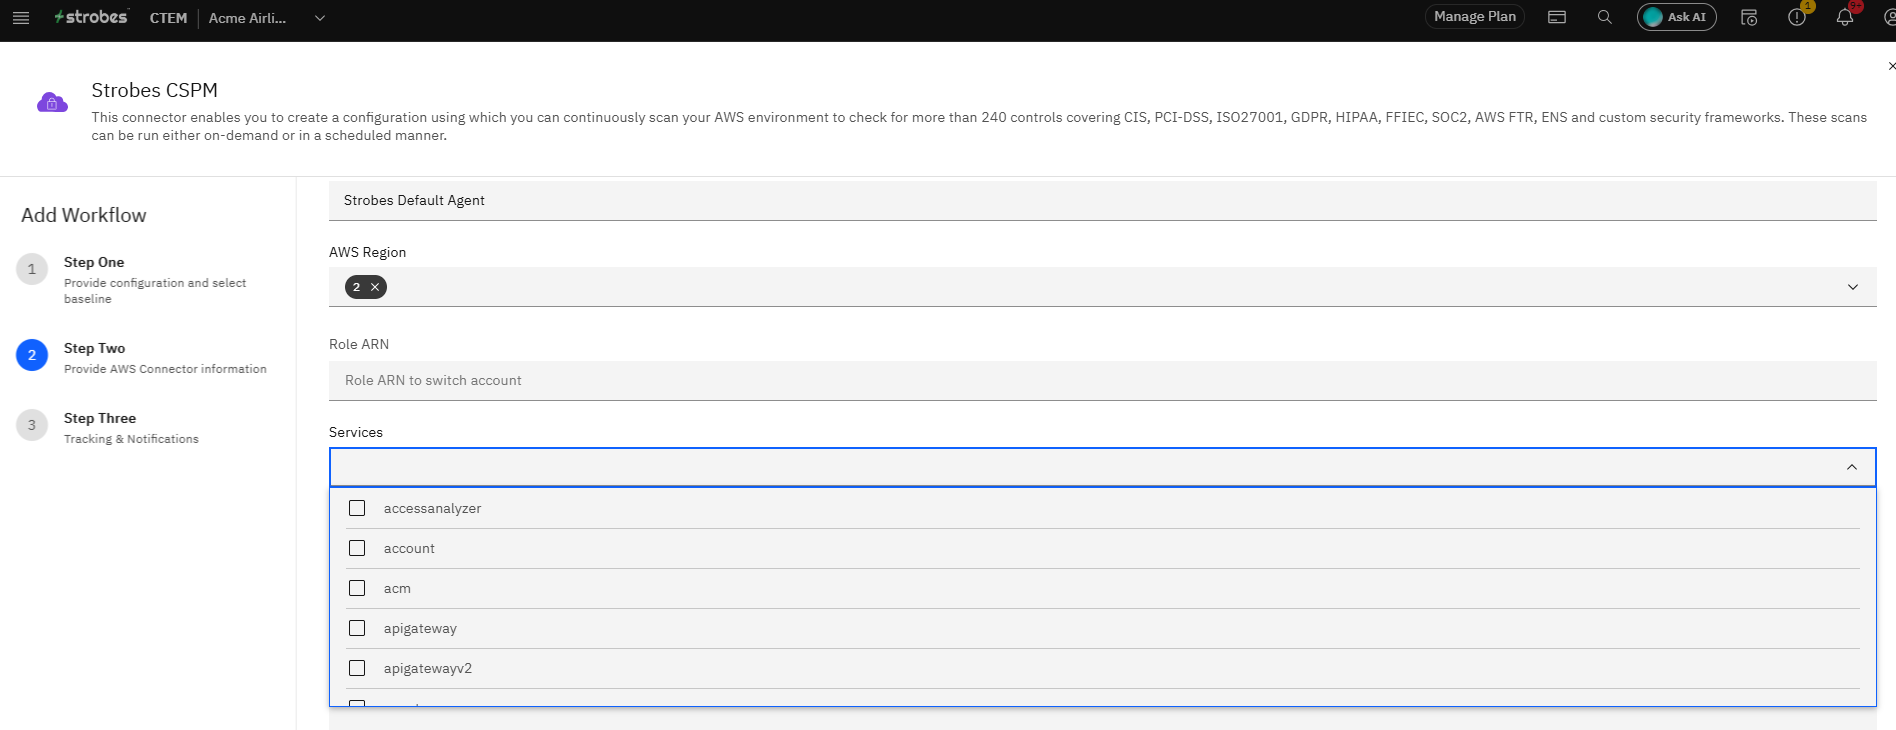
Click the Services dropdown and select each cloud service you want Strobes to scan for misconfigurations. Available AWS services include accessanalyzer, acm, apigateway, autoscaling, awslambda, backup, bedrock, and many more. At least one service is required. GCP configurations also include a Services field. Azure configurations do not.
Step 14 — Set Smart Auto-closure
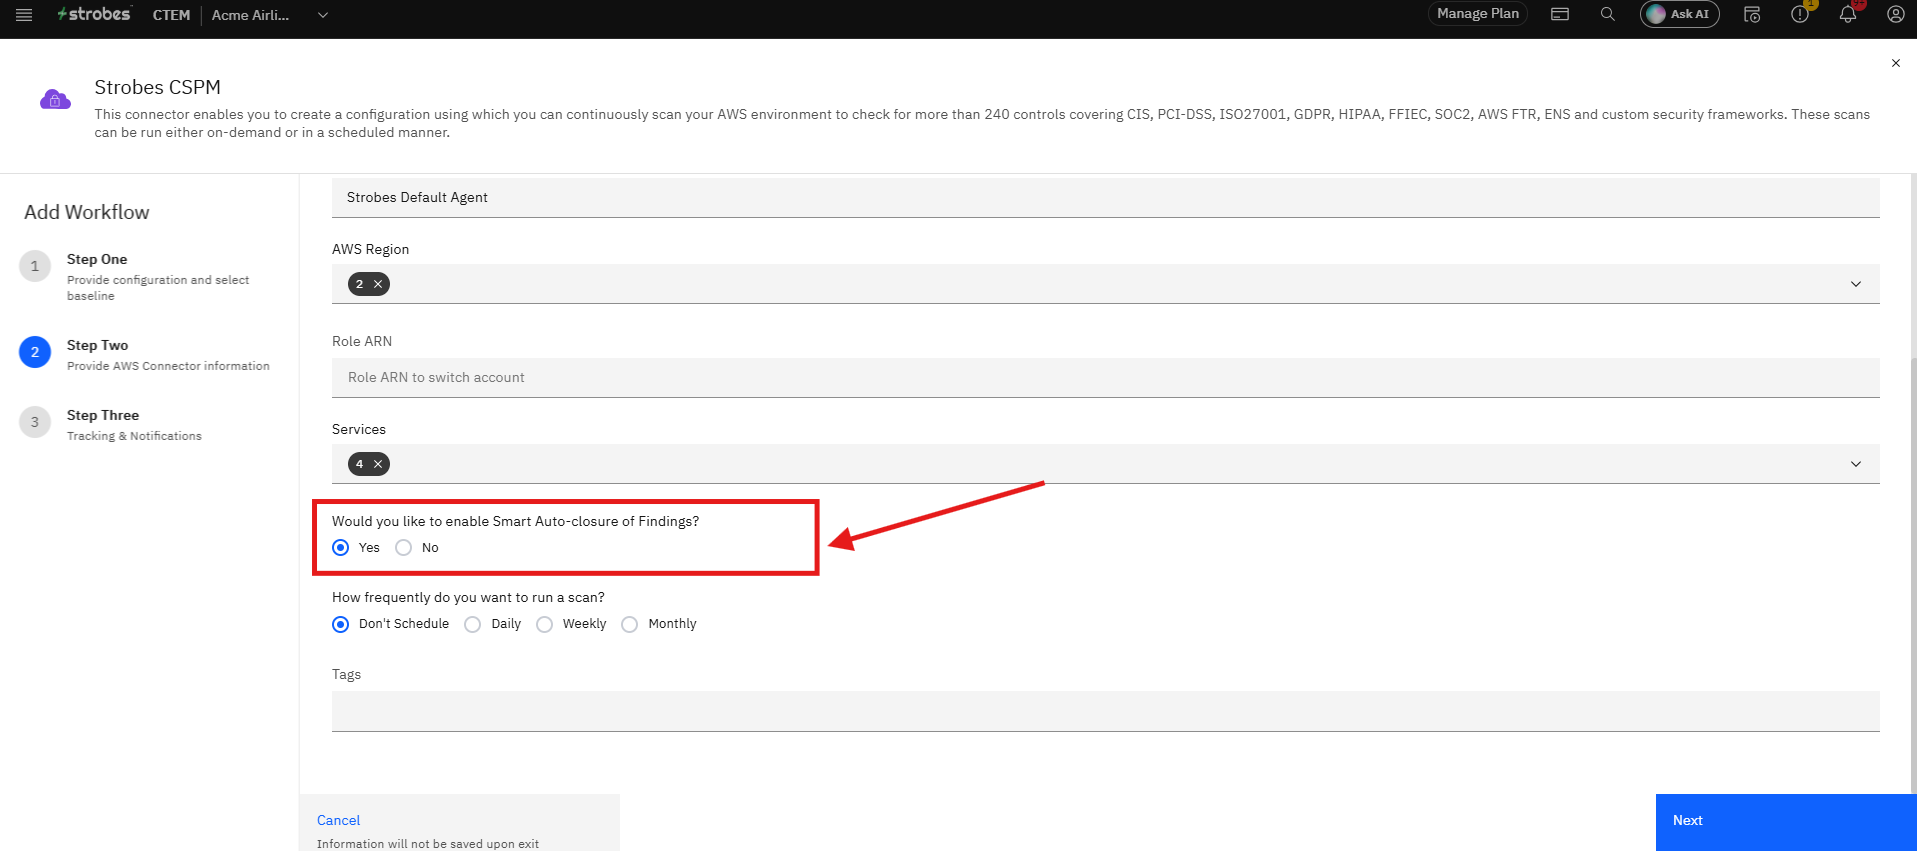
Under "Would you like to enable Smart Auto-closure of Findings?", select Yes or No. When set to Yes, Strobes automatically closes a finding if it is no longer detected in a subsequent scan of the same resource.
Step 15 — Set the Scan Schedule
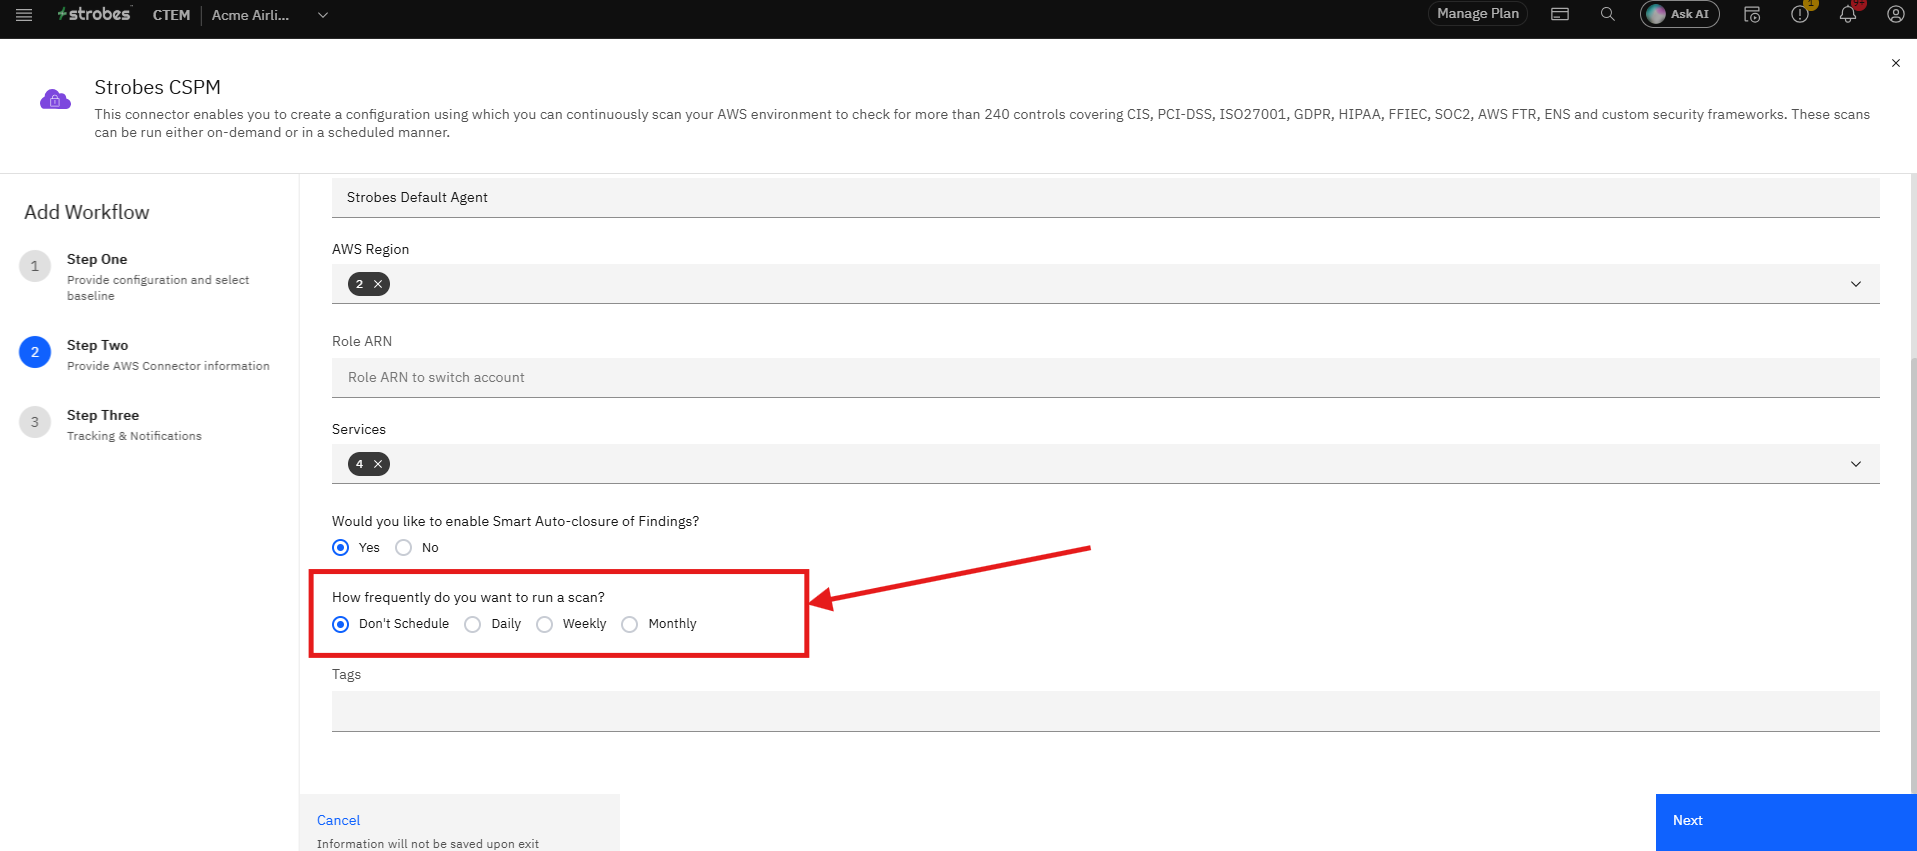
Under "How frequently do you want to run a scan?", choose how often Strobes should run scans automatically. Options are Don't Schedule, Daily, Weekly, and Monthly. Don't Schedule means scans only run when triggered manually from the workflow detail page.
Step 16 — Add Tags (Optional)
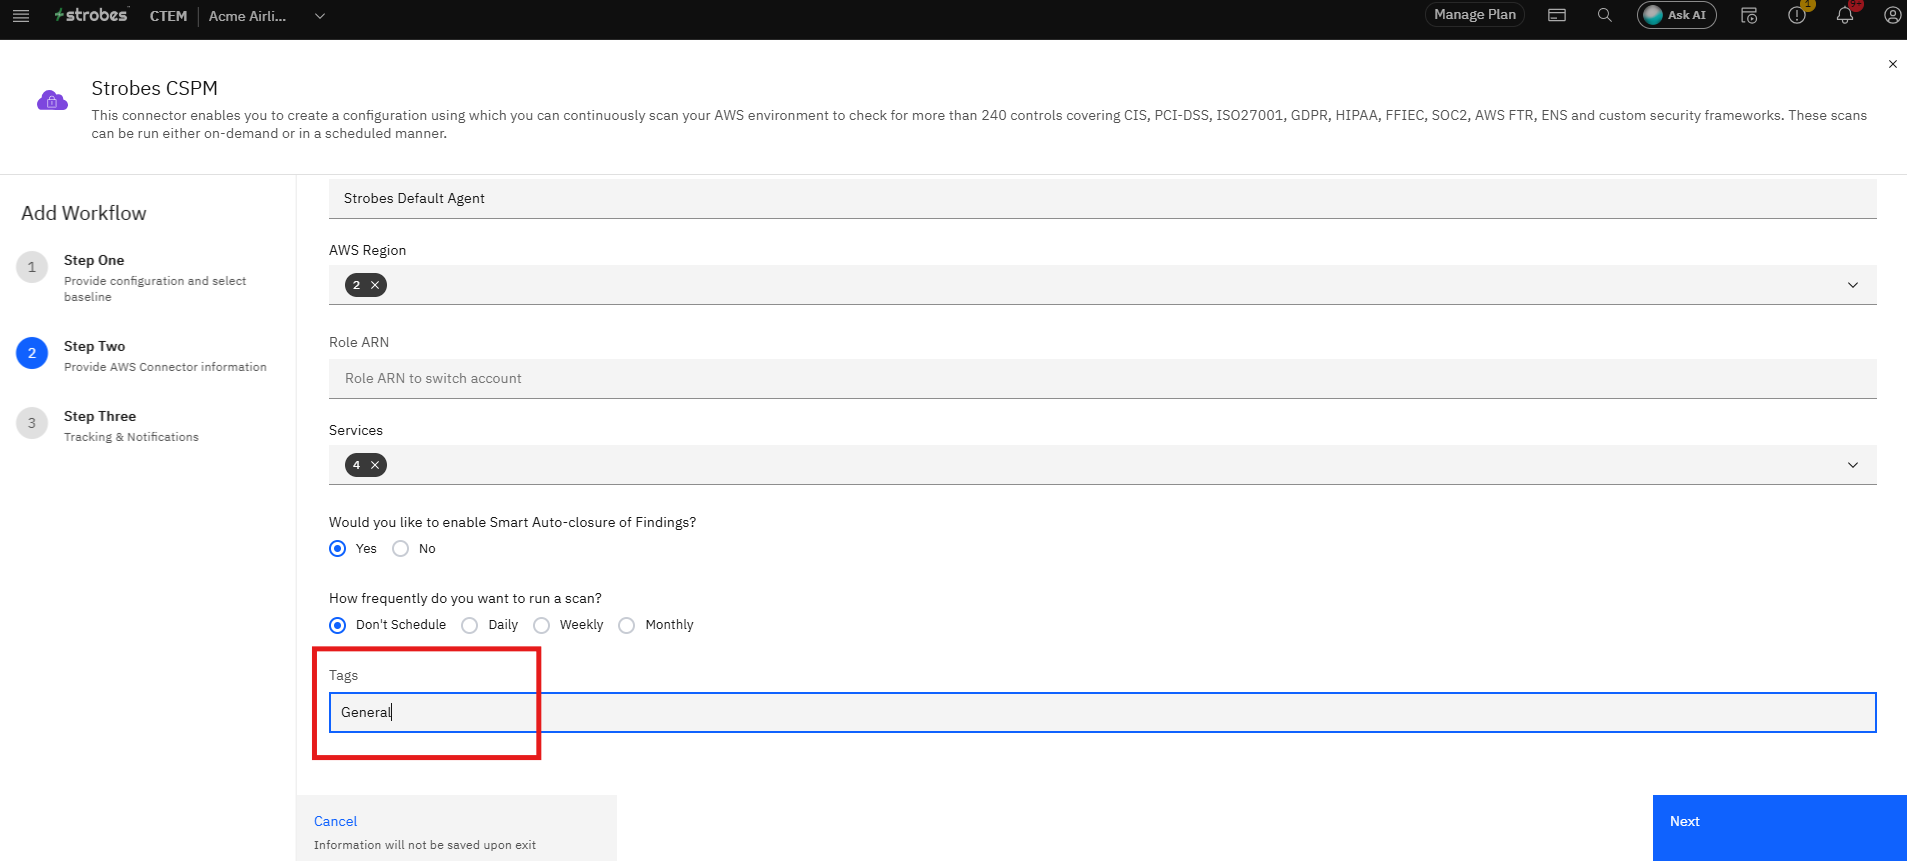
Click the Tags field, type a tag to categorize this workflow, and press Enter. Tags help you filter and organize workflows across connectors. This field is optional.
Step 17 — Proceed to Section C
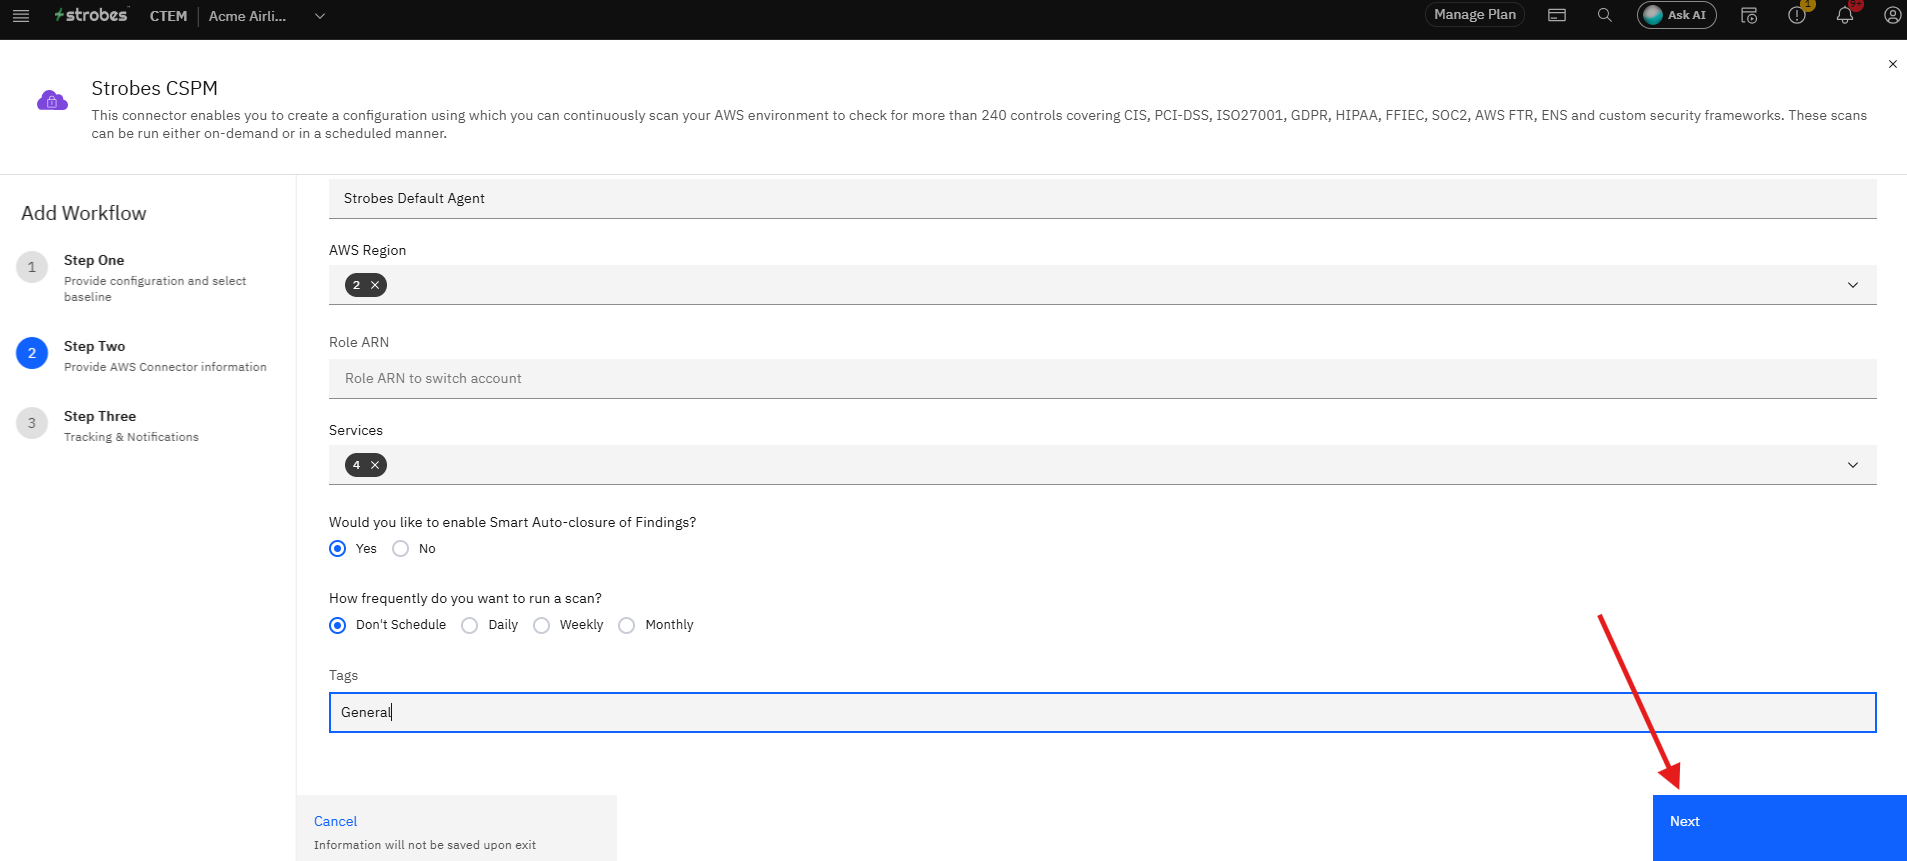
Click Next. The wizard advances to Step Three — Tracking and Notifications (Section C).
Section C: Step Three — Tracking and Notifications
(Optional)
Step 18 — Review Ticketing Platform Integrations
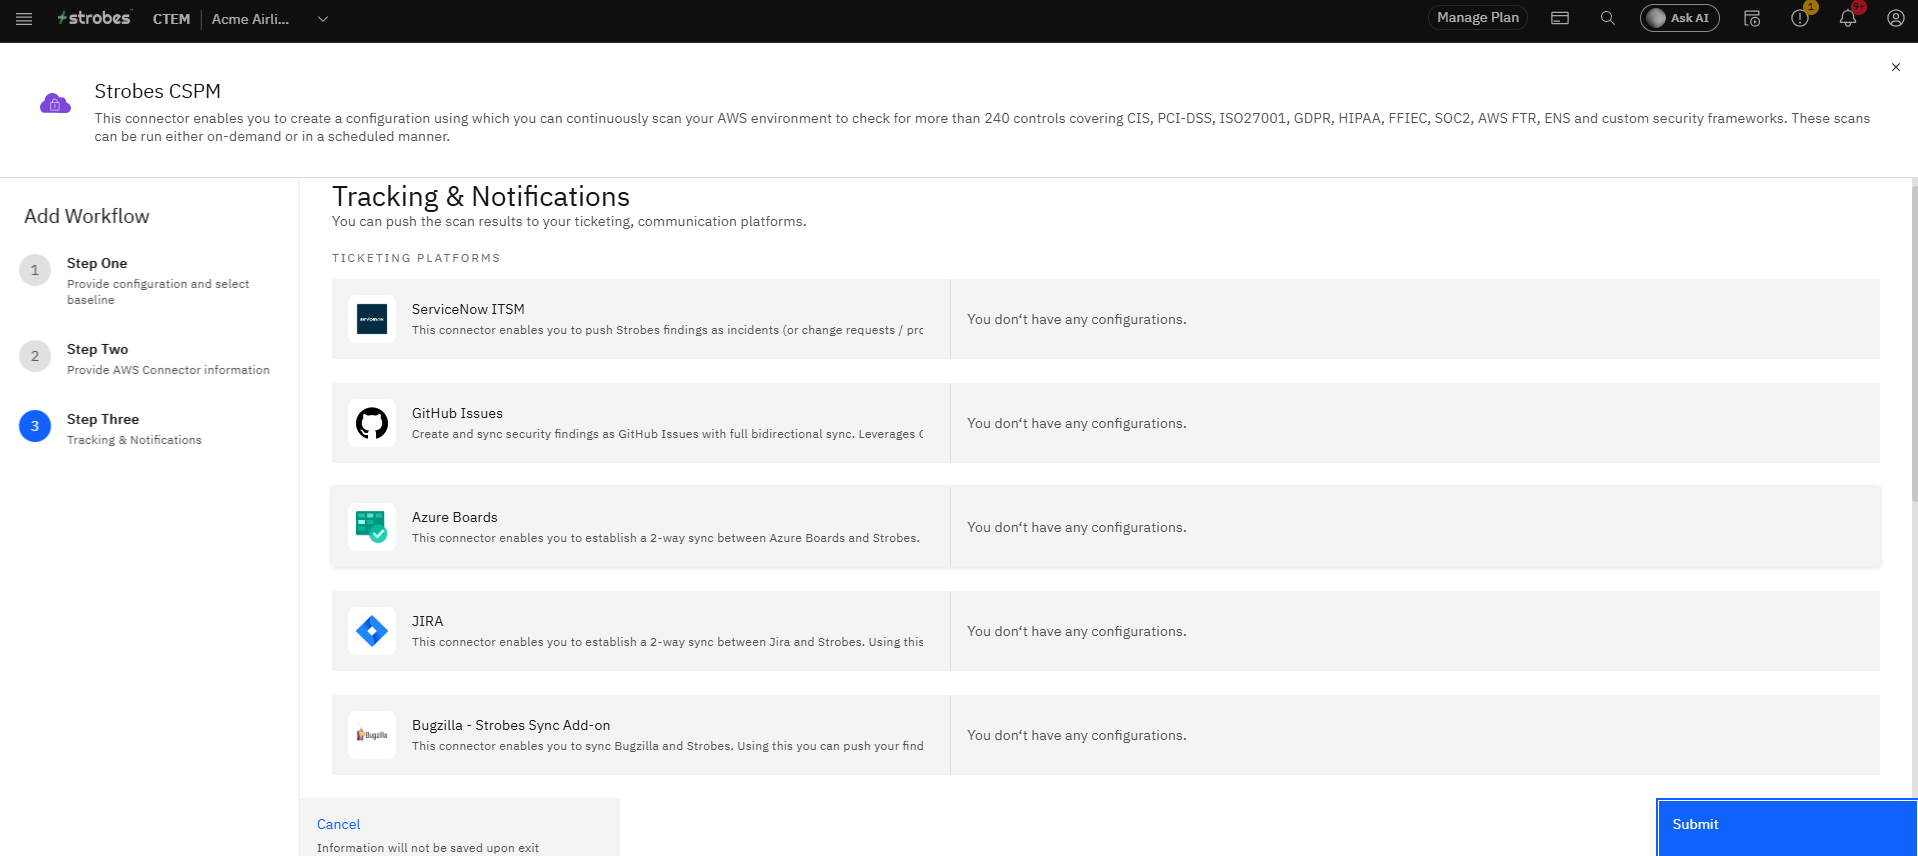
On the Tracking and Notifications screen, review the Ticketing Platforms section. Strobes can push CSPM scan findings directly to the following ticketing systems if they are already configured in your Strobes Connectors:
- ServiceNow ITSM
- GitHub Issues
- Azure Boards
- JIRA
- Bugzilla - Strobes Sync Add-on
If a platform shows "You don't have any configurations," set it up in Strobes Connectors first, then return here to link it.
Scroll down to review the Communication Tools section. Strobes can send real-time notifications to the following platforms when scan results are available:
- MS Teams
- Microsoft 365 Email
- Flock messenger
- Slack
Platforms that have a pre-configured connector will show available configurations to select. Those that show "You don't have any configurations." require setup in Strobes Connectors before they can be linked here.
Step 19 — Submit the Workflow
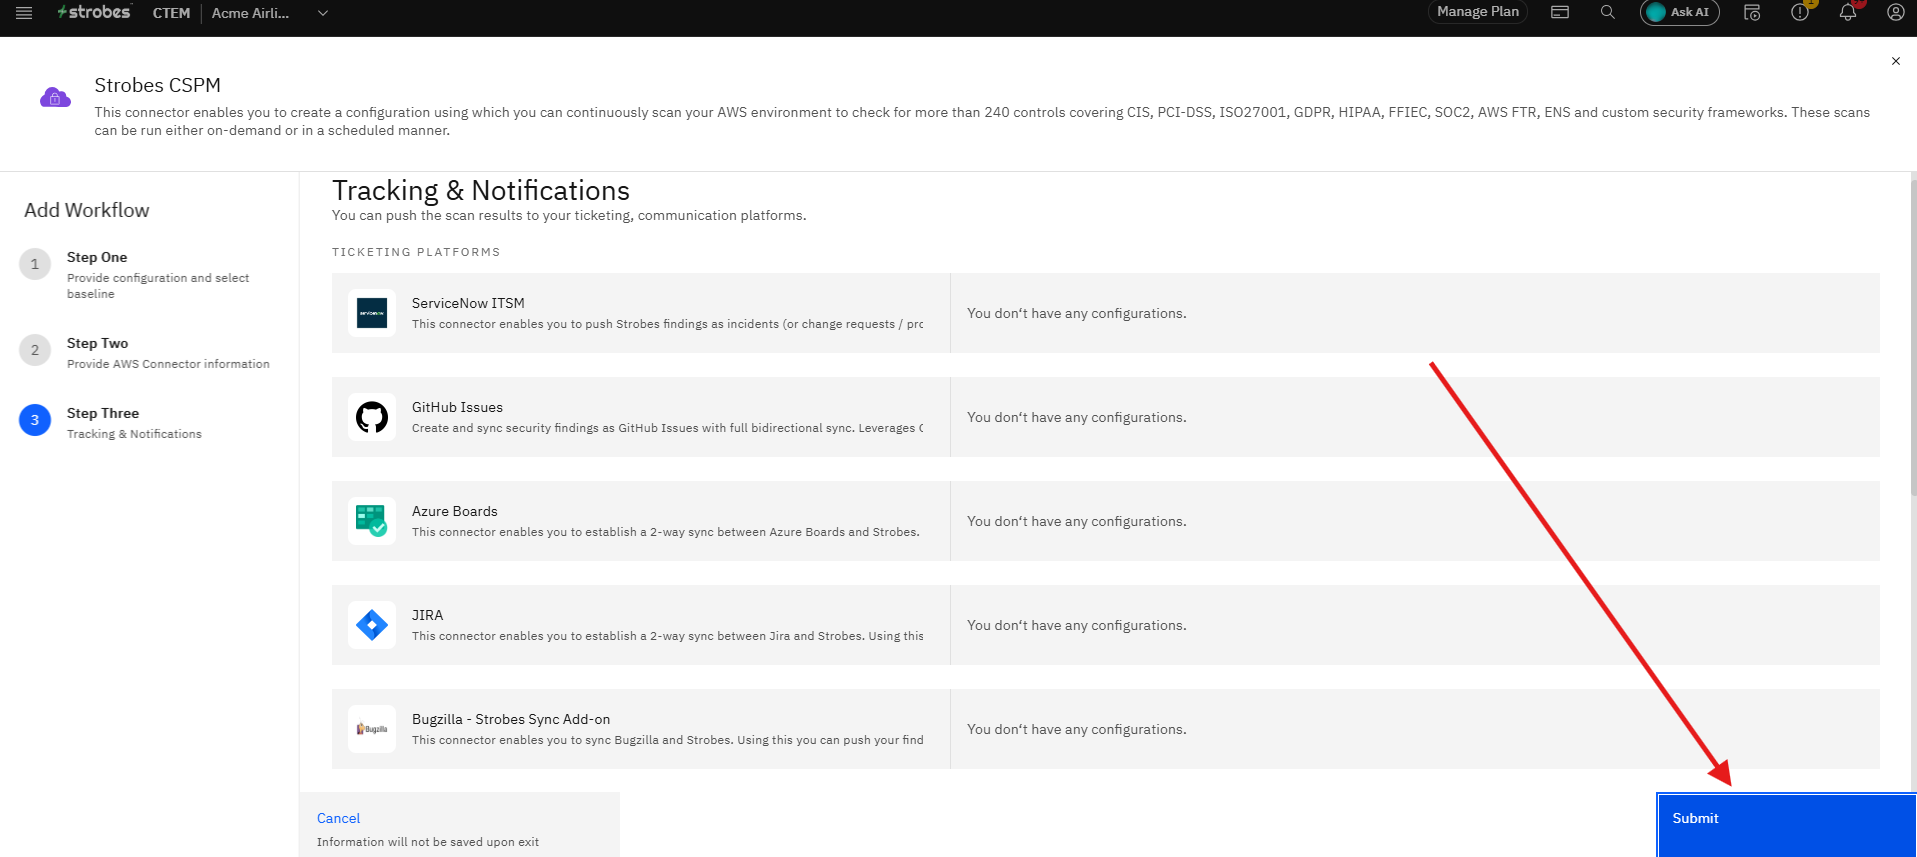
Click Submit to save the CSPM workflow. A loading spinner appears while Strobes saves the configuration.
Step 20 — Confirm the Workflow Was Created
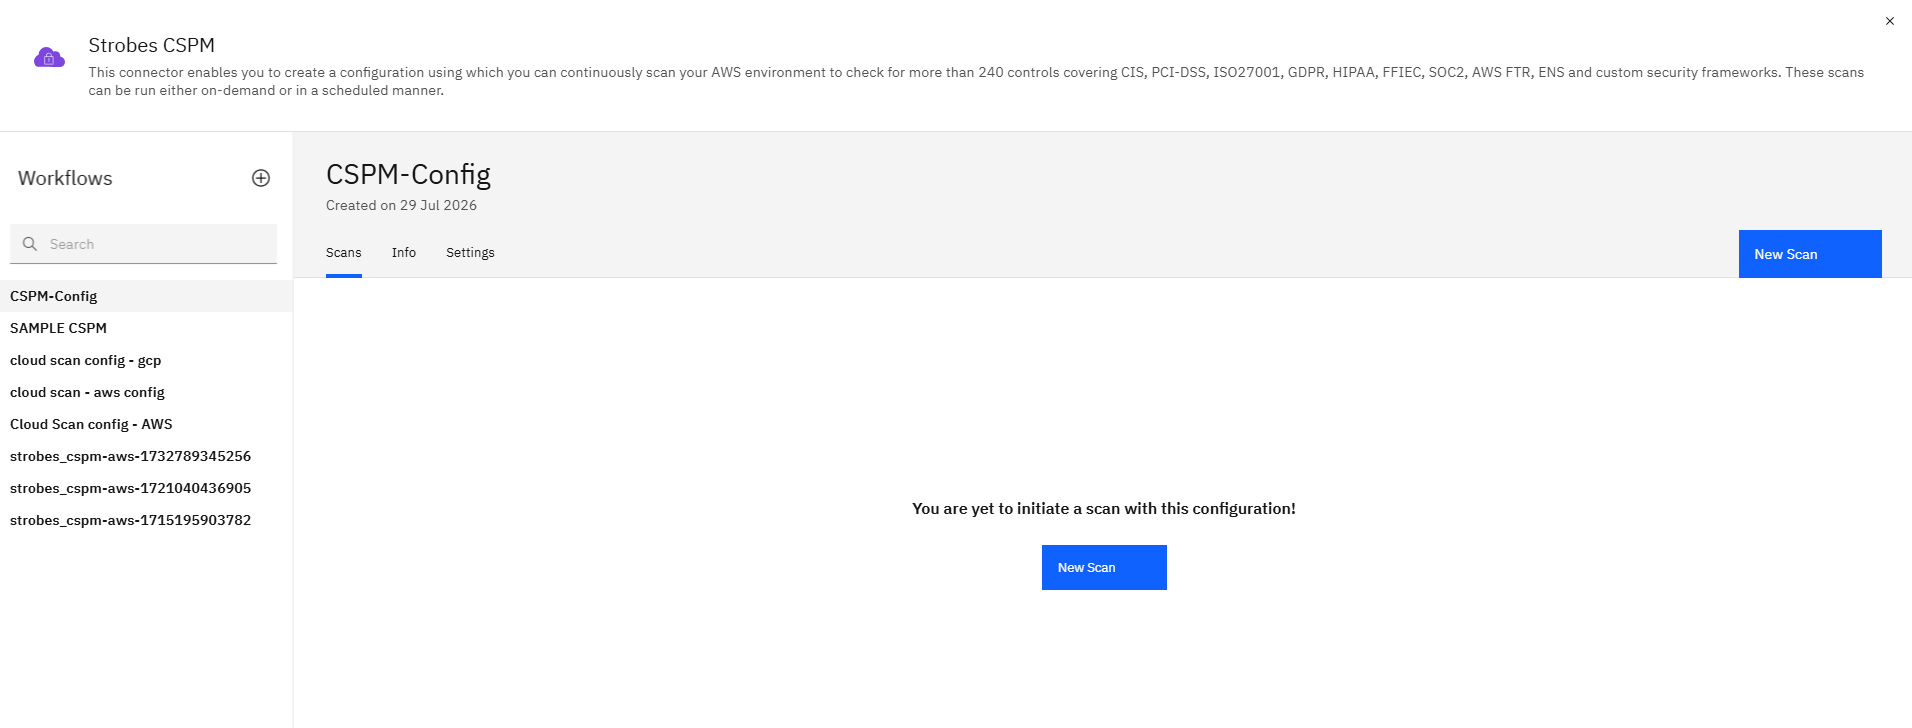
After the save completes, the Workflows panel on the left lists your new configuration at the top. Click the workflow name to open its detail page, where you can review all settings, run a manual scan, or edit the configuration from the Settings tab.
Tips
Choose your baseline carefully before the first scan. Strict captures every finding at every severity level, which can produce a large volume of results on a fresh environment. High is a good starting point for teams that want to prioritize Critical and High exposure first.
Scope your services before scanning. Enabling all available services in a single configuration can generate hundreds of findings on the first run. Start with the services most relevant to your environment, then expand once you have reviewed the initial results.
Pre-configure ticketing and messaging connectors before Step Three. If ServiceNow, Jira, Slack, or any other integration shows "You don't have any configurations." in Section C, configure that connector in Strobes Connectors first. Once configured, edit this workflow from the Settings tab to add the integration.
For AWS, apply least-privilege IAM permissions. Create a dedicated IAM user or role for Strobes with read-only access scoped to only the services you are scanning. Avoid attaching credentials that carry write permissions.
Run your first scan manually before enabling a recurring schedule. After saving the workflow, trigger a scan from the workflow detail page to verify the configuration connects and returns results correctly. Switch to a Daily, Weekly, or Monthly schedule only after confirming the first scan succeeds.