
Configuring Azure Boards Integration with Strobes
Overview
The Azure Boards connector establishes a 2-way sync between Azure Boards and Strobes. You can push findings from Strobes directly onto Azure Boards as work items, and when the state of a ticket changes on Azure Boards, that change syncs back automatically to Strobes.
Setup takes two steps: Step One names the configuration and links an Azure Boards credential, and Step Two selects the Azure Board project and maps Strobes statuses and priorities to the corresponding Azure Board fields.
Before You Start
- Role required: Owner or Manager access on your Strobes account.
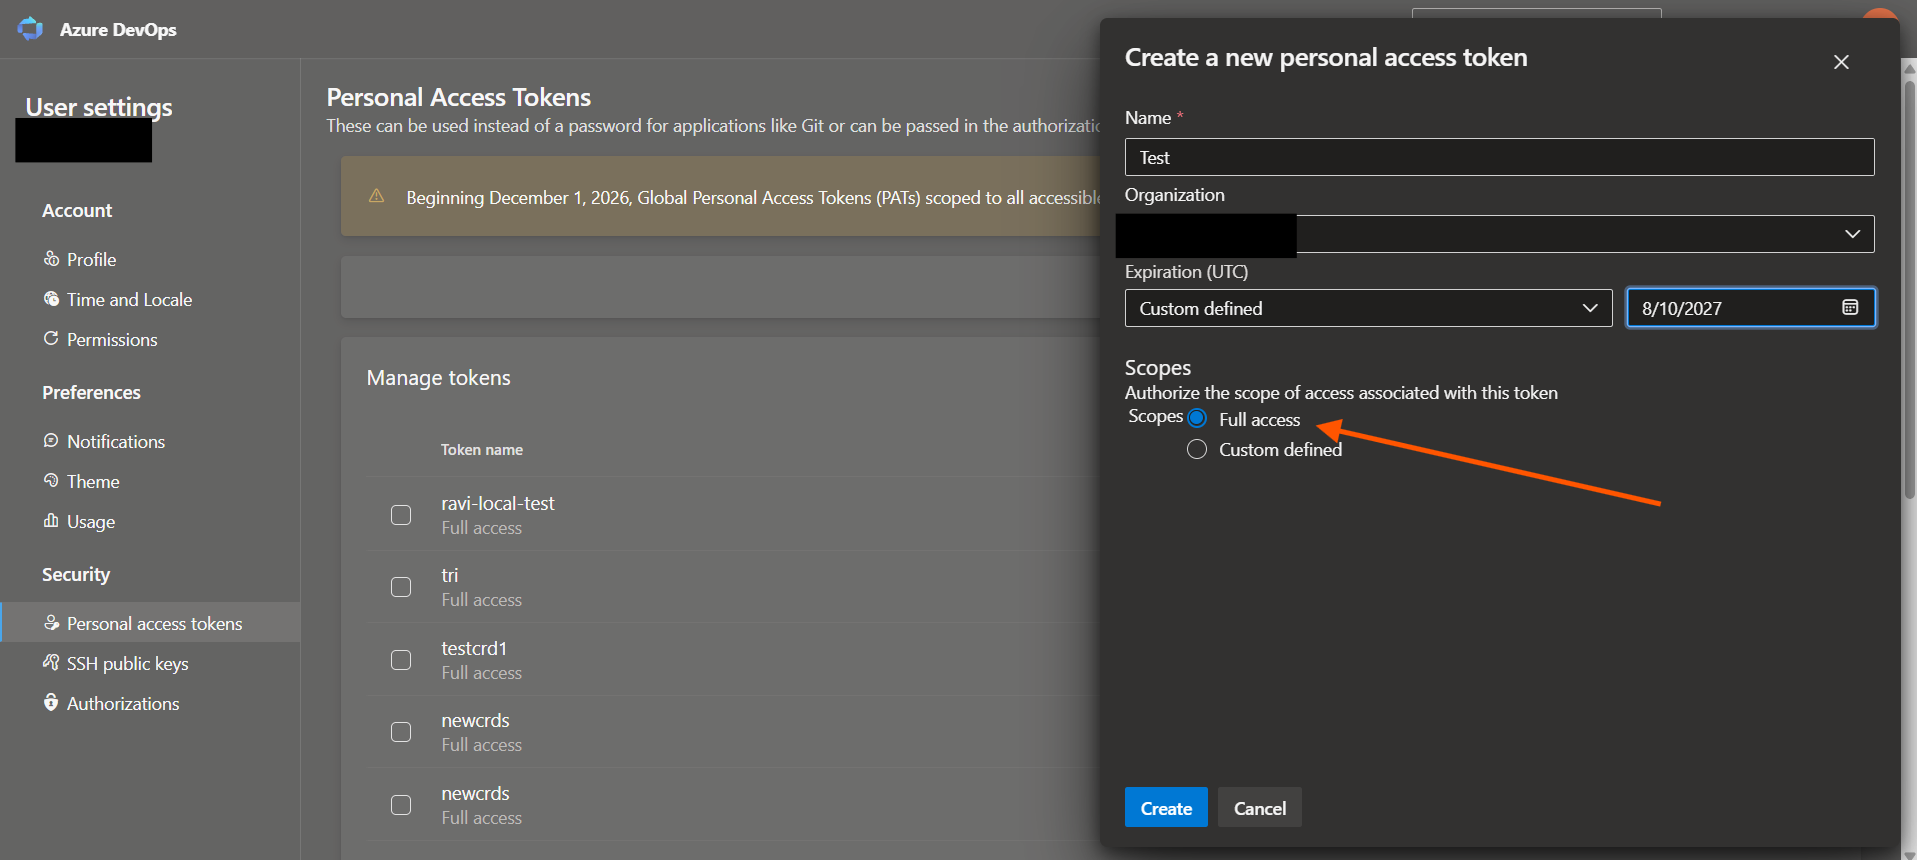
- Azure DevOps access: You need your Azure DevOps organization URL and a Personal Access Token (PAT) with "Full Access" permission for Work Items before you begin.
- Below is how you can generate your Azure Devops access token.
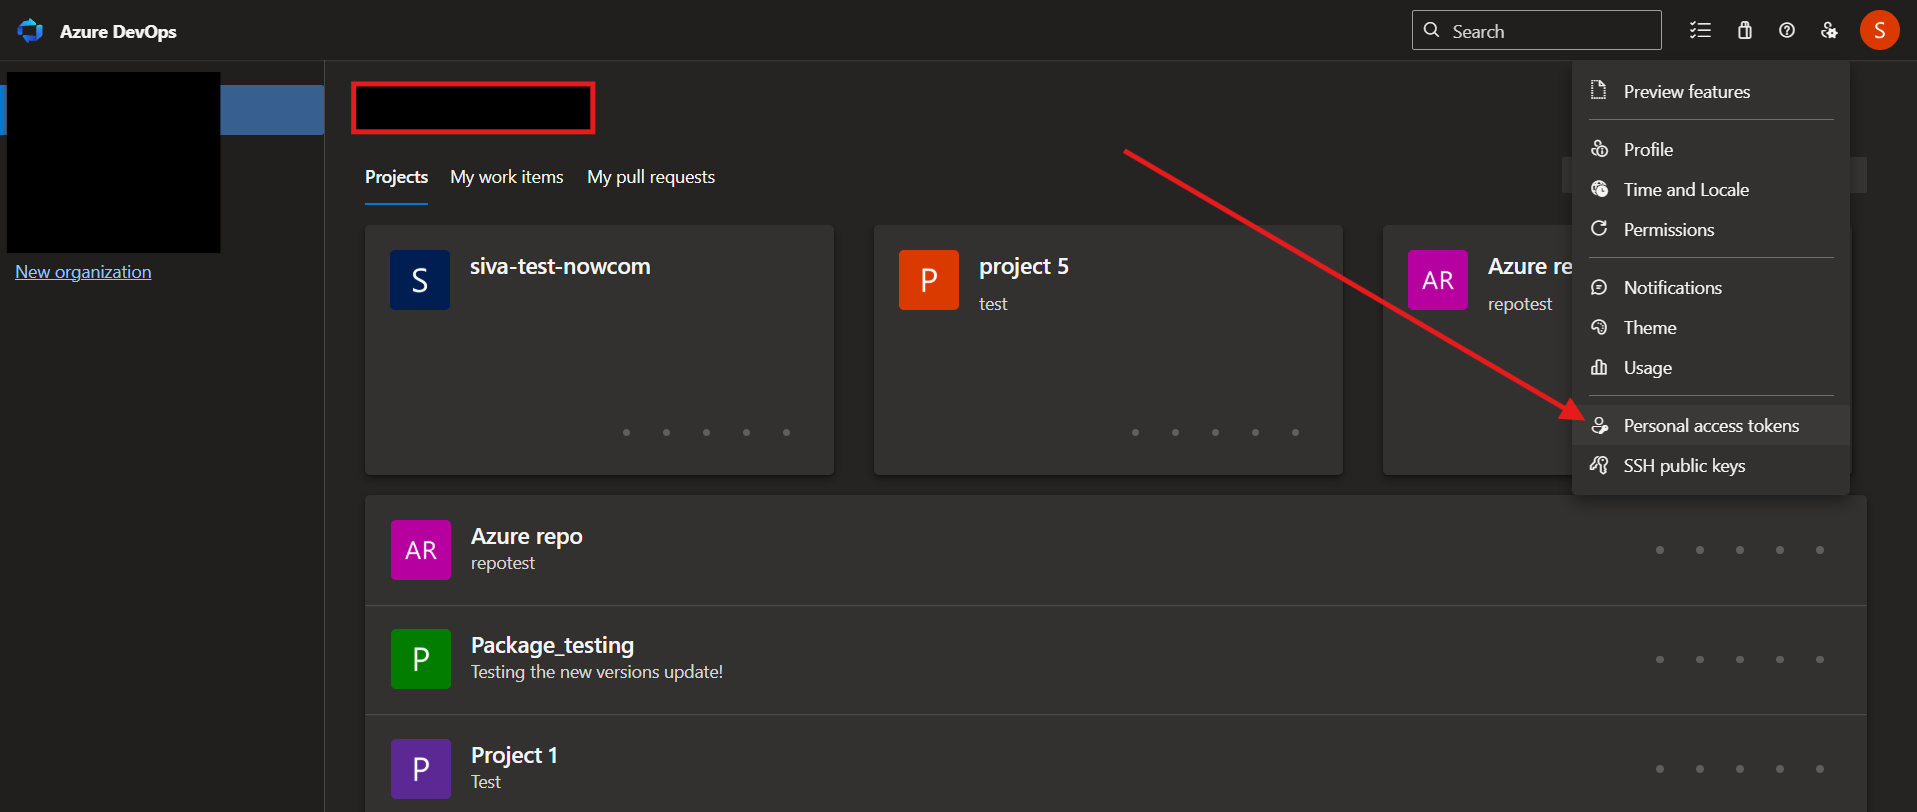
Copy and keep this Personal Token Access ready!
Step One: Configuration Name and Credential
Step 1 — Open the Connectors Page
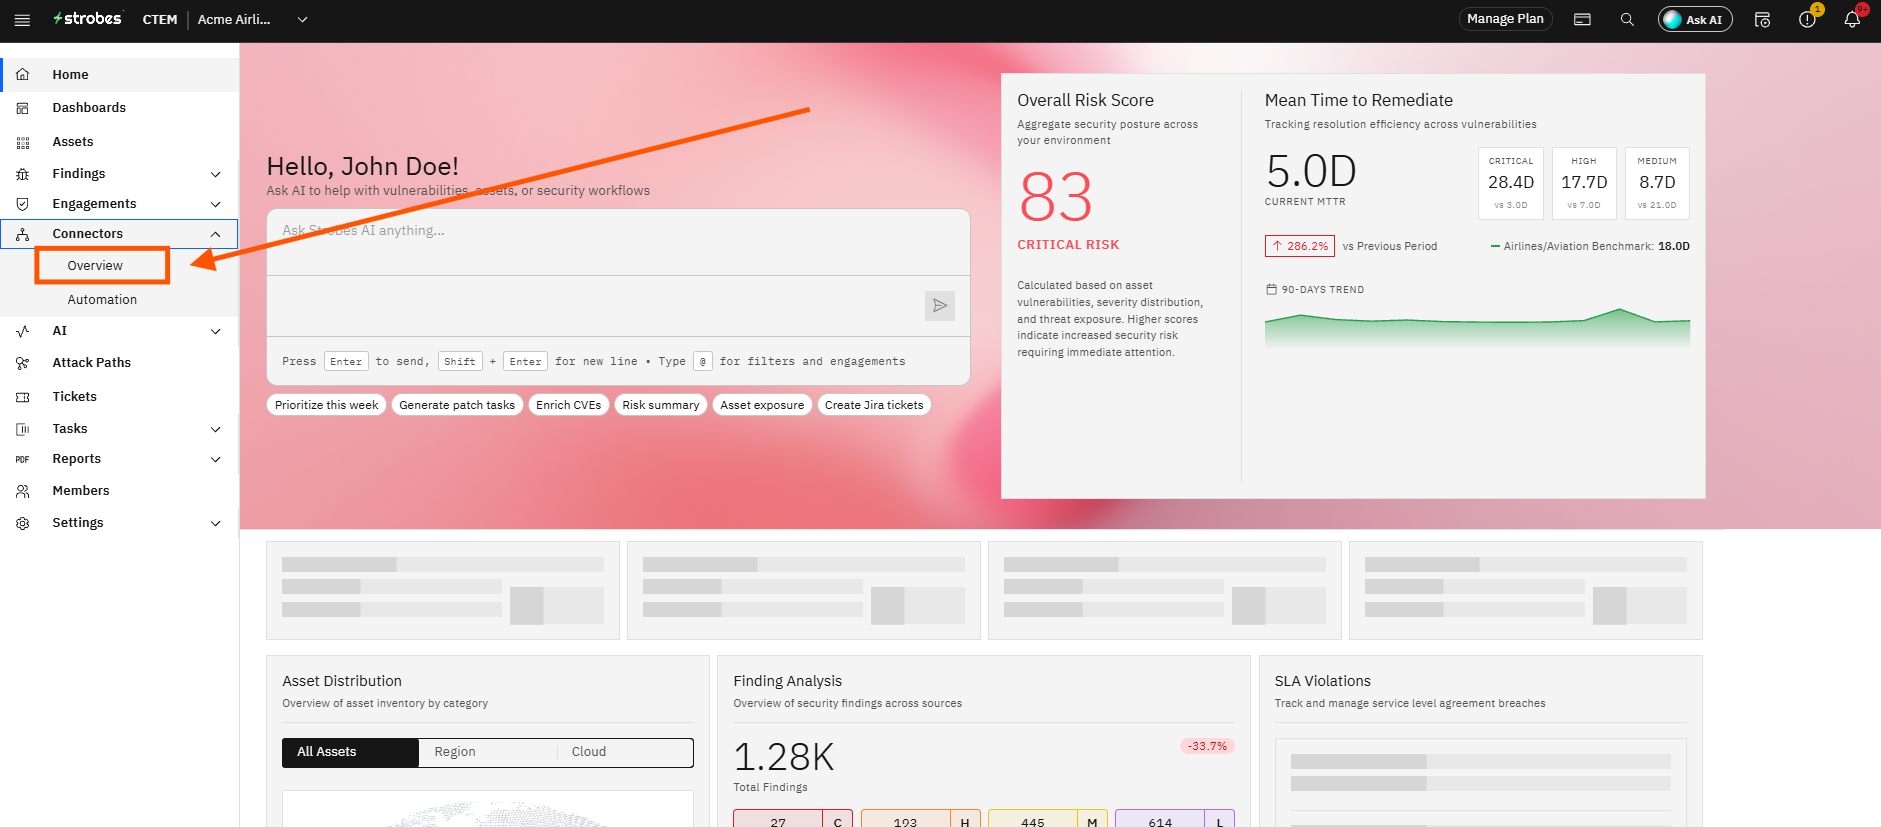
Click Connectors in the left sidebar. The Connectors page opens showing your installed connectors and the Look for Connectors search bar.
Step 2 — Search for Azure Boards
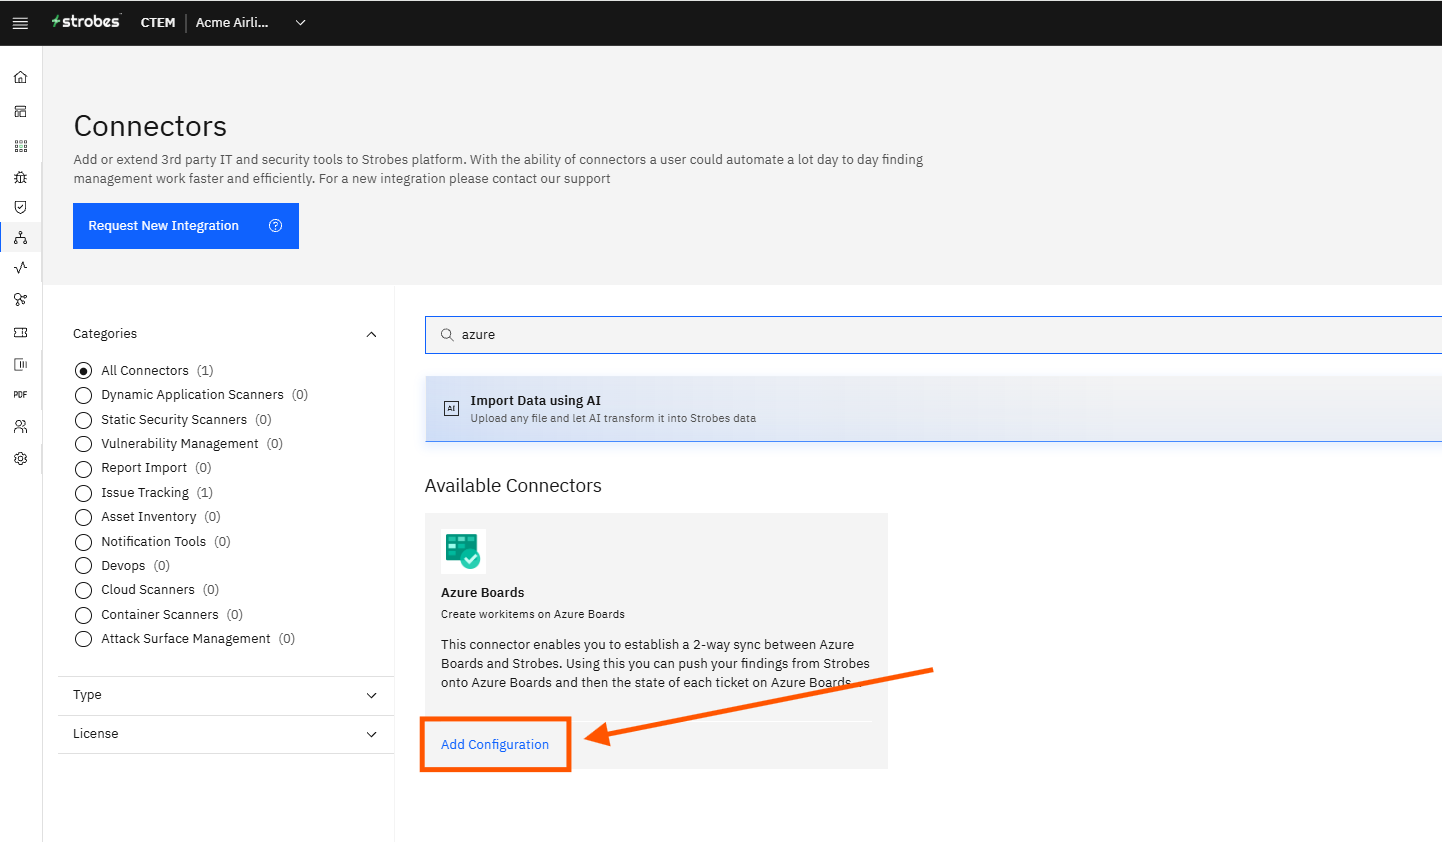
Click the Look for Connectors search bar and type Azure. The Azure Boards connector card appears. The card description reads: "This connector enables you to establish a 2-way sync between Azure Boards and Strobes. Using this you can push your findings from Strobes onto Azure Boards and then the state of each ticket on Azure Boards will be in sync with the state on Strobes."
Step 3 — Open the Connector and Click Add Workflow
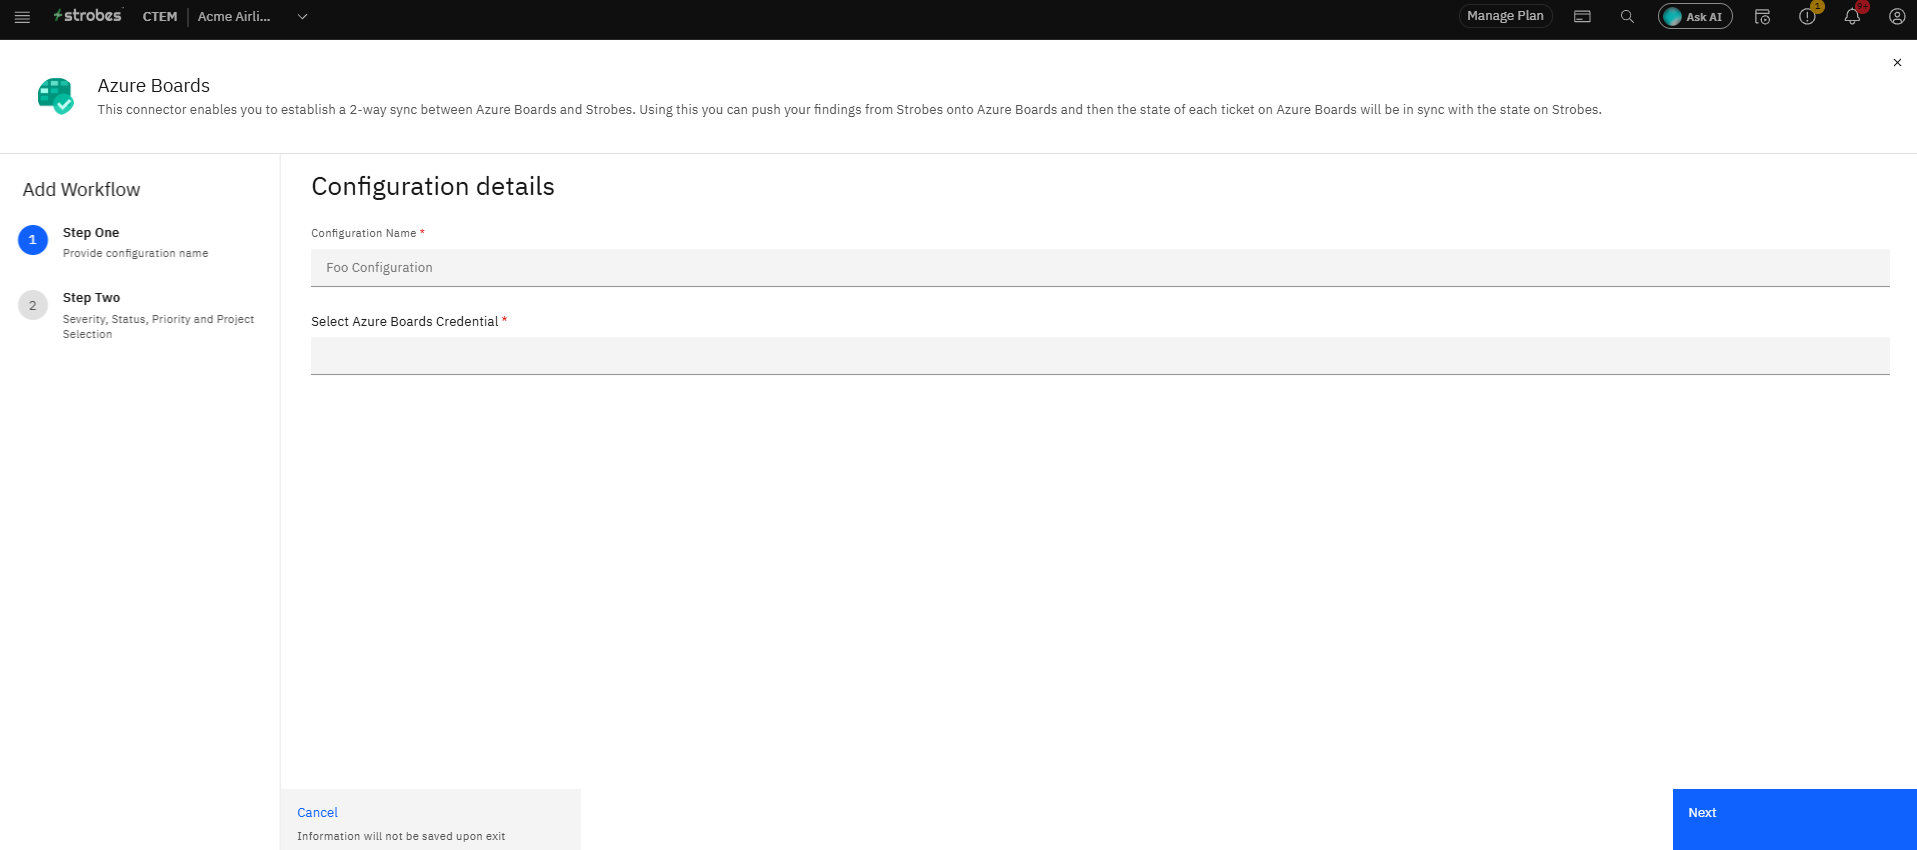
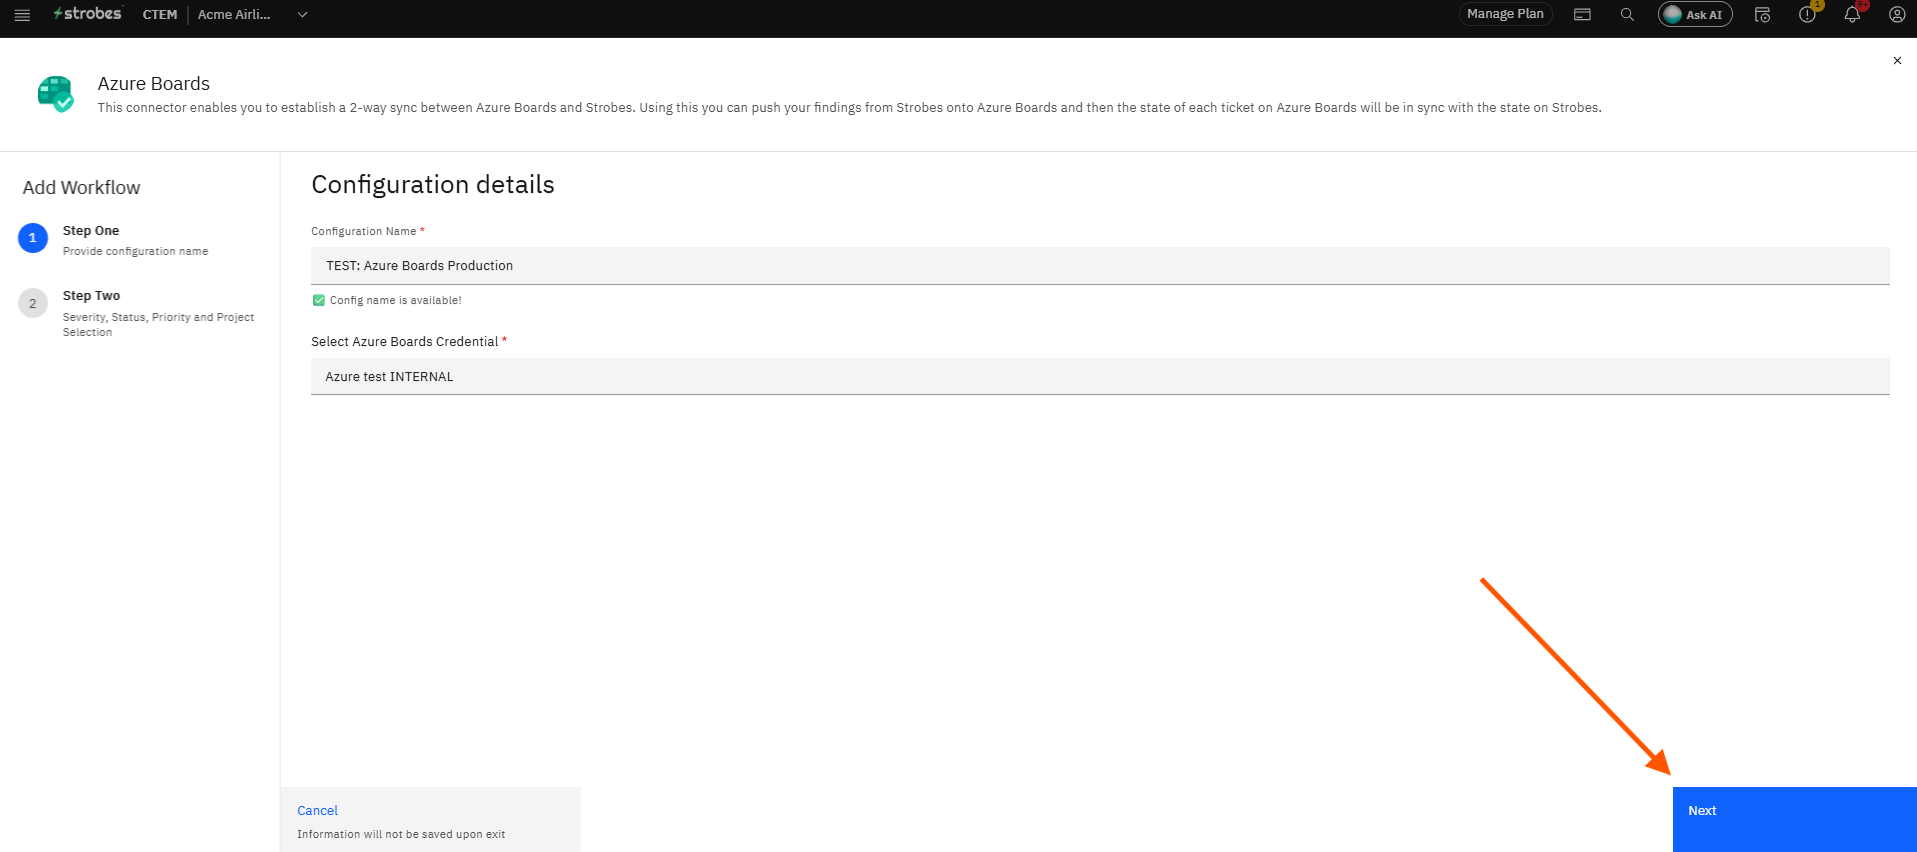
Click the Azure Boards connector card to open its panel, then click Add Workflow. The Add Workflow wizard opens with two steps shown in the left sidebar: Step One (Provide configuration name) and Step Two (Severity, Status, Priority and Project Selection).
Step 4 — Enter a Configuration Name
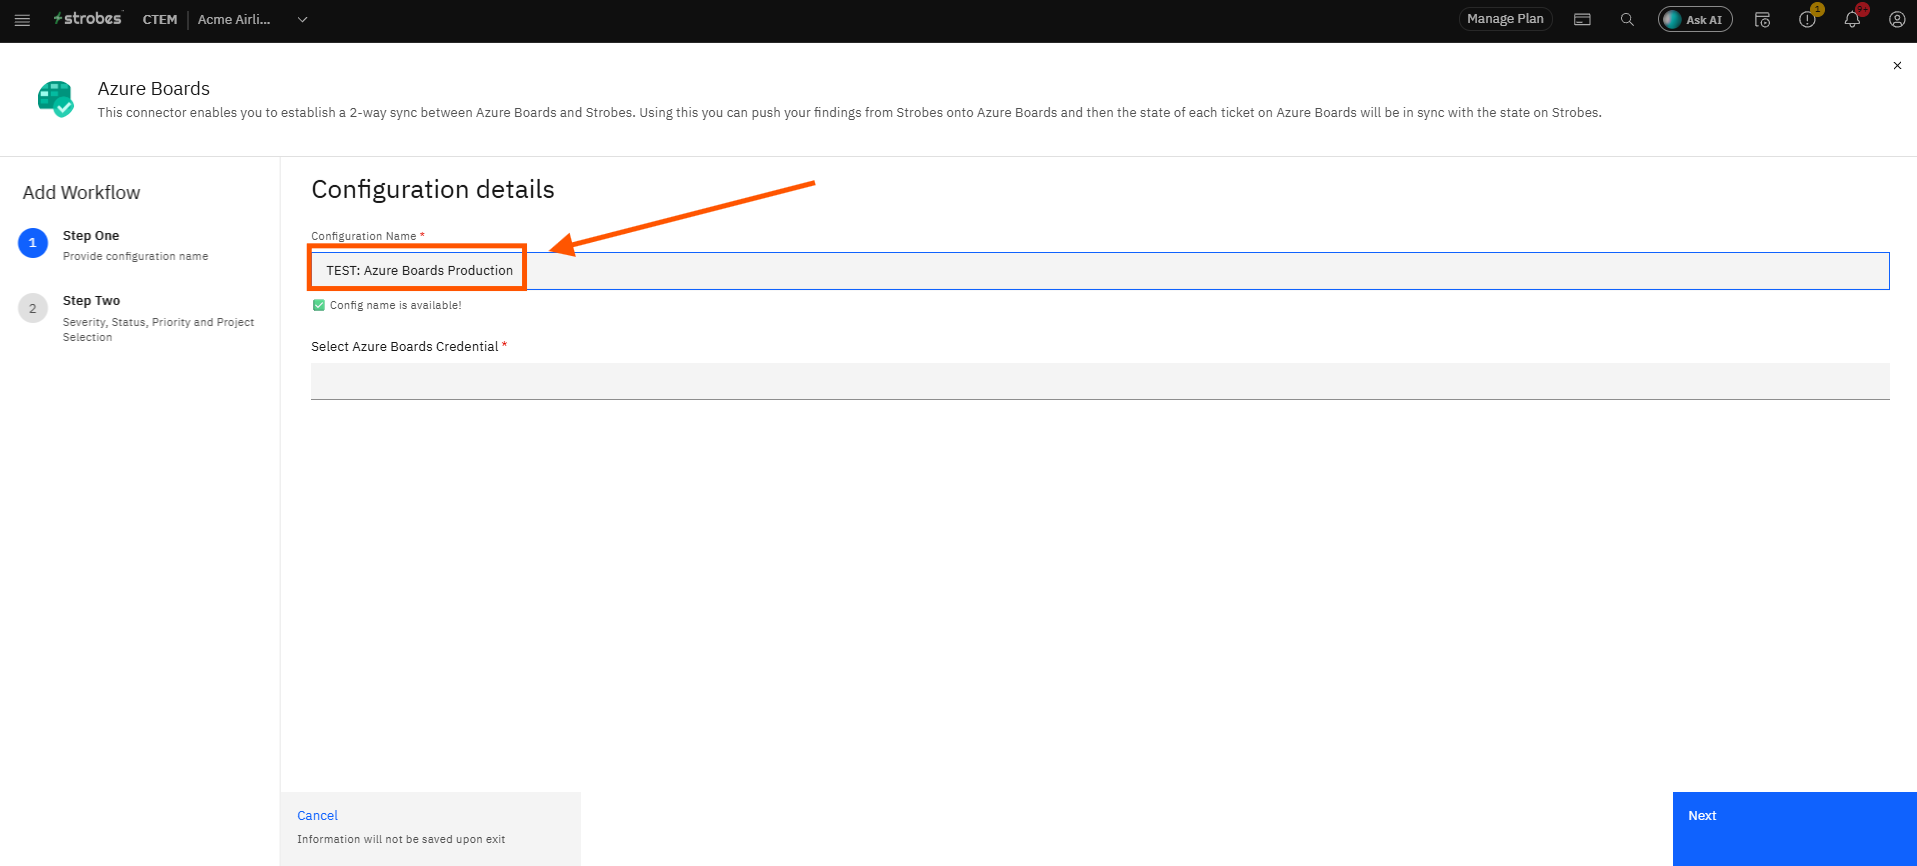
In the Configuration Name field, type a unique name for this configuration. A green "Config name is available!" message confirms the name is not already in use. Use a name that identifies the Azure project or team being connected, for example: Azure Boards Production or Azure Boards QA Team.
Step 5 — Open the Credential Dropdown
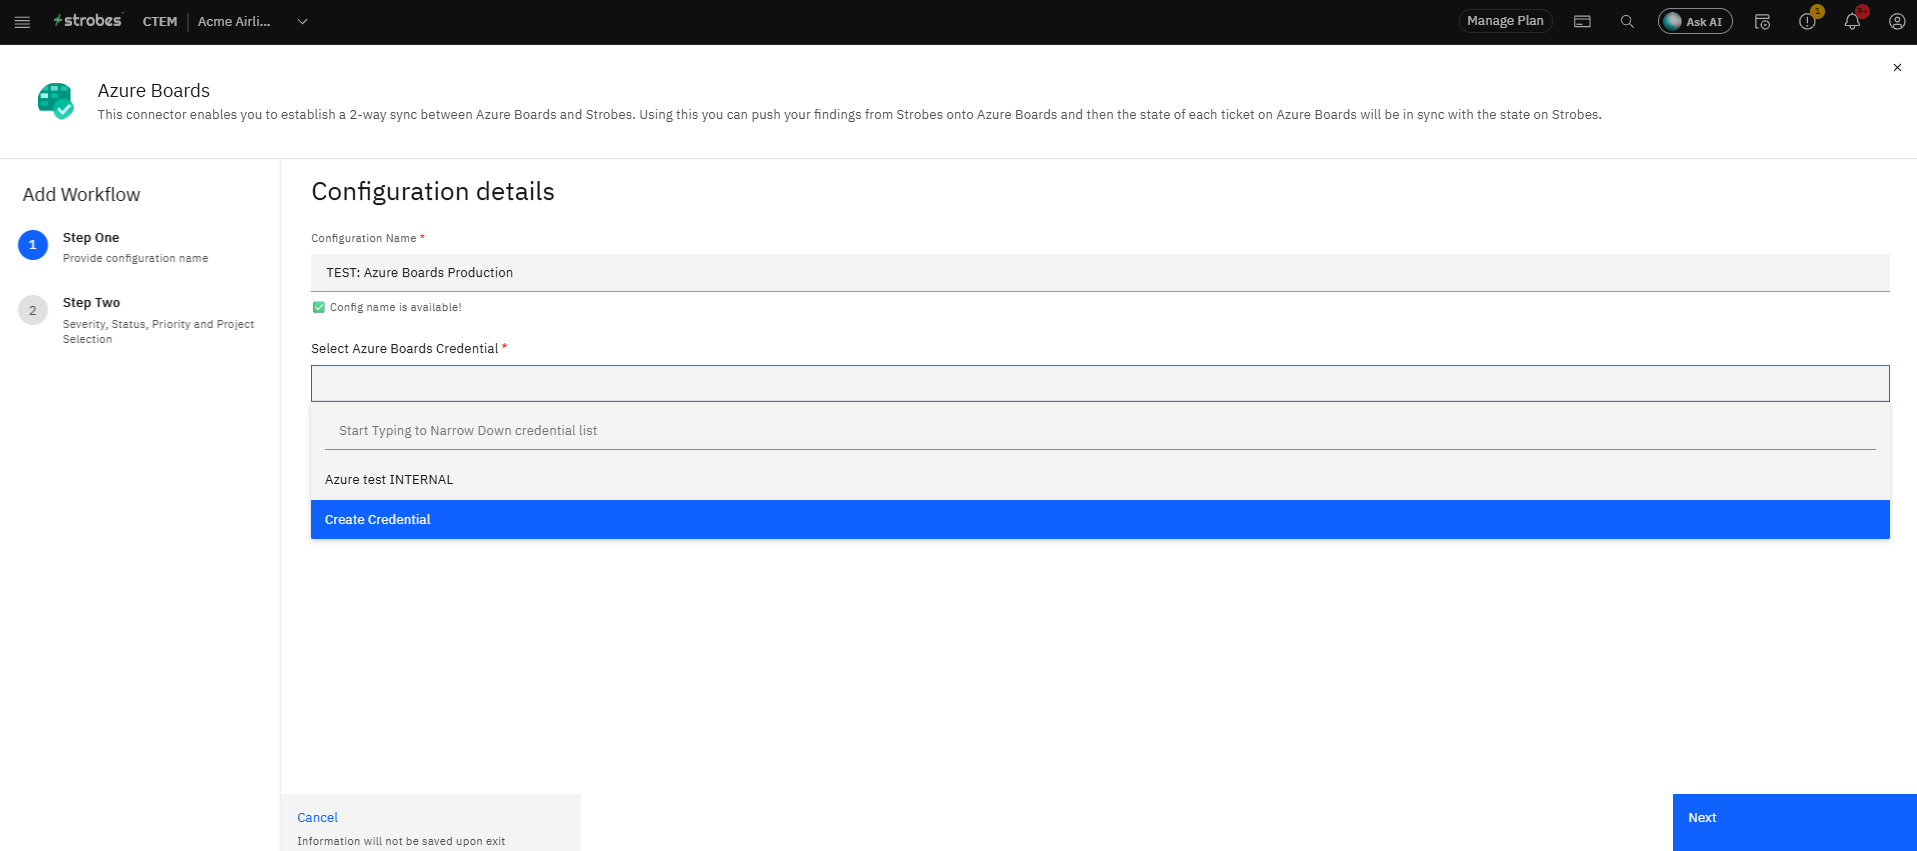
Click the credential dropdown beneath the configuration name field. If you already have a saved Azure Boards credential, click it to select it and skip to Step Two. If you need to add a new credential, click Create Credential and continue with Steps 6 through 9.
Step 6 — Enter a Credential Name
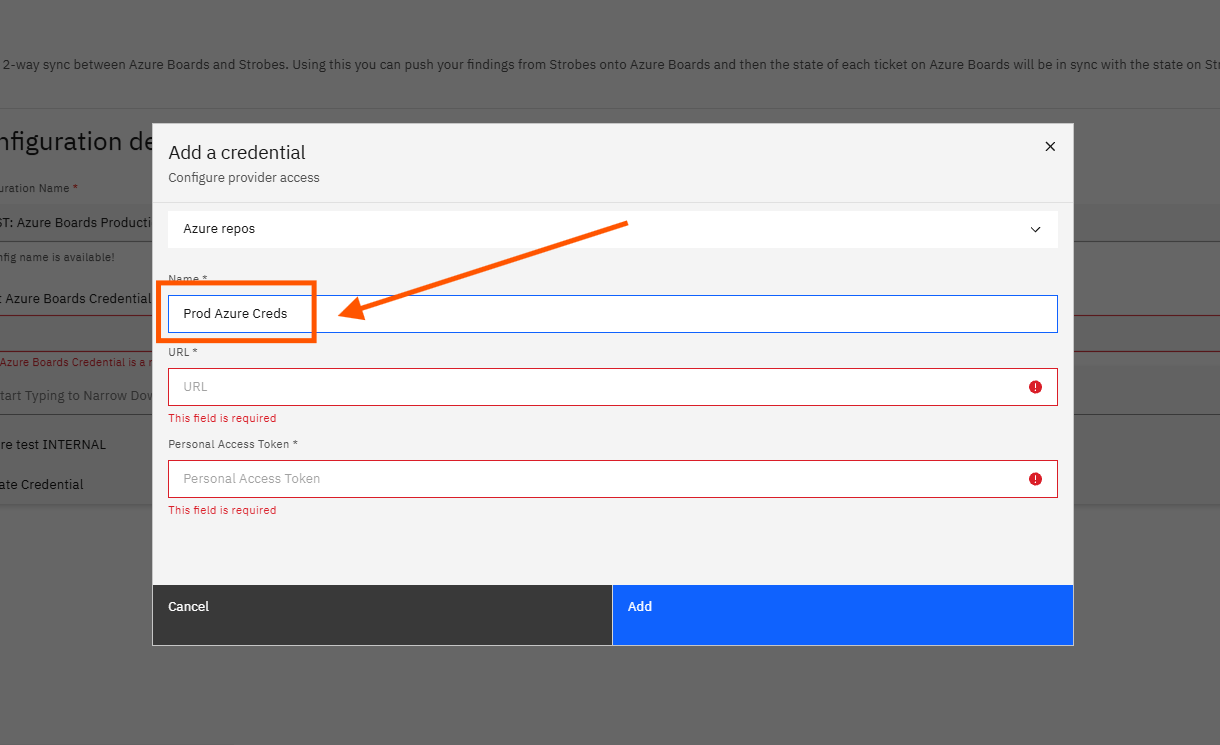
In the Add a credential dialog, click the Name field and type a label for this credential. This name identifies the credential in Strobes when it appears in the dropdown. Use a name that reflects the Azure DevOps organization it connects to.
Step 7 — Enter the Azure DevOps Organization URL
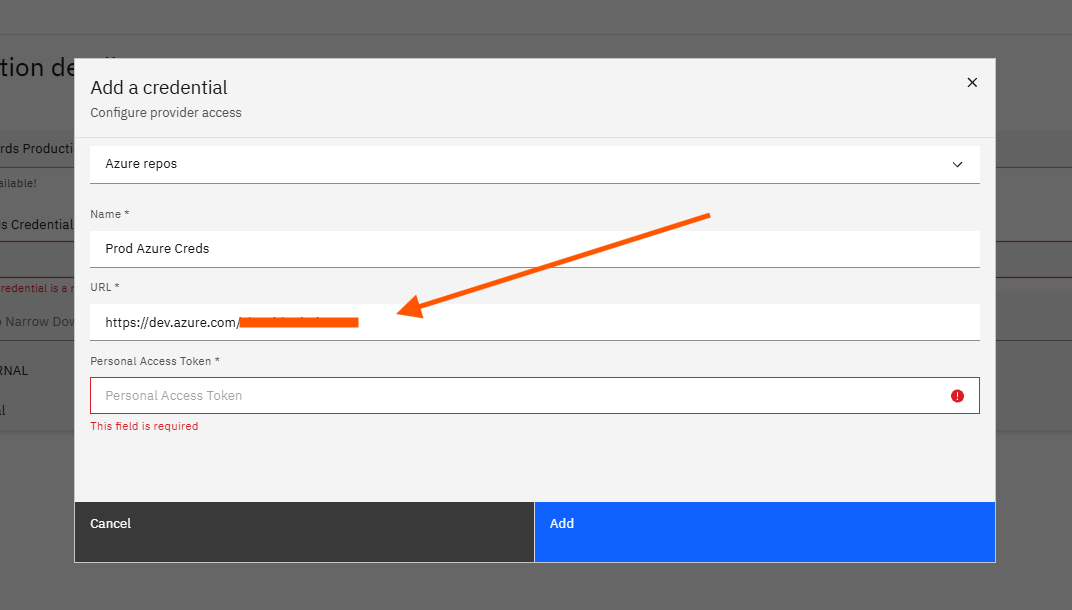
Click the URL field and paste your Azure DevOps organization URL. This is the root URL of your Azure DevOps organization. You can find it in your browser's address bar on any Azure DevOps page (see the annotated screenshot in Before You Start).
Step 8 — Enter the Personal Access Token
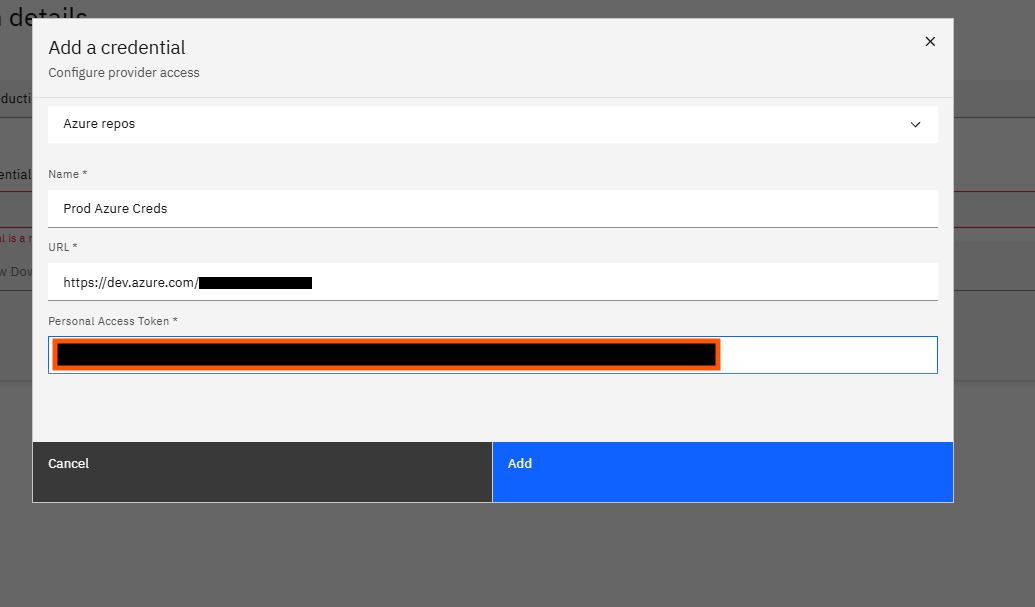
Click the Personal Access Token field and paste the PAT you generated in Azure DevOps. The token must have Read and Write permissions for Work Items. See the annotated screenshot in Before You Start for where to generate and copy it.
Step 9 — Save the Credential
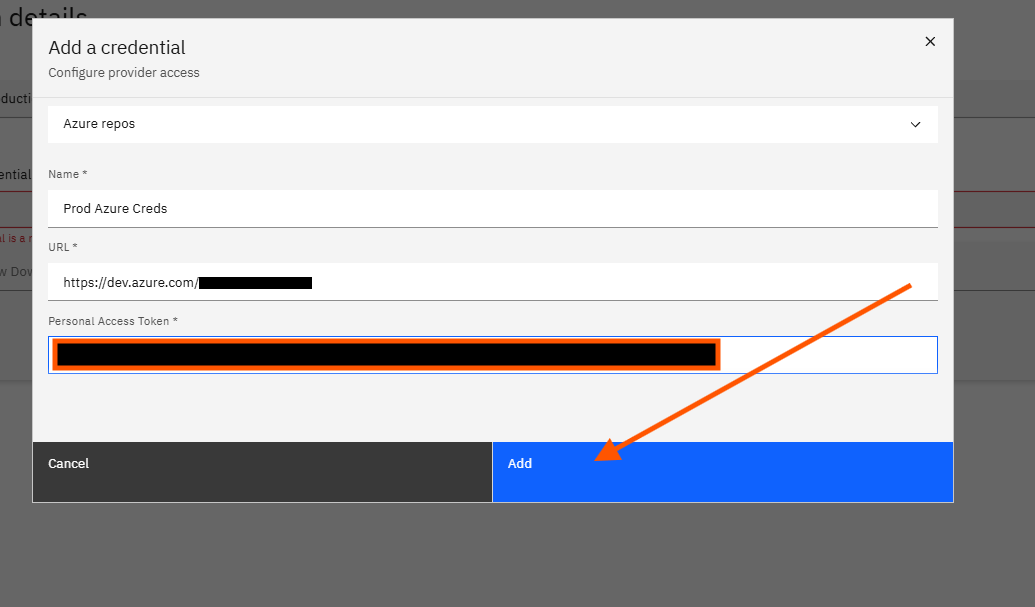
Click Add to save the credential. Strobes saves the credential and returns you to Step One with the new credential automatically selected in the dropdown.
Step Two: Project Selection and Mapping
Step 10 — Select an Azure Board Project
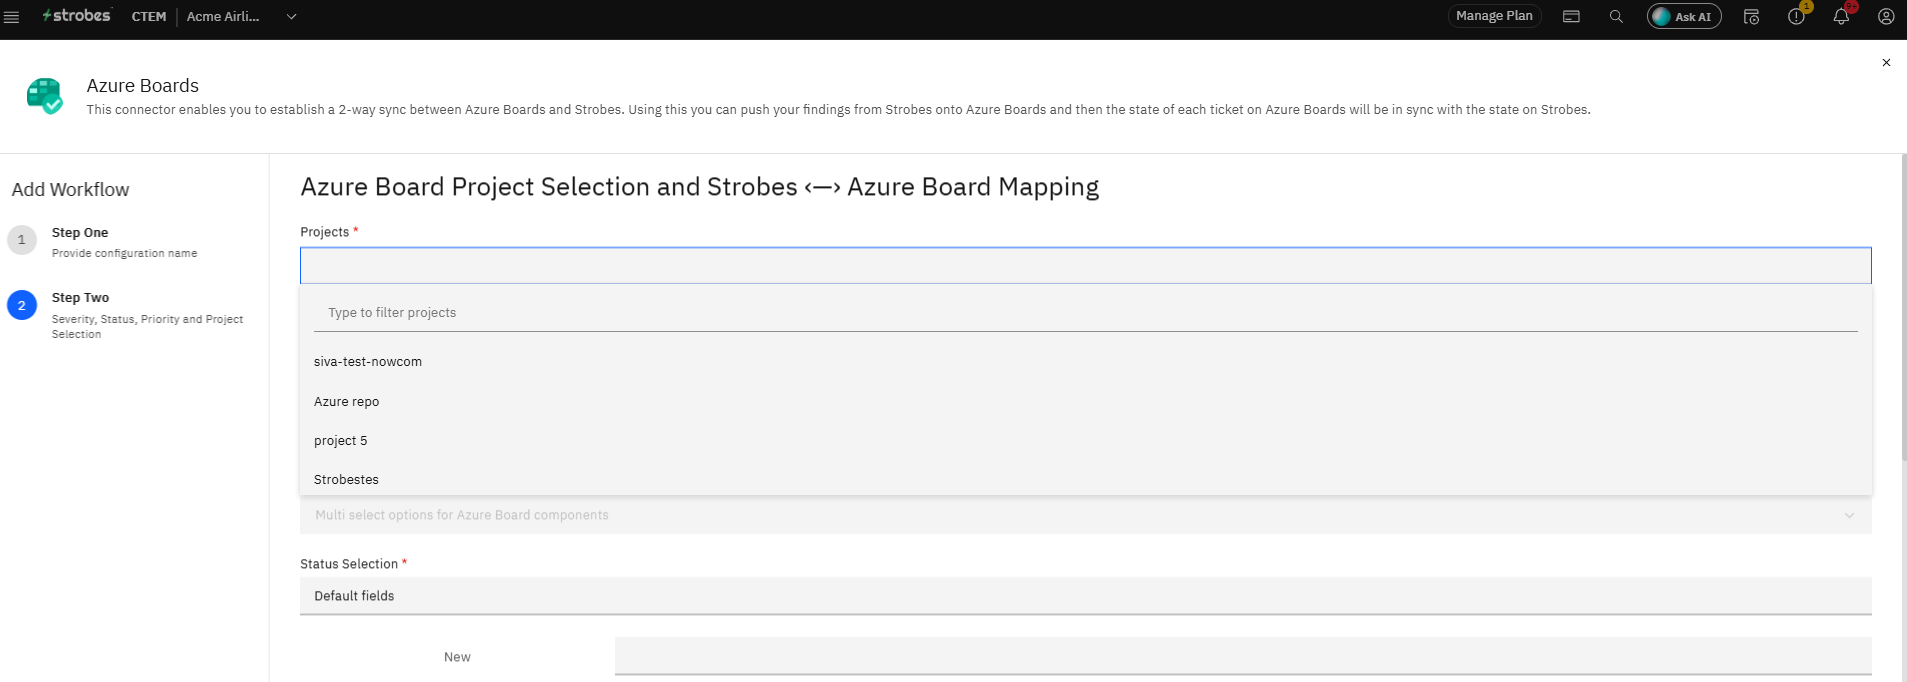
On Step Two, click the Projects dropdown and select the Azure Board project you want to sync with this workflow. Strobes loads the available projects from the credential you selected. Click the project name to select it.
Step 11 — Select a Work Type
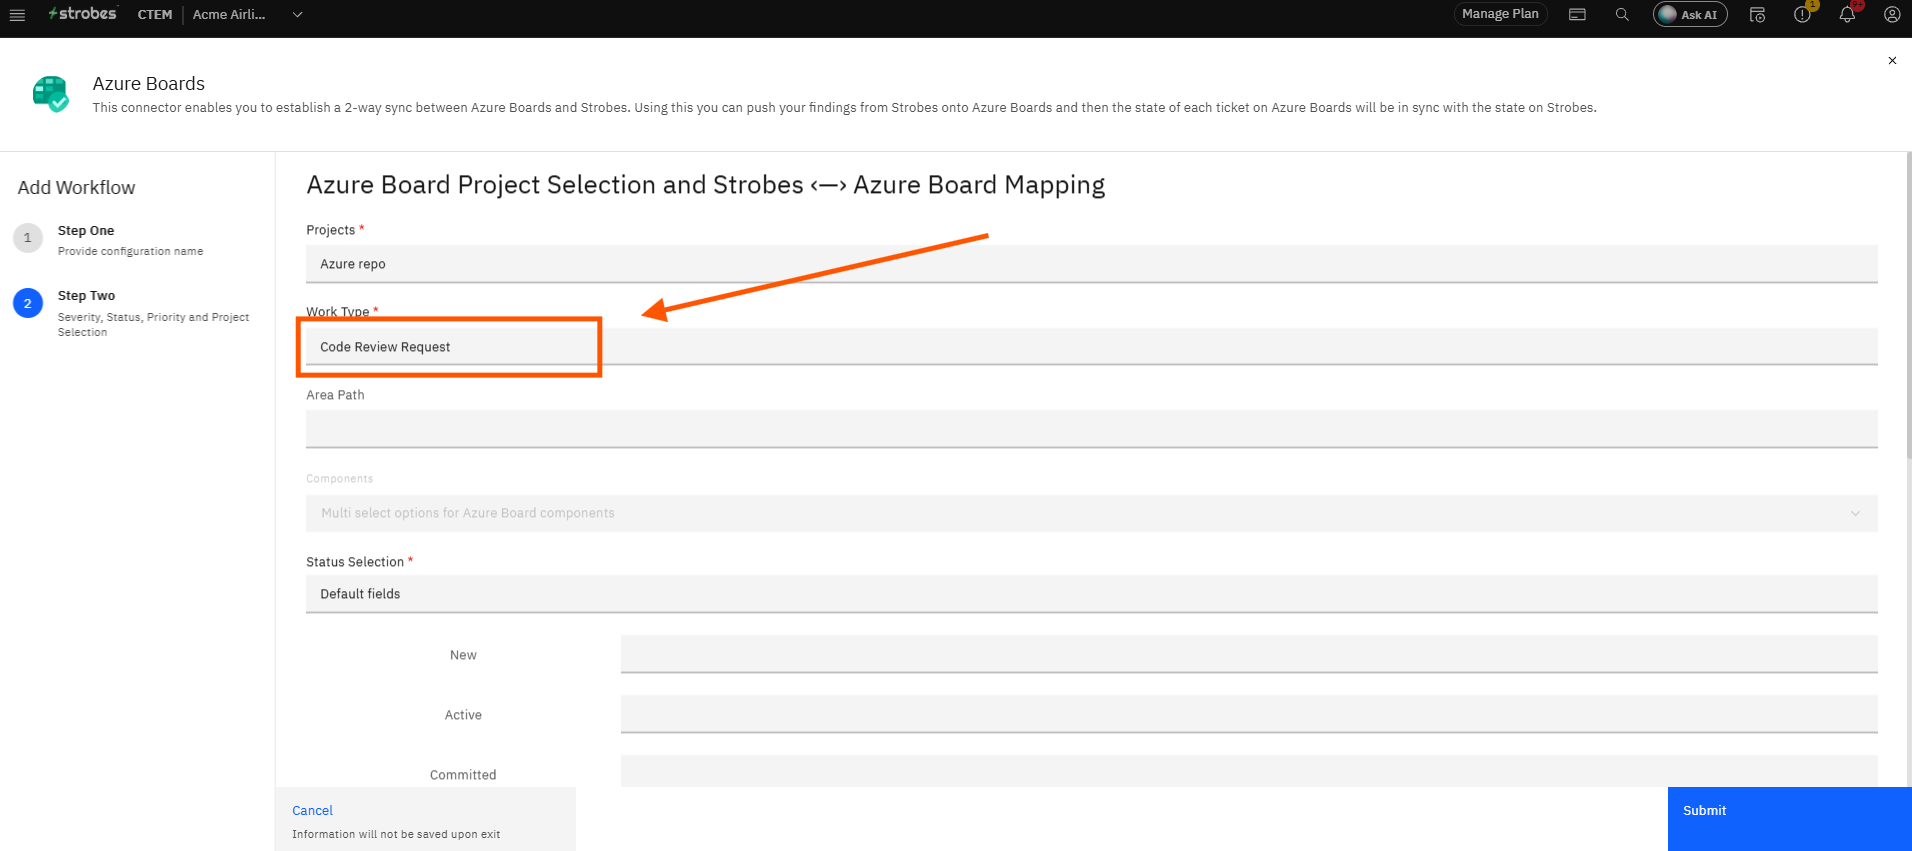
Click the Work Type dropdown and select the Azure Boards work item type that Strobes findings should be created as. Work types are loaded from the selected project. Common options include Bug, User Story, and Test Case. The work type you choose determines which status and priority options are available in the mapping rows below.
Step 12 — Enter an Area Path (Optional)
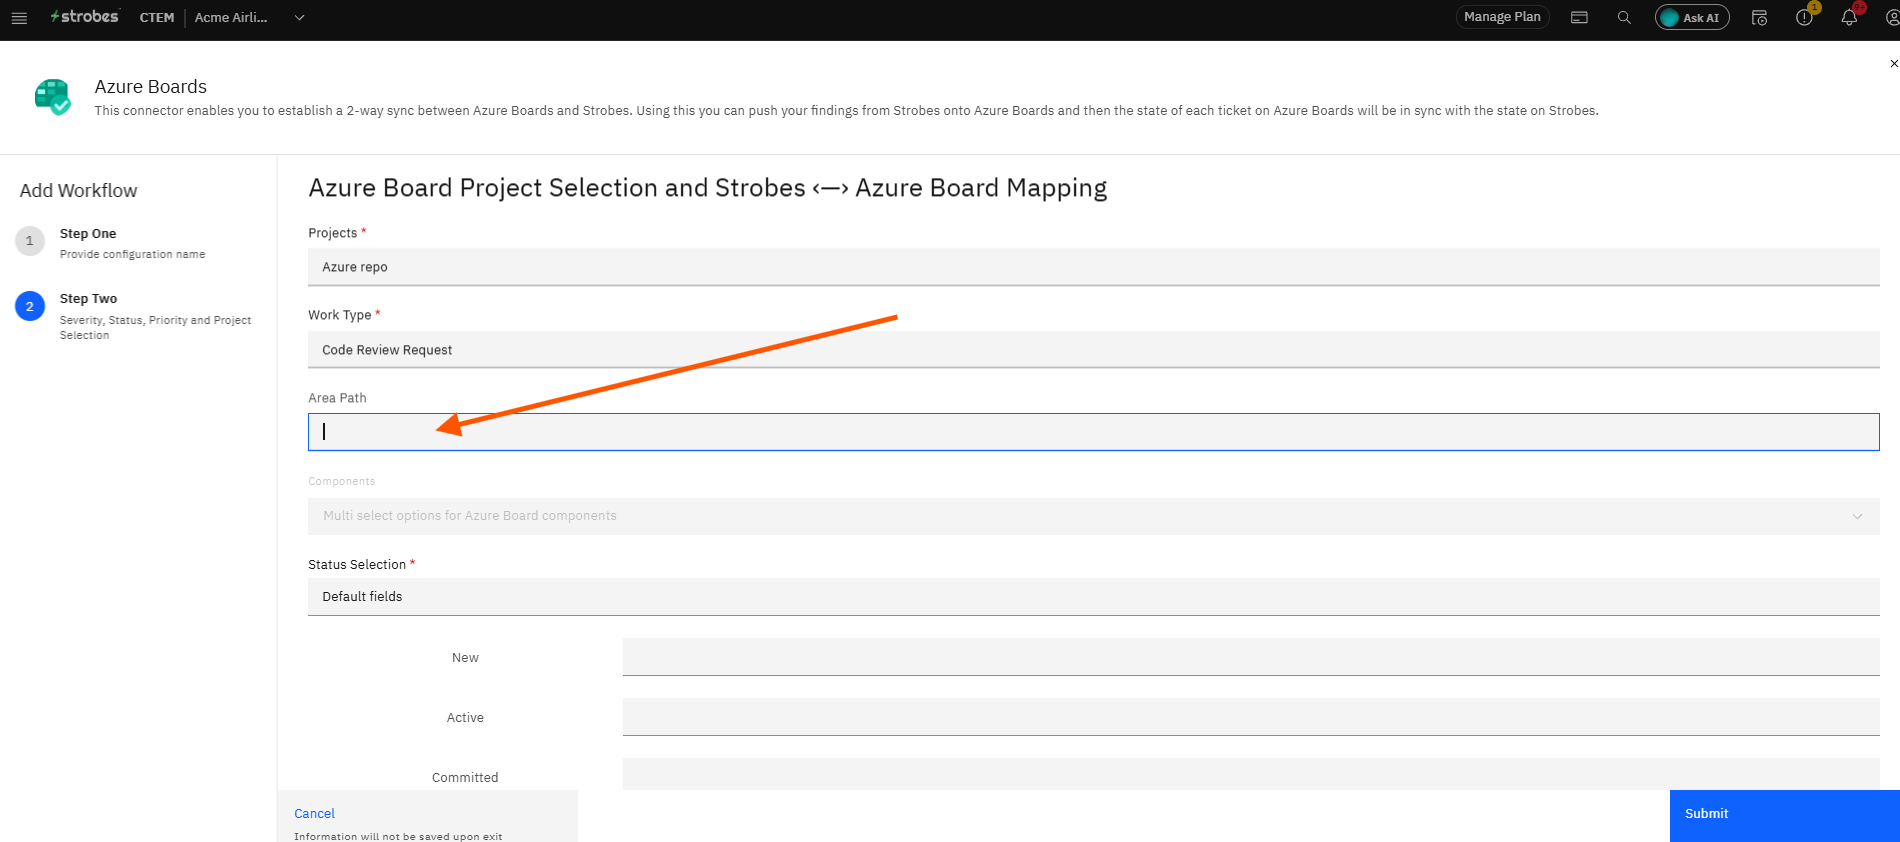
Click the Area Path field and type the area path to assign tickets to a specific team or area within your Azure Board project. This maps to the Area Path field on Azure Board work items.
Leave the field blank to use the project's default area.
Step 13 — Select Components (Optional)
Click the Components field and select any Azure Board components to associate with work items created by this workflow. This field supports multi-select.
Leave it blank if your Azure Board project does not use components.
Step 14 — Confirm the Status Selection Mode
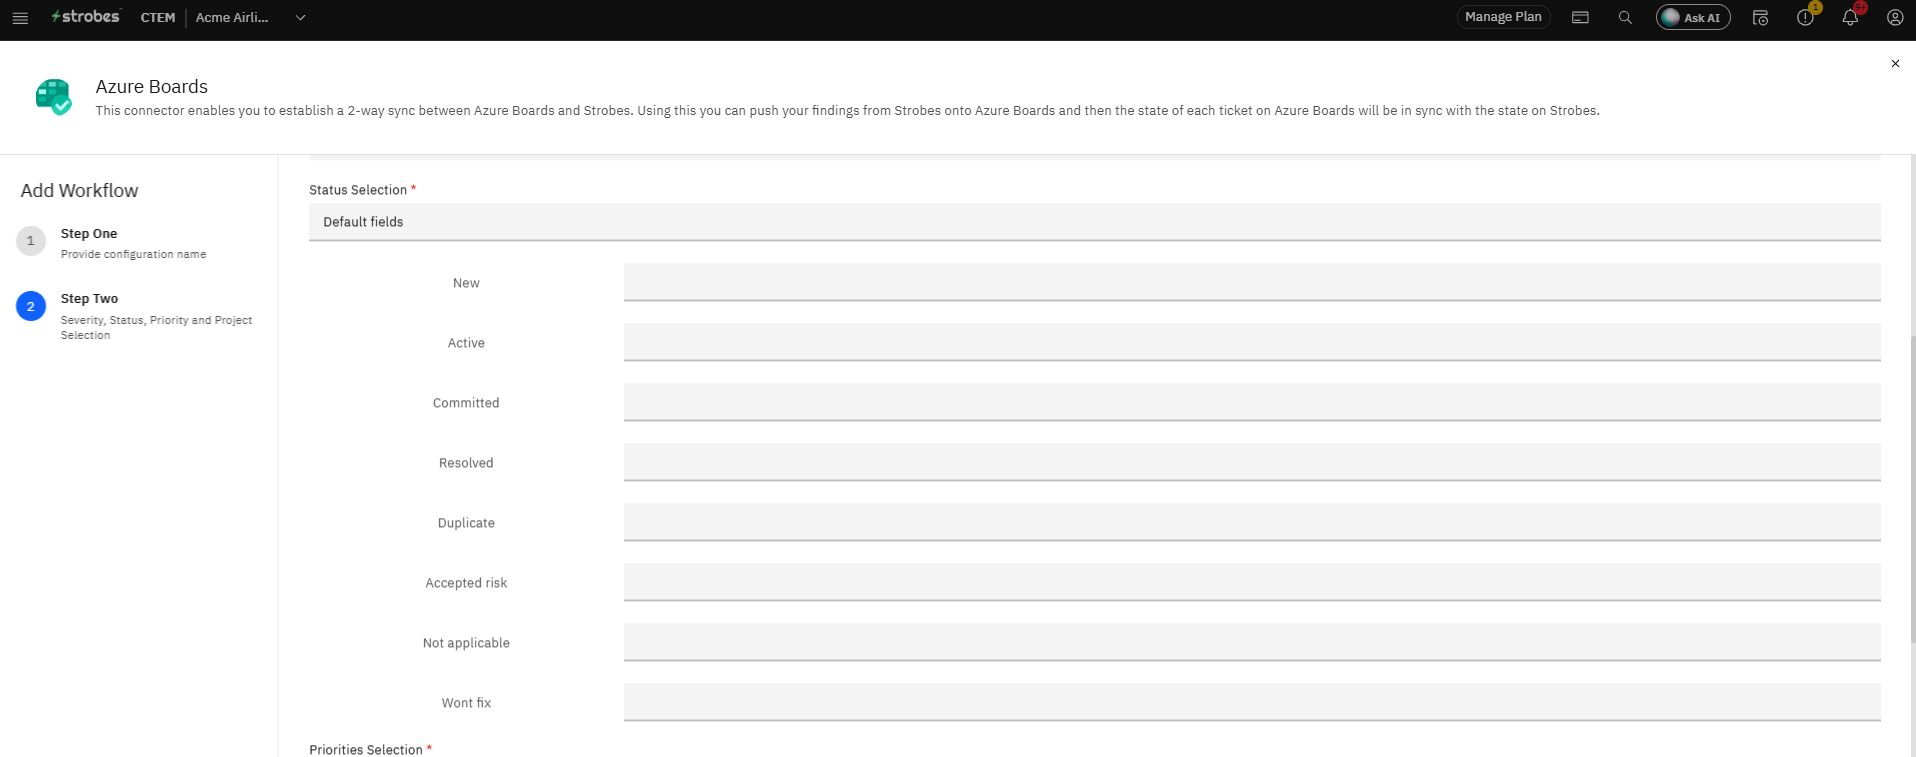
Review the Status Selection field and confirm it is set to Default fields. Default fields uses the standard state mapping rows that cover all Strobes vulnerability statuses.
Step 15 — Map Each Strobes Status to an Azure Board Status
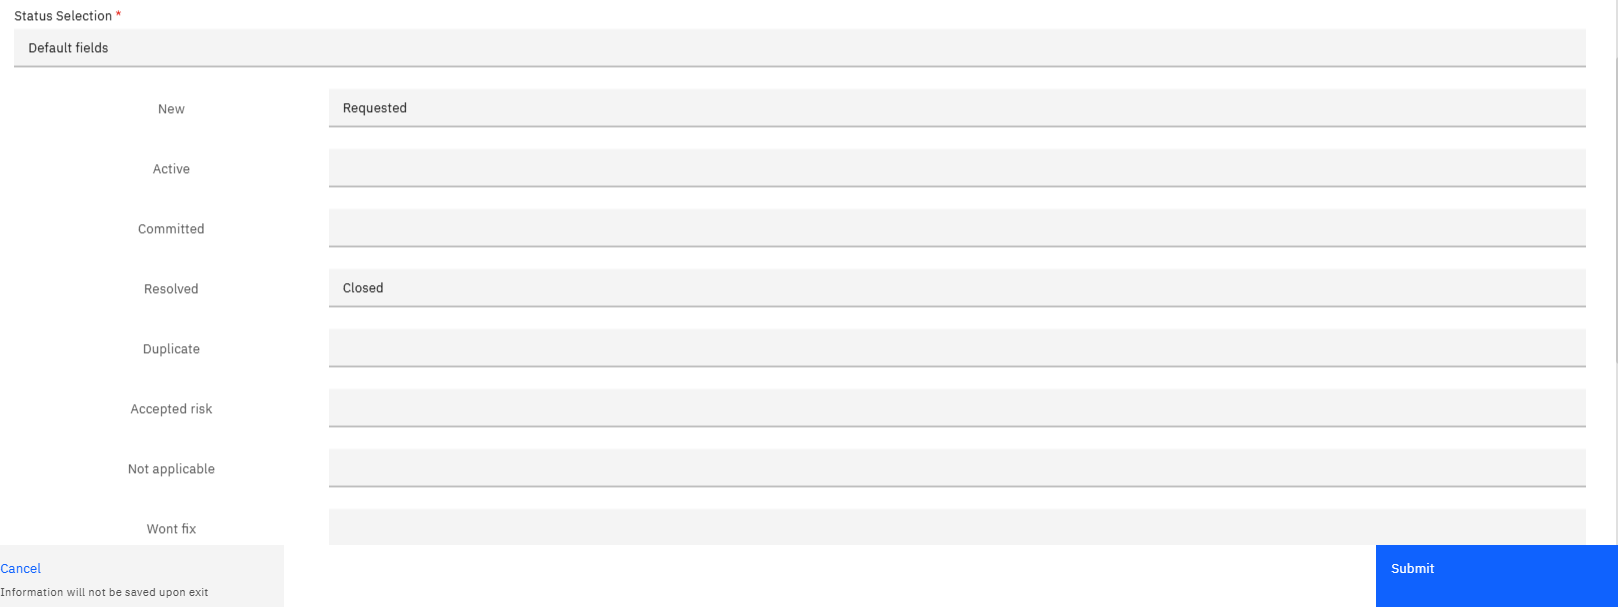
Click the dropdown next to each Strobes status row and select the Azure Board status that matches it. The options in each dropdown are loaded from the work type you selected. You do not need to map every row — leave a row blank to skip that status in the sync. The Strobes status rows are:
Strobes Status | Map to your Azure Board equivalent |
|---|---|
New | The Azure Board state for new, unstarted work |
Active | The Azure Board state for work in progress |
Committed | The Azure Board state for committed or planned work |
Resolved | The Azure Board state for resolved work |
Duplicate | The Azure Board state for duplicate items |
Accepted risk | The Azure Board state for accepted risk |
Not applicable | The Azure Board state for N/A items |
Wont fix | The Azure Board state for items that will not be fixed |
Step 16 — Map Each Strobes Priority to Azure Board Priority Values
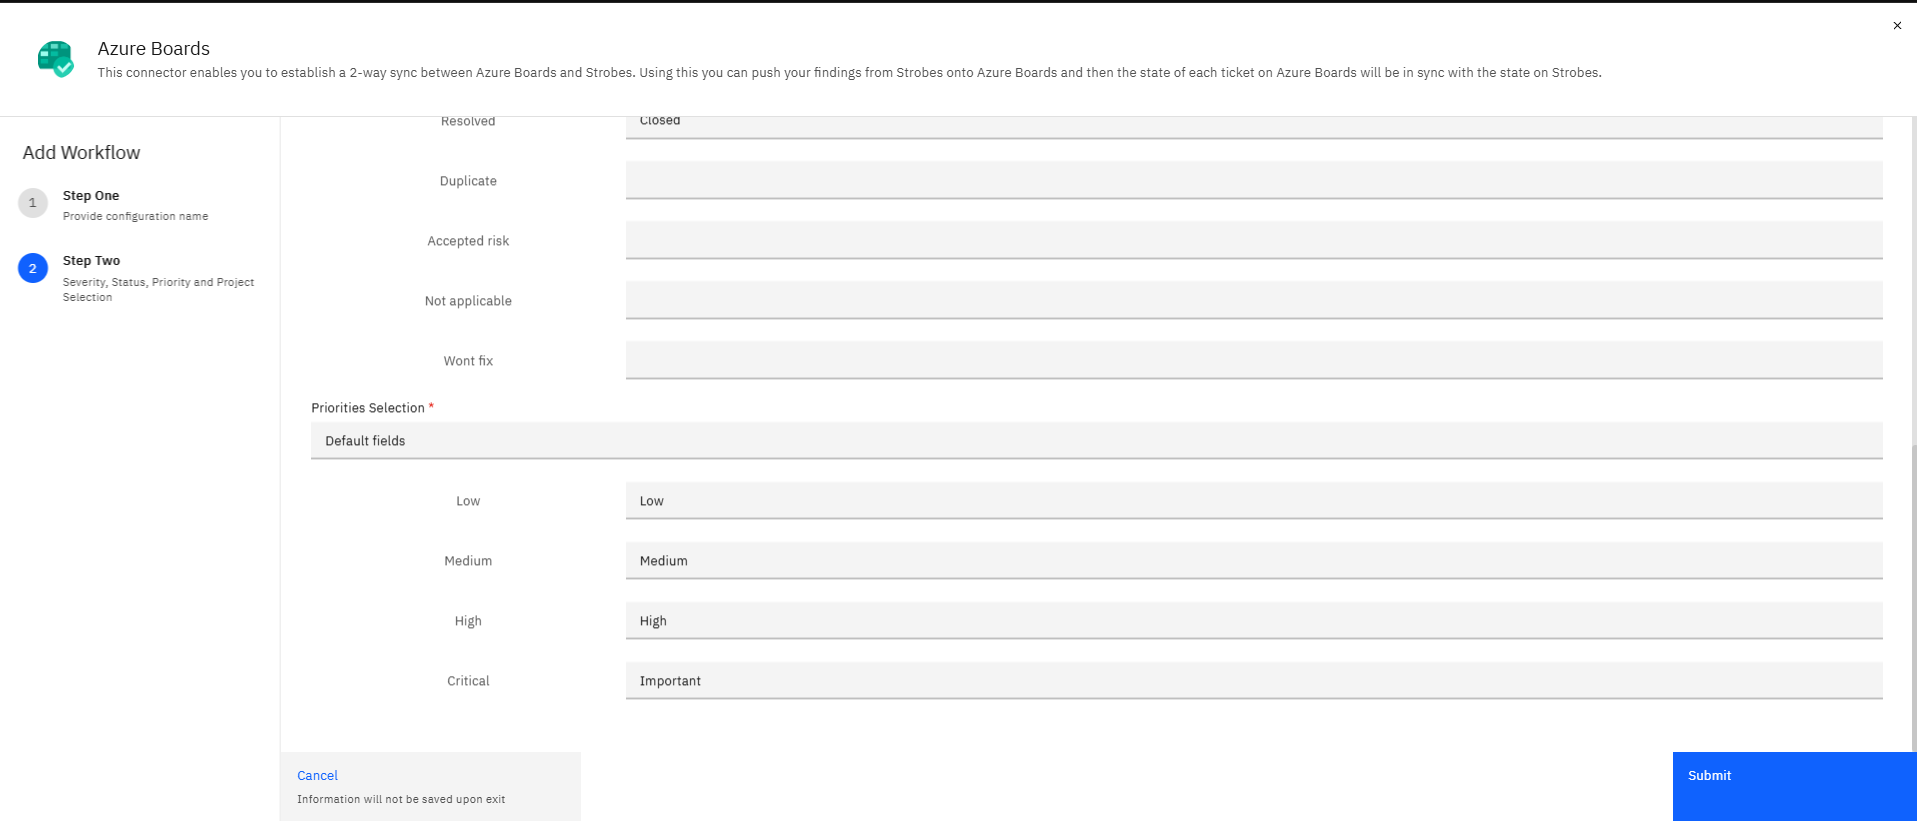
Click the dropdown next to each Strobes priority row and select the corresponding Azure Board priority value or values. Each row supports multi-select, so you can map multiple Azure Board values to a single Strobes priority level. The Strobes priority rows are: Low, Medium, High, and Critical.
Step 17 — Click Submit
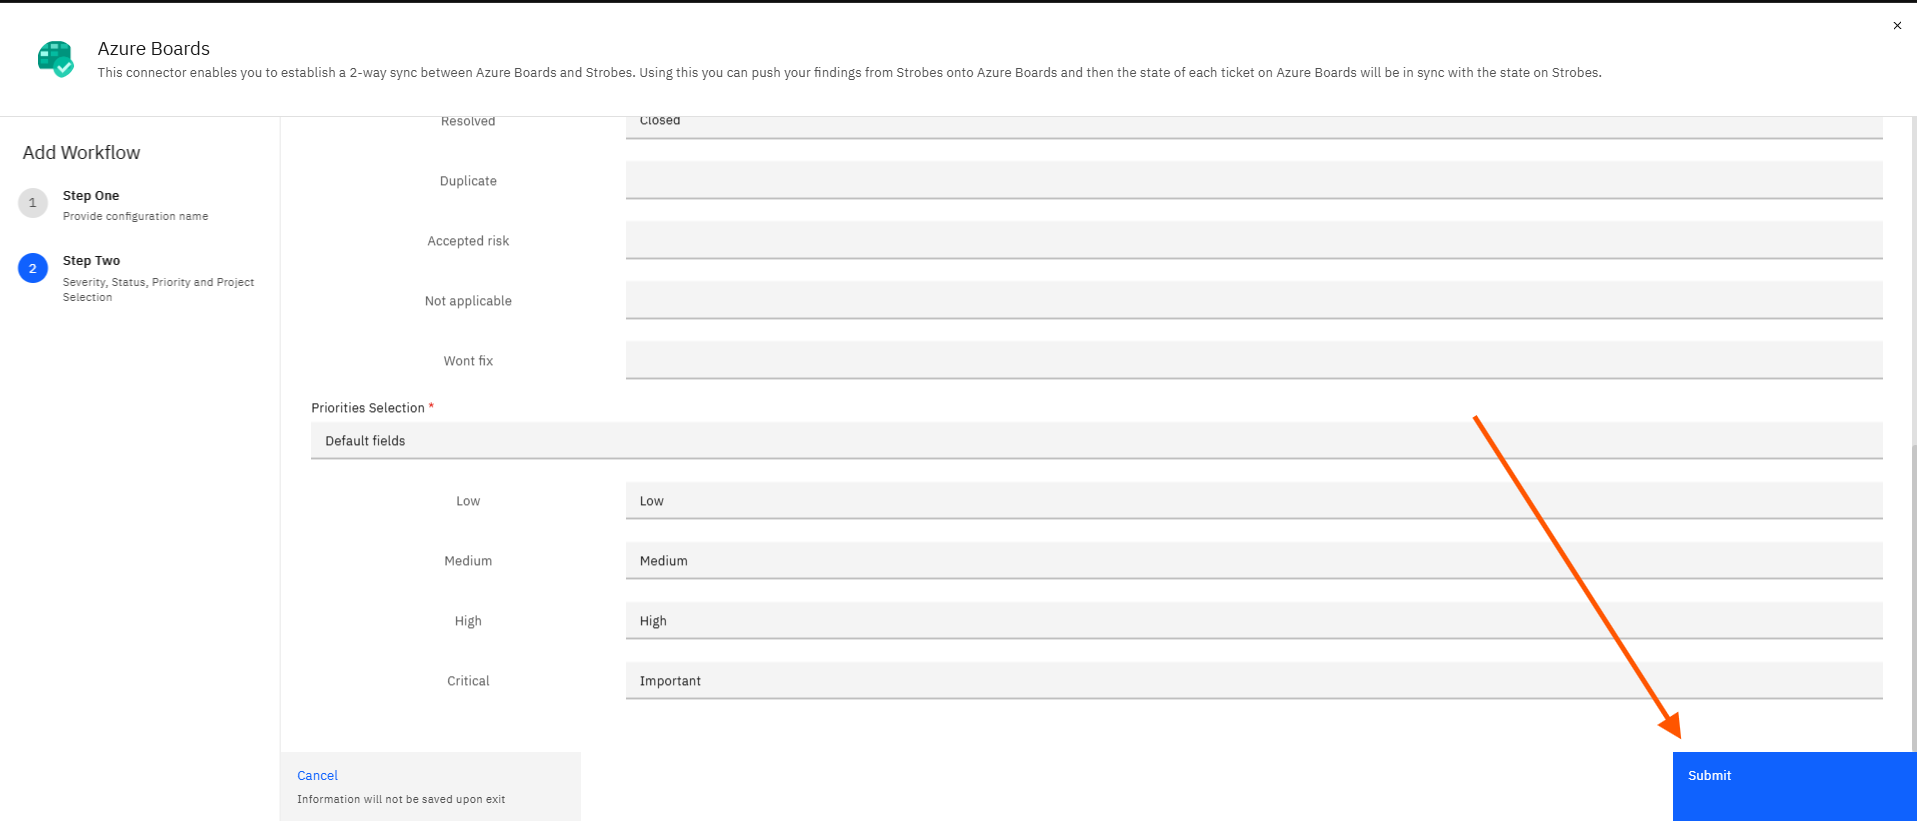
Click Submit to save the Azure Boards workflow. A loading spinner appears while Strobes saves the configuration.
Step 18 — Confirm the Workflow Was Created
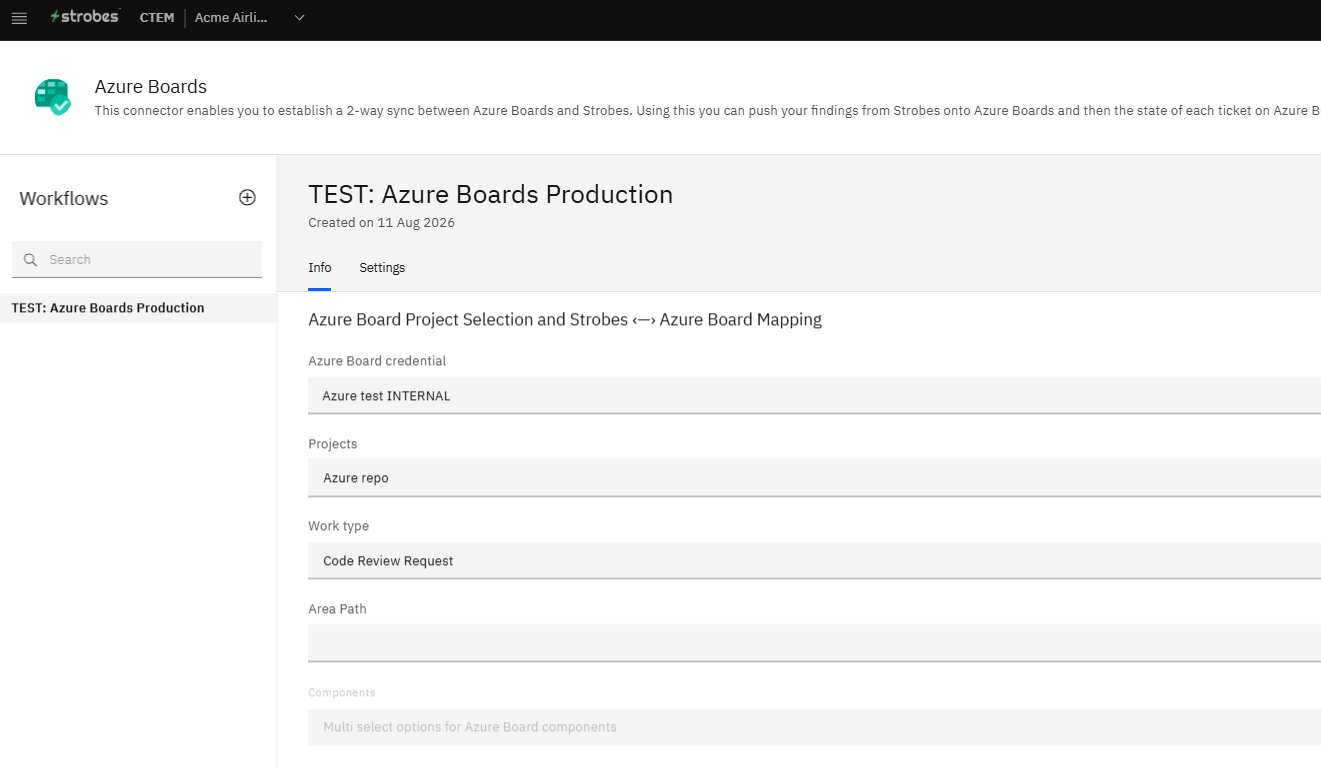
After the save completes, the workflow detail page opens automatically on the Info tab. The Info tab shows a summary of every setting you configured: the credential, project, work type, area path, status mapping, and priority mapping. The workflow name appears in the Workflows panel on the left. Click the Settings tab to edit the configuration name or delete the configuration at any time.
Tips
All three credential fields are required. When creating a new Azure Boards credential, the Name, URL, and Personal Access Token fields must all be filled before clicking Add. Leaving any field blank prevents the credential from being saved.
Your Personal Access Token must include Work Items permissions. A PAT without Read and Write access to Work Items will authenticate but fail when Strobes attempts to push a finding. Generate a token scoped correctly before starting setup.
Work Type options depend on the project selected. If the Work Type dropdown shows no options after you select a project, the project may not be returning work types correctly. Try selecting a different project, then return to your intended project if the issue persists.
You do not need to fill every status or priority row. Leaving a mapping row blank means Strobes will not sync that status or priority to Azure Boards. Only map the rows that are relevant to your team's workflow.
Submit only becomes active after required fields are filled. The Projects and Work Type fields are required for Step Two. The Submit button will not process the form if either field is empty. Confirm both are selected before clicking Submit.