
Managing AI Workspace Isolation and AI Member Access
Overview
Every workspace in Strobes is created as a public workspace by default — meaning every member of your organization automatically has Owner-level access to it. For most internal workspaces, this is fine. But when a workspace contains sensitive engagement data, client-specific findings, or work that should be walled off from the rest of the organization, you need workspace-level isolation.
Strobes solves this by letting you make any workspace private. A private workspace is visible and accessible only to the members you explicitly add. No one else in your organization — regardless of their organization-level role — can see or enter a private workspace unless they have been individually invited to it. This gives you true workspace-level access control without needing to change anything at the organization level.
How Workspace Access Works
Public Workspaces
When a workspace is public:
- Every member of your Strobes organization can access it automatically.
- Every org member gets Owner access to that workspace by default.
- No invitation is required — the workspace is visible to everyone in the organization.
Private Workspaces
When a workspace is private:
- Only the members listed in the workspace's Members section can access it.
- Members must be explicitly added and assigned a role.
- No one else in the organization can view or enter the workspace, regardless of their organization-level role.
- Once a workspace has been made private and members have been added, it cannot be made public again until all explicitly added members are removed first.
Workspace-Level Roles
When adding members to a private workspace, you assign each member one of three workspace-level roles. These roles apply only within the workspace — they are independent of the member's organization-level role.
Role | Access Level |
|---|---|
Viewer | Read findings, files, tables, and reports. Cannot run agents or use the chat. |
Contributor | Run agents, create tasks, edit findings and files. Cannot manage workspace settings or members. |
Owner | Full access, including workspace settings and member administration. |
Members can be promoted or demoted between roles at any time after being added.
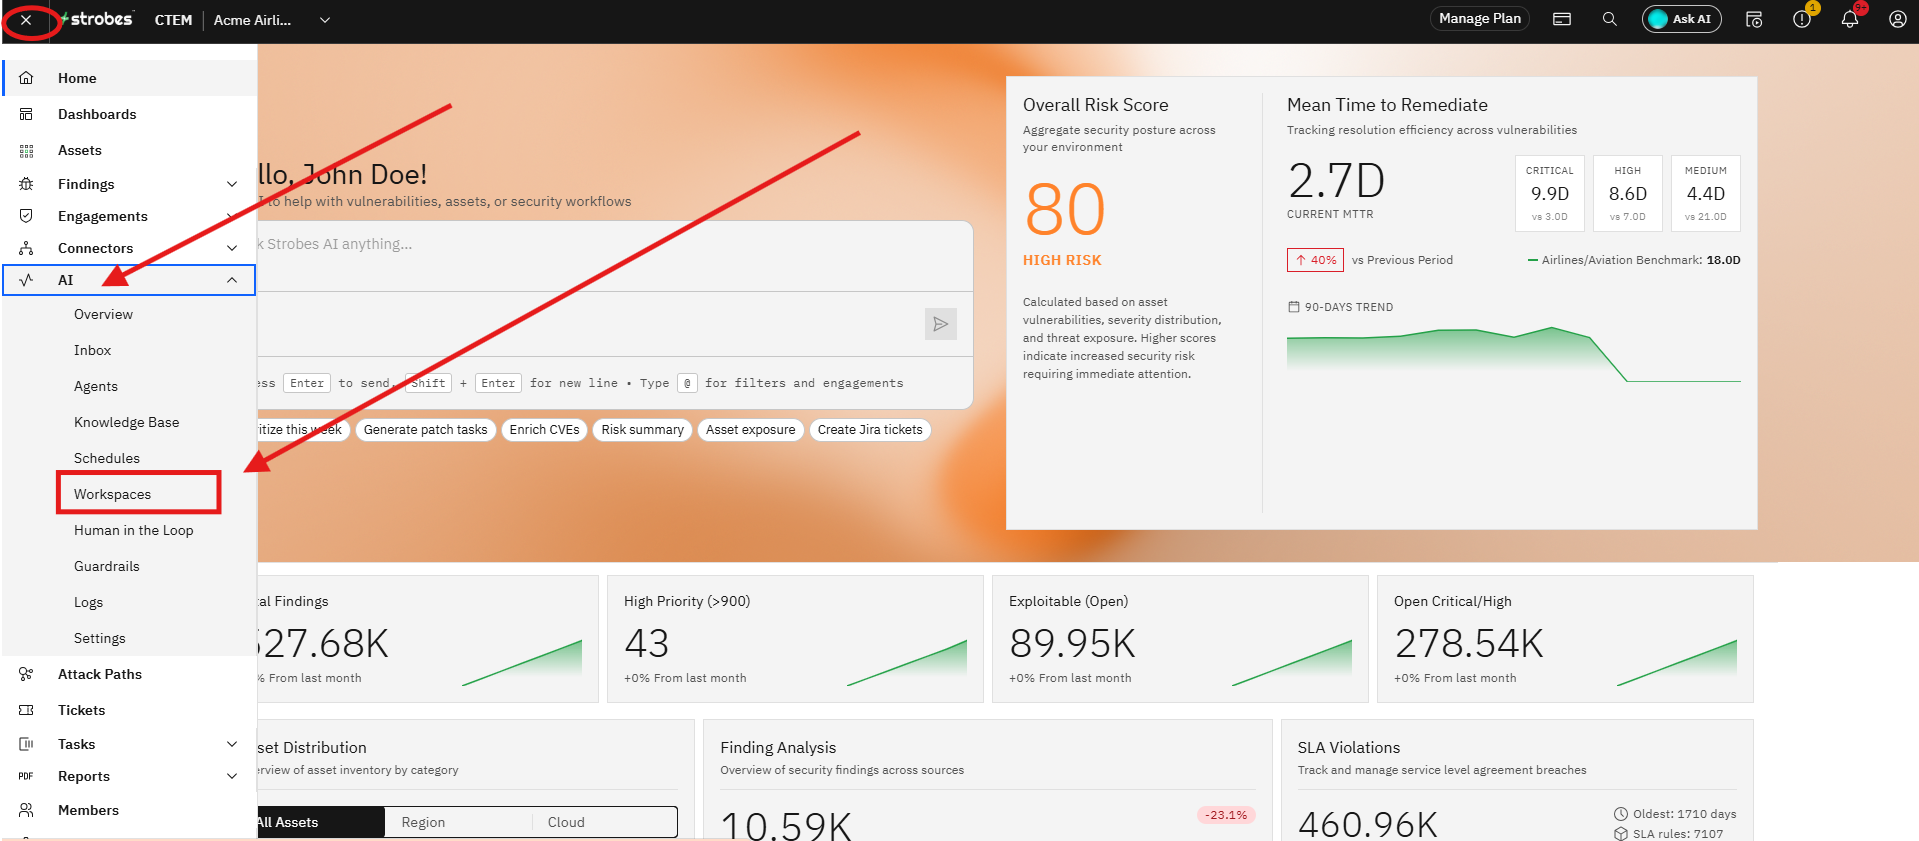
Step 1 — Navigate to AI Workspace
Click AI Workspace in the left sidebar. The Workspaces page opens, showing all workspaces across your organization.
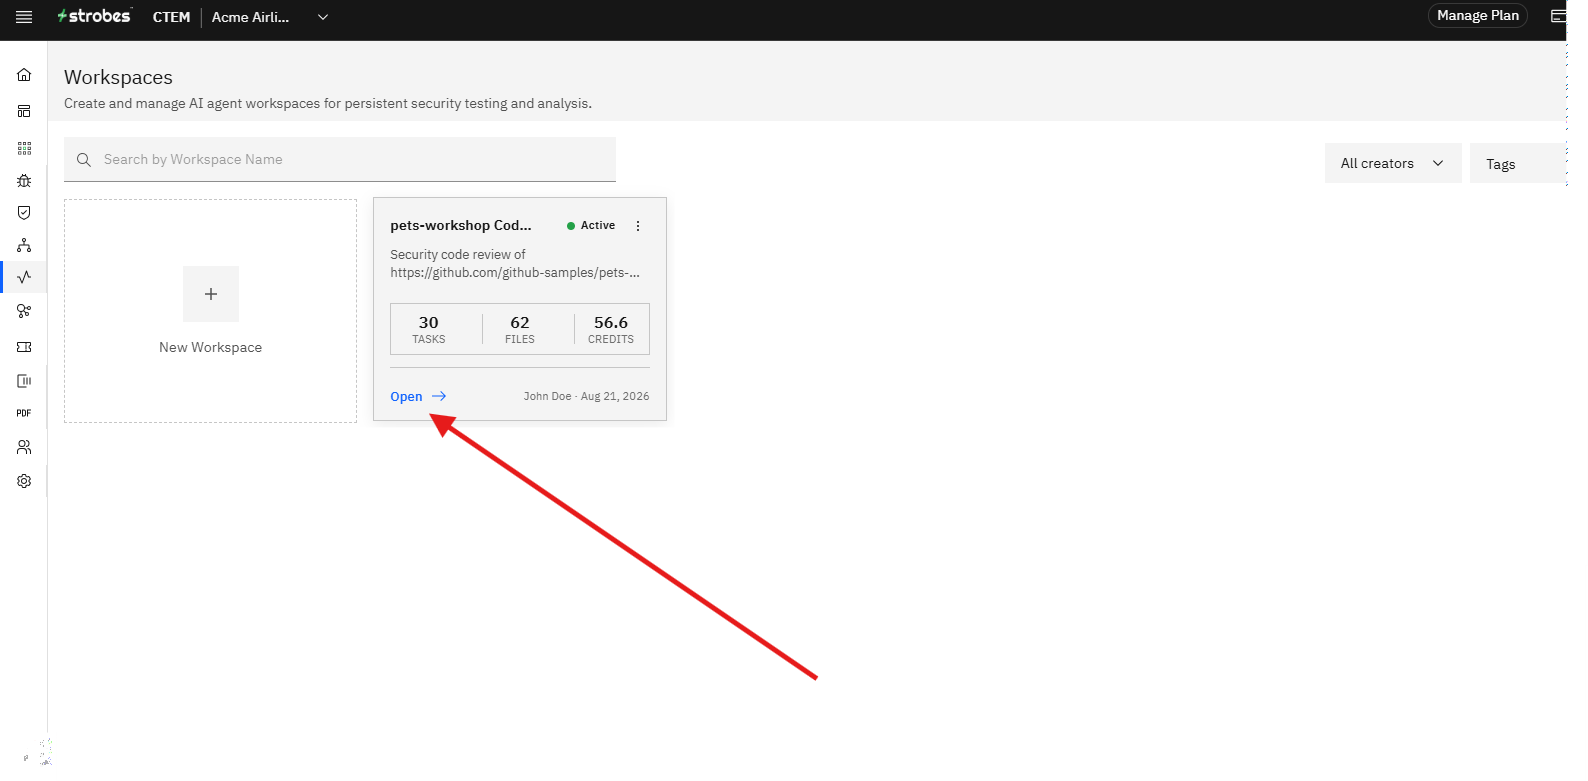
Step 2 — Open the Workspace
Click the workspace you want to isolate. The workspace Overview opens in the left-panel view with the workspace sidebar visible.
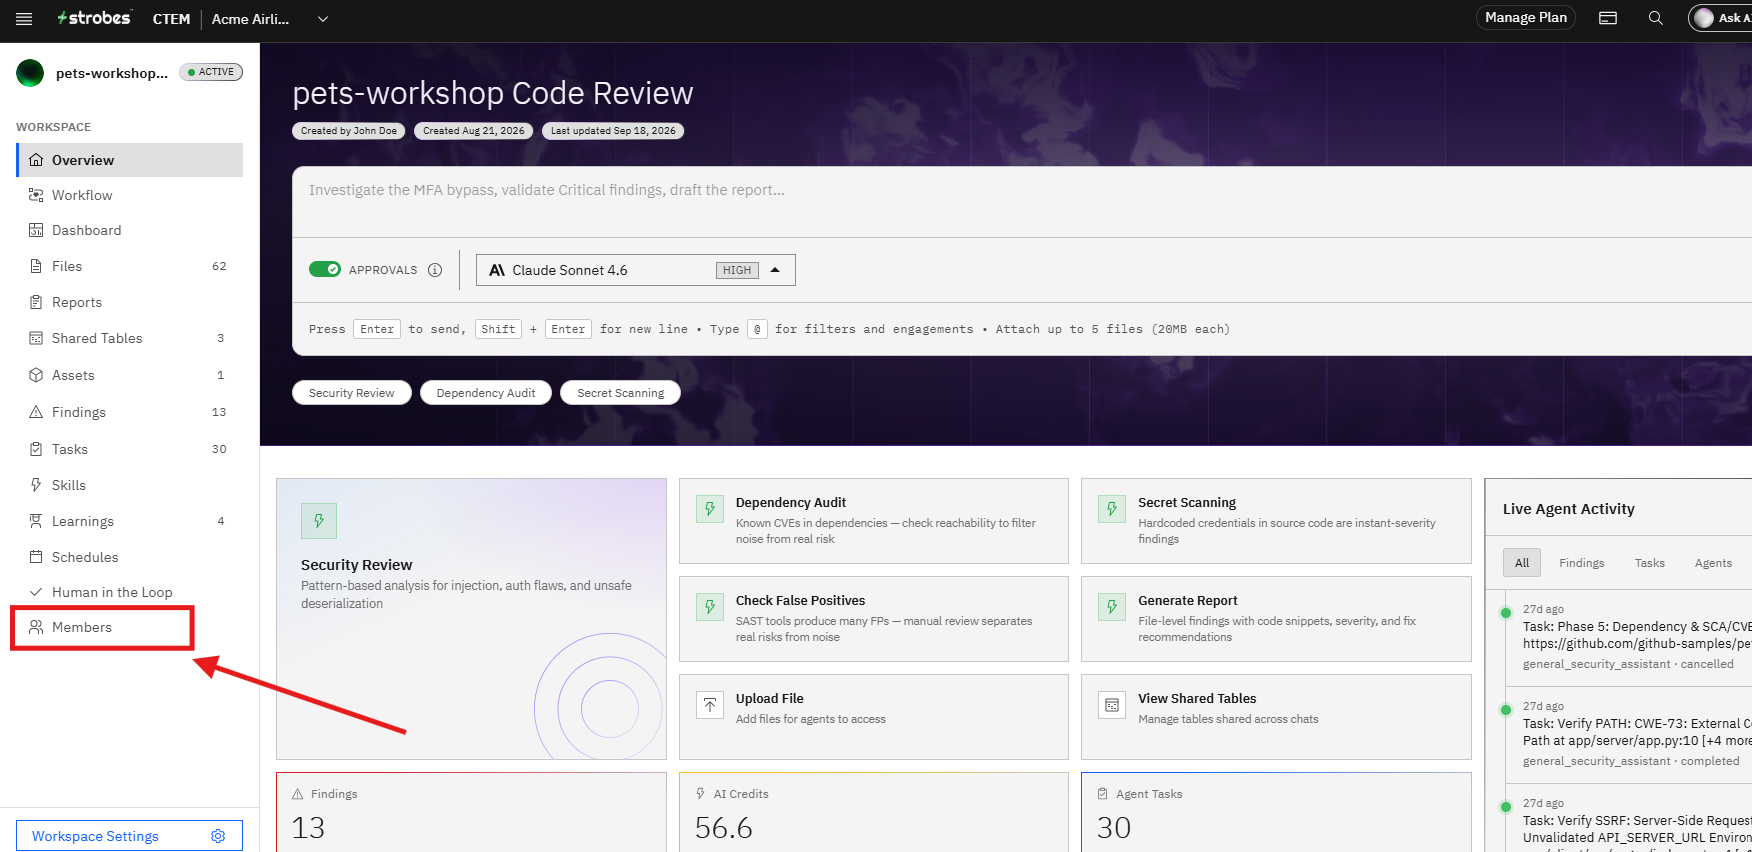
Step 3 — Click Members in the Workspace Sidebar
Click Members in the workspace sidebar. The Members page opens, showing the current access level for the workspace and a list of all members who have explicit access.
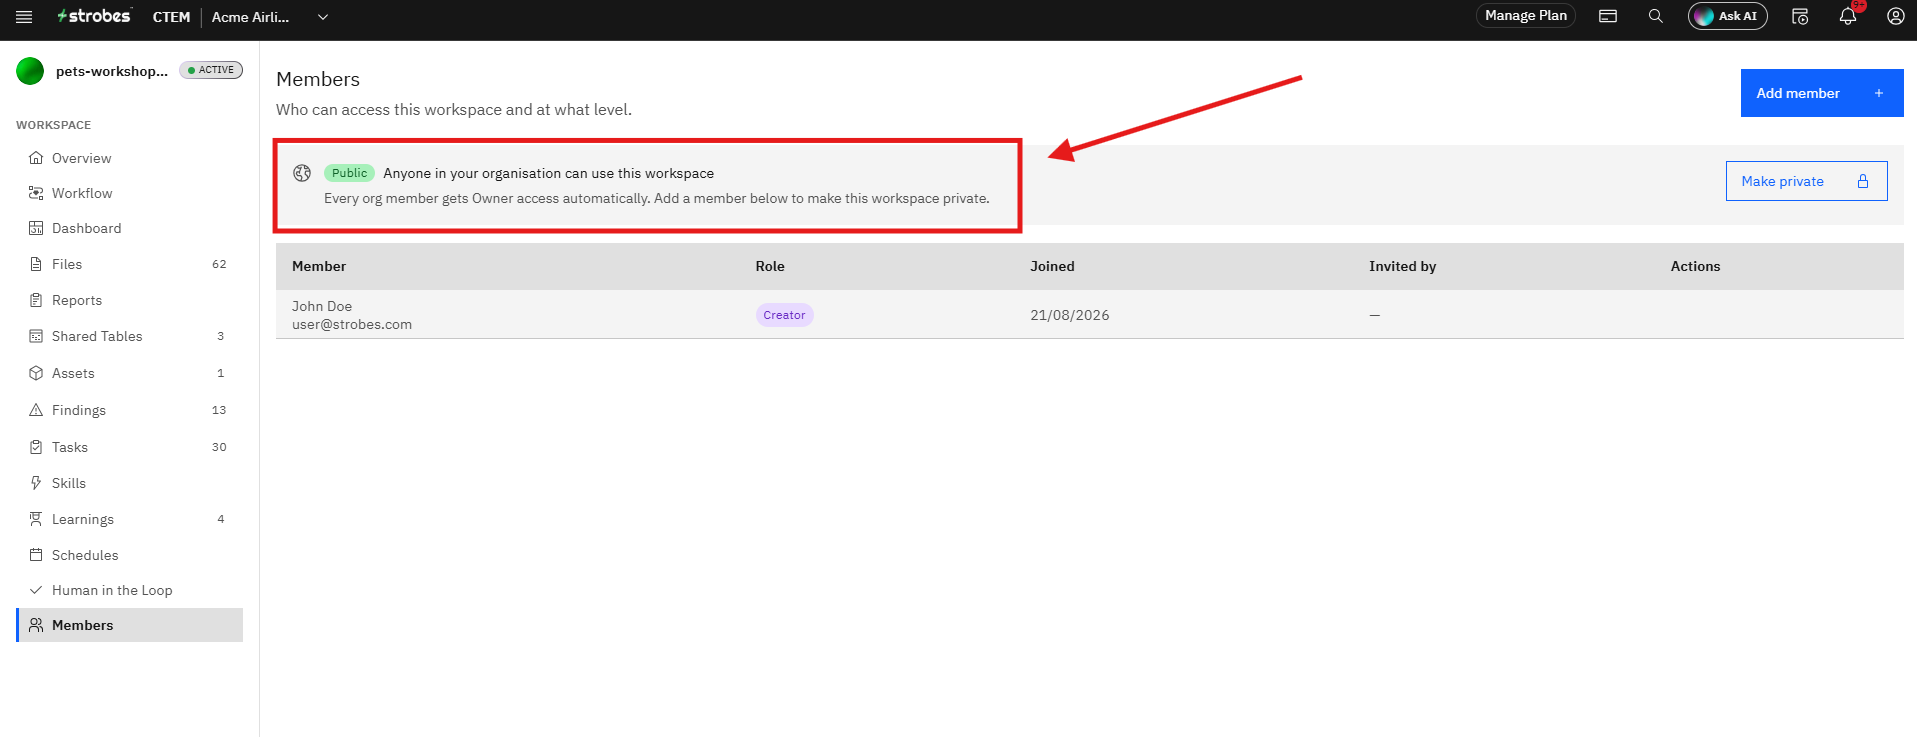
Step 4 — Review the Current Access State
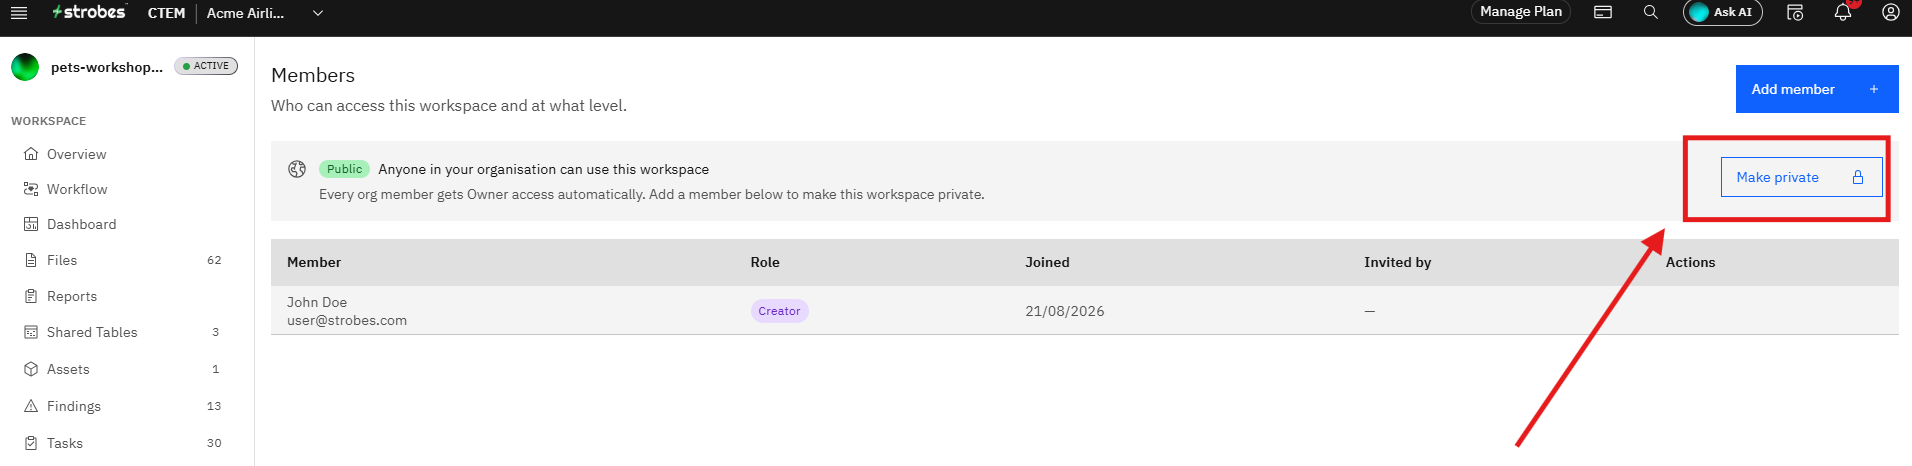
Review the access banner at the top of the Members page. If the workspace is public, the banner reads:
Public — Anyone in your organisation can use this workspace. Every org member gets Owner access automatically. Add a member below to make this workspace private.
The Make private button appears in the top right corner.
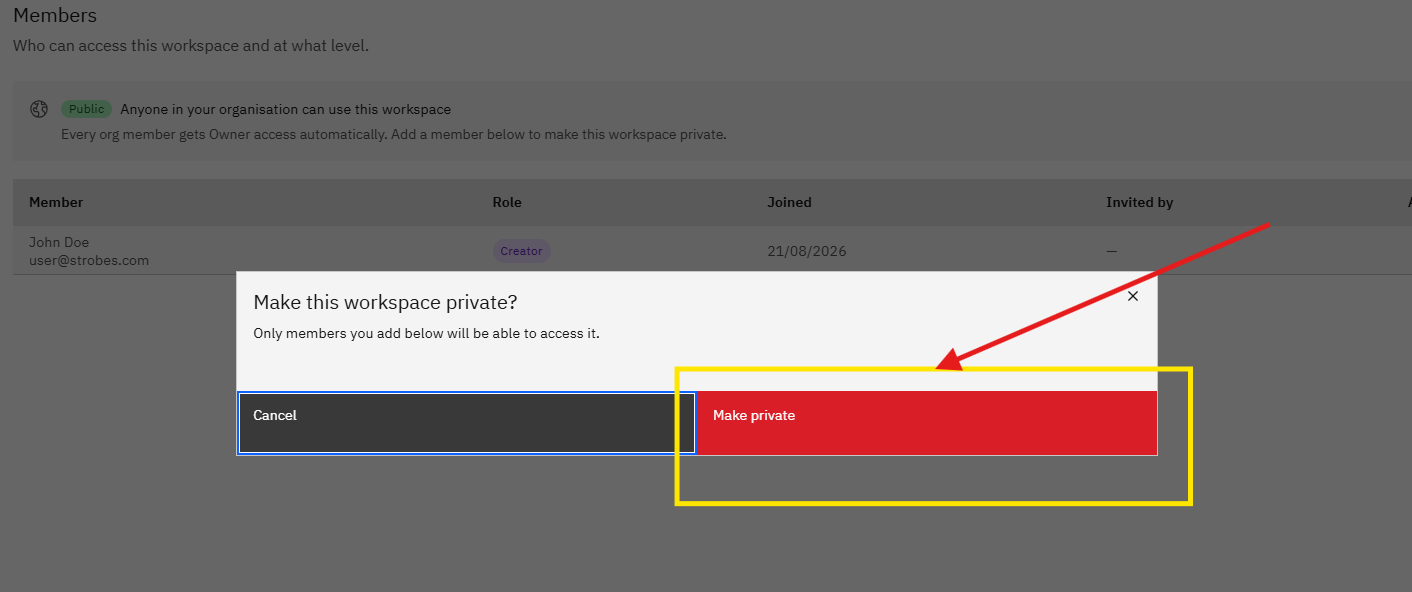
Step 5 — Click Make Private
Click the Make private button. The workspace access state changes post confirmation.
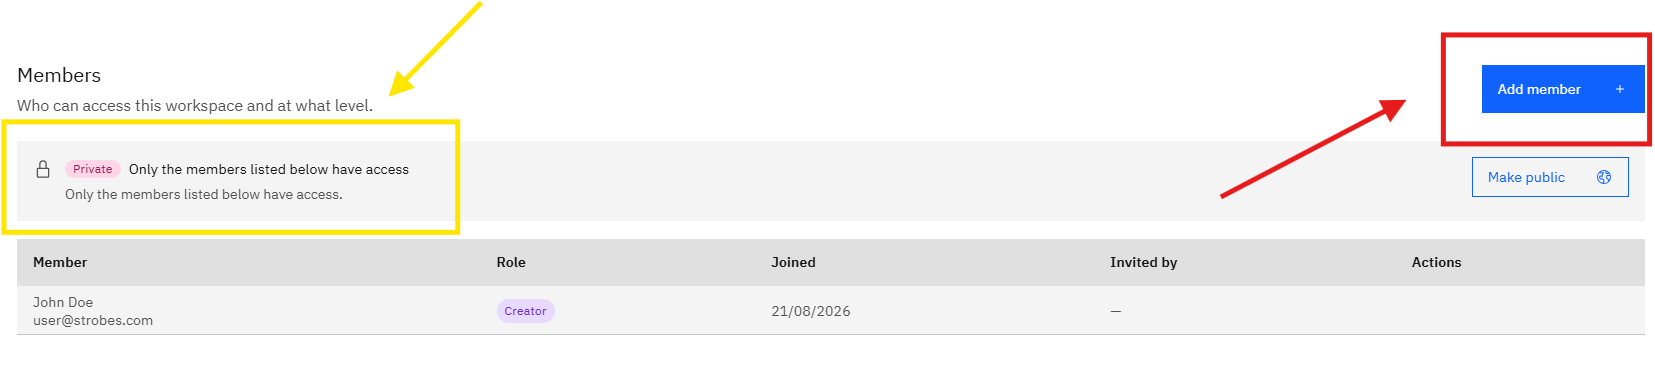
Private — Only the members listed below have access.
The button in the top right changes to Make public.
Step 6 — Click Add Member
Click the Add member button in the top right corner of the Members page. The Add workspace members modal opens.
Step 7 — Search for and Select Teammates
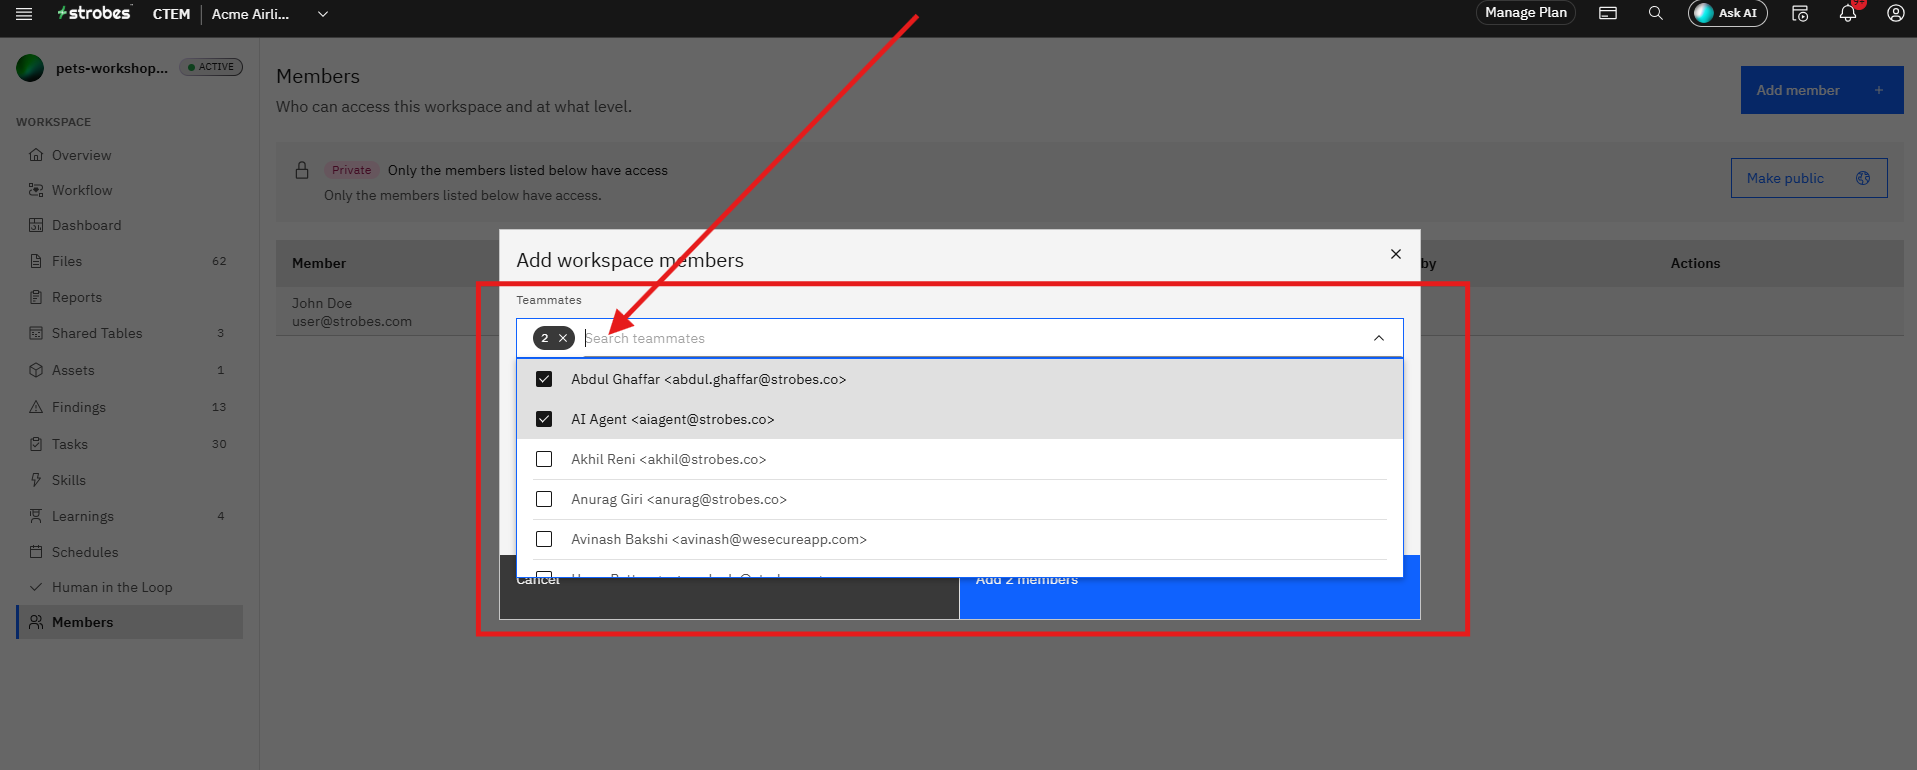
Click the Teammates search field and type the name or email of the person you want to add. A list of all organization members appears. Click the checkbox next to each person you want to add. Selected members appear as chips at the top of the search field. The count of selected members updates as you select.
Step 8 — Click the Role Dropdown
Click the Role dropdown below the Teammates field. Three role options appear:
- Viewer — Read findings, files, tables and reports. No chat, no agent runs.
- Contributor — Run agents, create tasks, edit findings and files.
- Owner — Full access including workspace administration.
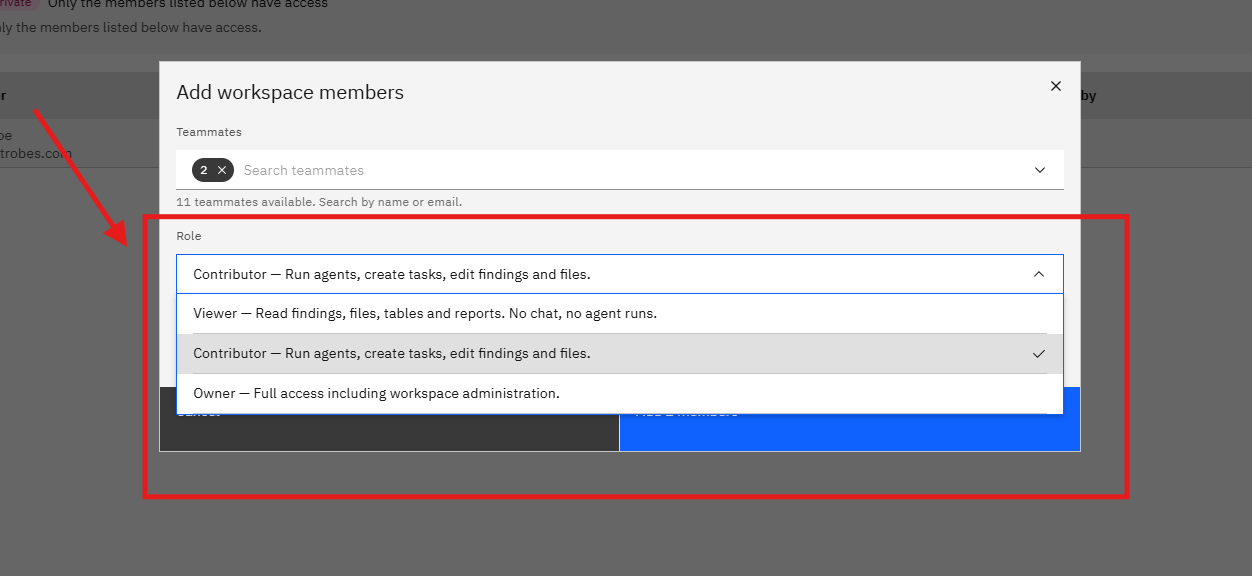
Step 9 — Select a Role
Click the role you want to assign to the selected members. All selected members are added at the same role. The dropdown closes and the selected role is displayed in the field.
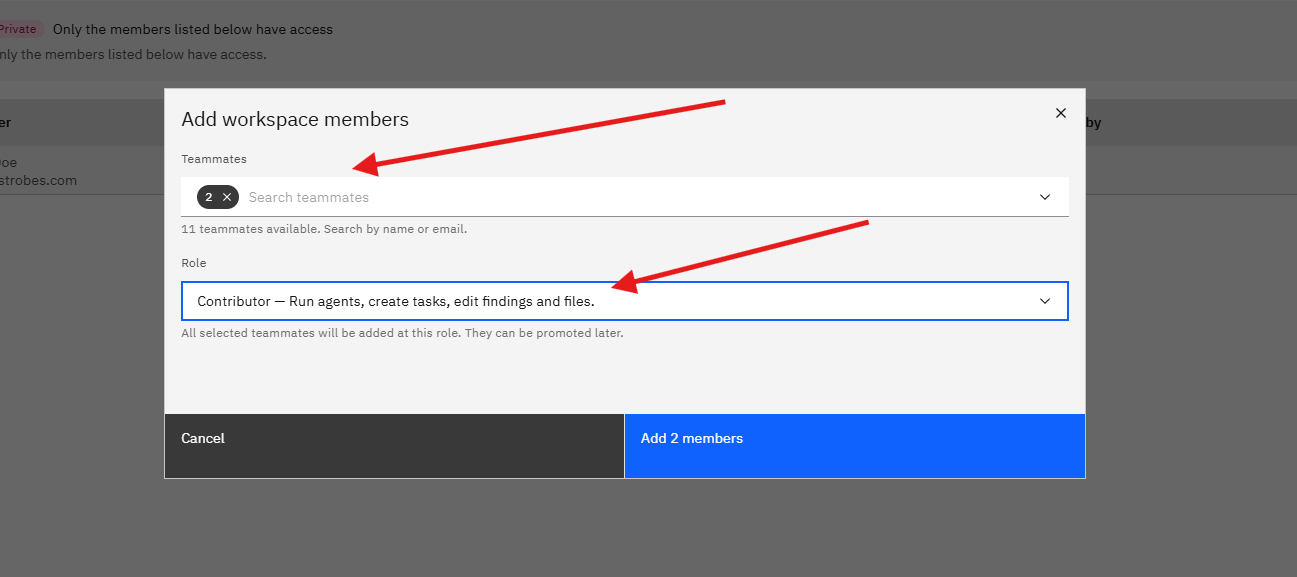
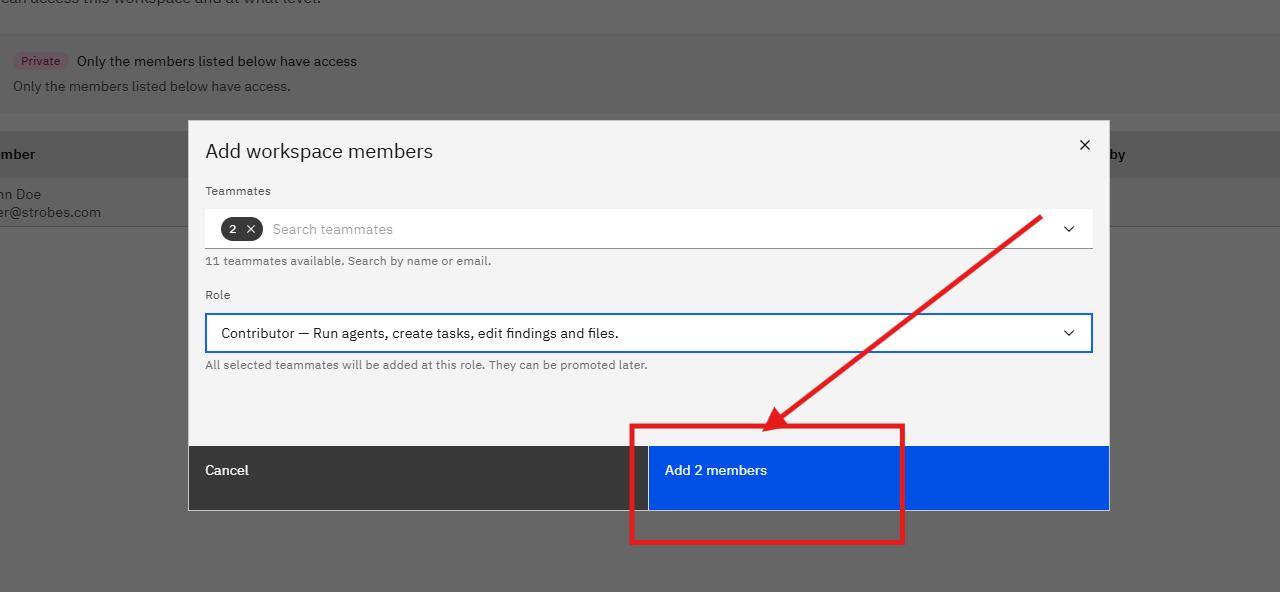
Step 10 — Click Add Member
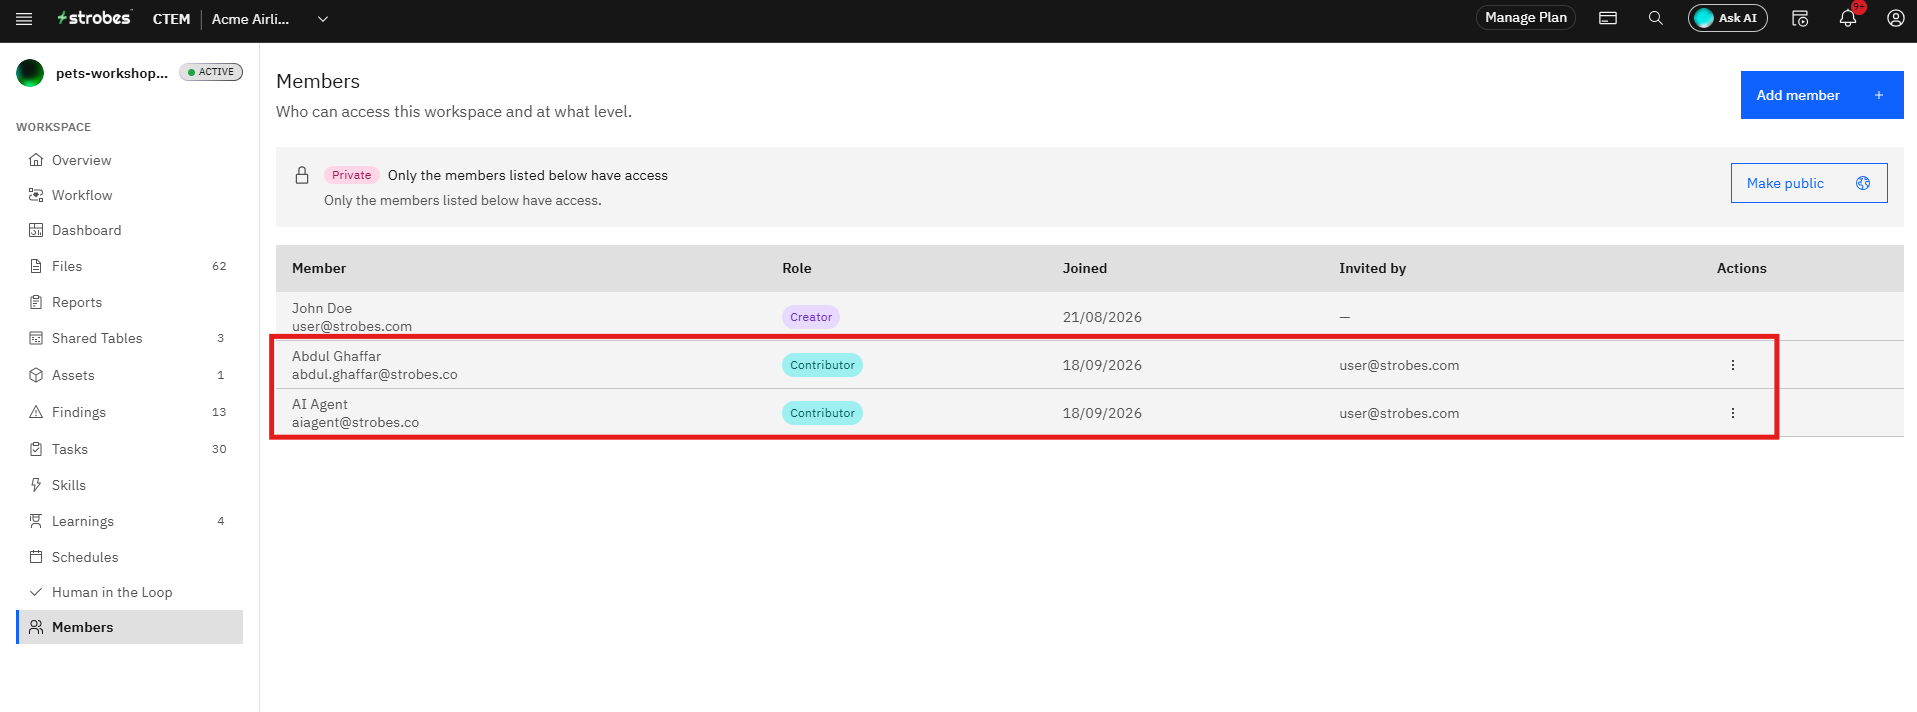
Click the Add [N] member button at the bottom right of the modal. The modal closes and the page reloads. The newly added members appear in the Members list with their assigned role, join date, and the name of the person who invited them.
Step 11 — Confirm the Member List
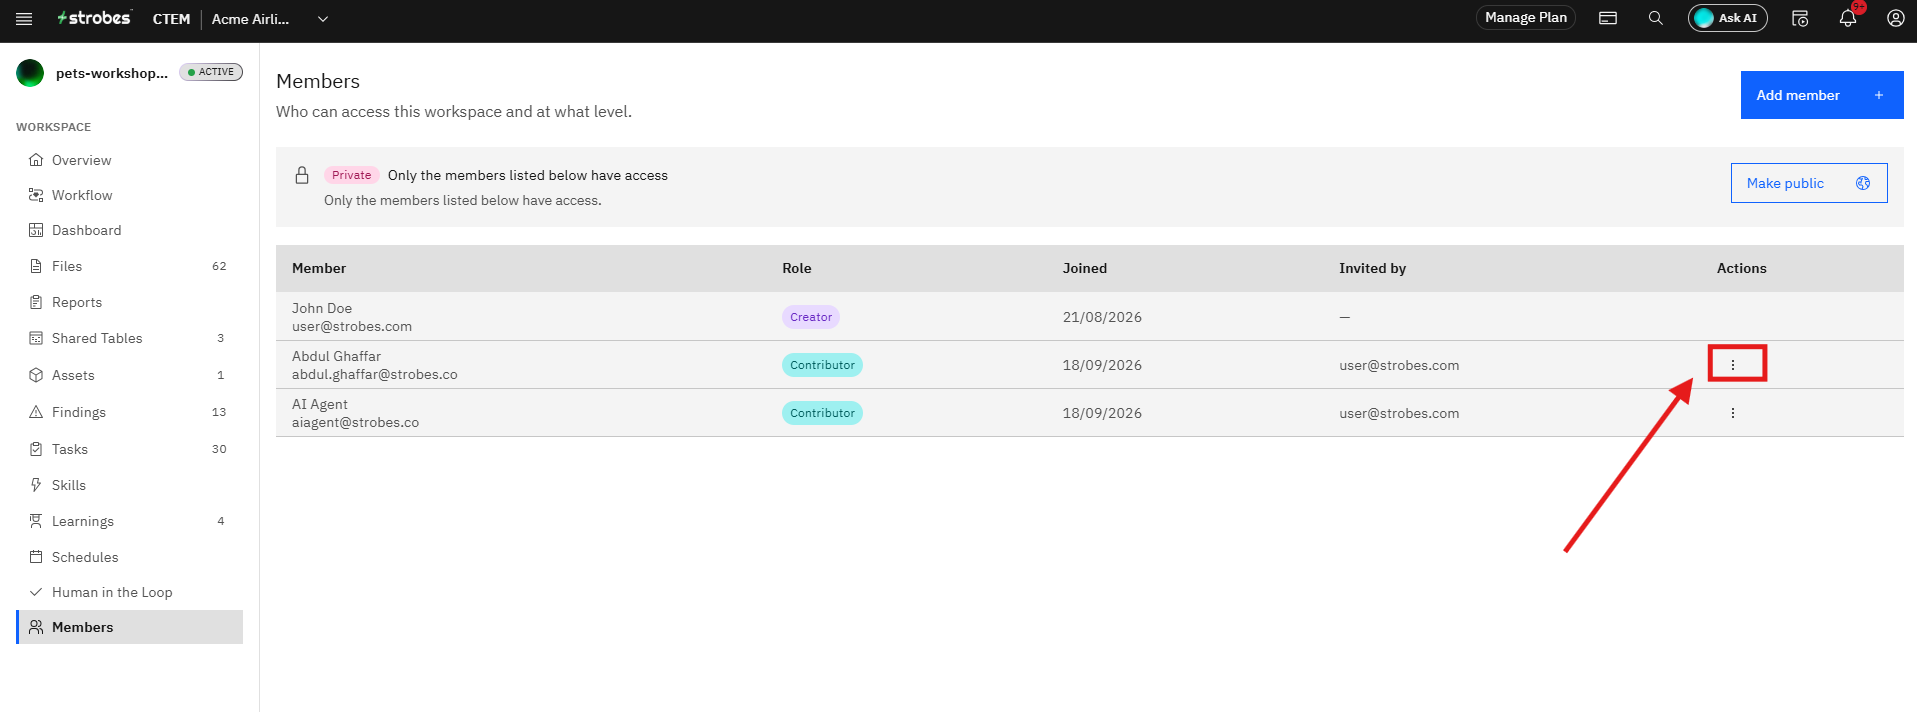
Review the updated Members list. Each row shows the member's name, email, assigned role, join date, and who invited them. The Private banner remains at the top, confirming that access is restricted to listed members only.
Changing a Member's Role; AI workspace
To change an existing member's role after they have been added:
Step 12 — Click the Actions Menu for the Member
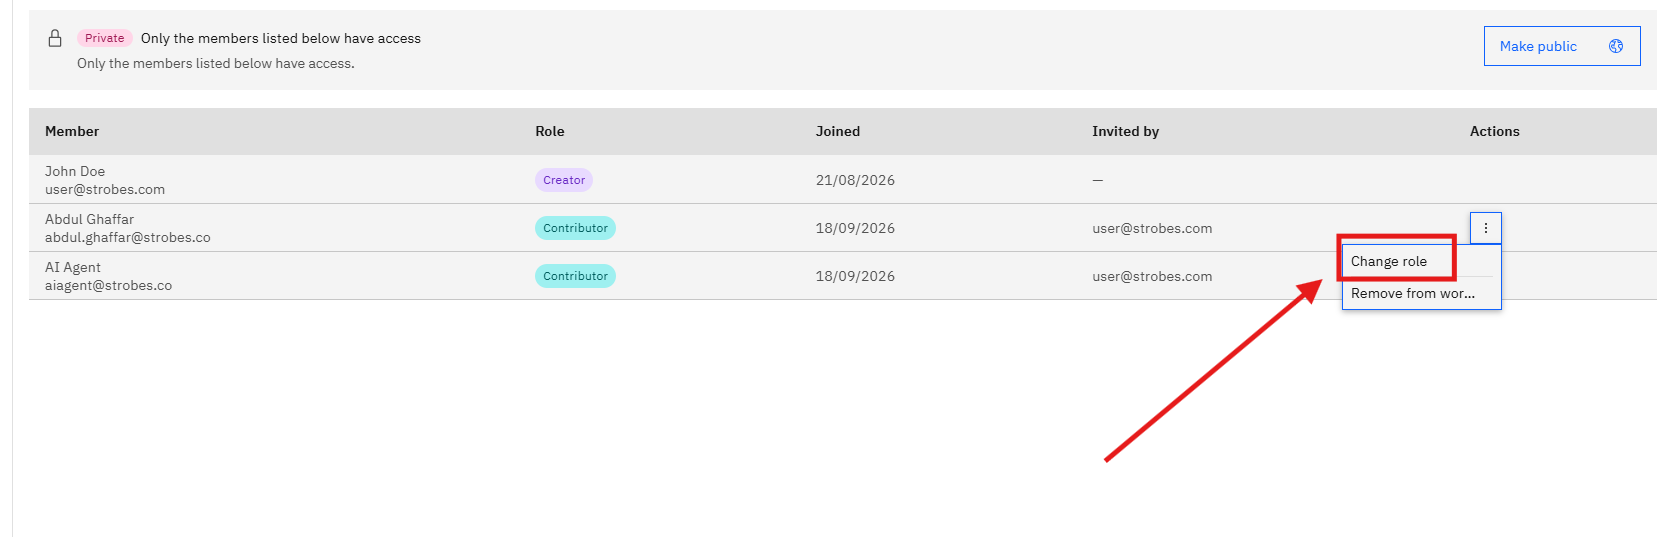
Click the three-dot (⋯) Actions menu at the end of the member's row. A dropdown appears with two options: Change role and Remove from workspace.
Step 13 — Click Change Role
Click Change role. A role selection dropdown appears. Select the new role for that member.
Reverting a Workspace to Public
If you need to make a private workspace public again, all explicitly added members must be removed first.
Important: Attempting to make a workspace public while it has members listed will show an error: "Cannot make a workspace with members public. Remove all members first."
To revert:
- Use the Actions menu to remove each member individually (Step 12 above).
- Once all members are removed, click the Make public button.
- A confirmation dialog appears: "Make this workspace public? Every member of your organisation will get Owner access automatically."
- Click Make public to confirm.
Tips
Making a workspace private does not notify excluded members. There is no automatic notification when a workspace transitions from public to private. Members who previously had access will simply no longer see the workspace. Communicate access changes separately if needed.
Workspace-level roles are independent of organization-level roles. A user with a Manager role at the organization level does not automatically have Owner access to a private workspace — they must be explicitly added and assigned a workspace role.
You can add multiple members at once at the same role. If different members need different roles, add them in separate batches — one batch per role level.
Members can be promoted later. When in doubt, add a member as a Contributor and promote them to Owner later via Change role if needed.
A workspace with added members cannot be made public. If you want to return a workspace to public access, you must first remove all explicitly added members using the Actions menu. Plan the transition carefully if the workspace contains active work.